This is how the coolant is drained
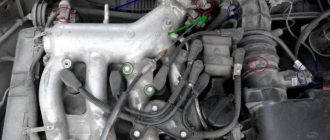
You need to remove the outer timing belt protection to get to the pump.
We fix the gear and unscrew the nut holding it
You will have to remove another casing, it covers the pump
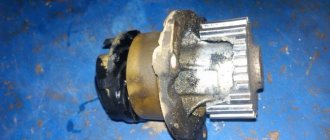
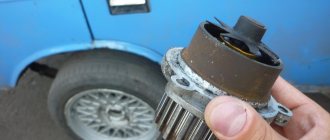
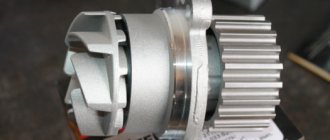
Centrifugal pump removed
Self-replacement of the water pump of a VAZ 2108/09 car
The water pump is the main component of the car's cooling system. The speed of coolant circulation in the ducts of the cylinder block depends on its proper operation. This ensures heat removal and maintains engine operating temperature. In the early stages, diagnosing and troubleshooting a water pump is not very difficult. Ignoring signs of pump malfunction can lead to severe overheating of the engine and deformation of the cylinder head. In this case, an expensive engine overhaul will be required.
Assembly Features
When installing the drive belt, you must again make sure that all the marks match, otherwise the gas distribution and ignition system will be disrupted. After installing the tension roller back, it is important to properly tension the belt.
If the car does not start after complete assembly or starts poorly, it means that the belt on the camshaft gear is misaligned by one tooth . To eliminate such a malfunction, you will have to remove the belt from the gear again, turn the gear a little so that it moves relative to the belt by one tooth, and then put the belt back.
Purpose and functions of the water pump
It should be noted that the term “water pump” or “water pump” is not entirely correct. The fact is that the first cars used ordinary water as a coolant. Today, a special liquid called antifreeze or antifreeze circulates in the cooling system. Water is poured into the system only in exceptional cases.
A special liquid called antifreeze or antifreeze circulates in the engine cooling system.
During operation of an internal combustion engine, the fuel-air mixture ignites in the cylinders. The heat generated during this process quickly heats the motor housing. If the temperature rise is not stopped in a timely manner, the metal can become very hot and even deform. To avoid this, channels through which the coolant circulates are machined inside the cylinder block and valve head.
Modern coolant (coolant) is a mixture of water, antifreeze and special anti-corrosion inhibitors (additives) that give the solution anti-foam, fluorescent and anti-cavitation properties. This composition allows you to operate the car at temperatures from -40 to +40 o C. In addition, the coolant acts as a lubricant, which significantly increases the service life of the rubbing elements of the cooling system.
Scheme of the movement of coolant in the ZMZ 40524 engine
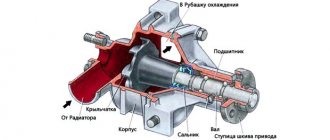
The water pump consists of a housing and a working shaft with an impeller. The shaft is mounted on a bearing and driven by a toothed belt from the crankshaft.
The pump is installed in the standard hole of the cylinder block. It is a cavity where the coolant is accelerated through the channels of the cooling system. In VAZ 2108/09 cars, the pump is secured with three bolts located on its body.
The engine cooling system is closed and unregulated. In addition to the water pump, it includes the following elements:
The radiator is installed in the front part of the car body
The thermostat regulates the flow of coolant
The expansion tank compensates for changes in coolant volume during heating
All elements are connected to each other by pipes and hoses of various diameters. A distinctive feature of the VAZ family of cars is the availability of the cooling system for maintenance and repair.
Quick replacement of the pump on a VAZ 2109
If your pump (water pump) is broken and you have no idea how to change it, then we will teach you. Replacing the pump on a VAZ 2109 is not difficult, but first you need to find out whether it really is out of order. It's done like this:
- start the engine and warm it up to operating temperature;
- compress the upper radiator hose.
If you feel that the water is circulating, it means the pump is intact. If not, then it’s broken.
It often happens that there is no need to change the entire pump; you can get by with changing the seal. And to find out if the oil seal is okay, you need to do the following:
- find the control and ventilation hole of the pump;
- look at it.
If liquid leaks from there, then the seal is worn out. You can verify this by removing the GPM cover and performing a more thorough inspection. If brown deposits have formed around the hole, then our assumption turned out to be correct.
Well, if while driving you hear howling sounds or the pump rattles and jams, and a visual inspection does not reveal any defects in the pump, then you will still have to remove it. It is possible that defects have appeared on the side of the rotor that is not visible.
Basic cooling system malfunctions
The main indicator of the performance of the cooling system is the engine temperature sensor. It is located on the dashboard inside the car.
The engine temperature sensor on the dashboard of the VAZ 2108/09 is located to the right of the fuel sensor
If the engine overheats, the gauge needle is in the red zone. There may be several reasons.
- Insufficient coolant level or leakage in the system.
- Problems with the water pump.
- Temperature sensor malfunction.
Thermostat failure.
First of all, you should lift the hood and inspect the cooling system. The very fact of a coolant leak is easily determined by the liquid level in the expansion tank. It is much more difficult to find the exact location of the leak. This often requires a thorough inspection of all areas of the engine compartment.
The most unpleasant option is a breakdown of the gasket under the valve head and coolant entering the oil sump. A symptom of this development of events is a change in the color of the oil. It turns dull white with rainbow streaks caused by ethylene glycol.
Sometimes the cooling system hoses leading to the interior heater are damaged. This usually happens after severe frosts or prolonged inactivity of the machine. In this case, the coolant leak should be looked for under the “dashboard”, lifting the floor mats and removing the interior trim. The leaking liquid accumulates under the floor mats or is absorbed by the interior insulation.
Overheating of the engine often occurs due to the fact that the radiator honeycombs become clogged. Dirt, dust and fine sand, falling on the front plane of the radiator while driving, form a dense crust, which prevents engine cooling. In this case, it is enough to clean the radiator with a jet of water under pressure. It is not recommended to use a wire brush.
A clogged radiator honeycomb leads to engine overheating.
A thermostat failure, as a rule, does not lead to engine overheating. The valve that falls on it opens a large circle of coolant circulation, thereby reducing the temperature of the liquid.
Diagnosing water pump faults
The design of the water pump is quite simple. In most cases, the bearing on which the impeller rotates fails. There are two possible types of failure, varying in severity.
- The bearing has failed. In this case, the motor begins to “squeal” - make a loud, high-pitched sound. The source of the “squealing” is usually located at the front of the engine near the timing belt. As the rpm increases, the sound frequency increases, and as the rpm decreases, it decreases.
- The bearing is stuck. This happens after prolonged use of a pump with a worn bearing. The “squealing” suddenly stops, but the engine temperature rises sharply. The pump stops working, and the coolant continues to move slowly through the channels without pressure. This, of course, is not enough to cool the engine. If such a situation arises, you should drive at low speeds and with frequent stops to the nearest car service center.
If the liquid level in the expansion tank is normal, but the coolant is boiling and steam is coming from the air valve, do not rush to open the cap. Firstly, you can get burned by the steam. Secondly, boiling antifreeze can burst out in a stream. You need to wait a certain time for the coolant to cool down and only then unscrew the expansion tank cap.
There is another way to check the pump's performance. To do this, you need to partially pinch the thick hose going from the engine to the radiator with your hand and start the engine at idle speed. If the hose pulsates under your fingers, the pump is in working condition. If there is no pulsation, the impeller does not rotate and the pump is faulty. To avoid injury, such diagnostics should be carried out very carefully, without touching the rotating fan with your hands. You need to compress the hose by 10–20% - this is enough to feel the pulsation of the coolant. You should also not touch the engine with your hands - you can get burned.
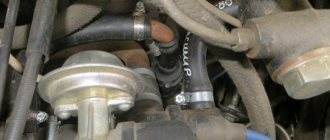
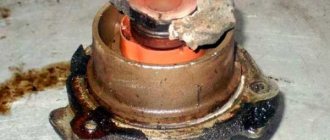
Then, after removing the protective plastic casing above the belt, you need to inspect the pump mounting location. Typically, when a bearing fails, characteristic leaks appear on the axis of rotation. Under the influence of vibration, the oil seal is deformed. It may look dry, but it leaves a dirty brown mark on the body. This indicates that coolant leakage occurs at high speeds. When the engine is not running, the fluid does not flow out, and the leak area dries out.
The location of a coolant leak due to a faulty pump is marked in red.
The serviceability of the bearing can be checked by rocking the pump drive pulley by hand. To do this you will have to remove the transmission belt. If the bearing is worn out, then when you rock the gear by hand, a certain amount of play will be noticeable, which should not be there.
Assembly nuances
When returning drive belt 2109 to its place, make sure that all marks on the crankshaft are in the correct position. If they move, you will have to spend additional time adjusting both the ignition and the gas distribution system.
When the tension roller is put in place, do not forget to also make sure that the belt does not dangle on it.
Sometimes, after the reassembly is completed, the car does not want to start or starts poorly. This symptom indicates that the belt is installed incorrectly. To fix the situation:
- remove it from the gear;
- turn it literally a couple of millimeters;
- put the belt back in place.
Replacing the water pump on VAZ 2108 and 2109
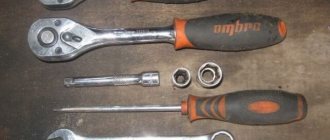
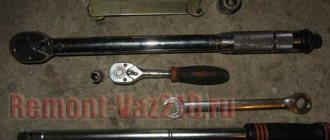
Even an inexperienced car enthusiast can repair and replace the pump on a VAZ 2108/09. You will need a standard set of tools - open-end and socket wrenches (10 and 17), screwdrivers, etc. If you plan to replace the pump, you should purchase a kit consisting of the pump assembly itself and a sealing gasket, and silicone sealant. In addition, for work you will need rags, acetone solvent and a canister of fresh antifreeze.
The repair kit for the water pump must contain a new gasket
As already noted, the pump is built into the bore of the engine cylinder block. The pump drive pulley is rotated by the timing belt. Therefore, to dismantle the pump, you must first remove the belt protective cover and the belt itself. But before this you need to perform a number of preparatory operations.
- The negative terminal of the battery is disconnected.
The negative terminal of the battery is indicated by a pictogram on the lead contact
The drain hole is located at the bottom of the cylinder block
The tension roller is loosened by unscrewing the fixing screw
After removing the belt, you can proceed directly to dismantling the pump. Using a 10mm wrench, unscrew the three mounting bolts and remove the pump. This is not always easy to do. The pump may “stick” to the landing site. In this case, you will need a chisel and a hammer, with the help of which the layer of old sealant in the socket is carefully torn off. After this, the pump can be easily removed.
The pump is secured with three bolts to the cylinder block body
It is impossible to completely remove the pump in the normal position of the car - the body gets in the way. You need to raise the motor slightly. To do this, the right side of the car is lifted on a jack - the engine is tilted.
If you have an assistant, you can do without hanging the body. One person forcefully pulls the motor in the direction opposite to the direction the pump exits the socket. Another person pulls out the pump at this time.
After removing the water pump, the impeller blades are inspected. They may break off or crack. This happens if the engine has been severely overheated, or the impeller is made of poor quality material. Small blade fragments usually fall out of the drain valve.
Chips on the impeller sharply reduce pump performance
To be completely sure that the cooling system is clean, it is recommended to flush it using the following algorithm.
- Remains of sealant, dust and debris are removed from the engine surface with a rag and solvent.
White spirit cleans the surface well from sealant residues
Professionals recommend replacing the tension roller along with the water pump. To check the serviceability of the roller, rotate it by hand. If the roller rotates with difficulty or a crunching sound is heard, it needs to be replaced.
It is generally accepted that the water pump should be changed every 90 thousand km of the car. However, this figure is conditional, depending on the operating conditions of the vehicle. Obviously, in the city cycle with constant traffic jams and limited speed, the cooling system will wear out faster than on the highway. Therefore, the need to replace the pump should be assessed based on its actual condition.
The main factor that destroys the bearing and oil seal of the water pump is an overtightened timing belt. If there is no key with a dynamometer, craftsmen use an ordinary steelyard. It is necessary to achieve such a belt tension at which the deflection of the rubber sheet in the middle between the pulleys is 10–15 mm. with a force of 10 kg. The steelyard hook clings to the belt and is tensioned to the 10 kg mark. The depth of belt deflection is measured.
Video: disassembling the water pump of a VAZ 2109/08 car
What to expect from a pump failure?
What can happen if the fluid pump fails? Firstly, with any practically breakdown of the pump, liquid will leak. It will start to drip slowly at first, but as it wears, the pressure will increase. But don’t be sad about this, replacing the VAZ 2109 pump, the price of which is 700-900 rubles, will improve the situation. The kit also includes a gasket and three mounting bolts.
But if a bearing is destroyed, for example, a leak may not appear, but you will be able to observe another phenomenon that will confuse you. The timing belt will begin to wear on the outside. Moreover, a thin edge will remain. This happens because the pump pulley begins to move to the side, and the belt slides behind it. the latter begins to rub against the tension roller, which gradually destroys it.
Installing an additional pump on a VAZ 2108/09
When operating a car in winter, it is necessary to maintain a comfortable air temperature in the cabin. The standard stove does not always cope with this. Some car owners install an additional water pump, which increases the efficiency of coolant circulation in the interior heater circuit.
An additional water pump increases coolant circulation inside the stove
The additional pump cuts into the break in the hose through which the antifreeze enters the heater radiator. To do this, you will need several hoses with a total length of about 50 cm and four clamps to secure them. Usually a pump from a GAZelle is installed, powered by an electrical network.
The procedure is as follows.
- For convenience, the battery and air filter are removed.
Remove the battery and air filter
The additional water pump from the GAZelle runs on electricity
The pump should not be installed above the thermostat
One hose connects the pump to the engine, the other to the heater radiator
As practice has shown, this allows you to heat the air leaving the stove to 50–55 o C. At low temperatures, the driver can be in the cabin without outer clothing. Naturally, such a device is used only in winter.
A more complex connection diagram for the second pump involves the use of an additional relay.