Possible reasons
What to do in a situation where the instrument panel backlight on a VAZ-2110 car has disappeared?
First of all, you should look for the reason why this malfunction occurred. Sometimes it can be identified immediately, but in some cases this process takes some time. In fact, there may be several reasons, so you will need to check everything methodically. The most banal and simplest option is that someone turned the rheostat knob, which is responsible for the amount of light flux, all the way to the left.
This, by the way, is often the sin of children who are placed in the front seat. “Young drivers” love to turn all sorts of knobs, press buttons and switch levers. Perhaps the adults overlooked it, and the child “corrected” the dashboard lighting. The problem, as you understand, is solved by simply returning the rheostat knob to its previous position. Therefore, before you start looking for possible reasons for the sudden disappearance of the backlight, check this particular point.
I would like to remind you of one simple rule. In a situation where there may be several possible causes of failure, when searching you need to follow the path of least resistance. In other words, test the simplest assumptions first. You may be lucky and find the problem with minimal time and effort.
If the reason is not in the position of the rheostat handle, you need to proceed to further search for the causes of the breakdown. Possible sources of problems here could be:
- fuse;
- instrument panel circuit board;
- contacts;
- wiring;
- failure of light bulbs due to short circuit.
So, let's look at some of the above reasons in more detail. After the rheostat handle, you should check the integrity of the 5-amp fuse F1. You can also usually turn on the side lights and see if they work on the left side. Everything is explained here simply. The lamps that illuminate the instrument panel, the left side lights, as well as the trunk lighting operate through this fuse. The dimensions located on the right side of the car receive power through F11, that is, they are not of interest to us in this particular case.
You may see the following situation. The left side parking lights, or trunk light, work, but the instrument panel light does not. This means that the problem is not in fuse F1. Therefore, you need to continue searching for the possible cause of the malfunction. In particular, it is necessary to check the contacts of the rheostat that illuminates the dashboard lighting. It is not uncommon for plugs to fall off. Accordingly, the lighting of the shield disappears due to lack of contact.
However, the rheostat itself can also fail. It is quite easy to check this assumption. To do this, you must first remove the rheostat, and then directly connect its contacts. If after this manipulation the instrument panel lights come to life, it means that the problem has been found, and you just need to replace the failed part. If not, then you need to continue searching further.
The most serious problem due to which the instrument panel lighting disappears is damage to the printed circuit board of the dashboard itself. In particular, there are often situations when the track on it that supplies power to the lamps burns out. One point worth noting here. The instrument panel in such a situation cannot be repaired, which means there is only one way out - replacement with a new one.
There are cases when, due to a short circuit, all the lamps illuminating the instrument panel burn out. However, this happens quite rarely. Much more often, one lamp may fail. As you can see, there are several reasons why the instrument panel lighting may disappear. Accordingly, the search will take some time. However, in the vast majority of cases, eliminating the malfunction that has arisen will not be so difficult, and many people can easily do this with their own hands.
How to assemble and disassemble the panel
To reset the speedometer or fix the problem that the turn signal light on the dashboard is not blinking, it must be removed.
To this end, you should perform the following actions:
- You can remove the cover, but the board will still be locked.
- You need to take a Phillips screwdriver and use it to remove a few more bolts.
- Now you need to unlatch the latches on the panel. You should start from the bottom. If they were disconnected from the bottom side, then you can push them up. This way the fee will be removed quickly.
- The arrows will have to be removed anyway.
Note: some arrows are easy to remove, but the arrows for the gasoline quantity indicator are much more difficult to remove. To remove the arrows, you need to gently pull them.
- The panel is disassembled, now we need to try to solve the problem.
Note: There are very small LEDs on the board that can also burn out. Because of them, the turn signal light may not blink, so they need to be replaced.
This requires working with a soldering iron.
But if the panel was disassembled in order to reset the speedometer readings, then:
Now it is advisable to somehow put the panel back together.
This is made even easier:
- Place the board in a plastic case.
Note: It is advisable to have a clean cloth underneath to prevent the surface from being scratched.
- Now you need to screw in the bolts on the panel itself. They do not need to be completely screwed in yet, as the arrows must be put in place first.
- Before putting the hands back in place, they need to be wiped thoroughly, as fingerprints, dirt, etc. will be visible when exposed to light.
Note: the arrows should be set approximately 3-4 mm below zero. It is also important that there is a small gap between the needles and the speedometer, otherwise they will stick.
It is much easier to install, as well as remove, long arrows. To install short arrows, you need to act very carefully, as they are more delicate compared to long ones.
- Before installing the glass, it also needs to be wiped. Now snap onto the latches.
- Secure the board with bolts.
- Lastly, screw in the screws on the cover, and then put all the light bulbs in place.
Working with a panel in a car is probably the simplest thing it can be. Therefore, there is no point in going to a car service center, where the price even for such trivial work will be high.
It’s better to look through a bunch of photos and videos before you decide to do repairs and tuning of the car’s interior with your own hands, so as not to harm the car. Any instructions will help you get the job done quickly and efficiently.
Replacing the light bulbs in the dashboard of a VAZ 2110 yourself
Installation of the dashboard on a VAZ 2110
The dashboard of the VAZ 2110 car is designed to reflect information about the current condition of the car. Made from ordinary plastic.
The presence of a huge number of light bulbs leads to the need to replace them from time to time. Many drivers want to replace the unsightly factory panel of the VAZ 2110 with a more modern one.
The article suggests finding out how to replace the dashboard bulbs of a VAZ 2110 and how to make it more aesthetically pleasing.
How to replace dashboard lights
- The steering wheel lowers to the down position.
- The two upper screws are unscrewed and the decorative trim is pulled out.
- Unscrew the three screws securing the dashboard.
- The cable remains in place, the device is pulled out, all electrical connectors are disconnected.
- The socket is rotated counterclockwise and removed along with the lamp. Baseless light bulbs.
- After replacing the light bulbs in the instrument panel of the VAZ 2110, assembly of the unit is performed in the reverse order.
How to replace the center console light bulbs
When operating the vehicle, the lamps located on the center console of the VAZ 2110 may fail. In this case, replacing the lamps on the instrument panel of the VAZ 2110 is easy to do with your own hands. The cost of the work is low. For this you will need:
- The screwdriver is flat.
- Phillips screwdriver.
- New light bulb.
Work instructions:
- The negative terminals are disconnected from the battery and from the speedometer cable drive to the gearbox.
- The outdoor lighting switch is pulled out. To do this, you need to pry off the element with a flat screwdriver. The connector is disconnected from the switch and pushed inside the dashboard trim.
- Replacing the VAZ 2110 dashboard light bulb to illuminate it is done by squeezing the socket antenna with a screwdriver, which is then removed from the switch. The lamp is pulled out of the socket and replaced with a new one.
- Use a flat screwdriver to pry up the hazard warning switch, which is then pulled out. The connector is disconnected from the switch and pushed into the panel trim.
- Unscrew the two self-tapping screws with a Phillips screwdriver, which secure the dashboard console trim, and the trim is removed. The heating element and ashtray are pulled out of the socket.
- The car radio is pulled out of the socket. The spring brackets securing the panel to the cover are pressed out with a screwdriver, and the shield is pulled towards itself. Use a screwdriver to release two plastic antennae from the lower fixation of the shield to the dashboard. The shield is raised and the third spring bracket for its fastening is pressed out.
Removing the panel on the center console
- The connectors for connecting the cigarette lighter (see VAZ 2110: replacing the cigarette lighter yourself), the backlight for it, and the lamp for the hazard warning switch are disconnected. The instrument panel panel is removed.
- Replacing the VAZ 2110 instrument panel light to illuminate the hazard warning switch on the inside of the instrument panel is done after removing it with its socket. To do this, they are rotated in the holder.
- The antennae of the cartridge holder are compressed and the element is removed from the cigarette lighter. The cigarette lighter blades are compressed, the part is pulled out, the light bulb is removed from the dashboard trim and changed if necessary.
- Use a Phillips screwdriver to unscrew the two screws that secure the instrument cluster to the panel. The instrument cluster is moved to the side. The union nut of the speedometer cable is unscrewed from the speed sensor. The cable is disconnected from the speedometer, then removed and routed through the hole in the front panel.
- The connectors are disconnected and the instrument cluster is removed. To replace the instrument panel bulbs on a VAZ 2110, the socket must be turned counterclockwise and the instrument cluster removed from the device. New lamps are being installed. Assembling and installing the combination is carried out in the reverse order.
- The battery is connected.
- The operation of the light bulbs on the instrument panel is checked.
How to replace light bulbs in buttons
- To replace the backlight bulb of the hazard warning light button, the panel with deflectors is removed, after which the hazard warning light button is pulled out of it.
- The deflectors are directed as high as possible.
- On the left and right below them there are mounting ears. Using a slotted screwdriver, they are pulled down and the panel is pulled towards itself.
- The hazard warning button is pulled out.
- There is a socket with a lamp on the side. You need to turn it counterclockwise with tweezers and pull it out.
- The contacts on the light bulbs are wrapped around the sides of the socket. The light bulbs are the same size as a matchbox.
- In order to replace the lamps in the instrument panel of the VAZ 2110 fog lamp, you need to carefully pry the panel with the button with a screwdriver and pull it towards you.
- The remaining operations are performed similarly to the same actions as replacing the instrument panel bulbs of a VAZ 2110 emergency system.
The light bulb for the headlight adjustment wheel is changed in the same way:
- Pry it up with a screwdriver and pull out the wheel.
- Using a small screwdriver, the socket is rotated along with the lamp and pulled out.
- The light bulb changes.
The VAZ 2110 instrument panel is clearly shown in detail in the video.
How to remove the tidy
On a VAZ 2110, removing the dashboard from the dashboard is not difficult, and the only tools you need are a Phillips screwdriver and pliers or a wrench. With their help, we will remove the positive terminal from the battery before starting work. So, lower the steering wheel and unscrew the 4 screws that secure the decorative trim.
Releasing the decorative trim on the VAZ 2110
After this, we pull the cover towards ourselves, and it can be easily removed, hanging on the wires of the switches. To prevent the cover from getting in the way, the wires from the switches can be disconnected - they are on the connectors.
Disconnecting wires from switches and removing buttons located on the decorative trim
Before disconnecting the connectors, do not forget to label them so as not to mix them up during assembly!
So, now we have a tidy in front of us, which is held in place by two screws located on the sides.
The instrument panel is secured with two screws
We unscrew them and carefully remove the panel, not forgetting that it is also on the wires. In principle, the wires supplying the instrument console in the VAZ do not need to be disconnected, since their length is sufficient to replace the lamps.
The ten have long enough wires, they allow you to replace light bulbs without disconnecting the connectors
Replacing the backlight on the dashboard
Dashboard sign for VAZ 2110
To do this, you need to use the following algorithm:
- The panel should be removed.
- The illumination designation is determined by special LED bulbs. To replace the backlight, these bulbs must be removed.
Note: this must be done very carefully, because they are quite small. In addition, there is a possibility of damaging the panel itself.
- But before that you need to disassemble it. This is not a difficult task, as to disassemble it you just need to press the latches, thanks to which you can remove the bulbs.
- Everyone has seen that on top of the dashboard there is a “sticker” and symbols (speed, amount of gasoline). It is held on by glue, so to remove it you will have to dig around a little.
Remaining glue must be removed.
You can start replacing the backlight.
Note: it is advisable to choose colors that are not very bright and strain the eyes. White or blue colors are ideal.
To remove the light filter located on the back of the “sticker”, you need to take a utility knife. The light filter is located under the protective layer. First you need to remove it. Do not press too hard with the knife, as necessary parts may be damaged.
Description of dashboard tuning
Note: it is easier to remove it if you rub it with a knife in one direction, then in the other.
To insert LED bulbs, you must remove the board located in the plastic case. There will be special holes for them.
Panel instrument pinout
Note: but that's not all, you will need to solder the wiring of the light bulbs to the board for them to work.
Now we need to put everything back together and install it correctly.
Deep revision
It is also advisable to add lighting - using an LED strip. You can take a white one, or a colored one. Preferably something that is not too harsh on the eyes – perhaps blue or green, depending on the owner’s taste.
Today, blue light is the most popular - it gives good visibility of readings on all instruments, but does not interfere with the driver’s ability to see the road clearly.
Another good idea is to make the arrows glow a different color. To do this, they need to be cleaned of old, red paint, and then painted white.
It could be nitro enamel or, even simpler, white nail polish. A color LED must be installed next to the needle on the instrument scale. The arrow, changing its position, will be colored differently.
How to replace a light bulb with your own hands
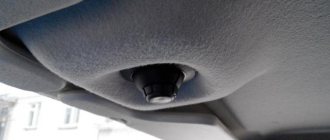
We have figured out the type of light bulbs for interior lighting, now we will try to replace them with our own hands, without contacting a specialist. To disassemble the interior lamp without breaking anything, you need to at least roughly know its structure.
So, structurally, the salon light consists of a body and a lampshade made of organic glass. The lampshade is made movable - it can swing vertically to switch modes, the swing axis is located in the center.
In both positions, the lampshade, which also acts as a switch, is fixed, providing two modes of operation of the lamp:
- The light is always on.
- The light comes on when any of the doors is opened.
Design of the VAZ 2110 flashlight
In the photo above the numbers indicate:
- Frame.
- Ceiling lamp.
- Swing axis.
Two ebbs on the glass, which are the swing axis, are the only lock that prevents the lampshade from falling out of the lamp body. Thus, to remove the lampshade, it is enough to insert a screwdriver between it and the body and press the body outward, releasing the ebb. We will insert the screwdriver, of course, next to the ebb on the lampshade.
Healthy! You can bend the edge of the case without using a screwdriver, just with your finger. This is easier and safer for the glass of the lampshade.
You can press the edge of the lamp housing with your bare hands
We press, pushing this side of the lampshade out, disengage the second latch and remove the glass.
Removing the lampshade from the interior lighting of a VAZ 2110
Under the lampshade we see a light bulb clamped into spring contact brackets.
Lantern with lampshade removed
Push the light bulb towards one of the contacts and pull it out.
We install a new one in place of the burnt one and snap the lampshade into place. To do this, we engage one of the clamps, press the second side of the lampshade, slightly bending the wall of the housing with a fingernail.
You can see in more detail the process of replacing a light bulb in the interior lighting of a VAZ 2110 in the video below.
Replacing a lamp in a VAZ 2110 interior lamp
As already noted, in some modifications of cars, in addition to the ceiling lamp, an individual backlight is installed, located between the driver and passenger. You can see how to replace the light bulb in it in the video below.
Replacing a light bulb in a VAZ 2110 individual backlight
Separately illuminated arrows
LEDS IN THE INSTRUMENT PANEL FOR VAZ 2110 2111 2112
Video guide for replacement
DIY
instrument panel for
VAZ 2110 An example of replacing
...
How to remove the instrument panel on a VAZ 2110, 2111, 2112 and replacing light bulbs
Video review - Backlight styling
interior of a
VAZ 2110 car, replacing
all incandescent light bulbs with diodes on
the panel
...
LED instrument panel VAZ 2110
If you want the arrows to glow a different color, you can do the following:
Note: in this case, the arrows will light up in a different color only when ignited.
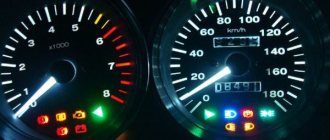
Classic tidy "tens"
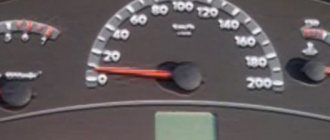
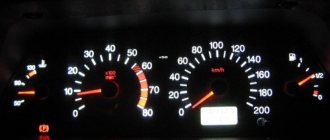
The driver behind the wheel of the tenth VAZ model can monitor the main indicators displayed behind the steering wheel on the panel. There are pointer type control devices:
- speedometer;
- tachometer;
- fuel tank full;
- cooling water temperature values.
Apart from the differentiated values displayed on the scale, the car provides information in the form of glowing or blinking indicators, for example, high beam indicators, turn signals, possible problems with the internal combustion engine, emergency lights, handbrake, etc. If the lamps turn off spontaneously, the driver will be misled , which can lead not only to the failure of one of the components, systems or devices, but also create a terrible (emergency) situation on the road.
It is important to know that the functionality of the display on the 2110 dashboard can be tested independently by holding the reset button and turning the ignition key to the 1st position (then I release it). You can finish the check by pressing the button on the panel again.
How to change the backlight using color film
Old dashboard of VAZ 2110
In order to change the color of the dashboard lighting, it is not necessary to change the LED bulbs.
To do this you can simply:
- Take 12 LEDs and an LED strip.
- Remove the light bulbs from the base and insert one LED at a time in their place.
- You need to take the required amount of LED strip.
Instrument panel diagram
Note: its length is measured according to the size of the panel.
- The base and LEDs must be returned to their original location.
- The tape should be glued to the plastic of the panel (the appropriate temperature must be maintained).
- Tighten the block well.
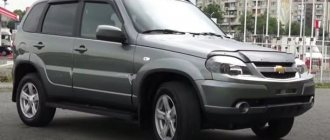
Priora panel
Some people prefer the Priora's dashboard. You need to know that you won’t be able to change it with your own hands “in a hurry” - there are differences: in the wiring, in the mounting of the ECU.
It should also be taken into account that the Priora has the same “propensity” for unnecessary squeaks as the “native” one, so you should also think about sound insulation in order to “fit” the Priora panel without unnecessary gaps and cracks. Another drawback of the Priora is the small glove compartment. In addition, you must definitely purchase a mount in the ECU area, specifically from Priora.
Panel from Priora in VAZ 2110
Or maybe you even liked the electronic panel, the installation of which is also possible. However, before you decide, do not forget to calculate how much such a replacement will cost you.
It is quite possible that tuning the lighting you already have, carried out with imagination and invention, will cost you much less. In this case, tuning yourself will become a source of pride for you, and will not only decorate the interior of your VAZ 2110, but also improve the lighting, make it brighter and more comfortable.
How to carry out high-quality soundproofing of a VAZ 2110 panel yourself
It's no secret that the VAZ 2110's panel often creaks. Eliminating squeaks is also called sound insulation. This process begins with disassembling the “tidy” into three parts, which are fastened together with bolts. Modelin can be used as an “anti-creak”, and bitoplast will act as a noise absorber.
In places where the panel parts come into contact, a model should be used. All bolt holes must be closed with model material to eliminate loss of heater air flow. The back of the dashboard needs to be covered with bitoplast.
The rest of it can be glued inside. This article provides more details on how to glue sound insulation. Often the black fuse box and glove compartment cause squeaks. At the bottom of the latter you need to lay bitoplast, and the sides should be covered with modelin. The sides of the black box that are in contact with the panel should be glued with modelin. It should be noted that the bitoplast is crushed during planting and there should be no problems with installing the “tidy”.
Nothing can please owners more than silence and the complete absence of various annoying squeaks in the car. The comfort in the cabin that occurs after soundproofing the panel causes only pleasant sensations.
Source
Auto-assistance
Taking into account the existing Traffic Rules, the driver is obliged to turn on the headlights on his VAZ-2112 passenger car before moving off. This means that the backlight on the instrument panel will also turn on, although it is completely unnecessary during daylight hours, because the instruments can be viewed normally without it. Constantly burning instrument panel backlight lamps shortens their operating life and leads to more frequent malfunctions in this electrical circuit.
The simplest reason why the headlights do not light up is when children's playful hands, sitting in the driver's seat, touch the car controls. If they turn the rheostat knob that regulates the amount of light flux to the left all the way, then there will be practically no illumination of the instrument panel. Therefore, before you start troubleshooting, try turning this knob to the right. If the backlight works, then the problem will be easily solved. But if not, then only then will you have to look for the cause of this malfunction.
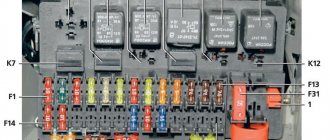
In this case, you will have to: either check whether the 5-amp fuse F1, which is located in the mounting block, is intact, or turn on the dimensions of your car, get out of it and see whether the parking lamps on the left side or the trunk lighting lamps are on, since all they receive power through this fuse. The right dimensions receive power through fuse F11.
If the left-hand side lamps are on and the instrument panel illumination does not work, it means that fuse F1 has not blown, so the next step is to check the contacts on the rheostat, with which I adjust the brightness of the instrument panel illumination lamps. There are cases when the plug comes off along with the contacts or it fails. You can check this assumption by removing the rheostat and closing its contacts directly. If the backlight lights come on, that means this is the reason.
A possible malfunction leading to loss of instrument panel illumination may be the instrument panel circuit board. This happens due to the burnout of the track on it, along which power is supplied to the backlight lamps. Considering that the instrument panel is not repairable, it will have to be replaced with a new one. And the filaments of the lamps themselves also burn out, although for this to happen on all the backlight lamps of the instrument panel at once, this is unlikely to happen.
We change the dashboard lighting in a VAZ to any color
The new dashboard lighting in the classic folk car VAZ adds sophistication and a sense of comfort to the interior. Installing neon or even LED illumination on a car requires a lot of money for such an expensive pleasure. The best way to solve the problem is to replace the dashboard backlight yourself. The process of replacing the lighting in your garage, firstly, is not complicated, and secondly, it requires less money. One of the options for tuning your car is a special overlay for the dashboard, but this will cost a lot. It will be better if you do the tuning of the instrument panel yourself.
To complete the job you need to be patient, as well as the tools and necessary materials. The first step in creating perfection is disassembling the dashboard. To do this, you need to remove the protective glass of the devices. The next step is to remove the arrows from the instruments. To avoid damaging the arrows made of fragile material, before removing the arrow with a screwdriver, place several layers of cardboard under the opposite end of the plastic. Using a little force, gently remove the arrow from the axis. Similar actions need to be done with the remaining arrows.
The dashboard backing is also very easy to remove. To remove it, you need any stationery knife. The edge of a knife is inserted between the panel and the substrate, and then we cut a layer of sealant around the perimeter of the substrate. After removing the protective glass backing, we proceed to further work on tuning the panel.
A light filter is placed on the surface of the dashboard under the backing, which evenly distributes lighting over the entire area of the panel. This light filter must be removed using a utility knife, carefully scraping off the light-conducting layer.
A light filter is a special paint that is applied to the back side of the dashboard substrate and provides color illumination for numbers and other information indicators. After rough processing of the substrate, the places where the light filter was applied must be treated with acetone or alcohol. The reagent will remove any remaining paint, as well as degrease the surface and prepare it for the next treatment process.
At the next stage of work, you will need to change the dashboard lighting. First you need to “get your teeth into it,” so to speak, and change the odometer backlight. An odometer is an indicator of the distance traveled by a car, measured in kilometers or miles. In order to install a new odometer backlight, you must first remove the odometer screen, remove the blue protective film, remove the old backlight bulb and replace it with a new LED. For the new dashboard lighting, you can use a multi-color LED, which has the ability to change colors at the user’s request. The LED is connected to the standard light bulb socket, then we put the odometer screen in its place.
The next step is to completely replace the dashboard lighting. We attach new LEDs to the instrument panel frame. The multicolor LEDs that we are installing in this case are sold complete with a color switch. If your budget is limited, you can avoid using multi-color LEDs in favor of regular ones. We install the LEDs on the seats and connect them with the standard contact of the previous dashboard lighting.
The speedometer and tachometer arrows must be able to change the backlight. Carrying out such an operation will require removing the old paint from the arrow. In order for the paint to be easily removed, you must first remove it from the surface with a stationery knife, and then go over the surface with acetone or industrial alcohol. When the arrow is clear of paint, you can paint it with white nail polish or something else. The main thing in this process is that the arrow is exactly white, since only white color can convey the entire range of LEDs.
If you have installed multi-color LED lighting on the dashboard of your VAZ car, you need to install a color switch to be able to select the color of the dashboard lighting. It is recommended to install the switch in the lower right corner of the dashboard. When all the work has already been done, you can begin the final assembly of the finished panel.
The first step is to start by installing the underlay. We apply a layer of sealant to the back side of the substrate so that it adheres firmly to the base. Next, we install the instrument arrows in their places and cover the structure with protective glass.
Thus, without much expense, we made an elegant dashboard for a VAZ car on our own. And you can choose the color of the glow yourself...
Overexposure of the instrument panel VAZ 2109
Not long ago, one good man
, part-time - my
friend
tema4970, it was his birthday... and I decided
to give him a gift
for his 2109 “My Cherry Nine”... give him
an overexposure of his tidy.
After all, since childhood I have heard - “The best gift is a gift made with your own hands!”
))
What came out of this is for you to judge
!)
Once upon a time, as soon as I started to overexpose the devices, this same friend gave me the old unit from his 2109. So I decided to overexpose it:
Disassembled. There’s nothing complicated here, just like everywhere else. Then I immediately started drawing the backlight circuit boards
in “sprint”:
Along the way I try on the layout, check it and eliminate inaccuracies using paper
:
The result is finished boards
:
I post the boards
in the dashboard box.
I connect them
with wires, attach them, and solder the contacts.
I also glue mini-scarves of arrow backlights
.
After that, I move on to the scale, the MOST difficult part.
I’m going to the copy center and scanning the stock scale...
Because Methods for printing scales are not available to me
, I still use the same “old-fashioned” method -
plotter cutting.
This is the scale we got after 3 days of torment: drawing the layout
,
adjusting sizes
and
cutting on a plotter
in an advertising agency,
transferring film to plastic
,
sticking color filters
.
Next is the second most difficult part.
) This is the plastic backing of the scale.
Of course, it was possible to remove it, but I didn’t, with it the height and alignment of the height are optimal
.
It needs to be improved
- cut out everything in it that interferes with the light, get onto the scale and shine through it!
To make it look like this:
Next, I wanted to make the CORRECT BSC BADGES!
So that the pictrogram icons themselves glow
, and not the dot-square-LED next to them... because now it’s just a pictogram drawing -
it won’t be visible!
To do this, BSK replaced and resoldered the stock diodes with SMD c-diodes 3528 of the corresponding colors!
And so that the c-diodes, when illuminated, do not illuminate neighboring icons
, it was necessary to make
a separating glass - a delimiter
for pictograms...
And thanks to 3D printing
, such a
“glass-svtovod” was born)
Now each symbol
, will glow
only from its c-diode
!
I'm moving on to the final stage
—
illumination of the hands and the hands themselves.
I place a small “light guide glass”
from heat shrink of the required diameter so that the red light
does not fall on the scale
when the arrow lights up
(two-channel smooth ignition... more on that below)
Well, the arrows
— from the same
Volga-3110)
I adjust the pointer bushings to the axles
: I file
their length
and drill out
the seats.
Oh yes! I almost forgot! Be sure to remove the tachometer board and move it outside the device... because... it interferes with the lighting!
Well, where would we be without smooth , 2-channel ignition with adjustable backlight brightness and “Night” mode?
?))
Of course - nowhere!)
Installing the
SCOOTER-VETERAN module (v.5.0)
The moment of truth has come...
You can hear the second hand ticking on your wristwatch...
We supply power to the ignition...
Problems and their solutions
Old and new sample
There are several common problems typical for the dashboard of the domestically produced VAZ 2110 model.
- The instrument panel lights on the VAZ 2110 do not light up. Check the contacts and the condition of the wiring that is responsible for the suspension. The fuses could simply have blown, or the light bulbs themselves could have burned out as a result of wear and tear or a short circuit. In fact, there can be many reasons, so it is not always possible to resolve the issue in a couple of minutes.
- The most serious failure for the instrument panel is a complete failure of the unit. In such a situation, all indicators stop working, the arrows fall down, and the warning lamps do not light up. To fix the problem, first check fuse 15, which is designated F6. You will find it on the mounting block. If this element is blown, simply replacing the fuse will not solve the problem. Look for the reason why it burned out. Usually this is a simple short circuit in the electrical network.
- The arrows jump up and down. This is also a common phenomenon, the cause of which in most cases is poor ground contact: This ground wire goes to the partition that separates the interior and engine compartment, from the instrument panel. To get to it, remove the radio from its seat. Check the quality of its fastening;
- Often, when installing an alarm system, the ground wire is moved to another location for more convenient access. Therefore, if you have an alarm system, but there is no wire under the radio, then look for it behind the interior trim near the driver’s left foot;
- The ground wire may be damaged when installing a new audio system. When the minus is connected, the mass is unscrewed and then often mounted back, only not as reliably as it was originally. Due to vibrations, collisions with bumps and holes, the fastening weakens and contact disappears. Hence the non-functional panel. Do not be lazy to properly wrap the bulk wire, since poor fastening is often explained by the inconvenience of performing this activity.
As practice shows, most problems associated with the failure of the dashboard can be solved independently. Especially when it comes to a car like the VAZ 2110.
But there is an important BUT. If you do not have minimal experience working with electronics and do not understand anything about electrics, we strongly do not recommend that you approach the dashboard wires
In this case, contact a service station, deal only with experienced auto mechanics and people who are well versed in automotive electrics.
Improve yourself. Perhaps soon you will be able to change to a more expensive, modern car. Then solving the electronics problem will be much more difficult. The VAZ 2110 is an excellent simulator that allows you to carry out repairs yourself, understand the structure of the car, and experience all the delights of self-repair
It is important for any man to be able not only to drive, but also, if necessary, to repair his car.
Loading …
Repair of "tidy" VAZ 2110
The domestic car 2110 cannot boast of a high-quality panel. In severe frost or summer heat, plastic often begins to crack. In addition, sometimes its corner also comes off. The “tidy” of this machine consists of three parts: a central, upper lining and a lower plastic lining. The corner most often comes off through: unscrewing the screws that attract the top cover, or through the fact that its soft part has moved away from the metal part of the top cover.
In the first option, you need to remove the panel, because otherwise you won’t be able to tighten the top trim. If only the soft part has come off, then there may be several solutions. You can glue it, but it will not stick tightly to the plastic air deflector. Another option is to mask the gap that appears when the corner of the panel peels off.
You can, of course, cover the gap with wire. It is placed inside using a screwdriver. Instead of a wire, you can use a headlight seal. In this case, you can return the corner to its place. Polyurethane foam is used to glue the corner. The casing, thanks to the foam, will stick to the metal body, but first it needs to be cleaned and degreased.
Then we apply foam inside, using a wet rag to remove excess foam. Use paper clips to press the corners. There is no need to remove the foam immediately. You should wait until it dries. After the foam has dried, you need to paint over it with a marker. It may seem like the foam is bursting, but in fact, the corners of the panel will not come out.
Now you can move on to repairing the crack in the panel. To do this, use either a plastic repair agent or tighten the lining with material. As for the first option, it is the simplest, because during repairs you do not need to remove the cover. You can remove the crack using a special epoxy resin.
Cosmofen and cold welding are also suitable for use. To prevent the crack from standing out, you should repaint the dashboard. In the second method, when reupholstering this automobile part, leather or vinyl leather is used. First, the crack must be filled with putty. If the problem is in the corner of the panel that has come unstuck, then repairing it will not be difficult.
If the “tidy” is cracked, then it is very difficult to completely hide the crack and, at the same time, not remove it. If the matter concerns repairs, then it is better to immediately replace it with a European overlay. Here you can see in detail how to solder plastic.
Restoring the backlight and changing the warning lamps
We remove the light bulb that needs to be replaced (the purpose of the light bulbs is in the first photo of the article). To do this, turn the socket counterclockwise 90 degrees, and it will easily come out along with the light bulb.
Replacing a light bulb without disconnecting the power wires on a VAZ 2110
We remove the burnt device from the socket, insert a new one in its place and install the socket with the lamp in place, turning it 90 degrees, but clockwise. After this, we install the terminal on the battery, turn on the ignition and check the operation of the VAZ panel, performing the appropriate manipulations: turn on the hand parking brake, headlights, turn indicators, high beam headlights, etc. If everything is in order, then install the panel and decorative trim in place .
I replaced the lamps, but there is still no backlight - possible reasons
It may happen that the lighting or indication on the VAZ will not be restored even after replacing the lamps. What is the problem and how to find and fix it? Let's look at the main reasons for this situation, and the easiest way to search is in the order in which they are listed:
- The power and control cable connectors have oxidized.
- The contact pads of one or a group of lamps have oxidized.
- The fuse that powers the backlight bulbs has blown.
- The conductive paths have oxidized and become short-circuited or “burnt out.”
- The wires supplying certain lamps are short-circuited to the car body.
So, let's start the search. We check the quality of the contacts on the connectors through which the control cables are connected to the VAZ instrument panel. The contacts (they are in plastic blocks) should not be oxidized, and the connectors themselves should fit tightly in their sockets. Additionally, it makes sense to tug with a little force (without fanaticism!) each wire in the bundles: it can simply break inside from vibration and hang on the same insulation.
Checking the quality of contact pads is quite simple visually. It is necessary to remove the non-working lamps and examine these areas in bright light. If they are covered with plaque (usually white or greenish), it needs to be removed, for example, with a rubber band.
We open the fuse panel of the dozens and find the fuse responsible for powering the backlight. It should fit tightly in its socket, and the contacts should not be oxidized. At the same time, we check the serviceability of the fuse - it could have burned out from a power surge or simply been defective.
In order to check the conductive paths on the board, you will have to definitely remove the protective casing from the VAZ panel. We unscrew 10 screws and carefully inspect the tracks. They should not be oxidized or covered with a white coating. Remove plaque with the same eraser. If we find a burnt or rotted track, we restore contact using a soldering iron and a piece of tinned wire.
In this case, as a rule, the fuse burns out or the wire burns out at the point of the short circuit. We replace the fuse with a new one with the same rating. If it burns out again, then the problem is a short circuit: you will have to find it by walking along the harness. This can be quite a difficult task since the harness is located under the dashboard. But nevertheless, it must be performed in order to find and eliminate the short circuit.
If the fuse does not blow and the lamp still does not light, then in the same manner it makes sense to look for the burnt out wire.
If you carefully read this article, you can easily replace the backlight and display lamps on the VAZ 2110 dashboard on your own, and, if necessary, find and fix the problem without the help of a specialist.
Previous Replacing car lampsHow to replace a license plate lamp on a Lada Priora Next Replacing car lampsReplacing a low beam lamp on a Renault Megane 2
Thank you, it helped!1 Didn’t help
What lamps are installed and how many of them?
The VAZ instrument panel is illuminated and the status of the vehicle’s components is indicated using 12 V 1.2 W incandescent lamps, which are installed in a 2W2 socket. The lamp is easily pulled out of the socket - you just need to pull it with your fingers; it can be purchased either separately or with a socket. In total, 20 lamps are used for lighting and indication in the instrument panel for the VAZ 2110, and they are inexpensive - 5-10 rubles. (at the time of writing) depending on brand (without cartridge).
VAZ car lamp installed in a socket and without it
If desired, instead of incandescent lamps, you can install LED ones in the VAZ instrument panel - they are produced for the same voltage with the same standard size and can be either with or without a socket. By the way, in the latest modifications of dozens of VAZs, LED light sources have already been installed.
LED bulbs without socket and with socket for VAZ 2110
Why are LEDs better?
First of all, they have a longer service life (up to 20-30,000 hours instead of 1,000 for incandescent lamps). They are not afraid of vibrations and are 8 times more economical. But you have to pay for all this in the literal sense of the word: LED light bulbs are many times more expensive than their conventional incandescent counterparts. If you consider that there are 20 of them in the VAZ panel, the amount will be considerable.
Be careful with the generator warning lamp; based on feedback from our readers, it is better to replace it only with the same one.
Causes and Troubleshooting of the Control Panel
When the instrument panel does not work on a VAZ 2110, this may be due to its complete failure or a malfunction of individual indicators. In special cases, along with the lighting fixtures, the left-side side lights and the rear license plate illumination stop working. The reason is the failure of the fusible element.
Fuse problems
Failure to operate the instrument panel occurs if the ampere fuse has blown. It occupies 15th place in the mounting block and is marked F6. If this happens, it is necessary to look for the reason for its failure. Simply replacing the element with a new one will not solve the problem. We can say with confidence that it will also burn out immediately. The cause is a short circuit in the circuit. It is necessary to find and eliminate it.
Chaotic movement of arrows on the instrument panel
It happens that the dashboard on a VAZ 2110 does not work, the arrows on the tidy jump and behave unpredictably. Within a few seconds they show either the maximum or minimum value. This means that it is necessary to check the contact with ground. This applies to the tachometer and fuel gauge. The ground wire fastening connects the instrument panel to the partition that separates the engine compartment from the interior space. To find this place, the radio is removed.
If an alarm is installed, such fasteners are transferred behind the interior trim, to the place where the driver’s left foot is located. When purchasing a car, this information is provided to the driver.
Sometimes the arrows start jumping after installing the radio. This happens because the tidy wire was not securely fastened. While the vehicle is moving, contact is lost. To eliminate such a breakdown, you just need to secure it more securely. After this, the arrows will display the correct information and stop jumping.
Cigarette lighter failure
It happens that the instrument panel of a VAZ 2110 does not work due to the cigarette lighter. Its socket is often used to connect various devices of higher power. This is where phones are charged, tablets or other equipment are turned on. There is a significant amount of current consumption. As a result, fuse f6 blows.
If the fuse is working, you should look for another reason. To do this, you need to unscrew the shield mount and pull it out. The wires leading to it are left in place. The voltage is checked at the contacts, which are numbered in the diagram: 6,9,10. The voltage everywhere should be 12 volts. The wire leading to ground, which is located on block X1, is checked. Its color is white.
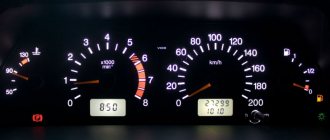
Features of the dashboard of the VAZ 2110 car
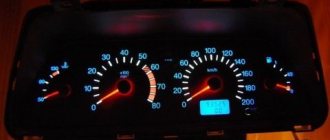
Dashboard VAZ 2110
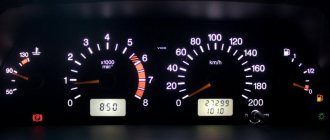
The dashboard combination on the dashboard of a VAZ 2110 car includes:
- 1 – shows the coolant temperature. If the arrow of this indicator moves into the red zone of the scale, this indicates engine overheating. It is necessary to pay attention to the operation of the electric fan and thermostat of the cooling system.
Advice: Do not operate the engine in overheating mode. Liquid temperature is more than 110 °C.
- 2 – tachometer. Shows the approximate frequency at which the engine crankshaft rotates. To obtain the true value of the unit's rotation speed, you need to multiply the arrow reading on the device by 100. The arrow reading in the red zone means that the engine is operating at a higher frequency, which is dangerous for the vehicle to continue moving.
- 3 – speedometer. The position of the arrow indicates the approximate speed of the vehicle in km/h.
- 4 – shows the fuel level.
- 5 – reset button on the daily mileage counter.
- 6 – display for trip odometer and odometer.
- 7 – display for indicating the time.
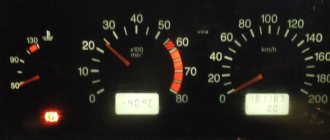
The photo shows the installation of light bulbs on the panel:
- Positions 1 – used to illuminate instrument needles and scales.
- Positions 2 – the smallest in size are used in yellow indicators and red signal indicators. These bulbs are installed without rubber caps. Light filters of the required colors are already built into the device.
- Position 3 – has a medium size, used to indicate a low gasoline level when the needle is at zero. It burns out very rarely.
Installing light bulbs on the panel
The entire instrument cluster is fixed with two screws in the corresponding slot on the dashboard. Its connections are made using printed circuit board mounting using foil getinax. The board is well attached to the back of the case. The speedometer is equipped with two counters showing the distance traveled: one is total, the other is “daily”. Using the corresponding button, the readings of the latter can be easily reset.
Tip: Readings can only be reset when the car is stationary.
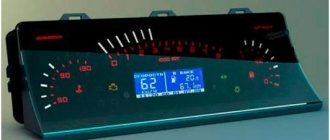
The latest VAZ 2110 models are equipped with an electronic dashboard. It contains all components and control indicators, icons and lamps.