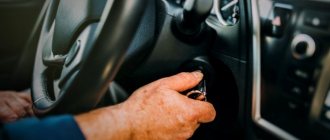
Doesn't it turn?
If the starter on an injection VAZ 2110 does not turn, there may be several reasons for this.
- The culprit is the solenoid relay. If you insert the key, turn it, the instrument panel lights up, the fuel pump turns on, but when you turn it further, the panel goes out and the starter does not turn on, you should check the solenoid relay. Make sure there is voltage in it. Try closing the starter, turning off the alarm, which can also cause problems. If everything works separately, but in the end the starter does not turn on, then the reason is in the solenoid relay. It needs to be replaced with new ones and the problem will disappear.
- Overrunning clutch does not work. You started a cold engine, drove a couple of tens of kilometers, stopped to get out for a couple of minutes, returned, and the starter clicks, but does not turn on your VAZ 2110. Only when the car cools down, you manage to start the engine. First of all, the overrunning clutch, or popularly Bendix, is to blame. Replace it with a geared analogue. Additionally, check the wires that go from the Bendix to the battery.
- There are no contacts. The starter starts, but it is very difficult, making a lot of clicks. If the situation repeats regularly, be sure to check your contacts. The terminals are probably oxidized. Cleaning didn't work? Then check the ground contact with the car body and the starter contacts. For them, oxidation is a natural phenomenon. Another way is to ask a friend to turn the key in the ignition, and then hit the relay with a hard object a couple of times. If the car starts, then the closing contacts are simply stuck. But here it is better to completely replace all the relays than to repair and disassemble the unit.
- The problem is in the immobilizer. It is not uncommon for the starter activation circuit on the injection VAZ 2110 to be disrupted due to the immobilizer. The engine may suddenly stall, the starter stops turning, and it is not possible to start it even with a push. The terminals are clean and the battery is charged. If the immobilizer is turned on, this may be the cause. Due to the protection being triggered, the engine does not respond. You will no longer be able to start the car, so call a tow truck and go to the nearest service station.
- Problematic injector. We have examined almost all starter problems characteristic of a carburetor engine. But today the “tens” are injection ones. They don’t really like low-quality fuel, which VAZ 2110 owners so often like to refuel with. Therefore, the starter may not work for the simple reason that the injector is clogged or dirty. By performing a flush, you will eliminate the problem.
Individual situations
If the VAZ 21099 injector stops starting, you can try to close the contacts of the mechanism in a straight line.
But sometimes there are emergency situations when the device stops functioning, let’s consider a few of them:
- The injection engine does not start in cold weather, but all devices work normally, the battery is charged. If there is no click, you should first diagnose the safety components, electrical circuit, and also the solenoid relay. If the device clicks, the relay must be replaced.
- The starter turns all day, there is a spark, but in the evening the engine stops starting. Before checking the starter, it is necessary to fully charge the battery, and then clean the contacts on both the battery and the mechanism itself. If these steps did not help solve the problem, you need to check the battery itself more carefully - try closing the contacts with a wire, which may cause a spark to melt. If this does not help, try applying a positive charge from the battery directly to the relay. If there are no changes, the unit will have to be replaced.
- If the car was operated normally all day, but after parking for five minutes it stopped starting, you can try to close the mechanism. You need to directly close two bolts on the relay; if this helps, but later the problem reappears, then disassemble the unit completely. Most likely, the problem lies directly in the erasing of the brushes. In this case, they will need to be changed.
- The unit does not turn at all, but the car can be started from the pushrod. If the problem is not with the starter, then check the fuse box and ignition switch. But before this, you should check the wiring - the reason may lie in the oxidation of the contacts.
Where is
The VAZ 2110 starter is located on the gearbox housing and is mounted on two studs. It is easier to see the starter in detail on 8-valve engines, since there is more free space in the engine compartment with such an engine. In a 16-valve engine, to see the starter, you need to remove the air filter housing.
Detailed installation process
In order to correctly install the starter, you must adhere to the following points:
1. Conduct a visual inspection of the device. 2. Installation of the device in its original place. First fasten with a long bolt, and then with two short ones. 3. Install the wire terminals and tighten the nuts. 4. Replace the battery. 5. Connect the terminals on the battery. 6. Install the braces coming from the intake pipe or air duct and air filter. 7. Replace the mudguard (if equipped).
After everything is done, you should start the engine. If everything works as expected, then the starter connection is made correctly. If the engine does not start, you should look for where the error was made.
Starter relay (retractor)
The starter retractor relay is located on the starter itself and serves to move the bendix to the flywheel, and then engage with it. This relay often fails due to poor workmanship. It is quite easy to understand that the solenoid relay has failed; with such a breakdown, the starter will spin at idle, but the engine will not rotate, since the moving part of the drive (bendix) will not engage with the flywheel.
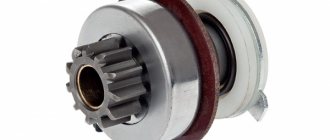
How to replace the Bendix VAZ 2109 correctly?
Bendix appearance:
Every owner of nines should know what a VAZ 2109 Bendix is and how to properly replace and diagnose it. So what is it and how to change it correctly? Bendix is a mechanism that is the connecting link between the starter rotor and the flywheel crown of the VAZ 2109 car. It contains a small number of elements - a gear and an overrunning clutch.
The first transmits rotational motion to the flywheel, and the second allows the gear to rotate in one direction. Note this property, it is very important for the normal functioning of the Bendix VAZ 2109 and other models.
Possible starter failures
There can be a large number of starter breakdowns, but most often they are all of the same type. Below are all the most common starter failures.
Brush wear
Starter brushes are a copper-graphite part that conducts electric current. The brushes are in direct contact with the starter armature and rub against its commutator, conducting electric current. During long-term use, brushes become unusable due to friction and must be replaced. This breakdown is not expensive or complicated; you just need to remove the starter and replace the brushes.
Bendix wedge
The Bendix is directly connected to the flywheel and quite often, wear appears inside it or on its gears due to high load, which makes it impossible to start the car from the starter. By design, Bendix is an overrunning clutch that rotates freely in one direction and is locked when rotating in the other direction. This part is sold separately and can be replaced as soon as possible.
Gearbox failure
The VAZ 2110 starter is geared. This modification allows you to reduce the load on the battery and rotate the engine crankshaft much easier and faster due to the additional ratios. Quite often, wear appears on the gears, which can lead to jamming or even breakdown of the entire gearbox.
Winding break
Since large currents flow in the starter, the winding in it is quite powerful and can withstand large currents, but sometimes a large cross-section of wires is not able to preserve the winding and it burns out, rendering the starter unusable. Such a breakdown can be repaired by replacing the rotor.
Solenoid relay
The retractor is an electromagnetic part that is retracted under the action of an electromagnetic force, driving the bendix inward and engaging it with the flywheel. Inside the relay structure there is a regular coil, which quite often burns out and damages the starter.
Almost all starter failures can be repaired by replacing the broken part with a new one.
Replacement technology
First of all, you need to disconnect at least one of the wires from the battery, as well as all the wires from the starter. Then you need to unscrew the bottom bolt that secures the starter and screw it in on the reverse side to secure the engine to its front mount. Otherwise, the motor may move forward. After this, you need to unscrew the remaining two bolts that secure the starter and remove it from the car. As mentioned earlier, the bushing is built into the clutch housing. To remove it, you need an M12 tap, as well as a drill chuck. The tap will have to be inserted into the chuck, then clamped, after which it must be carefully screwed into the sleeve, thereby cutting the thread. Great care is required due to the fact that the steel of the tap is very fragile and even a slight misalignment with the applied force can lead to its breakage. In this case, the shank will remain in your hands, and the cutting part will remain inside the sleeve. It would seem that the situation is hopeless. However, it is not. The length of the sleeve is approximately 14 millimeters, which means that there is approximately 10 or 20 mm of the cutting part of the tap on the hands. You need to take a regular nut with exactly the same M12 thread and screw it onto the broken tap. In a situation where the tap is broken off so that it is impossible to screw a nut onto it, you can take a bolt with a corresponding thread about 10 centimeters long and grind grooves on it similar to the grooves of the tap. Or you can do it more radically, but at the same time simpler. Go to the store for a new tap. The tap is equipped with three grooves into which you need to insert nails of the appropriate size. This must be done in such a way that their ends protrude beyond the end of the tap by about 10 mm. Try to insert the resulting structure into the sleeve with the broken end of the tap. It may not work out right away, but with the right amount of persistence the operation can be easily accomplished. After this, you can try to unscrew the piece and try to unscrew the bushing again. As a rule, after a few turns the bushing will begin to rotate and can be carefully unscrewed. If the bushing is very stuck, you will have to cut the thread in it approximately 6 or 8 turns. After this, remove the tap, and in its place screw in a bolt of a suitable size and use it to remove the sleeve. When a new one is inserted in its place, it is slightly pressed in.
Bushings
If the replacement is not happening for the first time, then the bushing can be inserted quite easily by hand. But during long-term operation, this can lead to it turning in the mounting hole. Over time, the mounting hole will break up, forming the so-called eccentricity, and the starter shaft may become misaligned. This means that the starter will stick and the engine will not be able to start. However, this is quite easy to fix. To do this, it is necessary to determine the size of the so-called eccentricity. Then you need to machine or order from a specialist a bushing with a larger outer diameter just to fit the eccentricity. You should solder some solder on the side of this bushing. After this, the bushing will fit in with a slight interference fit.
The starter doesn't turn over
There are many reasons why the starter does not work, but first of all you need to check the most common reasons why the engine will not start.
Checking contacts on the battery
Often the reason when the starter does not turn is due to loose terminals on the battery or their oxidation. It is enough just to clean the oxidized terminals from chemical reactions and tighten them with a force that will ensure reliable contact.
Battery discharge
Quite often, especially in winter, after a period of inactivity, the car’s battery may discharge, and thickened oil during parking will not allow the weak battery to rotate the crankshaft with the starter. You can check the battery with a regular multimeter; in winter its voltage should not be less than 12V, in summer not less than 11V. This voltage is not an indicator of the battery charge; at such values it is better to charge the battery.
Egnition lock
In some cases, the contact part of the ignition switch may fail. This is due to aging or poor quality parts. In this case, when turning the key, the contacts will not close to turn on the starter.
Winding break
If the winding on the stator or rotor of the starter breaks, the magnetic field that rotates the armature will not appear and the starter armature will not move.
What is a VAZ 2107 starter and how to change it?
A faulty VAZ 2107 starter causes the engine to simply stop starting.
When the key is turned in the ignition switch, the electrical circuit is closed, but the starter itself does not fire, so no force is transmitted to the crankshaft and it simply does not turn.
There can be many reasons why this happens, ranging from a banal short circuit in the car’s electrical system, to failure of the starter rotor winding or mechanical wear of the brushes. How to properly disassemble and repair a VAZ 2107 starter?
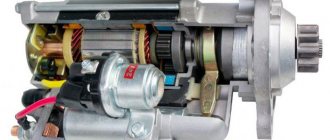
Starter device for a VAZ 2107 car
The design of the VAZ 2107 starter is to some extent reminiscent of an ordinary electric motor. The basis of the design is the so-called shoe, which is driven by the rotor.
t, in turn, begins to rotate when a voltage of 12 V is applied to it. This is the so-called gear starter. An ordinary electromagnet, which consists of an insulated copper winding, a metal core and brushes, is responsible for generating the magnetic field.
On the VAZ 21074 car, a similar scheme is used, but a slightly different fastening is used - 3 bolts each. The brushes transmit voltage to the rotor. They wear out not only due to friction, but also due to the high current generated by the coil.
The starter switching relay, located with it in a single housing, is responsible for the supply of electricity and timely shutdown of the shoe.
The operating principle of the classic starter on the VAZ 2107 is extremely simple: the device is connected to the crankshaft. When voltage is applied to the rotor, it spins and turns the fists.
As a result, the engine starts, after which power is supplied to the spark plugs from the generator, and not from the battery.
During an emergency engine start, a similar scheme is used - artificial cranking of the crankshaft.
It is not always the case that the engine does not start due to a faulty starter. It is possible that the problem lies in the wiring. Therefore, the first step is to study the starter connection diagram and all underwater wiring for a break. If one is found, the area will have to be replaced. At the same time, it is advisable to check the operation of the fuse (it is located on the left side of the hood).
It should also be mentioned that in some starter models protection is installed - this is an additional relay that automatically turns off the traction and prevents the supply of electricity from the battery even when the engine is running. These were not included in the factory configuration, but many install them after a certain period of operation.
Main causes of malfunction
Minor or partial repairs will not always save the situation. But before removing the starter from the VAZ 2110, we recommend that you familiarize yourself with the main reasons for its failure, which serve as a reason for replacement.
- When turning the ignition key, a grinding noise occurs in the engine compartment. This is the cause of a faulty bendix or flywheel.
- Clicking noises are heard when turning the key. The reason is the solenoid relay, which needs to be replaced.
- The engine turns over with a friend. This indicates that the starter brushes are worn out.
How to ring the starter, which indicates the need to replace the starter
The scheme for carrying out this activity is very simple, you need to place the starter with the windings up, i.e. on the end, after which we perform the following actions: we connect one end of the wire to the bolts of the mechanism, the other to the positive terminal, then we start the device.
If the mechanism does not turn at all or turns poorly after starting, feel free to start repairing it. But, if the device is working normally, then there is no need to disassemble it; most likely, the reason for the poor start lies in another component of the vehicle.
In addition, it would be useful to check the mechanism relay. In this situation, the verification scheme is elementary:
- We apply the “minus” to the relay body.
- We apply 12-volt voltage to the output.
- We connect an ohmmeter to the contact bolts.
If sparks appear on the contact bolts and the coupling moves into the hole, then the relay is working properly. The absence of these phenomena and voltage surges on the device will indicate that it is necessary to replace the relay, since the starter does not turn because of it.
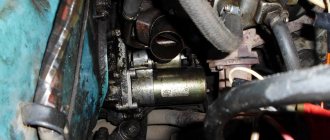
Replacing the unit
Now another question arises - how to disassemble it? There shouldn’t be any particular problems with this matter if you arm yourself with the instruction manual and also read our recommendations.
Arm yourself with a set of keys for 10, 13, 15 and 8 millimeters. Actually, you don’t really need anything else in terms of tools.
The sequence of dismantling and repair is as follows:
- Drive the car into the pit or lift it using a lift. You must have access to the underside of the car.
- If you have just arrived, give the engine some time to cool down. It is better to work with a cold engine.
- Remove the negative cables from the battery.
- First remove the protection and then the tin casing that protects your gearbox. To do this, you will need two keys - 8 and 10 millimeters.
- The power wire plug is removed from the starter. You just need to pull it towards yourself a little.
- Now take a 13 mm wrench and use it to unscrew the power wiring located on the solenoid relay.
- Place the loose wire aside and secure it with something temporarily so that it does not interfere with further repairs.
- The starter is attached to the gearbox housing with two nuts. They are easily loosened with a 15mm wrench. If you have problems unwinding, lubricate the fasteners with the almighty WD40.
- Dismantle.
- Now check the condition of the bushings on the gearbox housing.
- Make sure that the armature shaft is in good condition; when moving, there should be no play or jamming. If such defects occur, then it is recommended to immediately replace the bushings with new and high-quality ones.
- There are always two bushings. One is at the bottom of the starter, and the second is on the gearbox housing. The bushing on the starter can be changed without any problems, but difficulties may arise with the second one. To dismantle it, you need a special tool called a rubber. It is better to entrust the work to specialists from a service station.
- If the cause of the starter malfunction is the bendix or the solenoid relay, there is no need to call the experts for help.
- To remove the relay, unscrew the power wire, or rather its fastening, from the starter housing. You will need a key for 13.
- Using a size 8 wrench, remove the two bolts securing the relay to the starter housing. It is important to be careful here, because when removing the bolts, there is a spring in the relay that can spring back. Hold it with your hand when dismantling.
- Remove the relay piston from the rocker arm hook located on the bendix.
- Proceeding in reverse order, install a new relay.
- If you need to replace the bendix, then remove the solenoid relay, unscrew the two bolts with a 10mm wrench at the back of the starter. Now disconnect the starter housing from the front of the starter where the bendix, rotor and fork are located.
- Use a flathead screwdriver to pry up the plastic fork to remove it from the armature, and remove the armature itself and the bendix from the front of the body.
- Remove the retaining ring located on the tip of the armature and remove the desired bendix.
- The structure can be assembled in the reverse order, but the splines must first be lubricated with Litol.
- Test the new starter in place before beginning installation. To do this, connect the power terminals of the battery.
- The nuts responsible for fastening the terminals are tightened with a 13mm wrench. But it is not recommended to apply much force, since the terminals are made of copper. Clamping too hard will damage the threads, causing even more problems.
We figured out how to disassemble the starter on a VAZ 2110 and we can say that this procedure is not particularly simple, but it does not require mandatory execution by a professional auto mechanic.
The starter on the “ten” is somewhat capricious, but if you operate the car correctly, check the condition of the contacts, and also periodically flush the engine on the injection VAZ 2110, it can last a long time and reliably.
Starter diagnostics
You can check the functionality of the starter without dismantling the device using a multimeter. As practice shows, it is most convenient to use a digital device.
- The battery terminals are connected to the poles of the measuring instrument. Ask an assistant to follow the readings, and get into the car yourself. For safety, set the gearbox to neutral and tighten the handbrake.
- Once the tester has been connected, the voltmeter should show voltage. If everything is in order with the battery, the values will be in the range from 11 to 13 V.
- Turn the ignition key, turn on the starter. At this moment, measure the voltage. If the system loses 1-2 V, then the starter provides no resistance. If the readings decrease by half, then we can conclude that “the starter is taking over.” In this situation, the brushes or bushings may have worn out.
- After dismantling the device, you can check the condition of the traction relay. Apply 12 volts from the battery to the terminals on the case. If the overrunning clutch moves towards the front cover, then everything is fine with this unit. Otherwise, you will need to buy a new element and replace it.
Step-by-step photo report on starter repair
I decided that it was the Bendix, but it turned out that it was not the problem, it was perfect.
removed the starter
Bendix is ideal
Just in case, I checked the flywheel ring, it is also in perfect condition.
To begin with, I sentenced the retractor. Although it worked, the contact of the supply pin was burnt. The pin got so hot that it melted the attachment point. It is clear that this is most likely not a cause, but a consequence.
burnt contact
I immediately bought a new retractor
New traction relay
Further disassembly of the starter revealed a broken planetary gear. It is plastic, burst and crumbled. Now it’s clear why the starter jammed.
The cost of a new metal gear is 150 rubles. The cost of the assembled gearbox is 750 rubles.
There is no point in taking it as a collection, because... All other parts of the gearbox are in excellent condition. I also purchased a tool to remove the retaining ring for RUR 170
I assembled the gearbox with a new metal gear. Lubricated it with CV joint.
I put the starter in place, and a miracle happened: the car started up normally.
Repair cost
Retractor - 620 RUR Gear - 150 RUR Pliers for retaining rings - 170 RUR Lubricant, wash total 1000 RUR
But it was too early to rejoice; after driving for a couple of days, the problem partially returned. The starter sometimes jammed and in general began to turn noticeably slower. I had to take it off again. This time, I was not lazy and disassembled it completely. It turned out that the magnets had fallen apart.
Most likely, this happened as a result of the starter jamming on an old, broken gear and its subsequent overheating.
As a result, I didn’t bother with further repairs and bought a new, factory, KZATE gear starter for 3200 rubles.
Now it starts just fabulous. The new starter spins like a hurricane. I should have not been too lazy right away and disassembled the starter completely, it would have saved money and time. But there is also a plus: I gained interesting experience in repairing gear starters.
Solution
- First you need to put your “nine” in neutral gear, and also turn on the parking brake.
- After this, the hood opens, you need to find the red cable on the retractor.
- Using a thick screwdriver, you need to short-circuit the terminals on this component. When a short circuit occurs, sparks may fly in different directions - there is no need to worry, this is a normal situation.
- Then you need to try to start the engine. If you notice that the starter starts to work normally when screwing in, then the problem is not with it. If the device does not turn, then most likely it will need to be changed.
- If the mechanism is working properly, the red wire from the solenoid relay must be removed, and voltage from the battery must be applied to this terminal. If there is a pop, the relay will be fully operational. If there was no clap, then most likely the reason lies precisely in the relay.
- Check the contacts on the starter, it happens that due to oxidation it stops turning.
How to repair a VAZ 2110 starter yourself
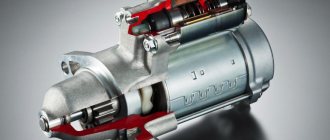
As a rule, the starter on a car of any brand performs one of the most important functions. This is a real electric motor, without which the car engine will not fully start.
The word starter is English, which translated into Russian means start. How does a starter work? Immediately after current enters the device, it begins to work and supplies torque further to the engine. The principle of operation is simple, but it often happens that the starter fails. We will talk about this in this article.
Let's try to disassemble its circuit and fix it ourselves.
starter
Sequential disassembly of the starter
The whole process occurs in several stages, and at each stage a potential malfunction can be identified.
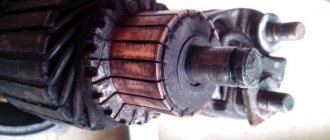
The first stage involves inspecting the brushes after removing them. This is generally the most common problem that prevents the starter from working properly. To do this, do the following:
- Unscrew the two screws that secure the protection cover. It comes off very easily.
- Using a screwdriver, remove the retaining ring and adjusting washers from the shaft.
- The next step is to remove the two tie rod nuts and the cover can be removed from the manifold side.
- Now, using a screwdriver, you can press the springs and pull the brushes out of their seats.
To measure the height of the brushes, use a ruler or caliper. If the element height is less than 12 mm, then they should be replaced. If there are chips and cracks on the surface, this is also a reason to update them with new parts.
How to recognize a starter malfunction
As you know, a new car can operate for about five years without breakdowns. Then any “spare part” can fail, including the starter.
Its malfunction is determined quite simply. You don't even have to take your car to a service center to understand this.
The car does not start, or the starter turns off spontaneously. Tapping or uncharacteristic sounds are often heard.
Many young and inexperienced motorists do not pay attention to these nuances and continue to drive. And this directly affects the starter, and even if it could have been saved, then after that it may become practically unusable.
Experienced drivers don't allow this to happen. They carefully monitor their car and when such symptoms are detected, they immediately take action.
Replacing VAZ starter brushes
The process of replacing brushes will not take more than 20 minutes. All you need to do is unscrew the contact wires of each of the elements on the brush holder, and connect new ones in the same way.
Next, each starter brush 2110 or 2109 is placed in its seat on top of the pressure spring. When this is done, the brush assembly must be mounted on the commutator. To do this, the brushes are alternately recessed inside the cell, and the armature is rotated in one direction. After this, we assemble the starter using the reverse algorithm. Before installing the starting device, we check it as described above. If the starter works, it means you did everything right.
Starter repair
Repair of the VAZ 2110 starter is carried out immediately after the problem is discovered. You need to arm yourself with patience, the necessary tools and first learn about its scheme.
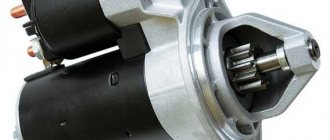
VAZ 2110 starter diagram
The VAZ 2110 car starter is a small four-band electric motor. It, as mentioned above, ensures the primary rotation of the crankshaft.
On average, three kW of energy is enough to start the gasoline engine on a VAZ 2110. Repair of the starter is necessary when the device is not able to ensure the engine operates. The starter itself is a DC motor that is powered directly from the battery. The starter design has 4 brushes, thanks to which the electric motor increases its power by receiving power.
starter brushes
Other main parts and elements of the starter include:
- drive shaft;
- gear with the inner ring of the overrunning clutch;
- drive shaft support with liner;
- relay armature;
- winding;
- brush holder;
- permanent magnet;
- armature core and much more.
Types of starters
As a rule, starters come in two types: with and without a gearbox. Experts advise using the first option (this is exactly what is used on the VAZ 2110). Such a device will require less current for normal operation and will provide torque to the crankshaft when the battery is weak. But prolonged use of this type of starter leads to its rapid breakdown. The rotating gear fails. As for a starter without a gearbox, it directly sends forward motion to the gears. Devices of this type have some advantages over starters with gearboxes. They are simple in design and easy to repair.
Dismantling
In order to begin repairing the starter, it is necessary to remove it. Let's look at its connection diagram below:
starter connection diagram
It is advisable to lift a VAZ 2110, the starter repair of which is carried out by yourself, onto an overpass or pit. You can also put the car on a jack to make it more convenient to work.
According to the diagram, we see that the starter receives power from battery 1. In addition, the diagram shows generator 2, switch 4 and starter 3 itself.
So, let's start dismantling, but don't forget to remove the engine splash guard:
- Disconnect the negative wire from the battery;
- disconnect the control wire from the starter traction relay;
- Using a key set to “13”, unscrew the nut of the “plus” wire on the relay:
- remove it;
- using a wrench set to “15” (it is rare and you can use a socket head), unscrew the 2 nuts securing the starter to the clutch housing;
removing the starter
- removing the starter;
- Using a “10” head, unscrew the nut of the lower terminal of the traction relay;
- release the terminal of the wire tip;
- Using the “8” head, unscrew the two bolts on the traction relay;
- we remove it.
Gearbox or rotary starter for VAZ 2109?
Hello! Today I will tell you with my own example about the differences between gearbox and rotary starters! For a long time I suffered with this rotary starter, installed back in 1998 in Togliatti on the AvtoVAZ assembly line. Owners' suffering, as a rule, begins under certain circumstances)) For example, when the battery is several years old and there are problems with the power supply or ignition system. That is, when the carburetor overflows or there is a slight malfunction of the distributor, when it’s already difficult to start (and you have to go to work), then our battery comes to the rescue in getting through the day =) We tried to start. There was just a little bit left and it should have been “grabbed”, but the battery died =( And then psychosis, hatred of everything in the world, despair. Everyone knows this!
This is my old starter. Rotary. Renovated 5 times already.
I got a car from my dad relatively recently. Previously, I could not influence her fate and for some reason I was not interested in how and what was going on with dad. He lived in Budennovsk, I lived in Moscow. But now...
While closely studying our and non-our automobile industry, I learned that modern cars have gear starters. Well, I bought myself a brand new shiny ZIT starter.
Here it is, below.
Let's talk about the differences right away. When I removed my old starter, I still remember how I broke my finger and scratched my hand. I also remember that it is heavy. When I bought a ZIT gear starter, it seemed much lighter to me. Then I compared and YES! It's really lighter. As for the seating, everything is identical. We install the same three holes on three studs and tighten them with nuts.
Well, now about the differences.
- What can I say about the stock starter that was installed in the VAZ 2109 in those years. Well, for starters, it's rotary.