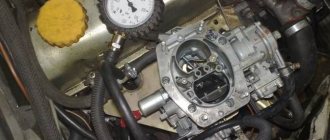
The VAZ-2110 engine is equipped with a Solex carburetor mod. 21083-1107010-31 – emulsion type, two-chamber, with sequential opening of the throttle valves (the second chamber begins to open after the throttle valve of the first chamber opens by 2/3 of the value).
The throttle valve drive is mechanical, cable.
The carburetor has a balanced float chamber, a crankcase gas suction system, heating of the throttle valve area of the first chamber, a semi-automatic starting device, and an idle speed solenoid valve.
Stages of setting up a VAZ 2022 carburetor
Without knowing the design of the car and without any experience in repairing, disassembling or assembling the fuel system of a car, it is not recommended to make adjustments. Changing the settings incorrectly may worsen the problem or damage the device. If you are familiar with the design of your car's carburetor, adjusting it will not be difficult. Adjusting the 2105 carburetor can significantly improve vehicle efficiency, reduce fuel consumption and increase the performance of the power unit. These so-called performance upgrades do not have any detrimental effect on the device. On the contrary, they are a mandatory procedure that guarantees long, uninterrupted operation.
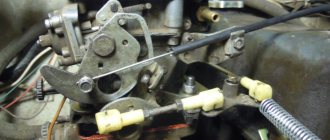
Screws for adjusting the idle speed system of the VAZ 2105 carburetor: 1 - mixture quantity screw; 2 - mixture quality screw
- Crankshaft speed calibration. The first thing to do is change the speed to 750-800 units per minute. To perform this procedure, a quantity adjustment screw is provided. It must be screwed all the way, and then unscrewed three times in the opposite direction.
- Change in CO2 content. We regulate the amount of carbon dioxide in the exhaust using the quality screw. To do this, you need to screw the screw in until it stops, and then unscrew it back 4-5 turns. This will increase the concentration of fuel and richen the mixture.
- Warming up the engine is a mandatory procedure, without which you cannot proceed to the next stages of work.
- Speed adjustment. Using the quantity screw, we adjust the idle speed. It is necessary to achieve stable operation of the motor at 750-800 rpm. Gradually tightening the quality screw. During this process, the speed should increase slightly and then decrease, causing the engine to run erratically. After unstable operation of the power unit begins, we begin to screw the screw back in until the operation of the motor stabilizes.
- Setting XX. Finally, you need to calibrate the idle speed using the appropriate screw to 800-900 units.
After completing all stages of adjustment and achieving the required parameters, you need to test the carburetor. With the engine running, sharply press the accelerator pedal and release it. If adjusted correctly, the crankshaft speed will temporarily increase. If the engine stalls, increase the speed using the appropriate adjusting screw. Check the operation of the motor at full load by turning on the stove, lights, etc.
Features of repairs
How to repair a VAZ 2110 carburetor? First of all, you need to disassemble the carburetor and make sure that there are no nuts or other foreign objects that could fall into the carburetor, and then into the cylinder and lead to a major overhaul of the engine. Only after successful disassembly and inspection can you return to the carburetor.
- The solenoid valve must be unscrewed. It is recommended to remove the idle jet from it, and then clean it and check for functionality.
- The next mandatory step is cleaning the cover and checking the cold start gap and the integrity of the cold start diaphragm.
- The float installed on the carburetor must have ideal geometry and be integral.
- One of the most common malfunctions of the VAZ 2110 carburetor is a stuck needle valve. To eliminate the malfunction, you need to install a return bracket, taken from a “classic” needle or created from the spring of an ordinary ballpoint pen. The solenoid valve must be screwed in with the utmost care, otherwise the threads in the cover will be damaged.
- The next step is the carburetor body. The mounting nuts must be carefully tightened to the intake manifold.
- The accelerator pump needs to be checked for proper operation. From the very first seconds of opening the throttle, gasoline streams from the nozzles should be visible. If the streams do not appear immediately, the car will not accelerate quickly. To eliminate the defect, you need to work on the lever, the accelerator drive eccentric and its diaphragm. You need to make sure the sprayer is clean. If the problem is in the diaphragm, the device will lead to excessive fuel consumption and disruption of the engine.
Adjusting the fuel level in the float chamber
We perform this when replacing a needle valve, float or other malfunctions. Remove the carburetor cover (see article - “Disassembling the carburetor”).
Holding the carburetor cover horizontally with the floats up, we check the gap between the floats and the cover gasket, which should be 1±0.25 mm and be the same for both floats.
The gap is adjusted by bending the tongue and/or float arms. The bearing surface of the tongue must be perpendicular to the axis of the needle valve and must not have dents or nicks
When installing the cover in place, check whether the floats are touching the walls of the float chamber; if necessary, bend the float arms.
Adjusting the idle system
Performed during maintenance or engine malfunctions using a gas analyzer.
We carry out the adjustment on a warm engine.
At the factory, the engine is adjusted at a minimum crankshaft speed of 800 ± 50 min -1 to a carbon monoxide (CO) content of 0.7-1.3% (the CH content is within acceptable limits, provided that the ignition system is working properly), after then press a restrictive plastic sleeve onto the screw head.
If by turning the bushing it is not possible to restore the factory adjustment parameters, unscrew the screw, breaking the bushing, then by rotating the mixture quantity screw set the required crankshaft speed (for clarity, the air filter housing has been removed), ...
. and the mixture quality screw – the content of carbon monoxide in the exhaust gases
When you press the gas pedal, the engine should increase the crankshaft speed without interruption, and when you release the pedal, it should not stall.
When turning the mixture amount screw clockwise, the crankshaft speed increases.
When turning the mixture quality screw clockwise, the CO content in the exhaust gases decreases.
Checking the EPHH block and checking the solenoid valve is discussed in the article - “Checking the EPHH block and valve.”
Source
Symptoms of a problem
Let's look at the main signs indicating that the sensor is faulty:
- The idle speed fluctuates;
- The engine starts poorly, even if the gas pedal is pressed;
- The engine has warmed up, but the speed does not increase;
- The engine suddenly stalls when the gear is in neutral;
- The speed drops if you turn on devices that consume a lot of energy: stoves, headlights, air conditioning, radio.
However, there is no need to immediately run for a new sensor. Replacing it will not bring results if the reason is different: for example, it could be spark plugs or a fuel filter.
How to adjust idle speed
Idle speed adjustment (IAC) is carried out when problems occur in the engine - if it does not start, stalls after starting and other problems. It is also recommended to perform IAC after replacing or repairing the carburetor.
For IAC you will need:
- Tachometer - it is used to determine the crankshaft rotation speed. You can adjust it by ear, but only experienced car enthusiasts can handle this.
- Slotted screwdriver - to rotate the screw for adjusting the quality/quantity of the mixture. Screwdriver width – 3 mm.
Preparation for IAC:
- Warm up the engine to 85-90°C.
- Press the choke lever all the way, it should be 100% open.
- Stop the engine and connect the tachometer. Before doing this, read the instructions for the device and follow them.
- Start the engine and turn on the high beams and heating - so that there is a load on the network.
The optimal idle speed for engines with Solex is 750-800 rpm. Rotate the fuel mixture “amount” screw and set the crankshaft frequency indicated above. If you cannot set the desired speed, you will also have to adjust the “quality” screw of the fuel mixture.
There may be a plastic plug on the fuel mixture “quality” screw; before adjustment, it must be removed, pierced with an awl and pulled out with a hook or self-tapping screw.
XX adjustment is carried out three times. If there is no result, repeat it 2-3 more times. Before starting work, check whether the ignition is set correctly and the wiring is in good condition, and whether foreign air is being sucked into the carburetor.
- Using a slotted screwdriver, turn the fuel quality screw. Set the maximum crankshaft speed. Rotate the screw left and right until you find the desired position. Determine it by ear or using a tachometer.
- Turn the vehicle “quantity” screw. set it to 900 rpm. If you turn it clockwise, the damper opens slightly and the speed increases; in the opposite direction, it decreases. Look for the optimal screw position.
- Turn the “quality” screw to set 800 rpm.
Repeat the setup if necessary. If you are replacing an old carburetor with a new one, or you have disassembled or repaired it, then before you start adjusting, tighten the “quality” screw to the maximum, and then turn it out 3-4 turns.
Having completed the adjustment, step on the gas - the engine should increase the crankshaft rotation speed without failure, and when it is released, it should not stall. If there are “dips,” repeat the adjustment or turn the mixture “quality” screw. Increase the idle speed to 900 rpm. If you tighten the “quality” screw clockwise, the CO concentration is reduced to 1.5%.
Functionality check
We have already talked about where the sensor is located. The first thing you need to do is find it and remove the block with wires. On a VAZ 2110, you must first unscrew the fastening elements of the throttle assembly, then move the entire assembly by about 10 mm.
Check with a voltmeter that the voltage is appropriate to the sensor. To do this, you must first connect the negative terminal of the battery to ground and connect a voltmeter to terminals A and D (they are usually marked), then:
- If the voltmeter shows less than 12V, this most likely indicates that the battery is not charged;
- If nothing is shown, faults should be looked for in the electronic control unit or in the circuit;
- If the reading is 12V or more, you need to check the regulator directly, or more precisely, its resistance;
- We connect a tester to the four terminals, which should give a total resistance reading of 50 or 55 Ohms.
Testing in pairs should give an infinitely large resistance. If the idle speed sensor on a VAZ 2110 (injector) gives different readings, it means it needs replacement.
You can also test the regulator in another way: remove the sensor and connect the block. Pressing the needle with your finger, watch its extension. When the ignition is turned off, there should be a push of the needle.
If everything is normal, then usually the speed does not fluctuate and the sensor itself is in working condition. If there is no shock, you can try cleaning the mechanism.
This is done using a special cleaner called WD-40. They very carefully, using a cotton swab, clean everything that is possible in the sensor.
Particularly carefully - the rod, as well as the needle. But if this does not help, a replacement is needed.
Purpose and design of Solex carburetors
The production of licensed Solex carburetors began with the entry of front-wheel drive small cars into the domestic market.
On turns, steep climbs and maximum accelerations, previous models could not provide an engine located perpendicular to the direction of travel with a fuel-air mixture.
Features of Solex carburetors
Carburetors of the Solex family are not interchangeable with other models of DAAZ carburetors.
But within the family, various modifications are very similar to each other, differing slightly in the size of the metering elements and the shape of the control levers.
Various Solex modifications differ in the size of the dosing elements and the shape of the control levers
Thus, carburetors 21083 engines with a volume of 1.5 liters differ from carburetors 21081 engines with a volume of 1.1 liters, the diameters of the starting gaps of the dampers are increased by fractions of a millimeter.
In addition, some 21083 models have additional components and functions.
Table: features of various carburetor models
| Carburetor model | Peculiarities | Automobile model | Engine capacity, l |
| DAAZ 2108–1107010 |
| 1,3 | |
| DAAZ-21081–1107010 |
| 1,1 | |
| DAAZ-21083–1107010 |
| 1,5 | |
| DAAZ-21083–1107010–31 | semi-automatic starting device |
| 1,5 |
| DAAZ-21083–1107010–35 | two-stage starting device |
| 1,5 |
| DAAZ-21083–1107010–62 | electronic fuel mixture control |
| 1,5 |
| DAAZ-21083–1107010–05 | for engines with microprocessor ignition | VAZ-2109 | 1,5 |
| DAAZ-21412–1107010 | without drain fitting | AZLK-2141–01 | 1,5 |
| DAAZ-21412–1107010–30 | without drain fitting, for engines with microprocessor ignition | AZLK-2141–23 | 1,8 |
| DAAZ-1111–1107010 | inertial mixture enricher |
|
|
| DAAZ-21051–1107010 | traction drive of throttle valves, without drain fitting |
|
|
| DAAZ-21053–1107010 | traction drive of throttle valves, without drain fitting |
| 1,6 |
| DAAZ-21051–1107010–30 | traction drive of throttle valves, without drain fitting |
| 1,5 |
| DAAZ-21053–110701–62 | semi-automatic air damper drive |
|
|
| DAAZ-21073–1107010 | one accelerator pump nozzle |
|
|
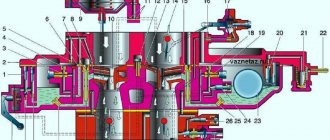
Design and operating principle
A carburetor is an attachment that mixes air with gasoline in the optimal proportion for efficient engine operation.
Carburetor malfunctions make it difficult to start the engine, increase fuel consumption, reduce power and worsen vehicle dynamics.
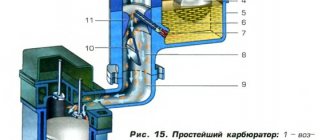
Air and gasoline are mixed in a special chamber. Solex carburetors have two such chambers.
Usually only the first is used, and the second is connected only at high speeds.
The fuel pump delivers fuel to the float chamber through a needle valve.
If there is excess fuel, the floats rise, press the tongue on the needle and stop the flow of gasoline.
Excess fuel is returned to the tank through the return fitting.
The fuel is then mixed with air. To prevent excessive enrichment of the mixture, the fuel flow is slowed down by jets and emulsion tubes.
All these elements - a float with a needle valve, air and fuel nozzles, emulsion tubes and mixing chambers with dampers - form the main metering system.
In the carburetor, air is mixed with gasoline in the optimal proportion for efficient engine operation.
In addition to it, the carburetor includes:
- starting device;
- idle system;
- forced idle economizer (EFH);
- transition systems of mixing chambers;
- accelerator pump;
- power mode economizer (EMR);
- econostat;
- locking mechanism.
Wire screw quantity
The surprise of many car enthusiasts is the wire with a connector protruding from the carburetor.
This wire belongs to the forced idle economizer.
If the engine is standing without load, a signal from the carburetor is sent through this wire, and the EPHH shuts off the fuel supply.
A signal from the carburetor is received through the quantity screw wire and the EPHH stops the supply of gasoline
This system works as follows. When the driver releases the accelerator pedal, the flap blocks the air flow, the control lever returns to its original position and rests against the quantity adjusting screw.
The wire is connected to this screw. Touching the propeller lever is the signal sent to the EPH to stop the fuel supply.
Automatic choke without drive
The principle of this modification is based on the installation of an additional thermostat, which will provide control of the air damper. Many drivers are familiar with such a device as a thermostat, which is used on air filters. This device is designed to open the cold air damper by extending the rod when the temperature of the air flow increases.
To install this auto-suction pump on the carburetor with your own hands, you need to buy a thermostat for 8 and 9 and install it in a 0.5-inch tee. In addition, you will need fittings, a plug, a tee, a lever and a bracket. You don’t have to buy the last two elements, but make them yourself.
On both sides of the tee we screw fittings under the tube, which provides heating to the collector. The third outlet must be plugged, and then a hole must be drilled in the plug. After this, we cut a thread for the thermostat and screw it into the tee. We connect a lever to the resulting structure, which is connected through a cable to the air damper. We also screw the fasteners under the shirt.
When the engine is not warmed up and there is cold fluid in the system, the damper is closed. As the temperature of the antifreeze rises, the thermostat is activated, which moves the lever. The cable tightens and opens the valve. The air intake closes under the action of a spring when the engine cools down.
Replacement procedure
Replacement is carried out in the following order:
- We de-energize the on-board system by removing the negative terminal, which is located on the battery;
- Disconnect the block from the sensor. For a VAZ injector this happens by pressing a plastic latch;
- We unscrew two screws, and it is recommended to first unscrew the left fastener, then the right one;
- Now the regulator has been removed and there is no problem in replacing it with a new one;
- Before installation, it is advisable to spread oil on the sealing ring. See if there are even the slightest cracks on the ring, in which case it needs to be replaced;
- There is also no difficulty in the calibration procedure; the electronic relay will do everything. You just need to turn on the ignition for a few minutes and then turn it off. After this, the speed usually no longer fluctuates, and the car works without failures.
Quick start of a car with carburetor 2108, 21081, 21083 Solex: 2 comments
Thank you! Completely comprehensive advice, with lots of handy links.
There is good useful new stuff for people. Don't advertise it.
I didn’t install it myself; the “eight-piece” carb with the “ten-piece” top was on the purchased car.
For some time I drove without any problems, but one day the idle simply disappeared(((To get home I screwed in the quantity screw (black plastic). As it turned out, there were no good carburetor technicians left in our (small) town(((One looked and said : -HZ, I need to buy a repair kit and flushing, for 800 rubles (at a discount for me, because I cooperate with the service on argon-arc welding) I will sort it out and clean it. I decided to do it myself, watched a bunch of videos by Nail Poroshin (I HIGHLY RECOMMEND IT TO EVERYONE!), theories ICE, I read about the design of the 83rd carb.
According to reviews, Mannol flushing seems to be good. I bought it (285 rubles) and a repair kit (300 rubles). By the way, you need to be more careful with repair kits, because... there may be any marriage there. Membranes are preferably made of red material.
In short, I removed the carb, disassembled it, washed it with Mannol, and blew it out with a compressor. I studied everything carefully, changed the cardboard gasket, the economizer membrane and some other little things (I don’t remember everything). Replaced the solenoid valve (RUR 100). From the mass of articles I read and videos I watched, I realized that the main thing is NOT TO FARM! For example, there is no need to shove two tubes into one (first) chamber or break off the plastic of the EMC. There is no need to sculpt some kind of crap from a dropper instead of a vacuum hose (as was the case on my car). In addition to working with the carb itself, I changed all the hoses suitable for it (gasoline, antifreeze, vacuum). All hoses and clamps cost about 1000 rubles.
My carb is installed normally, through a plate that protects it from overheating. In general, if anyone doesn’t know, you can “Russify” any intake manifold by purchasing an old manifold for the carb, which you want to fit into your foreign car, and contacting an argon specialist. I’ve done this myself at work several times (I’ve attached photos of the work). By the way, you can look at other works on VK in the group: vk.com/nord_88 Subscribe! There are a lot of interesting things there))
During the bulkhead, washing the carb, I also made a “cut Nail” cam No. 4 (20 r.), as it turned out later, it really works great!)) No failures!
Another carburetor technician didn’t really help with the settings, he just checked the spark plugs and said to change them. I bought a set of spark plugs A17 (215 RUR). My wires seem to be normal.
I’ll tell you separately about the auto suction... To be honest, it’s possible with a regular one. The principle of its operation is that antifreeze circulates in a liquid chamber where there is a bimetallic spring, which regulates the suction by expanding and contracting depending on the temperature of the antifreeze. It’s a convenient thing, and it feels almost like an injector))
How did the Solex carburetor come about?
The evolution of carburetors for VAZ cars began with the use of fairly efficient Weber-type devices and continued in the Ozone family, which were the same two-chamber Weber, but with additional measures to improve environmental friendliness.
Especially during start-up and warm-up, as well as overall fuel economy through the use of a slightly leaner working mixture, where exhaust toxicity was simultaneously reduced.
However, with the advent of the promising front-wheel drive VAZ-2108 family, the further use of ozone had to be abandoned. They could not work normally on a transverse engine, and their efficiency reserves were exhausted.
The new carburetors were based on devices from Solex, a well-known French manufacturer that supplies many world brands of cars and motorcycles with its products.
Initially, Solex carburetors were used on 1.1 and 1.3 liter engines of VAZ 21081 and 2108 cars; with the advent of an engine with an increased displacement of up to 1.5 liters, model 21083, a similar device was developed, differing only in calibrations, but giving rise to a whole family of power supplies including cars with a classic layout, as well as all-wheel drive Niva with engines up to 1.7 liters. Similar modifications were used for Muscovites, as well as in the later Volga.
Finishing and tuning of DAAZ 21083
Now about the little things, if they make sense when working with Solex. In order to avoid failures in transient conditions, the diameters of the accelerator pump nozzles are increased. We strongly do not recommend doing this if there are no spare staff, since the result may be exactly the opposite of what was expected, and fuel consumption will increase.
Therefore, as an escape route, the standard accelerator injectors should be kept in a safe place. The diameter of the nozzle nozzle of the primary chamber is increased to a maximum of 45, it is better to leave the secondary one in the drain.
This minimal and simple tuning of the Solex 21083 carburetor can slightly revive the engine of the eight or nine. Filter your gasoline carefully, and good luck on the road!
How to choose a cooling radiator for a VAZ 2110 engine
The car consists of different systems, one of them is the important engine cooling system of the VAZ 2110. If it works normally, drivers don’t even think about it. However, if one part fails, a whole series of problems may subsequently arise. In this situation, you need to figure out which radiator is suitable in order to serve for a long time and reliably.
To begin with, it should be noted that a high-quality radiator will ensure not only efficient operation of the cooling system, but will also last a long time. Radiator malfunctions often occur due to its leakage. This is affected by corrosion and the quality of the materials from which it is made. In order for the radiator to last longer, you need to constantly care for it.
Dust, dirt, poplar fluff, leaves affect the contamination of the radiator, it begins to cope with its responsibilities somewhat worse. As a result, it is better to rinse the unit at the beginning of summer.
All car radiators are divided according to their composition into aluminum and copper.
- The main “advantages” of aluminum devices is their lower weight. VAZ 2110 engine, the price of the radiator is also considered its advantage. Disadvantages include lower thermal conductivity and susceptibility to corrosion.
- The advantages of copper radiators are strength and durability (they are more resistant to corrosion). Copper has higher thermal conductivity and, accordingly, higher efficiency.
After analyzing the facts, each car owner will be able to decide for himself which radiator is best for him to choose.
A little history
A new carburetor was needed when the front-wheel drive VAZ project was being developed. The transverse arrangement of the engine did not make it possible to install the old OZONE carburetor, which was used for the “classic”. But the development of the French company Solex, after a little “finishing with a file,” went off without a hitch. The production of new carburetors began at the Dimitrovgrad Plant (DAAZ), where French equipment was installed and the production process was launched under a Solex license.
The design of Solex carburetors made it possible to install them on engines of different types and power, slightly changing some parameters. So, the most common was the Solex model 21083, which was installed on a 1.5 liter engine. VAZ 2108, 2109. For “classics” with a 1.45-1.6 liter engine. modification 21053 was developed, structurally similar to Solex 21073, designed for the VAZ 21213 Niva with a powerful 1.7 liter engine. And even for Moskvich with a 1.5 liter engine. Solex 21041 was installed, and for 1.8 liters. – modification 21041-10, suitable for both Volga and UAZ.