Adjusting the VAZ 2107 carburetor with your own hands will not take you much time, since the VAZ is designed in such a way that it is easier to carry out repair work yourself.
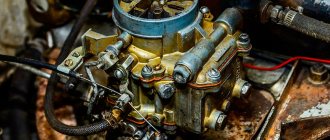
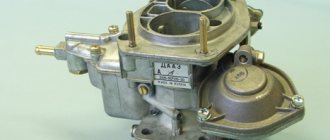
Various types of carburetors were installed on VAZ cars, but since we are talking about 2107, the DAAZ 2107-1107010 unit was installed on them. Signs of malfunction of this carburetor can be determined by pressing the gas pedal with the car running. When you press the pedal, the car will start to stall (while idling it works fine). Before starting work on adjusting the carburetor, we clean it using a special Abro product, which is quite good and not expensive compared to other similar products. Then we proceed to adjust the DAAZ carburetor on the VAZ-2107, repair it slowly, fulfilling all repair requirements strictly according to the instructions. Don’t forget - the rhythm of your car’s engine depends on the quality of your work. We will also adjust the carburetor choke - this will greatly simplify starting the engine in the cold and warming up the engine in the future. Don’t forget about cleaning the carburetor filter, since in our country gasoline is not of particularly good quality, so often the filters quickly become clogged and the car stops working as it should. Let's look at the same nuance as cleaning the carburetor on the road. It will be interesting to read not only about adjusting the carburetor, but also adjusting the valves of the 2107 carburetor.
The main component in a car is the engine. You can safely put the carburetor in second place in importance. The main task of this part is to ensure normal operation of the power unit in a variety of operating modes (during acceleration, at idle, during starting and braking). It is in the carburetor that the air-fuel mixture is prepared, which is subsequently ignited in the combustion chamber.
A small violation in the adjustment of the device can lead to a number of negative consequences - problems with starting the engine, increased fuel consumption, deterioration in dynamics, decreased power, and so on. To prevent such problems, it is important to timely tune and adjust the carburetor.
Main types of DAAZ Carburetors
DAAZ 2107-1107010 - installed on the VAZ 2105, as well as the VAZ 2107.
DAAZ 2107-1107010-20 - installed, as a rule, on new VAZ 2106 VAZ 2103.
DAAZ 2107-1107010-10 – installed on VAZ 2106 or VAZ 2103 engines without a vacuum corrector with an ignition distributor.
At all times, VAZ cars were equipped with a variety of types of carburetors - Ozone, Weber, Solex and others. However, some of them are still popular today. Generally speaking, the types of carburetors are float, bubbler and needle.
In our article we will pay special attention to the “native” carburetor of the VAZ-2107 – “Ozone”. At the same time, I would immediately like to note that these devices come in different series. For example, DAAZ 2107-1107010 was most often installed on “fives” and “sevens”. In turn, the marking of carburetors on “sixes” and “threes” was slightly different - DAAZ 2107-1107010-20 (or a similar type, but with 10 at the end).
Introduction
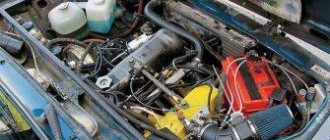
The normal operation of a car engine directly depends on the quality of the fuel-air mixture. On modern cars, the task of properly preparing the mixture is successfully handled by the electronic control unit, collecting information from many sensors. Although the “injector” has practically replaced carburetor engines, there are still many cars on the roads that use this particular method of preparing the mixture.
Such carburetors are installed on VAZ-2107 series cars. Although their production has been discontinued for a long time, they are still very popular among car enthusiasts. This is especially noticeable in rural areas and small towns. The reason is clear: low cost of maintenance, quick repairs, availability of spare parts.
Design Features
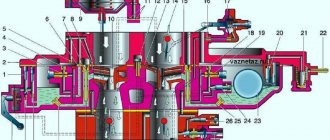
The main parts of the carburetor include the exhaust shut-off valve, the burnt fuel assembly outlet compartment, the transition chamber system, the throttle valve, the dosing system, the econostat, the float chamber, as well as the autonomous exhaust system. Each of these nodes performs its own function. We won’t delve deeply into this issue - the knowledge you’ve already gained will be enough to set it up.
- Float chamber.
- Econostat.
- Autonomous idle system.
- Idle clearance valve.
- Throttle valve.
- Dosing system.
- Transitional system of two chambers.
- Crankcase gas removal department.
Principle of operation
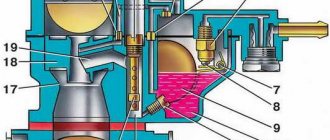
First of all, gasoline is supplied to the chamber, before which it is filtered through a mesh. In this case, the fuel level is regulated by a float, and when the required amount is reached, the valve blocks the access of gasoline. Through the float chamber, gasoline is supplied to the first and second chambers. The air that has previously passed through the air filter also enters there. Air, already mixed with gasoline, is transferred into the chambers through jets, resulting in an emulsion. The mixture passes through the econostat and goes through the sprayers into the diffusers. The resulting finished mixture is sent through the throttle valve to the cylinders. When idling, fuel is taken from only one chamber. The second switches on only when the engine is warm and when power develops.
This is interesting: Video of repairing a trimmer carburetor with your own hands
Setting up the DAAZ carburetor on a VAZ-2107
Please note that the adjustment process will take some time. It is necessary to work slowly and strictly follow the instructions. Please note that the characteristics of your engine and its “gluttony”, and therefore your further costs, depend on the accuracy of the settings. The general operating algorithm is as follows:
— inspect the part for damage and defects;
— clean and rinse all parts from dirt and debris;
— clean the mesh filter;
— wash the float chamber;
— clean the air jets;
— adjust the XX carburetor, trigger mechanism and float system.
Now let's look at each stage in more detail:
- Restoring the mesh filter is performed in the following sequence:
— using a gasoline pump, pump fuel into the carburetor chamber until the shut-off valve closes;
— move the filter “cap” to the side and remove the valve;
— rinse the valve in solvent and dry (you can use a source of compressed air).
Please note that the presence of “dips” during engine operation, decreased power, and “dullness” of the car are often associated precisely with filter contamination.
- Clean the float chamber. For these purposes, use a special rubber bulb. After this, dry the product. Wiping the bottom of the float chambers with ordinary rags is prohibited. Otherwise, pieces of lint may remain at the bottom of the carburetor, which is likely to clog the jets and lead to a number of problems.
- Check the tightness of the locking needle. This can be done using a special pear. Make sure the floats are on top and replace the lid. Press down on the bulb and listen to see if air is leaking anywhere. If there is a leak, the valve body or needle may need to be replaced.
- Adjust the float system. For this:
— check what position the float is in. If it is displaced, then straighten it using a special holder;
— make sure the needle valve is closed;
— open the chamber “hatch” and move the float. Next, lightly pull the “tongue” of the bracket towards you;
— set the required distance between the float and the hatch gasket. The optimal parameter is 6-7 mm. If the measured value does not fall within this range, then adjustment is necessary. In case of immersion, the gap should be no more than one or two millimeters. Otherwise, the needle can be rejected;
- measure the gap that actually appears between the float and the needle. When the valve is open, this value should be 15 mm.
The above checks can be performed without dismantling or with dismantling the carburetor.
- Adjust the starting system. To do this job you must remove the air filter, start the car and pull the choke out about a third of the way. Your task is to achieve 3,200-3,600 rpm. As soon as this parameter is set, release the air damper and set the rotation to about 300 rpm less.
- Adjust idle speed. Tighten the quality screw completely, and then make 2-3 turns to the side in a clockwise direction. Check that the quantity screw is not fully tightened. Next, warm up the engine to operating temperature (the choke should be open). As soon as the engine has warmed up, remove the choke and listen to the operation of the power unit. If the engine starts to stall, then slightly turn out the quantity screw. If the speed is too high, then, on the contrary, screw the screw back in a little.
Your task is to set 900 rpm. By rotating the quality screw, achieve the minimum speed during stable operation (in this case, the speed may increase). After this, use the quantity screw to return to the 900 rpm parameter. If necessary, use the quality regulator again.
Display Guide
So, we figured out where the VAZ module and ignition coil are located and what functions they perform, now let’s talk about setting them up. If the system torque is set incorrectly, this will cause increased gasoline consumption, as well as detonation of the power unit (the “fingers” will start knocking). In general, the operation of the motor will be unstable.
To set up the ignition of a VAZ 2107, you need to perform several steps, all of them are described in detail below:
First, you need to correctly adjust the gap that exists between the interrupter device. To do this, you should dismantle its cover in advance and clean the contact surface. At the same stage, it is necessary to check the connection of the contacts - the elements must come into contact over the entire surface, and not just in certain areas. If the contacts are poorly connected, you should try to bend them slightly
You can also try sharpening the plane a little. Having done this, we move on to an important stage. You need to turn the crankshaft until the contacts open as much as possible
Using a feeler gauge, you need to increase the gap to approximately 0.45 mm. It should be noted that during this, the probe between the contacts should move with low resistance. The crankshaft rotates until the “ignition timing” mark marked on the pulley itself. Having done this, a voltmeter should be connected to the terminal of the interrupting mechanism; if it is not there, a regular test light can be used. We are talking directly about the breaker terminal, which is connected to the coil. Using a 13mm wrench, you need to slightly loosen the nut securing the breaker to the BC. After these steps, you need to turn the key in the lock, but do not start the engine; at the same time, the breaker body must be turned counterclockwise. When you notice that the light has gone out, you need to start turning the housing in a different direction until the light comes on again. If the control light is on, this indicates that the moment of spark transmission through the high-voltage wires has been set. Once the torque has been established, the breaker fixing nut should be tightened until it stops.
As for checking, this is easy to do. When the car is traveling at a speed of 40 km/h, you need to press the gas so that the vehicle quickly gains power. During rapid acceleration, a brief detonation should occur until the car can accelerate to 60 km/h. If this is so, then the moment was set correctly and for some time you can forget about this procedure.
Sorry, there are no surveys available at this time.
Solex carburetor VAZ2107, how to adjust the float system with your own hands
To adjust the float chamber, you must perform the following actions:
- We check the position of the float and pay attention to the shape of the mounting bracket - if it is deformed, it needs to be aligned. This is quite important, since otherwise the float will not sink into the chamber normally.
- We adjust with the needle valve closed. It is necessary to open the float chamber cover and move it to the side. Next, carefully pull the tongue of the bracket. You should ensure that there is a distance of six or seven millimeters between the float and the cover gasket. After immersion, the distance should be approximately one or two millimeters. If it is significantly larger, the needle must be replaced.
- When the needle valve is open, the distance between the float and the needle should be about fifteen millimeters.
It is worth noting that it is not necessary to remove the carburetor from the engine to perform these steps.
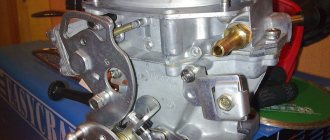
Setting the carburetor choke
How much trouble does incorrect carburetor choke adjustment bring to drivers, especially in winter. In some cars, you pull the choke all the way, but the engine does not hold speed, you have to hold the gas pedal until it warms up. For others, on the contrary, you pull the choke to the end, and the engine screams like crazy, although during warm-up such high engine speeds are unnecessary.
The whole point is that the lever for forced opening of the carburetor throttle valve is incorrectly adjusted when the choke is pulled.
All this is easy to fix; in the photo above the arrow shows the thrust for forced opening of the throttle valve at the moment the choke is pulled out. If the engine does not hold speed, then it is possible that the rod is on the lower hole of the throttle lever; the photo shows two holes for the throttle rod. Move the rod into the upper hole of the lever.
If the engine is spinning very quickly on the choke, then use pliers to slightly bend the rod shown by the arrow; it bends easily without removing it from the carburetor; if the engine speed is low, straighten this rod. In this way, you can easily adjust the desired engine speed when starting on choke.
Setting the choke engine speed in a VAZ 2108 carburetor is even simpler; the photo above shows boot 3; by tightening it, the choke engine speed will increase, and unscrewing it will decrease.
I hope that after reading this article, you can easily adjust the carburetor on your car yourself.
Adjusting the air damper drive
If you don't take care of the drive, the car may stall. To do this, you will need a simple Phillips screwdriver and a 7 mm open-end wrench.
The positions of the damper are shown above with the “suction” extended and recessed.
To adjust the drive, do the following:
- drown the “suction”;
- Unscrew the rod fixing screw with a screwdriver (the spring will push it out vertically)
- Tighten the screw;
- Check the valve stroke.
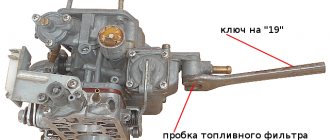
Carburetor filter, how to clean the strainer
By pumping, fill the float chamber with fuel. As a result, the shut-off valve will close, after which it is necessary to move the upper section of the strainer, remove the valve and clean it with a solvent. To get the most optimal result, it is advisable to use compressed air to purge the valve.
When cleaning the bottom of the float chamber, do not use a rag, as this may cause fibers to appear on the bottom, causing the carburetor jets to become clogged. For cleaning, it is advisable to use compressed air or a rubber bulb.
When checking the shut-off needle for leaks, a bulb is also used, since the pressure that appears due to squeezing this object with the hands approximately corresponds to the pressure of the gas pump. When installing the carburetor cover, check whether the floats are set up. Significant pressure will be felt during installation. At this moment, the carburetor needs to be listened to, since air leaks are unacceptable. Even with the most minimal leak, the needle and valve body need to be replaced.
How to clean a carburetor on the road
Sometimes it happens that the main jet in the carburetor gets clogged, if the carburetor in the classic is easy to clean, since the jet is easy to pull out, then in the VAZ 2108-2109 carburetor the jet is deep and can be pulled out for cleaning by removing the carburetor and turning it over. On the road this is of course a very long time.
There is an easy way to clean the VAZ 2108-09 carburetor jet without removing the carburetor, but you only need to remove the top part of the carburetor. In order to remove the jet from the carburetor you will need a toothpick or a finely planed stick.
To get to the jet, you need to remove the air filter pan, unscrew the bolt holding the choke cable (it is shown with an arrow in the photo below), disconnect the fuel hoses and the five bolts holding the top of the carburetor.
Next, unscrew the air jet, use a thin screwdriver to unscrew the main jet, stick a toothpick into it and pull out the jet.
After removing the jet from the carburetor, inspect the jet; there may be a speck in it; blow it out; blow it into the hole from which the jet was removed with a pump; if there is a speck in it, it will fly out into the carburetor's float chamber.
The carburetor float chamber can be drained of gasoline with a rag, then wiped well with the rag, removing debris, or blown out with a pump.
That's it, the main jet is cleaned, you can reassemble everything in the reverse order. This cleaning is easy to do on the road yourself, not to mention at home.
Sign of a clogged jet in the first chamber of the carburetor
The sign of a clogged first chamber of the carburetor is very simple: the engine runs fine at idle, but as soon as you lightly press the gas pedal, the engine stalls.
But there is a very similar sign that indicates a malfunction of the spark plugs or ignition coil; more often this sign appears in damp weather or heavy fog. You're driving a car, the engine starts to twitch, you give it gas and it accelerates, but as soon as you let off the gas the engine stalls, if you give it a little gas the engine doesn't react, if you press it into the floor or pull out the choke the engine starts to drag. It looks very much like the jet in the carburetor is clogged, but it’s not the jet, it’s the spark plugs that are failing. You can check this way: unscrew the spark plugs; if they are covered in dry black soot, then the spark plugs are to blame; if the spark plugs are very old with a lot of deposits, then such spark plugs need to be replaced or calcined on a gas stove.
Why does the VAZ engine stall at low speeds at 90c and not start?
There may be two reasons for this; the carburetor produces a very rich mixture. The rich mixture may be due to the carburetor needle (not holding the level), the float has a leak and has collected gasoline, the float level is incorrectly set, or the jets are incorrectly set to the calibers. While a cold engine needs a richer fuel mixture, which can be provided by an overflow carburetor, a hot engine needs a leaner fuel mixture, which is why the engine stalls when warming up.
The second reason is not related to the carburetor, but this is a sign that the ignition coil (bobbin) is faulty. Due to a malfunction of the ignition coil, a warm engine may also stall at low speeds and not start until it cools down.
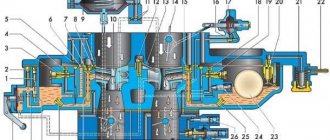
Setting up the PU (starting device)
To begin the stage of setting up the launcher (starter), first prepare a piece of wire with a cross-section of 0.75 ± 0.05 mm and a cardboard (plastic) template 5.0-5.5 mm wide. After this, remove the air filter and clean the outside of the carburetor.
1 — three-arm air damper control lever; 2 - air damper; 3 — thrust of the starting device; 4 - rod; 5 - adjusting screw; 6 — throttle valve of the first chamber; 7 — throttle drive rod
We close the air intake completely, while the end of the rod that connects the air intake lever with the PU rod should be at the end of the groove of this rod. Then we fully retract the PU rod and, using a template or caliper (ruler), control the size of the gap between the chamber wall and the edge of the air intake. It should be 5.0 + 0.5 mm.
Now we adjust the air intake opening gap. The adjustment is made using a special screw, which is closed with a stopper. Therefore, first we unscrew the plug with a slotted screwdriver, and then we correct the opening of the air intake.
Remote control opening control
To perform this operation, you must first remove the carburetor. Then we scroll the 3-arm lever counterclockwise and use a wire to check the gap, the value of which should be within 7.5 ± 0.5 mm. If necessary, carefully bend the rod or move its tip to another hole.
Setting XX
To properly configure the XX, you will need a gas analyzer and a multimeter. Pre-warm the engine. The speed in idle mode should be within 860 ±40 rpm. First we set the lead angle.
- We switch the multimeter to the speed measurement mode and connect one probe to the primary winding of the short circuit (ignition coil), and connect the second to ground.
- We insert the gas analyzer sensor into the exhaust pipe and turn on the device.
- We start the engine and control the speed . If necessary, use the quantity screw to adjust their value to 860 ±40 rpm.
- Using the quality screw, we achieve a carbon dioxide content within 0.85 ± 0.35%. If you do not have a gas analyzer, we monitor this parameter for stable engine operation.
When configured correctly, if you sharply press and release the gas pedal, the engine should smoothly increase and then decrease speed.
Setting up the VZ drive
After dismantling the air filter, take the damper handle with your hands and move it away from you so that the air intake becomes vertical. If it was not possible to install it vertically, proceed to adjustment.
Using a 7mm wrench, hold the bushing and at the same time unscrew the screw securing the damper rod. Under the action of the spring, the air intake should be in a vertical position. Then tighten the screw.
Adjusting the throttle drive
If this drive is incorrectly configured, the car's engine response drops and acceleration dynamics deteriorate. The setup is done with an assistant.
You will need the following tools: a screwdriver, an 8-mm open-end wrench, a flashlight, a ruler or a caliper.
- Turn down the “choke” (air damper drive) completely.
- Have your assistant press the gas pedal all the way to the floor. The throttle valve will open completely, as shown in the picture below, you can shine a flashlight into the first chamber. When you release the pedal, the damper should completely close the first chamber without any gaps. If there are gaps, then proceed to the next step.
- Next, we measure the length of the rod with a caliper; it should be exactly 8 cm. To adjust the length of the rod to the required size, rotate the tips by unscrewing the lock nuts.
After all these operations have been completed, put the rod in place and repeat the check. Nowadays, rods are made of low-quality plastic, which shrinks over time. Therefore, you need to check the operation of the traction after a week or two.
We looked at all the ways to adjust the carburetor yourself. We hope this article helped you, if you have any questions, ask them in the comments and we will definitely answer.
Why do I adjust the carburetor myself?
Self-adjustments save money and time. There are types of work that cannot be done with your own hands without special equipment. But I am capable of servicing a carburetor, which does not have a complex design.
Therefore, I am happy to do this process myself, without outside help. After correct adjustment, there is a feeling of pride and satisfaction for the result obtained. My car runs like a clock, which is nice.
Source ru.megasos.com prosedan.ru vipwash.ru mylada.net make-1.ru