01/26/2022 7,946 VAZ 2106
Author: Ivan Baranov
The quality of operation of the VAZ 2106 engine depends on the condition of the cylinder head gasket. It is a disposable consumable that requires replacement every time the cylinder head is removed. The article describes what function the gasket performs and how to replace it on a VAZ 2106, and also attaches a video demonstrating the replacement procedure.
[Hide]
What is the function of the cylinder head gasket?
The cylinder head gasket is located between the cylinder head and the cylinders and performs several functions:
- seals the place where the head adheres to the cylinder block;
- prevents oil from leaking and coolant from entering the cylinders;
- Restrains internal pressure and heat.
Thus, it separates three systems: gas distribution, cooling and lubrication. Experiencing heavy loads, it wears out quickly.
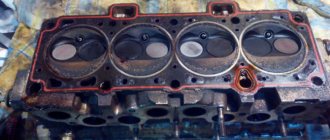
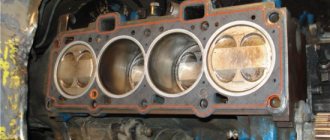
Gasket with traces of breakdowns
The following are signs that may indicate the need for replacement:
- insufficient pressure in one or more cylinders;
- foaming of the coolant, a drop in its level in the absence of an external leak, occurs due to gases entering the cooling system;
- emulsion on the oil dipstick, an increase in the oil level in the pan, the reason for this is the presence of antifreeze in the lubrication system;
- the appearance of oil stains on the surface of the coolant and the radiator neck indicates a broken gasket in the area of the oil channel;
- white smoke in the exhaust gases, while the coolant level drops;
- squeezing out the coolant fluid from the expansion tank in the form of foam indicates a violation of the tightness of one of the cylinders;
- The coolant level drops and the engine boils.
The video describes the signs of gasket burnout.
Damage to the gasket may be caused by:
- low-quality consumables;
- overheating of the power unit;
- improper tightening of cylinder head bolts;
- insufficient coolant level;
- Incorrect installation of the cylinder head.
Installing the cylinder head
Now a few words about installing the cylinder head back onto the block.
Firstly, be sure to change the gasket, because it is installed once. Obviously, you need to first clean the block and the surface of the head from traces of old gaskets. I did this using a special Dutch-made Ombra gasket trace remover, applying this liquid to the entire surface of the cylinder head: As a result, after about 10 minutes of waiting and painstaking work with an ordinary clothes brush, a fairly tangible result is obtained. For comparison, I was going to do the following: I cleaned the first three combustion chambers with different means, from gasoline to WD-40, and the last one with this special tool. You can see the result clearly:
After all this is done, you can start installing the cylinder head back. In order to do this, you will need a special torque wrench, because these bolts need to be tightened with a certain torque in the following order:
- 1st method: moment of force from 33-41 Nm.
- 2nd from ninety 5 to 100 eighteen Nm.
It should also be noted that the following order must be observed:
We install all the removed parts in reverse order and completely assemble the VAZ 2106 engine. This is how you can remove the cylinder head yourself and install it back. I wish you success.
Damage to the cylinder head mating plane
To the formation of defects in the mating surface of the block head
The following reasons may be given:
- long-term operation of the unit;
- motor overheating;
- bad coolant.
Disadvantages of this kind are eliminated by processing the plane, with preparatory dismantling of the head.
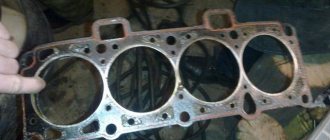
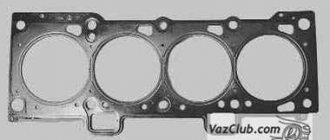
Cylinder head gasket
Head gasket
ensures a tight fit of the cylinder head to the cylinder block. The material for the production of the seal is reinforced asbestos, which is able to withstand the effects of high temperatures that arise during operation of the unit. In addition, reinforced asbestos can withstand high pressure under various engine loads.
Replacement process
If signs of damage to the gasket are detected, it should be replaced immediately.
Set of tools
To carry out the replacement procedure you need to prepare:
- set of wrenches;
- pliers;
- screwdriver;
- torque wrench;
- coolant container;
- clean rags.
A set of necessary tools
The car must be washed before replacement to prevent dirt from getting into the disassembled engine.
Beginning
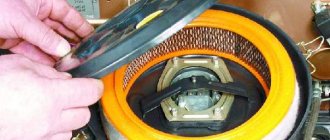
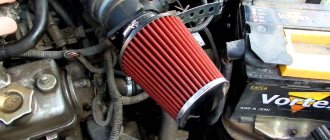
The first step is to disassemble the air filter. Of course, on a carburetor engine it is a little easier to remove. If you have an injector, you will have to tinker with its rubber mounts. But the essence remains the same. you need to completely disassemble the fuel system to get to the cylinder head. But we will not consider injection, but the carburetor is seven. However, there are still many classic cars with this power system.
It is advisable to remove the carburetor because if you remove the head from it, you may accidentally damage it. On all cars of the classic series, the carburetor is removed in the same way. This procedure is quite simple, but will take some time. Now you can unscrew the nut that secures the distributor and remove the distributor along with the wires. Closer to the engine it remains small. drain the antifreeze from the system.
And then disconnect all the pipes that you see. After this, you can remove the cylinder head cover. It is secured with nuts and washers. Don't lose them during repairs. That's all, the preparation is complete, the hardest part can begin. disassembling and installing the block head.
READ Replacement Intermediate Shaft Bearing Kia Spectra
Stages
The procedure for replacing the cylinder head gasket on a VAZ 2106 consists of the following steps:
- Disconnect the car from power by disconnecting the negative terminal from the battery.
- Drain the coolant into a prepared container.
- Remove the air filter, valve cover, air damper control drive.
- At the next stage, it is necessary to align the timing marks on the camshaft and crankshaft so that you do not have to set the valve timing again during assembly.
- Next, you need to dismantle the carburetor and ignition distributor with high-voltage wires.
- After unscrewing the tensioner cap nut, you should loosen the tension on the timing chain.
- Having loosened the fastening of the gear, it is necessary to dismantle it.
We remove the camshaft sprocket.
The chain should be tied with wire so that it does not accidentally fall into the engine. - Next you need to remove the bearing housing along with the camshaft.
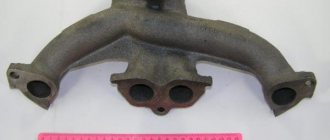
- The next step is to disconnect the exhaust manifold from the cylinder head and all pipes.
- After loosening the clamps, you need to remove the radiator inlet pipe and the thermostat bypass hose.
- Next, you need to unscrew the cylinder head mounting bolt located next to the ignition distributor.
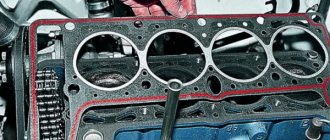
- Then you need to unscrew the ten mounting bolts of the cylinder head and dismantle the unit along with the unscrewed bolts.
- Next you need to remove the old gasket.
- Before installing a new consumable, it is necessary to thoroughly clean the adjacent surfaces from dirt and remnants of the old gasket.
- Having degreased the contacting surfaces, you need to install a new consumable.
Installing a new consumable - The cylinder head mounting bolts should be tightened using a torque wrench with the tightening torque specified in the VAZ 2106 operating instructions.
- Next, we reassemble in reverse order. At the same time, we control the coincidence of the marks and adjust the belt tension. The valves should also be adjusted.
- After final assembly, you need to check the operation of the engine.
This completes the replacement of the gasket on the VAZ 2106.
There is nothing complicated in the procedure; a car enthusiast can do it independently, even with little experience in repair work. This way you can save on car service costs.
Head milling
There are several cylinder head malfunctions that you cannot fix on your own. When the engine overheats systematically, the aluminum cylinder head becomes deformed. The perfectly flat surface of contact between the head and the engine block ceases to be so.
This leads to the gasket between the block and the head starting to leak. Replacing it with a new one does not solve the problem. In this case, grinding the adjacent surface may be the solution. Milling is performed on a special machine, which allows the work to be completed with perfect precision.
In the conditions of your garage, it is unlikely to carry out such a procedure yourself. Using a hand sander (as some garage “kulibins” advise) for this purpose means completely ruining the adjacent surface. In this case, repairing the cylinder head will lead to a complete replacement of the head - it is impossible to grind it indefinitely.
If overheated, the housing may also rupture in the form of cracks. They are not always visible to the eye, but their presence greatly affects the proper operation of the engine. If cracks have formed in the areas where the head and block meet, or in the valve seats, you will have no choice but to replace the block head with a new one. All other areas can be restored using argon welding. It is impossible to do such a cylinder head repair yourself due to the lack of specialized equipment - not all service stations have such welding.
As you can see, not everything can be repaired on your own. By correctly assessing the scope of work, you will nevertheless be able to save money on your budget.
Is it possible to increase the power of a VAZ 2107 engine by installing a different camshaft?
Probably, every owner of the “Seven” wants the engine of his car to work not only without interruptions, but also with maximum efficiency. Therefore, some craftsmen are trying to tune power units using various methods. One of these methods is to install a different, more “advanced” camshaft.
The essence of tuning
Theoretically, it is possible to increase the power performance of a power unit by increasing the phase width and lift height of the intake valve. The first indicator determines the period of time during which the intake valve will be open, and is expressed in the angle of rotation of the timing shaft. For the “seven” it is 232o. The lift height of the intake valve determines the area of the hole through which the fuel-air mixture will be supplied to the combustion chamber. For VAZ 2107 it is 9.5 mm. Thus, again, in theory, as these indicators increase, we get a larger volume of combustible mixture in the cylinders, which can really have a positive effect on the power of the power unit.
The phase width and lift height of the intake valve can be increased by changing the configuration of the corresponding cams of the gas distribution shaft. Since such work cannot be done in a garage, for such tuning it is better to use a finished part from another car.
Camshaft from Niva
There is only one car whose camshaft is suitable for the “seven”. This is a VAZ 21213 Niva. Its timing shaft has a phase width of 283°, and the intake valve lift is 10.7 mm. Will installing such a part on a VAZ 2107 engine give anything in reality? Practice shows that yes, there is a slight improvement in the operation of the power unit. The power increase is approximately 2 liters. s., but only at low revs. Yes, the “seven” responds a little sharper to pressing the accelerator pedal at the start, but once it gains speed, its power becomes the same.
Sports camshafts
In addition to the timing shaft from Niva, the VAZ 2107 can also be equipped with one of the shafts made specifically for “sports” tuning of power units. Such parts are produced by a number of domestic enterprises. Their cost ranges from 4,000–10,000 rubles. Let's look at the characteristics of such camshafts.
Table: main characteristics of “sports” timing shafts for VAZ 2101–2107
| Name | Phase width, 0 | Valve lift height, mm |
| "Estonian" | 256 | 10,5 |
| "Estonian +" | 289 | 11,2 |
| "Estonian-M" | 256 | 11,33 |
| Shrik-1 | 296 | 11,8 |
| "Shrik-3" | 304 | 12,1 |
Description of the cylinder head of the VAZ 2106
The cylinder head (cylinder head) is an integral part of any internal combustion power unit. This mechanism controls the supply of the combustible mixture to the cylinders and the removal of exhaust gases from them. The unit has inherent faults, the detection and elimination of which are worth dwelling on in more detail.
Purpose and principle of operation
The main purpose of the cylinder head is to ensure the tightness of the cylinder block, that is, to create sufficient obstacles for gases to escape outside. In addition, the block head solves a whole range of tasks that ensure the functioning of the engine:
- forms closed combustion chambers;
- participates in the work of the State Russian Museum;
- is used in the engine lubrication and cooling system. For this purpose, the head has corresponding channels;
- participates in the operation of the ignition system, since spark plugs are located in the cylinder head.
For all of the above systems, the cylinder head is a housing element that ensures the rigidity and integrity of the power unit structure. If a malfunction occurs with the cylinder head, normal engine operation is disrupted. Depending on the nature of the breakdown, there may be problems with both the ignition, lubrication and cooling systems, which require prompt repair.
The principle of operation of the cylinder head comes down to the following steps:
- The camshaft is driven from the engine crankshaft through a timing chain and sprocket.
- The camshaft cams act on the rockers at the right moment, opening and closing the cylinder head valves at the right moment, filling the cylinders with the working mixture through the intake manifold and releasing exhaust gases through the exhaust.
- The valves operate in a certain sequence, depending on the position of the piston (intake, compression, stroke, exhaust).
- The coordinated operation of the chain drive is ensured by a tension device and a damper.
What does it consist of?
The cylinder head of the “six” is 8-valve and consists of the following structural parts:
- head gasket;
- timing mechanism;
- cylinder head housing;
- chain drive;
- the combustion chamber;
- tension device;
- spark plug holes;
- planes for mounting intake and exhaust manifolds.
The node in question is common to four cylinders. Cast iron seats and valve bushings are installed in the body. The working edges of the seats are processed after they are installed in the body to ensure a clear fit of the valves. The holes in the bushings are also processed after pressing into the cylinder head. This is necessary so that the diameter of the holes in relation to the working planes of the seats is accurate. The bushings have spiral grooves to lubricate the valve stem. On top of the bushings are valve seals, which are made of special rubber and a steel ring. The collars fit tightly onto the valve stem and prevent lubricant from entering the combustion chamber through the gaps between the bushing wall and the valve stem. Each valve is equipped with two cylindrical springs, which are supported by special washers. On top of the springs there is a plate that holds two crackers on the valve stem, shaped like a truncated cone.
Cylinder head gasket
The head gasket ensures a tight fit of the cylinder head to the cylinder block. The material used to make the seal is reinforced asbestos, which is able to withstand the high temperatures that arise during operation of the power unit. In addition, reinforced asbestos can withstand high pressure under different engine loads.
Timing mechanism
The gas distribution device consists of a valve mechanism and a chain drive. The first of them is responsible for the operation of the valves and consists of direct intake and exhaust elements, springs, levers, seals, bushings and a camshaft. The design of the second includes a double-row chain, a sprocket, a damper, a tension device and a shoe.
Cylinder head housing
The cylinder head is made of aluminum alloys and is fixed to the cylinder block through a gasket using ten bolts, which are tightened in a certain order and with a given force. The cylinder head has spark plug wells on the left side into which the spark plugs are screwed. On the right side of the body there are channels and planes, to which the intake and exhaust system manifolds are attached through a seal. The head is closed on top with a valve cover, which prevents oil from leaking out of the engine. The tensioner and timing gear drive are mounted at the front.
Typical breakdowns
The “Five” can notify its owner of problems with the steering not only by loss of controllability and the appearance of noticeable play, but also by knocking noises that appear when turning the steering wheel or crossing uneven surfaces. Most often, the steering column of the VAZ 2105 knocks, namely one of the worn-out crosspieces. Previously, there were smart people who pressed out the crosspiece and made repairs to it. Today the best solution is to completely replace the steering shaft, along with the cardan. It’s more reliable, faster and smarter. Replacement takes very little time, you literally need to unscrew two bolts. There is no need to worry when purchasing, because the shaft dimensions of the entire “classic” family are the same.
If knocking occurs in several places, then it is best to change the entire control, including the steering gear. Moreover, today they offer better quality spare parts than they cost initially. For example, the new VAZ gearbox has a more convenient system for changing the oil and disconnecting the bipod; there will be much fewer problems with it in the future than with the old one.
If damage to the boots or gaps is detected, the tips must be replaced. To replace them you will also need a special puller. Some owners of the “classic” once every few years redo the steering and measure the wear of the pins and other parts with a caliper. This gives you confidence that the car will not let you down on a long trip.
More serious damage is deformation of levers and rods. They happen when hitting an obstacle, a curb, or a speed bump at high speed. Sometimes it is very difficult to determine whether the tie rod needs to be replaced or not. Deformations are often difficult to see, so you also have to resort to measuring tools. Again, repairs come down to simply replacing deformed or worn parts. There is no point in trying to straighten or restore them.
If, when turning, the control does not knock, but crunches, it means that one of the bearings has crumbled. It can be located either inside the steering column or in the gearbox. In both cases, replacement is a rather complicated operation; disassembly requires incredible effort. The gearbox, of course, should be replaced entirely, but it is better to entrust the repair of the column to a workshop. It is worth remembering that after the steering has been repaired, it is necessary to adjust the camber and toe of the wheels.
Purpose of sleeves
The main task of the valves is to supply the combustion chamber with a fuel-air mixture and remove exhaust gases from it. Each engine cylinder has two valves - intake and exhaust. A rod moves in the guide bushing, which lets in/out exhaust gases and the fuel mixture. The combustion chamber is sealed due to the precise “fitting” of the head on the seat.
The quality of engine valve operation depends on the guide bushings and seats. During operation, they wear out and cannot maintain high engine performance. In such a situation, they will have to be changed.