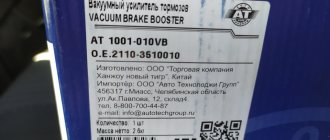
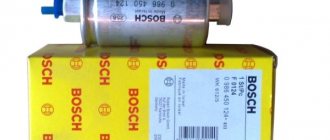
Good day! Today we will talk about the next redesign of the Priors. 4 years after buying the car, I finally got around to the rear brakes. I spent a long time studying the information on which supports to collect this pornography on. I didn’t want to use Taz calipers (I had experience with a previous car), I was looking for an option with a cable handbrake. I went through a bunch of information and settled on Solaris/Rio calipers. The reasons why I did this: - quite reliable (I haven’t heard anything bad about them) - cable handbrake - it’s not a problem to find a drawing for the adapter plate - not expensive (I took it for 3500 rubles from a car with a mileage of 5 thousand km)
We’ve finished the preface and let’s actually move on to the implementation of our plans!
1. We start by finding a drawing of an adapter plate for a Rio/Solaris caliper online, transferring it to the compass and sending it to production to make, fortunately we have a lot of them. Here are a couple of drawings that I managed to find:
From this drawing I took the dimensions of the caliper bushing and the handbrake cable bushing, but the handbrake cable bushing had to be adjusted, as it did not fit in the drawing, I had to shorten it by half.
From this drawing I took the dimensions of the caliper bushing and the handbrake cable bushing">
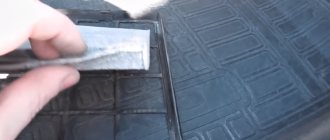
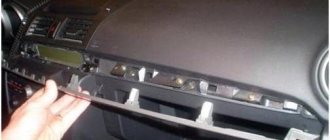
2. When we receive our spacers, we begin to disassemble our old, non-working drum brakes and it’s better to immediately throw everything that relates to them into the trash (that’s what I did).
The most popular car among beginners and experienced drivers is the VAZ-2109. Over time, the realization comes that the car is not ideal and, first of all, there is a desire to change drum brakes to disc counterparts, since they have many advantages.
Benefits of rear disc brakes
Rear disc brakes on the VAZ-2109 are in demand in the automotive spare parts market for a number of obvious reasons:
- with them the braking distance of the car is significantly reduced;
- ZDTs greatly simplify pad maintenance;
- the reliability of the brakes is greatly increased, which improves the safety indicator;
- Braking power is applied evenly across all wheels;
- due to the special method of thermal dissipation, overheating of the heat exchanger is eliminated;
- unsprung mass is reduced;
- in the winter season you don’t have to deal with such a problem as frozen brakes after washing;
- From an aesthetic point of view, the wheels look better.
Disadvantages of TRT
Naturally, where there are advantages, there are always several disadvantages:
- First of all, it is worth noting the price, which is significantly higher than that of drum brakes.
- The need for high-quality adjustment, which may cause a call to the service center.
- Poor-quality installation leads to the fact that the safety of the car is reduced - the car skids.
- In the case of the VAZ-2109, like any other VAZ model, the installation of an anti-aircraft protection device is not a certified event and may result in a fine from the traffic police.
- If you get into an accident, most likely, the expert will find you at fault, since the improvements to your car will be illegal.
- The lack of high-quality tuning can lead to the fact that the rear wheels can brake much better than the front wheels, which is fraught with serious consequences and emergency situations.
In other words, self-installation of the HCD on the VAZ-2109 is recommended only if you are confident in your capabilities. Otherwise, it is recommended to contact a service center. Despite the fact that the safety of your car with such tuning will increase, you may encounter problems with the traffic police, since such improvements are not legal.
Necessary materials
If you decide to install the HTD yourself, then you will need the following materials:
- Directly disc brakes, machined under the hub by 0.6 cm. The diameter of the disk should be 24 cm. Please note that it is not necessary to grind the disk itself. If you want to leave it unchanged, then you need to groove the hub.
- Front calipers and hoses.
- Faceplates necessary for attaching calipers. You will have to tinker with this part, since it is quite unusual and requires separate manufacturing to the exact dimensions.
- High quality pads that fit true to size.
- 12 bolts M10 × 1.25 with groovers.
- 8 spacers. You can use timing belt tensioner roller washers for the VAZ-2108.
When you have acquired all the necessary materials, it’s time to proceed directly to the replacement. The procedure is performed in several stages.
Stage 1. Removal of the PTA
First of all, you need to remove the wheel. After this, you need to loosen the handbrake cable and bring the pads together. The guide pins are unscrewed using a 12mm wrench.
If the car is old or the brakes have not been changed for a long time, it is recommended to treat the seats with a wire brush, and also lubricate all running surfaces with WD40. This will help you remove the brake drum without much effort.
Please note that even if the drum is tight, you need to remove it gradually, gently tapping it with a hammer along the entire circumference. If you do not want to damage the part, then use a hammer with a rubber tip or a rubber gasket.
Next, remove the tension spring and guides by prying them off with a screwdriver. After this, the brake pad needs to be lifted up, the spacer bar removed and the pad and tension spring removed.
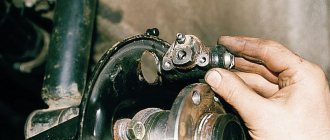
To remove the second block, you need to remove the handbrake lever from the cable. The bolts that secure the hub to the beam should be treated with WD 40 and unscrewed with a split or regular 17 wrench.
At the last stage, the brake tube of the hub is dismantled. After this, you can begin installing the HCD.
Dismantling
Before installing disc brakes, you need to dismantle the old rear brake mechanisms of the VAZ 2110.
- Remove the wheel;
- Remove the brake drum;
- Remove the pads;
- Remove the hub from the wheel, having first unscrewed the brake pipe.
You should prepare for the fact that dismantling will not be easy. Not only do the brakes have the unpleasant tendency to stick during operation, but the bolts are also “welded” by corrosion. Therefore, it is advisable to treat the nuts and bolts themselves with a special agent (for example WD 40) so as not to tear off their edges.
It is important to plug the removed pipe with something so that brake fluid does not leak out and air is not sucked into the system. After that, knock down the hub. This works best if you attach a board or lath to the back of the support disk and hit it with a hammer, moving the blows: one from below, the other from above. This will prevent you from causing serious damage to the disk.
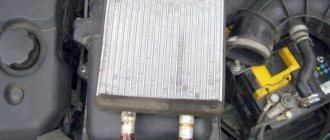
Stage 2. Installation of the HCD
First, the caliper is mounted. It can be placed in relation to the axis in front or behind, but the second option is recommended as the most symmetrical.
Next, you should dock the hub with the faceplate so that the holes completely coincide. If inaccuracies are observed, you can correct this deficiency using a hammer.
A hammer is also used to straighten the corners of the beam, on which the caliper will rest in the future. Please note that there is no need to place the engraver under the upper left bolt, since the caliper bracket will rest against it. But, again, you have a choice - you can refuse the engraver or grind off its head using a grinder.
The brake is mounted on the hub and secured with a faceplate. The necessary gaps are made using washers. Tightening must be done with a force of 3-4 Nm.
Next, the block is installed, the hose is connected to the caliper, and only after that the tube is connected to the hose.
The line needs to be sealed and checked - this is very important. If you are sure that the HCDs are installed efficiently, you can proceed with mounting on the second wheel.
Need a handbrake?
But some motorists cannot do without a handbrake. And the new VAZ-2114, the price of which at one time was close to 300 thousand, does not have a handbrake, and this is not very convenient. In cities, parking lots are simply impossible without it. And if an autostart system is installed, then you simply cannot do without a handbrake - it is not recommended to set it to speed.
What is needed to install this mechanism? First of all, this is the handbrake itself, but not a cable one, but with a hydraulic cylinder. As a rule, they are universal, and new Chinese mechanisms cost from 1,500 rubles and more. And the rear disc brakes on the VAZ 2114 will be equipped with a handbrake system.
The installation procedure is extremely simple - put it in place of the old one, fasten it with bolts, connect it to the hydraulic system, namely to the part that controls the calipers on the rear axle. That's all, from now on you will have a handbrake that will work perfectly in any conditions. Neither overheating, nor frost, nor torrential rain is scary. And even in cold weather you can use the handbrake.
pros
Let's look at why disc brakes are better than drum brakes:
- Braking becomes more reliable, braking distance is reduced;
- Braking forces are distributed more evenly, given that the VAZ 2110 is a front-wheel drive car;
- There is an effect of faster response after pressing the pedal;
- Unsprung masses are reduced;
- Heat dissipation occurs better, which is especially important when driving on a mountain road or during active acceleration/braking. For this reason, the brake system is cooled better;
- Disk ones are much easier to dismantle and replace;
- There is no need to adjust the handbrake after each repair of the rear brakes, although this will have to be done the first time;
- They do not freeze in winter after washing, like drum ones;
- Rear disc brakes installed on the VAZ 2110 are much more convenient to control and promptly notice pad wear.
Stories from our readers
“Fucking basin. "
Hi all! My name is Mikhail, now I’ll tell you a story about how I managed to exchange my two-wheeler for a 2010 Camry. It all started with the fact that I began to be wildly irritated by the breakdowns of the two-wheeler, it seemed like nothing serious was broken, but damn it, there were so many little things that really started to irritate me. This is where the idea arose that it was time to change the car to a foreign car. The choice fell on the melting Camry of the tenth years.
Yes, I had matured morally, but financially I just couldn’t handle it. I’ll say right away that I am against loans and taking a car, especially not a new one, on credit is unreasonable. My salary is 24k a month, so collecting 600-700 thousand is almost impossible for me. I started looking for different ways to make money on the Internet. You can’t imagine how many scams there are, what I haven’t tried: sports betting, network marketing, and even the volcano casino, where I successfully lost about 10 thousand ((The only direction in which it seemed to me that I could make money was currency trading on the stock exchange, they call it Forex. But when I started delving into it, I realized that it was very difficult for me. I continued to dig further and came across binary options. The essence is the same as in Forex, but it’s much easier to understand. I started reading forums, studying trading strategies. I tried it on a demo account, then opened a real account. To be honest, I didn’t manage to start earning money right away, until I understood all the mechanics of options, I lost about 3,000 rubles, but as it turned out, it was a precious experience. Now I earn 5-7 thousand rubles a day. I managed to get the car buy after half a year, but in my opinion this is a good result, and it’s not about the car, my life has changed, I naturally quit my job, I have more free time for myself and my family. You’ll laugh, but I work directly on the phone)) If If you want to change your life like me, then here’s what I advise you to do right now: 1. Register on the site 2. Practice on a Demo account (it’s free). 3. As soon as you get something on the Demo account, top up your REAL ACCOUNT and go to REAL MONEY! I also advise you to download the application to your phone, it’s much more convenient to work from your phone. Download here.
- Reducing braking distance.
- Uniformity of braking forces.
- Reducing the response time of brake mechanisms.
- Reduced unsprung masses
- Improved heat dissipation (important during active driving, at higher speeds and on mountain roads)
- Reliability
- Easy to maintain and replace pads
- No need to tighten the handbrake regularly
- Appearance.
- In winter, after washing, drum brakes freeze, but there are no such problems with disc brakes.
Problems after replacing drum brakes with disc brakes
Do-it-yourself installation of rear disc brakes on a VAZ 2110
The main advantage of installing disc brakes yourself is cost savings. The savings are very large, about 10 thousand rubles. I will say right away that I am not a supporter of this method and believe that if you decide to install rear disc brakes, then it is better to install devices that have a certificate from the autonomous non-profit organization “Center for Assistance in Certification of Automobiles and Motorcycles” at NAMI. Rear brakes M5 13″ disc brakes (certified) and install this whole thing at large dealers at service stations, who also provide certificates stating that your VAZ 2110 rear disc brakes are adjusted in accordance with all standards. And this does not mean that your papers will provide you with a trouble-free MOT.