Today we will talk about replacing the cabin filter on a Mazda 3 car and the specifics of performing this work.
Nowadays, not a single modern car can do without such an element in the cabin ventilation system as a cabin filter.
This, on the one hand, is good, but on the other hand, another part related to consumables has appeared in the design of the car.
This cleaning element needs to be changed periodically, because over time it becomes clogged with dust and stops purifying the air.
At the same time, unpleasant odors appear in the cabin, dust constantly floats in the air, and the ventilation system itself does not provide proper air supply.
Why is a cabin filter needed in a car?
Cabin filters act as air purifiers. Thus, the cabin filter prevents the entry of all kinds of impurities and makes the air in the car cleaner, thereby ensuring the safety of the driver’s health. The filter is installed in the body of the heating device.
Typically, special paper is used to make the cabin air filter element. This phenolic polymer impregnated paper contains an electrostatic charge. This technology is used by all leading manufacturers of filter elements.
When a cabin filter is used in a car, it leads to the disappearance of unpleasant odors, which improves overall comfort. Effective air purification is especially important for those motorists and passengers who are susceptible to respiratory diseases, suffer from allergies to pollen, dust, soot and other pollutants.
According to the statistics of car accidents, quite a lot of accidents occur with the participation of allergy sufferers, and if you neglect to replace or install the cabin filter, you can unintentionally put at stake not only your life, but also the lives of your loved ones and people around you.
If the car is operated in conditions with a high dust content in the air, then the service life of the cabin filter installed in such a car is halved.
The cabin filter helps improve visibility in the car. It is thanks to this device that plaque does not form on the glass, leading to reflections.
Cabin filters are the best car protectors from street dirt and any dust, including plant pollen.
When to change an element
The cabin filter (including Mazda 3 1.6) is a consumable and requires routine replacement. The instructions stipulate its replacement every 10 thousand km. However, this should be done earlier if the car is operated in a modern metropolis or in another area with a lot of dust. Over time, the filter wears out and its capacity decreases. The following signs may serve as indications for replacing the interior element:
- Air is blowing weakly from the ventilation nozzles.
- The appearance of foreign irreducible odors.
- Windows that fog up in cool weather.
Instructions for replacing the cabin filter on a Mazda 3
Replacing the cabin filter with your own hands will take a significant amount of time, so it is worth preparing all the tools in advance and warming up the cabin in cold weather - since you will have to dismantle the plastic parts on the pistons and latches; frozen plastic may burst when bent.
On cars produced at least before 2011 (but in most cases – on the entire first and second generation), before starting work, you need to disconnect the battery terminal for safety: along with the Ford C1 platform, the car also received an extremely inconvenient location of the main fuse box. For easy access to the cabin filter compartment, you will have to remove the entire fuse box, simultaneously disconnecting several more connectors in the electrical wiring.
Then you need to remove the plastic panel that runs from the glove compartment to the center console. It is held in place by tight latches, and you need to remove it carefully: the part is in plain sight. The screws holding the glove compartment are hidden under the decorative panel; they can be unscrewed with a Phillips screwdriver. Having pulled the glove compartment towards you, you need to unscrew the screw holding the backlight and remove it from its socket, after which the glove compartment will be completely released.
Next you need to remove the console trim in the area of the left leg. Use a thin screwdriver to pry up the central part of the piston, after which it can be pulled out, freeing the panel. Two clips are released under it, and the plastic part is completely removed.
Remove the two screws that secure the fuse box. Carefully lowering it, disconnect the connectors and remove the block to free access to the stove body. From the cabin filter cover, which can already be seen, the fan speed control unit is removed, then the screws of the cover itself are unscrewed, and it is removed from the work area.
Alternately pulling out the upper and lower filters, vacuum the stove body as far as the narrow nozzle allows, then insert new ones in the reverse order. Further assembly is also carried out in the reverse order until the installation of the decorative trim.
On third-generation cars, the work is simpler - you only need to remove the panels under the glove compartment and at the foot, after which the fan speed control unit is dismantled and the cabin filter cover is removed.
Video of replacing the cabin filter on Mazda 3
Preparatory work
First, you need to remove the negative terminal from the battery by turning off the power to the car. Afterwards, work begins in the salon. First you need to remove the glove box. To do this, remove the decorative panel from above. It is held on by latches. To release them, you need to pull it to the left and then towards you. The panel is held on by clips that must be removed sequentially. It is better to put all removed parts in a separate place to avoid damage.
The glove box body is held on top by two bolts or screws, depending on the version. After this, the glove box can be removed by pulling it towards you and slightly rocking it from side to side. Having pulled out the housing, you need to unscrew the backlight plug.
Where is the Mazda 3 cabin filter located?
To replace the filter you do not need to go under the hood; it is located in the cabin under the front panel. To get to the location, you will need to remove several panel elements. This can be done with a screwdriver and a pair of keys. The work does not require physical strength, the main thing is to do everything accurately and carefully so as not to damage plastic and plastic components.
If you decide to change this consumable, then during repairs all parts should be removed without strong physical impact. If the cover or fuse block is stuck, you may have forgotten to remove the retaining clips or unscrew the bolt.
: Remove the fuse box
Pull the fuse cover down.
If you pull from the front edge, it won't take much force.
Remove this sidebar. It is held in place by one plastic clip.
Another surprise. Surprisingly, only one rivet holds the panel in place. Looks like there should be more fasteners...
Now it's time to disconnect the fuse box, nothing complicated.
Unscrew these two screws. Turn the fuse block down. Proceed to disconnect the connectors.
At this stage, I wondered what the developers were thinking when they recommended removing the fuse box every 30 thousand kilometers traveled. After all, it is precisely with this frequency that the cabin filter on a Mazda 3 car should be replaced (in Russian conditions this can be done much more often).
Removing the fuse box is fairly easy. You just need to understand how to disconnect the connectors. They resemble those used in computer processors. You just need to turn the plastic lever, which will release the connector. Unfortunately, it was not possible to take a corresponding photo, but they are not difficult to find on the Internet.
Connectors are disabled.
The work is not finished yet, because to replace the Mazda 3 cabin filter, you need to do something else.
What is a cabin filter
This device consists of synthetic fibers with antibacterial impregnation, the purpose of which is to purify dirty air taken from outside before being supplied to the car interior. Thanks to this device, being in the car becomes much more pleasant.
It reduces the amount of substances that negatively affect human health, such as nitric oxide, carbon monoxide, aromatic hydrocarbons and other impurities.
Currently, the Mazda 3 uses single-layer and multi-layer filters:
- Single-layer - considered the simplest element of air filtration: it contains dense fabric. The advantage of using such devices is their low price, while the disadvantages include unsatisfactory air purification.
- Multilayer - consist of elements with activated carbon between them. The use of carbon cloth together with a microfiber cloth makes it possible to achieve high-quality air purification. Negative qualities include low flow capacity, which increases pressure on the ventilation system.
Functions
The Mazda 3 cabin filter cleans the air that enters the cabin through the heating, ventilation or air conditioning system. The filter consumable filters out pollen and other impurities that are harmful to people with breathing problems or those with allergies. If the element is made of coal, then unpleasant odors will be additionally neutralized.
How often to change
When it is necessary to change the cleaning device, you must refer to the owner's manual for machine maintenance. This is where you can find recommended deadlines. But according to statistics, the element is changed every 20-25 thousand km. If the car owner drives most of the time where the air is of very low quality, with a high content of dust and impurities, replacement should occur annually. The same must be done by drivers whose cars travel in deserts or places with high concentrations of dust.
Signs of wear
A decrease in air flow through the HVAC vents is a signal that the element requires replacement. Another sign of failure is the presence of an unpleasant odor in the interior or foggy windows. Even if this is not observed, the element still needs to be checked at least once every 12 months.
Determining signs for replacing the Mazda 3 cabin filter:
- unpleasant odor;
- increased humidity that appears when water gets on the filter.
If a climate-controlled vehicle has been operated for a long period of time with a clogged component, you will have to leave a significant amount of money at the service station. Poor performance of the air purification system leads to icing of the evaporator radiator. The dirt that gets in will promote the development of bacteria, which will lead to a disgusting smell. Replacing the filter will not solve this problem. Dust particles and dirt that the material missed will get into the furnace or air conditioner, so you will need to remove the evaporator and clean it yourself.
When to replace: signs of wear
The main function of the cabin filter is to clean the air in the cabin while the car is moving. The device filters the air, eliminates unpleasant odors and harmful substances that could get inside from the street. It is especially important to change the cabin filter on time for motorists who live in large cities with heavy traffic.
Over time, the filter becomes dirty and can no longer fully perform its function. The main signs of wear are:
- deterioration of air circulation in the cabin;
- reduced throughput;
- feeling of increased humidity (windows fog up);
- unpleasant odors do not disappear over time.
Over time, the cabin filter wears out and becomes unsuitable for use.
The manufacturer in the technical documentation indicates the need to replace the filter after 10 thousand km or if more than six months have passed since the date of the previous repair. If the filter element is dirty, foreign odors will enter the cabin, and high humidity promotes the development of fungi and other harmful microflora.
Advice: If you often drive your car on a dusty, dirty road, it is better to replace it after 3-4 months.
Choosing a cabin filter for Mazda 3
| Catalog article / search index | Cost, rub.) |
| Original paper BBP2-61-J6X | From 2000 (set) |
| BK: (10.2003 - 12.2009)BL: (12.2008 - present) BM: (09.2013 - present) sedan BK: (09.1999 - 06.2009) sedan BL: (12.2008 - present) sedan BM: (09.2013 - present) (length 250 x width 102 mm) | |
| NF-63742 | From 1500 - 1600 |
| Filtron K1252-2X | —/— |
| Bosch 198745698 | —/— |
| Delphi TSP 03 25442 | —/— |
| Fram CF12584-2 | —/— |
| COMLINE EKF188 | —/— |
| PURFLUX AHC208 | —/— |
| BLUE PRINT ADM52520 | —/— |
| BLUE PRINT ADM52503 | —/— |
| KNECHT LAK 158 / LA 158 | —/— |
| BOSCH 1 987 432392 (carbon) | From 1700 |
| HENGST FILTER E3928LI-2 | —/— |
| MANN-FILTER CU 26 008-2 | —/— |
| JAPKO 21MA8 | —/— |
| SAKURA Automotive CAC-17150 | —/— |
| PATRON PF2220 (carbon) | —/— |
| JS ASAKASHI AC0157SET | —/— |
| COMLINE EKF336-2 | |
| PURFLUX AH292 (carbon) | |
| BLUE PRINT ADM52522 (charcoal) |
Replacement procedure - sequence of actions
Replacing the filter element on Mazda cars, including the Mazda 6, should be done in the following sequence:
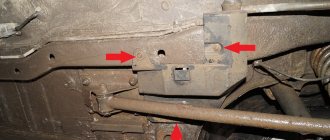
We remove the glove compartment - remove all the contents from it, after which we proceed directly to dismantling. Move it to the left and pull out the decorative panel hiding the fasteners. The clips are released and the panel gradually moves away. We move the L-shaped clamp to the extreme right state and begin to work on the two fastening bolts - unscrew them and gain access to the internal contents; We dismantle the block with fuses - pull the cover towards you (it is best to do this from the front edge), remove it and disconnect the block. To do this, unscrew the two fastening screws and turn the device down, disconnecting the contacts one by one. This is done quite simply - we turn the plastic lever and the connector is released; We gain access to the filter by removing the bracket that held the previously removed unit in place. To do this, simply unscrew a couple of bolts and take it out. Here you need to be extremely careful, if possible, without touching the visible silver tubes connected to the heating radiator
The thing is that if the engine of your car has recently been running, then they will be very hot and the slightest carelessness can lead to a burn. We disconnect the small connector hidden inside by unscrewing four screws;
Changing the filter - replacing the cabin filter first of all involves removing the old device. Here you need to make sure that the accumulated dust and dirt does not spill out and stain other parts of the car. The installation also has its own nuances due to the fact that the filter itself consists of two parts mounted on top of each other. We install the smaller filter at the bottom of the compartment, and place the one equipped with a panel dividing it in half at the top
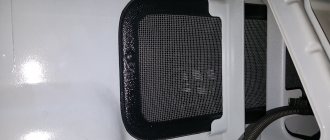
We pay attention to the arrows that are marked on the body of the element - they show the direction of air flows passing through it;
We carry out reverse assembly - we install all previously dismantled and removed components in their place, paying special attention to the quality of tightening the fastening bolts.
Summing up
This completes the replacement of the cabin filter. As you can see, there is nothing overly complicated in it, and all that is required from you is a little attention and patience. The reward is more than worthy - the serviceability of your vehicle and financial savings.
Removing the cleaning element housing cover
Now access to the filter is almost open. On the side of the center console you will see a black cover with a wire.
The wire with the plug is disconnected from the connector, which is located here. The cover is secured with four screws. They will need to be unscrewed. It is advisable to use a magnetic screwdriver to avoid losing them. You need to be very careful if the car engine has not yet cooled down - next to the filter housing there are pipes of the heater radiators, which can be very hot.
Types of cabin filters
As a rule, the cabin filter has a rectangular shape and comes with or without a frame. May consist of 2 parts. Sometimes it is impregnated with activated carbon. Such a filter not only has the usual filtering properties of a cabin filter (which consists of retaining pollen and other mechanical particles and impurities), and also performs the function of a gas mask, but it must be borne in mind that its function as a gas mask is short-term. After some set time has elapsed, activated carbon loses its original properties, as a result of which the filter begins to work like a regular cabin filter.
Filters that have an additional layer of filtration (made from activated carbon) can also trap and absorb odors.
In addition, the cabin filter protects the air conditioner evaporator from debris entering it.
This is why it is so important to use a filter in winter too.
Articles
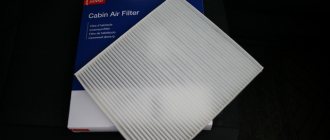
If you don’t know which filter element you should buy, here are some examples of original cabin filter part numbers offered by manufacturers: BBM4-61-J6X, BBP261J6X, B32L61J6X.
Cabin filter Mazda BBM4-61-J6X (Link to photo source)
You can also give several examples of analogues suitable for replacement in the 2012 Mazda 3 BL:
- JD JDACX034C;
- AMD AMD.JFC73;
- MILES AFW2199;
- AMD AMD.JFC73C;
- ASAM 70350.
In addition to them, there are also analogues of carbon cabin filters that can be replaced in Mazda 3 from the 2nd generation:
- GOODWILL AG 342 2K CFC;
- FENOX FCC118;
- GREENFILTERS IF0182K;
- LYNXAUTO LAC-405C;
- MEAT & DORIA 17292FK-X2.
Goodwill AG 342 2K CFC carbon filter (Link to photo source) Their dimensions on average correspond to the original ones: height - 22 mm, length - 235-236 mm, width - 95-98 mm.
Which cabin filter is better to choose?
Today, both original filters for different car models and analogues are on sale. The original Mazda 3 cabin filter (article BBP2-61-J6X -9A) costs about 1 thousand rubles, while analogues (for example, Filtron K 1312-2X or MANN-FILTER CU 26 008-2) cost 30-50% cheaper . There are also very cheap solutions on sale that can be purchased for 250-300 rubles.
At the same time, many car enthusiasts recommend installing:
- original;
- analogues of exceptionally high quality.
The fact is that cheap filters do not do their job well, they allow odors into the interior, get dirty quickly, can cause the windows to fog up, etc.
If we add to this that the cabin filter on the Mazda 3 is not so easy to change, the general feasibility of using cheap cabin filters is called into question.
Symptoms of clutch malfunctions
As we have already noted, many drivers, when problems arise with the clutch, understand that the car has begun to behave strangely, but often get used to it without taking any active action. As a result, a minor breakdown develops into a serious one, leading to a situation where the car becomes immobilized.
If you know the main signs of a clutch malfunction, you can avoid such risks by carrying out timely repairs yourself or contacting the nearest service station or service center.
So, we will describe the main signs of possible clutch malfunctions and the specific unit responsible for the “wrong” behavior.
note
An unpleasant smell in the cabin while driving or parking may be a signal to replace the filter element and the need for additional treatment of the evaporator of the air conditioning system.
The evaporator, necessary to reduce air humidity levels, is constantly exposed to moisture. Treatment with antibacterial agents will prevent the appearance of painful microflora, thereby protecting people and pets traveling in the car.
Automotive giants today produce cars equipped with ECU systems. These electronic control units using sensors...
When choosing a car, the future owner quite reasonably analyzes all the information relating to the vehicle of interest. Today thanks to...
Mazda MPV is a Japanese-made car designed for 7 seats. In some Asian countries, the model...
source
If not repaired
The air contains many different gases, dust, soot, plant seeds and other pollutants. In addition, the air conditioner evaporator constantly releases moisture, which creates a breeding ground for putrefactive bacteria, which are also present in the air.
A dirty Mazda 3 cabin filter reduces its capacity, reducing the intensity of air circulation. Humidity increases inside the cabin, causing windows to fog up and unpleasant odors and chemicals to accumulate.
Therefore, it is necessary to strictly monitor the frequency of replacement of consumables so that the air in the cabin does not have a negative impact on the health of those in the cabin.
See also: Mazda 3 repair
Replacing the filter on a Mazda 3 first generation
As already mentioned, this consumable is installed behind the center console in the cabin. It can only be reached from the front passenger side.
The tools you will need are Phillips and flat-head screwdrivers, a 12mm head with a knob, and an open-end wrench of the same size.
Don't forget to disconnect the terminals from the battery.
The carpet is pulled out of the car and the glove box is completely emptied. The glove box will have to be removed.
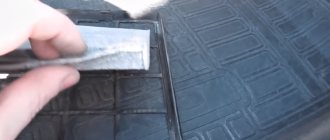
To do this, use a flat screwdriver to pry up the decorative trim located above it and carefully remove it.
This will give you access to the three drawer mounting bolts. They are unscrewed and the box moves down along four guides.
Then you need to unscrew the connector with the wires going to the glove box, it is located in its rear wall, and the box is removed from the car.
Next, you need to remove the decorative panel installed on the side of the center console.
POPULAR WITH READERS: Replacing the cabin filter for Ford Focus 3
To remove it, you need to pry and pull out the fastening clip, after which the panel is removed. It is under this panel that the required cover is located.
Removing the glove box will provide access to the protective panel of the fuse box, which prevents the removal of the cover. This panel must be removed by first unclipping the two fastening clips.
After removing the panel, you can remove the fuse box from its place. It is secured with two wing screws on the seat side. By unscrewing the screws, the near edge of the block will lower and it will be possible to disconnect the chips and wiring going to it.
To completely remove the fuse box, after removing the chips, you will need to unscrew the fixing plate located in the front bulkhead.
It is secured with two 10mm nuts; you can reach them with a socket wrench. After unscrewing the plate, it is removed from the studs and the fuse box is completely dismantled.
Let's move directly to the filter cover. An air sensor is attached to it, to which a wire goes from the chip.
The wire is disconnected and the three sensor screws are unscrewed, after which it is removed.
After this, unscrew the 4 screws securing the cover and remove it, this will provide access to the filter elements.
The used elements are removed one by one. First, the lower part is removed. Then you need to stick your hand into the hole and take the upper part, pull it down, and then remove it.
The new filters have marks that indicate how the elements should be located in the seats.
Before installing them, it is advisable to clean the housing with a clean rag or vacuum it with a car vacuum cleaner.
Installation of new consumables is carried out in reverse order.
When installing the upper part, you need to get the side protrusions into the guide grooves and push the element up until it stops.
Then the lower part is installed, and you need to get the protrusions into the guides of the upper part and the guides of the body.
After installing the lower part, you should check that the installation is correct.
If everything is normal, the filter parts in the housing should not play. Then all previously removed parts are put back in place.
Note:
When installing, make sure that the filters are positioned correctly among each other: the arrows on the element bodies should be opposite each other and directed backwards. The protrusion of the lower part of the filter should fit into the groove of the upper part.
It is very important to insert new elements into the housing correctly and evenly. There are guides on the far wall of the filter housing. When inserting the first element, you need to get into the guides on the far wall and into the guides on the near wall. Then lift the filter up. After this, install the lower element.
Location of grooves in the filter box
23. Reassemble the structure in reverse order.
How to replace
If there is a need to replace the cabin filter, we recommend that you first decide on the filter element. There are two types on sale: carbon and anti-dust. The first has a higher degree of purification, but also gets dirty much faster. The second will last longer and is better suited for motorists who operate vehicles in a more or less clean environment.
Despite the fact that in the 3rd Mazda it is somewhat more difficult to replace the filter than in other models of the Japanese manufacturer, you will need no more than 30 minutes. The car must be turned off, work can be carried out both on the street and in the garage.
Necessary tool
To replace, you will need a common tool that is found in every home. Prepare in advance:
- set of spanners;
- thin screwdriver;
- a thick flat screwdriver;
- a few rags.
Tools must be clean and free of oil or other substances. The work will be carried out in a salon, so dirty materials will cause an unpleasant odor and may ruin the interior.
Choosing a new cabin filter
As mentioned earlier, you can choose a carbon or anti-dust filter element for replacement. There are quite a lot of consumables for Mazda, both new original ones and similar ones from other manufacturers. Despite the fact that the latter have a lower price, their quality does not always meet factory requirements and they wear out much faster.
Choose original cabin filters for Mazda 3
Most experts recommend choosing original filters marked (BP4K-61-J6X-9A). When purchasing, make sure that the packaging is intact, without any signs of tampering. To replace, you will need two filter elements; it is better to purchase them in one place.
Step-by-step instructions for replacing the cabin filter
After preparing all the necessary tools and materials, you can start working:
- Disconnect the battery by disconnecting the negative terminal.
Disconnecting the negative terminal of the battery - We get to the fuse block. To do this, you need to remove the glove compartment lid.
- Remove the decorative element on the front panel.
This can be done using a thin flathead screwdriver. You don’t need to make any special efforts here, just move the strip a little to the left. Removing the decorative element to access the bolts - Having gained access to the bolts that secure the glove compartment lid, unscrew them. We pull out the duffel bag, shaking it to the sides.
- Next, unscrew the screw under the glove compartment that secures the plug.
- Remove the side panel on the passenger side of the front seat.
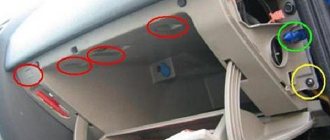
Using a thin screwdriver, remove several plugs that secure the decorative panel to the door. To remove the side panel, press the clip with a flat screwdriver - Remove the small panel in front under the glove compartment. It is held in place by two clips, which must be pressed in the same way as the side ones.
- After gaining full access to the fuse panel, remove it by unscrewing two bolts. After removing the block, the bolts remain inside it.
- To get to the cabin filter itself, you will also need to remove the box with plugs, which remained after dismantling the fuse box.
It is also secured with two bolts. Remove the back cover to gain access to the cabin filter - Removing the filter begins by unscrewing the two bolts that secure the device body. After this, carefully pull the electrical control plug out of the housing.
- To replace the filter elements, remove the side cover of the compartment and pull out the old consumables.
Open the side cover of the compartment to remove old filter elements - Before installing new ones, we recommend wiping the compartment with a rag to remove dirt and dust that has accumulated there over several months.
- We install new filter elements.
- We reassemble in reverse order.
- We connect the battery.
As a visual example, you can watch the entire process of replacing the cabin filter on video. Let’s make a reservation that there are no significant differences in installing the filter on Mazda of 3 different model years, be it 2008 or 2011.
Video of installing a cabin filter on a Mazda 3
As we can see, the process of replacing the cabin filter is quite simple if you know how to get to the filter elements. There is no need to use special tools or brute force. Therefore, such work can be done alone, saving on car service.
We recommend that you pay special attention to assembly and securely secure all bolts and clips
- 5
- 4
- 3
- 2
- 1
TOP 6 reasons why the clutch “burns” |
The concept of “clutch” is familiar to almost every driver: there are those who like the feeling of control over the car, there are those who are financially unable to drive cars with an automatic transmission. The first category can also include a separate caste of people who love, appreciate and overcome harsh off-road conditions exclusively through classic solutions: with three pedals under their feet and more than one gearshift lever at hand
But for both of them, the health of the clutch assembly is as important as life - without it, it’s not that you won’t go far... you just won’t go
The modern automobile industry offers two main clutch designs: hydraulic and a simpler mechanical cable clutch. The difference between the two schemes is minimal: in the first case, the driver is “helped” to depress the clutch by the hydraulic clutch master cylinder, in the second there is none and the force from the pedal is essentially “directly” transmitted mechanically further - to a dense assembly of forks, levers, drive and driven disks . The design differences between a simple cable and a hydraulic cylinder also have differences in the handling of the pedal: the first essentially uses the entire range of motion of the drive pressure shaft, and the second has only two operating modes: the clutch works (closed) and does not work (open).
Modern cars, of course, also have a completely electric clutch circuit without a direct physical connection between the pedal and the final clutch disc - but apart from the slightly differently “designed” power transmission unit, the circuit does not change further.
So, we present the TOP 6 bad tips on how to “kill” the clutch as quickly as possible.
The clutch assembly itself is quite simple and reliable. If you follow fairly simple rules, which everyone is told about or shown in driving school.
Life is a race, push it to the fullest!
Starting as quickly as possible is the first way to “kill” the clutch as quickly as possible. The correct way would be a simple (and boring) smooth start with a smooth release of the clutch. It is also better not to touch the gas pedal at the start unless necessary - increased engine speed at the moment the clutch closes will not have the most positive effect on the latter.
Keep the pedal half-pressed
The reason why the clutch suffers at this point is the so-called “heavy foot”: the driver does not remove his foot from the pedal, pressing it lightly (i.e., in fact using the pedal in the format of a footrest). And even a small angle of deflection activates the drive and relieves the pressure of the disk on the flywheel. The result is slippage, reduction in the life of the unit, overheating.
Skid more often!
This point is relevant for winter with snow or off-road rides. If you find yourself in a snow/mud/sand (and other) trap, first confidently try to get out with the help of the car - but if a characteristic smell and heat has risen from under the bottom, it’s time to look for alternative ways to continue moving.
Release the clutch downhill, save fuel!
The last statement was once not such bad advice - when the grass was greener, the trees were very small, and the engines had carburetors. In modern cars, there can be only three reasons to touch the third pedal: changing gears, starting and stopping. And we are no longer talking about saving.
And we'll drive with the handbrake!
If the handbrake is no longer great, then in principle you can even drive on it. Needless to say, even in this state, the load on all components and assemblies increases many times over? The same applies to situations when the handbrake lever is not fully lowered.
... and take the house with you...
A motorhome, a heavy trailer or just another car is a large load, which is not included in the calculations by the manufacturers themselves. We are talking not only about straight-line movement, but also about the process of more “heavy” starting
What if it’s also uphill? Of course, help on the road is a very important matter, but it is also important to remember the golden rule: everything is good in moderation
What's the verdict? For “difficult” drivers, the clutch can fail within a ridiculous few thousand kilometers, but experienced drivers can confidently travel an impressive 200 thousand with the same mechanism. Choose who to look up to.
crossovery.info
Installation features and replacement period for the cabin filter
Don't rush and assemble everything completely at once. After installing and connecting the fuse box, connect the battery, check the functionality of the electrics: lights (dimensions, low beam, high beam, brakes, turn signals), wipers, power windows, power steering, heater, etc. Once you are sure that everything is working properly, continue assembling.
The manufacturer recommends replacing the filter element after 30,000 km or after 2 years of operation. If you constantly drive in heavily polluted, dusty areas, this procedure should be performed more often. The efficiency and duration of operation of the cabin filter is related to several factors:
- period of operation;
- level of air pollution (related to the characteristics of the area where the vehicle is operated);
- mileage
More frequent replacement of filters (once a year or after 10-15 thousand km) is due to:
- operation of the Mazda 3 in particularly polluted, dusty areas;
- frequent use of the vehicle (for example, you drive it to work every day);
- operation during the flowering season of plants.
Work order
On Mazda 3 models of 2008-2011, the process of changing the cabin filter is a labor-intensive and responsible operation associated with careful disassembly of part of the central panel, removal of the glove compartment, fuse box and disassembly of other elements.
On later models, the filter element remained in the same place, but it can be replaced without removing the glove compartment and fuse box, although the work also requires attention and accuracy.
In any case, it is best to entrust this complex and painstaking work to professionals from the Mazda service center, who perform it constantly and know all the intricacies.
To replace the Mazda 3 BK cabin filter, do the following:
1. Place the vehicle on a level surface and open the hood.
2. Disconnect the wire from the negative terminal of the Mazda 3 battery.
3. To access the filter, you need to remove the glove box. Open the glove compartment and remove all contents.
4. Pull it towards you and remove the central decorative trim of the instrument panel (held on by 4 clips).
5. Using a Phillips screwdriver, remove the 2 screws securing the glove box.
6. Move the entire structure of the box towards you and down (the car door must be open).
7. Unscrew the screw securing the glove compartment light.
8. Using a thin slotted screwdriver, remove the clip of the plastic shield on the side panel under the glove box.
9. Remove the plastic panel by moving it out of the grooves.
10. Remove the decorative panel under the glove compartment. It is held on by 2 latches.
This will give you access to the fuse box.
11. Unscrew the 2 fasteners securing the fuse box.
12. Lower the fuse box down.
13. Disconnect all plugs from the unit (3 large and 3 small). Place the fuse and relay box aside.
14. The fuse block mounting bracket limits access to the hole where the Mazda 3 cabin filter is located. Therefore, using a 12-socket wrench, unscrew the 2 nuts securing the metal bracket. Put it aside.
15. Using a flat-head screwdriver, disconnect 2 chips from the resistor.
16. Using a Phillips screwdriver, unscrew the bolts and remove the heater resistor.
17. Using a Phillips screwdriver, remove the screws securing the air conditioner filter cover.
18. Move the cover to the side.
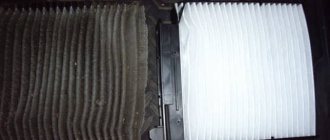
19. First remove the lower and then the upper parts of the filter element.
Removed old filter
20. Use a brush to remove all debris from the housing and, if possible, wipe the inside.
21. Replace the Mazda 3 cabin filter with a new one.
22. Insert the new filter into the housing along the existing grooves.
Stages
The process of replacing the cabin filter in Mazda 3 contains the following steps:
- The first step to changing the cabin filter is to disconnect the battery. For this purpose, you need to lift the hood and disconnect the negative terminal of the battery.
Remove the terminal from the battery
The cabin filter of the Mazda 3 is located behind the glove compartment. Therefore, you need to remove it to get to the fuse box and filter element. The screws that secure the glove compartment are located under the decorative plate. Using a narrow screwdriver, carefully remove it. While removing the panel, you need to move it to the left, then it will simply come off.
Removing the decorative panel
Next you need to unscrew the screws holding the glove compartment. Rocking from side to side, the glove box is removed. There is a screw under the glove compartment that holds the plug; it must be unscrewed. Next you need to remove the decorative panels. Using a knife or flat-head screwdriver, you need to pry off the cap of the plug holding the panel, which is located to the left of the passenger, and remove it from the panel. Then the panel itself is removed.
Remove the clip on the panel
Under the glove compartment there is another panel, which is held in place by two clips located on the right and left of the front part. The panel simply folds down after pressing all these clips. The second step is to free yourself from the fuse box. For this purpose, two screws are unscrewed. In this case, there is no need to remove the screws; they remain in the block. Then the plugs are disconnected and the unit is removed to the side. To remove the box, you need to unscrew the two fastening nuts.
Removing the fuse box
Next, you need to find the two screws securing the cabin filter housing and remove them. Next, you should carefully disconnect the electronic control plug, which is located in the housing. Then the cover is removed from the compartment in which the filter elements are located.
Removing the compartment cover
Now you should get two old filters. Before installing new consumables, it is worth thoroughly cleaning the inside of the case by wiping it with a clean cloth. When replacing it yourself, of course, it is not enough to upgrade the consumable material by covering it with a foam rubber seal. This allows you to better strengthen it in the housing and eliminate gaps between the housing and the filter element.
We cover the new filter elements with foam rubber
Now you need to replace the old filters with new ones and tighten the housing cover. Then the actions that remain to be done by our client are carried out in reverse order. At the final step, do not forget to connect the negative terminal to the battery.
Replacing the cabin filter of Mazda 3 2011.
Thus, any car owner who does not have special abilities can change the cabin filter in a Mazda 3 2008, 2011, 2012 without the help of others. Timely implementation of this procedure will create comfortable conditions inside the car.
How to choose the right cabin filter for Mazda 3
The original Mazda BBP2-61-J6X9A filter is installed from the factory, the cost is about 900 rubles. In addition to the original, there is a large selection of analogue filters that are also of good quality, but they are cheaper.
Analogs and prices for cabin filter Mazda 3
- Ashika 21M-AM-A12 from 350 RUR
- BIG Filter GB9968 from 400 RUR
- BIG Filter GB9968C carbon from 420 RUR
- Bosch 1 987 432 209 from 1000 rub.
- Corteco 8000 1736 from 750 RUR
- Dextrim DX400342 from 430 RUR
- Fortech FS074 from 500 rub.
- Fortech FS074C coal from 920 RUR
- Sakura CA17150 from 700 RUR
This is not a complete list of analogue filters that may be suitable as a replacement for the original, however, I tried to collect those that will definitely fit, both regular and carbon.
One of the advantages of a carbon filter is its better filtration of air entering the cabin. But a high-quality carbon filter will cost more than a regular paper filter. If you see a cheap carbon filter, I don’t recommend buying it, since its production is more expensive than a paper one, so it cannot cost less.
Spare parts
The best option would be to purchase an original filter insert BP4K-61-J6X-9A. There are several replacement options available for sale:
- the carbon filler copes well with foreign odors,
- Antibacterial coating prevents the development of bacteria.
In any case, it is best to give preference to products from well-known manufacturers who fight for the honor of their brand. There are also many cheaper analogues, but it is better not to skimp on your own health and the health of your loved ones.
Replacing the Mazda 3 air filter
The design of the air filter for Mazda 3 with an engine capacity of 1.6 and 2.0 liters is excellent. This is explained by the location of the air ducts. In the first case, the air filter is installed above the valve cover, in the second - on the left side of the compartment, closer to the battery.
Cleaning element shape:
- 6 l.: rectangular, paper filler, hygroscopic fiber;
- 0 l.: square, in a plastic frame with paper filling.
If you have consumables, replacing the Mazda 3 air filter yourself can be done within 10 minutes.
How often should I replace?
The recommended replacement interval is 40 - 43 thousand km, such data is in the Mazda 3 operating instructions (2008). Maintenance of the cleaning element and air intakes should be carried out every 15,000 km.
If the machine is often used on rough terrain, then the maintenance and inspection of the air element becomes more frequent by a third. Despite the high degree of filtration, dust particles still penetrate into the cylinders and combustion chamber.
Choosing an air filter for Mazda 3
Technical specifications:
- 6 liters: length 310 x width 210 x height 350 mm;
- 0 liter: length 275 x width 185 x height 55 mm.
| Engine modification | vendor code | Price, rub.) |
| MAZDA 3 (BK) 1.6 (105 hp) | 1987429184 (original) | from 300 – 350 |
| —/— | 1982003335 (original) | —/— |
| —/— | JAPKO 20335 | —/— |
| —/— | MEYLE 35123210006 | —/— |
| —/— | STELLOX 7101064SX | —/— |
| —/— | SAKURA Automotive A1762 | —/— |
| —/— | BLUE PRINT ADM52249 | —/— |
| —/— | FILTRON AP113/3 | —/— |
| —/— | MANN-FILTER C 3220 | —/— |
| —/— | AWM EA 0601 | —/— |
| —/— | JAPANPARTS FA335S | —/— |
| —/— | NIPPARTS J1323047 | —/— |
| —/— | LYNXauto LA-420 | —/— |
| —/— | KNECHT LX 1921 | —/— |
| —/— | MAHLE ORIGINAL LX 1921 | —/— |
| —/— | PARTS-MALL PAH059 | —/— |
| —/— | PATRON PF1322 | —/— |
| MAZDA 3 (BK) 2.0 (150 hp) | MEAT & DORIA 18287 | from 390 – 420 |
| —/— | 2003337 (original) | —/— |
| —/— | 2039930 (original) | —/— |
| —/— | UFI 3034400 | —/— |
| —/— | MEYLE 35123210004 | —/— |
| —/— | KOLBENSCHMIDT 50014143 | —/— |
| —/— | STELLOX 7101116SX | —/— |
| —/— | PURFLUX A1237 | —/— |
| —/— | DENCKERMANN A140357 | —/— |
| —/— | SAKURA Automotive A1768 | —/— |
| —/— | JS ASAKASHI A475J | —/— |
| —/— | MANN-FILTER C 2841 | —/— |
| —/— | HENGST FILTER E658L | —/— |
| —/— | BOSCH F026400129 | —/— |
| —/— | JAPANPARTS FA337S | —/— |
| —/— | NIPPARTS J1323054 | —/— |
| —/— | LYNXauto LA429 | —/— |
| —/— | KNECHT LX 1688 | —/— |
There is no data on the compatibility of components from other manufacturers with the Mazda 3. When purchasing filters from third-party manufacturers, the quality is not guaranteed.
By replacing the air filter on your Mazda 3 yourself with an original one, you can be confident of a long service life, high-quality cleaning, and maximum flow into the combustion chamber.
Replacing the Mazda 3 air filter
Before changing the air filter yourself, we carry out a comprehensive diagnosis of the car, identify possible breakdowns, and calculate the amount of consumables, time, effort, and money.
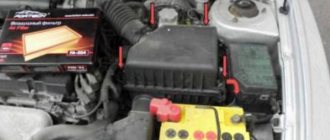
Where is the air filter located in the Mazda 3: the left side of the engine compartment for the Mazda 3 2.0 l configuration, and the right side for the 2007 Mazda 3 1.6.
Replacement sequence:
- we place the car on a level platform, take basic safety measures, install wheel chocks, engage first gear, open the hood;
- for a 1.6 liter engine: snap off the plastic decorative cover. There are only 4 latches around the perimeter;
- for a 2.0 liter engine: on the right side of the engine compartment, unscrew the fasteners, remove the decorative plate, unclip the three fasteners around the perimeter;
- We remove the filter, wipe the cavity from dust, and install a new one. Arrow in the direction “from left to right”;
- close the lid.
The work of replacing the air filter on a Mazda 3 with your own hands has been completed. Scheduled maintenance after 14 - 16 thousand km.