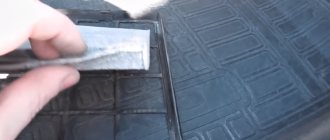
The second generation Renault Megane (both pre-restyling and updated) is a fairly popular car on our roads, even despite its “proprietary” features such as replacing headlight fuses with removing the battery, and the lamps themselves through hatches in the fender liners. But this car was equipped with K4M engines (gasoline), well known to repairmen, and the K9K diesel, especially beloved by the owners for its efficiency, and the suspension worked well.
Another purely French feature is hidden in the cabin - having replaced the cabin filter yourself with Renault Megane 2, it is not difficult to notice: without removing the glove compartment you will have to tinker in a narrow space, but with removal there is a considerable amount of disassembly. Which of the two methods to choose is up to you.
Replacement procedure
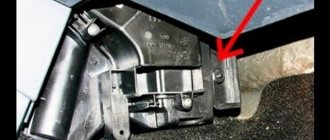
The cabin filter of Renault Megane 2 is located on the passenger side, under the glove box.
To change you need to follow a certain procedure:
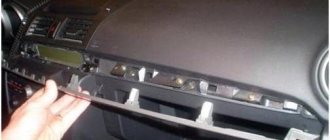
- Remove the glove box. To do this, you need to unscrew several screws, as in the image above.
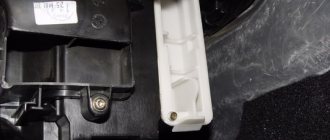
- Remove the side plate, under which there are additional fasteners
- Disconnect the airbag control connector
- Unscrew the remaining bolts.
- Removing the glove box
- Having gained access to the niche, we replace the old consumables with a new one.
During vehicle operation, a large amount of dirt and debris can accumulate in the niche. Therefore, before installing a new filter, you must thoroughly clean the installation area with a vacuum cleaner.
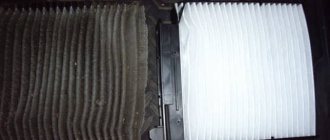
An important accessory such as a cabin filter is responsible for the cleanliness of the air inside the car. It prevents dust, engine exhaust gases and other contaminants from entering the cabin. However, if this part fails or does not function effectively, passengers are at risk because they are forced to breathe in contaminants that should have been trapped on the filter element. In this article we will try to understand how to replace the cabin filter.
Electrics
- Remove the Renault Megane 2 battery
- Replacing the battery in the Renault Megane 2 key fob
- How to replace the battery in a Renault Megane 2 key
- Replace the battery in the Renault Megane 2 remote control
- Replacing the Renault Megane 2 fuse box with your own hands
- Replacing the retractor relay Renault Megane 2
- Change the side lamp of Renault Megana 2
- Replacing the rear light of Renault Megane 2
- Removing the rear light of Renault Megana 2
- Change the ignition switch of Renault Megane 2 with your own hands
- Change the ignition coil of Renault Megane 2 with your own hands
- Removing the power window button for Renault Megane 2
- Change the low beam lamp Renault Megane 2
- Change the lamp in the glove compartment of Renault Megane 2 with your own hands
- Replace the lamp in the dimensions of Renault Megane 2
- Replace the high beam lamp in Renault Megane 2 with your own hands
- Replace the reverse lamp Renault Megane 2
- How to change the lamp in the turn signals of Renault Megane 2 with your own hands
- Replace the lamp in the dashboard of Renault Megane 2 with your own hands
- Installing lamps in fog lights Renault Megane 2
- How to replace a lamp in a Renault Megane 2 PTF
- Replacing a lamp in the headlights of a Renault Megane 2 with your own hands
- Replace the interior light bulb of Renault Megane 2
- Replacing the brake light lamp Renault Megane 2
- Replacing rear light bulbs Renault Megane 2
- Remove the left headlight of Renault Megane 2
- Remove the window lift motor Renault Megane 2
- Remove the front headlight of Renault Megane 2 with your own hands
- Remove the right headlight of Renault Megane 2 with your own hands
- Do-it-yourself replacement of Renault Megane 2 fuses
- Replace the Renault Megane 2 cigarette lighter fuse with your own hands
- Repair of fog lamps Renault Megane 2
- DIY turn signal relay repair for Renault Megane 2
- Renault Megane 2 starter relay repair
- Do-it-yourself windshield wiper relay repair for Renault Megane 2
- Replace spark plugs for Renault Megane 2 with your own hands
- DIY installation of Renault Megane 2 generator brushes
- Automatic transmission wiring diagram Renault Megane 2
- Diagram of the Renault Megane 2 speaker system
- Renault Megane 2 fuel pump diagram
- Renault Megane 2 fuse box wiring diagram
- Electrical circuit of the Renault Megane 2 engine control unit
- DIY Renault Megane 2 cooling fan wiring diagram
- Renault Megane 2 fuel pump connection diagram
- Electrical circuit for turning on the cooling fan Renault Megane 2
- Diagram for switching on the Renault Megana 2 air conditioner
- Wiring diagram for the front axle Renault Megane 2
- Renault Megane 2 starter connection diagram
- Wiring diagram for turning on headlights Renault Megane 2
- DIY Renault Megane 2 generator circuit
- Renault Megane 2 oil pressure sensor diagram
- DIY oxygen sensor wiring diagram for Renault Megane 2
- Electrical circuit of the coolant sensor Renault Megane 2
- Wiring diagram of the speed sensor Renault Megane 2
- Temperature sensor wiring diagram Renault Megane 2
- Electrical circuit of the fuel level sensor Renault Megane 2
- DIY Renault Megane 2 engine diagram
- DIY Renault Megane 2 wiper diagram
- DIY ignition circuit for Renault Megane 2
- Wiring diagram of the ignition switch Renault Megane 2
- Wiring diagram of the sound signal Renault Megana 2
- Renault Megane 2 injector diagram
- DIY Renault Megane 2 carburetor diagram
- Wiring diagram for headlight range control Renault Megane 2
- Interior lighting diagram of Renault Megane 2
- Renault Megane 2 heater diagram
- Renault Megane 2 engine cooling circuit
- Electrical diagram of the Renault Megane 2 instrument panel
- Wiring diagram of Renault Megane 2 headlights
- DIY Renault Megane 2 stove diagram
- Renault Megane 2 dashboard diagram
- Renault Megane 2 wiring diagram
- Do-it-yourself wiring diagram for Renault Megane 2 fog lights
- Renault Megane 2 fuel pump relay wiring diagram
- Renault Megane 2 pressure switch diagram
- Do-it-yourself Renault Megane 2 turn relay diagram
- DIY Renault Megane 2 regulator relay diagram
- Starter relay wiring diagram Renault Megane 2
- DIY Renault Megane 2 injection system diagram
- Wiring diagram of the ignition system Renault Megane 2
- Electrical circuit of the Renault Megane 2 air conditioning system
- Renault Megane 2 cooling system diagram
- Electrical diagram of the Renault Megane 2 engine management system
- Renault Megane 2 starter wiring diagram
- Windshield wiper circuit for Renault Megane 2
- Window diagram for Renault Megane 2
- DIY brake light wiring diagram for Renault Megane 2
- DIY fuel pump diagram for Renault Megane 2
- Do-it-yourself electrical circuit of the Renault Megane 2 fuel system
- Wiring diagram of the brake system Renault Megane 2
- Renault Megane 2 central locking diagram
- DIY instrument panel diagram for Renault Megane 2
- Do-it-yourself wiring diagram for Renault Megane 2 ecu
Which cabin filter to buy
Considering the range of cabin filters, as well as their manufacturers, it is difficult to choose a device for Renault Megane 2. According to the results of experiments, BOSCH, CORTECO, GOODWILL, MANN, MAHLE, DENSO, RAF FILTER and many other brands received the best ratings.
During the tests, silica dust with a specific surface area of 5600 cm2/g was used as a pollutant. Each sample was given 20 minutes, and the air mass flow was 20 m3/h. The main indicator of the study was yield, which should not exceed 10%. Result of the following image:
Click to enlarge
- BOSCH. According to the characteristics, the device must retain 100% of dust, pollen and bacteria. However, in practice this is far from the case. Its efficiency is 11.1% higher than the established value, but due to the large filtration area it is compensated by high aerodynamic drag in a dirty state.
- GOOD WILL. There is no description in the kit, but of all the models, the vacuum cleaner has the smallest working area, which affects the cleaning efficiency, not to mention its resistance to dirt.
- MANN also does not have a description, but it has the best transmission percentage with an average value of 5.9, despite the small filtering area. High absorption and low price speak for themselves.
- RAF FILTER has similar properties, curtain size and transmittance. However, due to the three-layer filter surface, which includes antibacterial, carbon and anti-allergenic coatings, the price of the purifier is quite high.
- DENSE. Cabin filter from a Japanese manufacturer, with the highest price. It has the largest working area, average jump speed and high aerodynamic drag. The quality and performance of the product leaves no doubt.
Despite the performance and efficiency of the listed products, their replacement does not guarantee long-term use, given different operating conditions, so there is no point in choosing expensive options for Renault Megane cars.
Rules for choosing consumables
It is not recommended to restore the old cabin filter, as this part cannot be repaired. Suitable for Renault Megane 2 cars:
- Single layer systems. They completely eliminate poplar fluff, dust, soot, pollen, and insects that enter the vehicle interior.
- Double layer filter. Eliminates unpleasant odors and toxic gases from the interior.
- Three-layer device. Capable of performing the functions of single- and double-layer cabin filters simultaneously.
- Combined systems. This is a compact and convenient installation that ensures effective removal of various contaminants from the interior.
Renault Megane 2 can be equipped with a variety of filter systems. Their choice depends on the degree of pollution of the car and the financial capabilities of the car owner. The most popular analogues of the Renault Megane 2 filter include:
- The installation is manufactured in Germany and is characterized by high build quality. Thanks to the presence of a high-quality plastic frame, a tight fit of the equipment to the walls is ensured. Despite the fact that the length of the filter system is shorter than that of the original, it does not allow untreated air to pass through.
- Citron. This model combines low cost and excellent technical characteristics. When using the device, high-quality filtration of air in the cabin is ensured even when driving a vehicle at a speed of more than 100 kilometers per hour. The manufacturer produces a carbon analogue of the filter, which not only provides air purification, but also eliminates unpleasant odors. The device has a reliable casing and is resistant to mechanical damage.
- MANN-FILTER. The German manufacturer produces several types of filters. Nanofiber is used to make the filter element, which ensures high-quality purification of polluted air. Model 1829 consists of a regular, carbon and antibacterial layer. Thanks to the three-layer system, high-quality air purification and neutralization of foreign odors are ensured. Thanks to the thinness of the plastic in the bending areas, convenient installation of the device is ensured.
Renault Megane 2 can be equipped with filters from various manufacturers.
Their choice is made depending on the preferences and financial capabilities of the car owner.
What are the consequences of untimely replacement of the cabin filter?
Although the automaker always quite clearly prescribes the timing of replacement (as well as the possible consequences), Renault Megan owners almost constantly postpone this procedure “for later”. This attitude towards car maintenance can end in disaster. The most common sign of the need to replace the filter in Renault cars is the appearance of foreign odors in the car. Change the part urgently in the following cases:
- if the microclimate in the car interior is disrupted (it’s cold in winter and hot in summer, but the air conditioner works properly);
- a foreign smell has appeared (usually not very pleasant) and it is not possible to determine its source;
- the interior windows began to fog up quickly, regardless of the weather (the ventilation system was faulty);
- Dirt appears in the car very quickly (on the dashboard, windshield, etc.).
Owners of Renault Megane recommend changing it in the spring (before summer).
Never attempt to repair (clean) an old part. This can lead to negative consequences.
In what cases is the cabin filter replaced on a Renault Megane 3 car?
- casing damage;
- deformation of hygroscopic fiber loaded with carbon;
- oil, moisture, lint, antifreeze getting on the surface of the detergent;
- manufacturing defects;
- operation longer than the specified period.
Characteristic signs of a clogged filter on Renault Megane 3
- foul odor in the car;
- dust flies out of the deflectors;
- insufficient air flow from the left and right deflectors;
- There is an unusually large accumulation of dust on the dashboard.
Diagnostics
The first stage is visual: assessing the degree of clogging of the hygroscopic fiber loaded with carbon. Check the housing for cracks, dents and other defects.
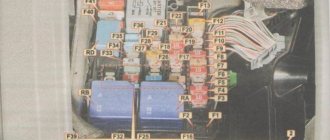
Sometimes when the stove is turned on, the fan does not spin. The probable cause is a faulty fuse (No. 21) in the mounting block located under the instrument panel to the left of the steering wheel.
Also perform maintenance on the air conditioner evaporator. Use special aerosols for cleaning. Alternatively, dilute the vinegar with water in a 1:5 ratio for free.
Why is it important to change it on time?
If the replacement is not done in a timely manner, then at first foreign odors may appear in the car interior when the heater fan is turned on. This is due to the fact that the microclimate in the cabin is disrupted. In addition, increased fogging of windows is possible, and a large amount of dust appears.
It is best to change consumables in the spring and summer. You should not try to clean an old product, since during the procedure it may completely lose its shape, the structure of the fibers will be disrupted and it will serve even worse.
We carry out a planned replacement for Megan 3 with our own hands
To properly replace the filter element, it is necessary to remove the dashboard floor, since access to the filter is on the right side towards the car. For clarity, you can watch the video, and below we will give clear instructions on how to properly replace the cabin filter.
- Before you begin the replacement, first open the glove box, after which you need to unhook the so-called outer cover of the panel itself, on which the lock for disabling the front passenger airbags is located, the lock must also be removed.
- Next, remove the decorative plastic strip located at the top of the car panel. To do this, you need to slightly pull it straight towards you and move it outward, as it were. For now, let's put this detail aside. Prepare a suitable container in advance where you will place the clamps and other screws so that you don’t lose anything during work.
- Under the special top cover of the instrument panel, unscrew 3 screws on the torx sprocket plus a pair of screws on the outside. Also, Renault engineers hid 1 bolt with a countersunk head. It is located near the glove compartment light and must be unscrewed. All bolts must be placed in a container and moved to the side.
- Without making a titanic effort, you will have to pull the glove compartment towards you and unhook all the electrical elements.
- On the left side, just below the glove compartment, you will find a pair of screws that you need to unscrew, then remove the cover and remove the filter.
Step-by-step instruction
1. Snap off the plastic sill trim. It’s not necessary to go all the way, the one in the photo below will suffice.
2. Remove the plastic cover of the stand. We move the overlay towards us and move it down.
3. Open the glove compartment and turn off the side airbag.
4. Use your hands to unclip the casing where the airbag operation switch is located, and disconnect the power connector. To disconnect, slide the latch and pull the connector towards you.
5. Unscrew the two screws securing the glove compartment under Torx T20.
When installing, please note that the screws are different, the bottom screw comes with a fine thread. Don't mix it up when installing.
6. Unscrew three more screws securing the glove compartment in the recesses. All screws are Torx T20.
7. We pick up the plug on the right and behind it we unscrew the last screw securing the glove compartment.
8. Close the glove compartment and, with a little effort, pull it towards you. Then we move the glove compartment to the side.
9. Snap off the decorative plastic for easy removal of the filter.
10. Squeezing the ears on the sides, remove the cabin filter.
11. Turn on the airflow at full power to clean the seat for the new filter.
12. Install the filter in its seat. The filter only fits in one position. Once installed, the fin on the filter should face toward the rear of the car, and the plastic latch should be at the top.
On Megan 2 it happens that after installation the cabin filter is not held tightly. It is best to fasten it with two screws, especially since the factory already has holes for them.
13. Wind up the glove compartment until it clicks and secure it with screws.
When you move the glove compartment into place, do not break off the light switch in the glove compartment.
14. To make installation of the casing easier, remove the airbag switch. We squeeze the two latches on the sides and pull them down.
15. Pass the connector and snap the casing by pressing it.
16. Connect the connector and snap the switch into the housing.
17. Install the plastic of the pillar and threshold.
Video lesson
Articles
In addition to the original for Megane 2 (article 7701 055 109), there are many analogues of cabin filters, including models based on activated carbon:
Original filter Renault Megan 2 7701055109 (link to photo source)
- BSG BSG 75-145-002;
- Sample CCF0060;
- MASUMA MCE4057;
- MAPCO 65118;
- Bosch 1987 432093 - length 254.6 mm, width 185.5 mm, height 42 mm;
- KOLBENSCHMIDT 50013790.
Carbon air purifiers for Renault Megane 2:
- FENOX FCC150;
- PROFIT 1521-2140;
- VALEO 715539;
- NAKAYAMA FC343NY;
- ZEKKERT IF-3130K.
Carbon filter VALEO 715539 (Link to photo source) Carbon cabin filters purify the air much better, but have a shorter service life and are more expensive.
