Replacing the cabin filter on Toyota Corolla E150 and E120 is the same process, since the filter element is located in the same place. The cabin filter serves to clean the air that enters the cabin from outside. According to new international standards, every car must be equipped with such a product.
Video
The videos will tell you how to change the cabin filter on different generations of the car, and will also tell you about some of the subtleties and nuances of the process.
The importance of having a cabin filter
Experienced drivers are often very conservative.
In their opinion, a cabin air purification filter is an exaggeration, which also requires additional costs and maintenance efforts. After all, the cabin analogue, being the same consumable item as a standard air filter, requires periodic replacement, but concern for the health of people inside the car is not comparable to the effort spent on replacing it. The fact is that about 100 cubic meters of air pass through an average passenger car per hour (this is approximately 100 thousand liters), and even if we assume that the dust concentration does not exceed the maximum permissible concentration (0.5 mg / cubic meter), then in 120 minutes the filter settles about one gram of suspended particles measuring 2.5 micrometers. The greatest danger to humans is microscopic dust (a fraction up to 10 microns in size easily penetrates the respiratory tract, and even smaller particles - into the lungs). Considering that on country dirt roads and on busy city highways the concentration of pollutants is many times higher than the maximum permissible dosage, the presence of a cabin filter becomes a prerequisite for creating the most comfortable and safe microclimate for health.
Conventional dust filter elements successfully cope with the task of capturing up to 90% of suspended particles of various sizes, which are usually invisible to the naked eye. Carbon cabin filters can also absorb many volatile substances, preventing unpleasant odors and carbon monoxide from entering the cabin.
Note that the Toyota Corolla 120 cabin filter can usually be made impervious to any substances in the air, but in this case its ability to pass air will also suffer, so designers are forced to strike an optimal balance between these two most important characteristics of the filter material.
Why is a filter element needed, how often to change it, how to determine the need for replacement
The filter element ensures high air quality and cleanliness in the cabin, which is very important for the health of the driver and passengers.
Toyota Corolla in AE 103, 100, 110, 120, 150 bodies, as well as Toyota Corolla Spasio, cars produced in 2007, 2008, 2009, 2010, 2011, 2012 have the same principle for removing and installing a new cabin filter, which is located in these modifications in the same place.
Replacing the cabin filter is usually done when it is felt that the air flow from the ventilation, air conditioning and heating systems has decreased. In addition, the appearance of a not very pleasant persistent smell inside the car, as well as causeless fogging and condensation on the windshield are also signs of the need to replace the Toyota Corolla cabin filter, not only in the Corolla AE91 body, but also in other versions. It is advisable to inspect and test the functionality of the cabin filter element at least once a year to ensure its effective operation. And if necessary, it is worth replacing this cleaning element in a timely manner.
If the car is operated in dusty conditions, in arid climates and with poor air quality, then this consumable should be checked and replaced more often.
Choosing the right filter
Before you think about the correct installation of the purifier, you must first purchase it. We recommend purchasing filters and other auto parts from official Toyota dealers. Of course, the price at the dealership will be higher than if you bought it at a regular store, but products purchased at authorized retail outlets are covered by the manufacturer's warranty.
To make the right choice of filter, you need to know the make of your Toyota engine, year of manufacture and chassis number. All this information can be gleaned from the state registration certificate of the car. Based on this data, use the catalog - finding the right product will not be difficult. If you have any questions regarding your selection, please contact the store consultants.
How to change the cabin air filter on a 2014 Corolla
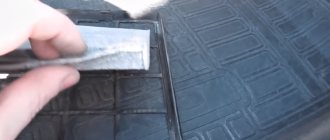
You need to remove the glove compartment by removing the rod from the side and removing the shelf from the clamps. Then remove the panel on the filter housing and pull out the cabin filter itself.
Then clean the housing and insert the filter. about which side to install the cabin filter . On the filter panel and the filter itself there are arrows and the word “up” in English. That is, the filter should be positioned so that the arrow points upward.
After that, reinstall the panel and glove compartment.
Replacing the filter yourself
If your hands are growing, replacing the Toyota Corolla cabin filter element is not a problem. Before replacing the cabin air filter on your Corolla 150 without assistance, empty the glove box.
How to replace the interior shock absorber:
- Empty the glove compartment;
- When the cold season changes, it is better to insulate the car in advance, because fresh plastic is fragile, so it often breaks when pressed;
- To remove the glove box, carefully slide the side walls and open the locking elements of the box slide;
- Remove the glove box from the hooks at the bottom of the glove box;
- At the back there is a cover covering the cabin filter. To remove the part, simply press the side latches attached to the body
- Pull out the dust protection element. Beware of debris getting into the air duct and heating fan, handle it very carefully, do not shake the filter too much;
- Connect the new filter.
Once the installation of the new absorber is complete, install the filter cover, then install the glove box.
How often should I change the filter element?
In accordance with the manufacturer’s recommendations, scheduled work to replace the filter in the cabin of the Toyota Corolla 150 should be carried out every 20 thousand kilometers.
However, in our realities, such an interval is not justified: in the vast majority of cases, filters stop performing their cleaning function much earlier. Therefore, it is really better to change the cabin air filter every 10 thousand kilometers.
The exception is for cars used in northern regions, where low temperatures last much longer, which means that the filter becomes dirty much less often.
Signs that require replacing the air purification filter in the Toyota Corolla 150:
- persistent unpleasant odors, the intensity of which increases when the air conditioner is turned on;
- reduce the power of the outgoing air flow through the deflectors;
- increased appearance of dust in the cabin even with frequent wet cleaning;
- fogging of windows for no apparent reason.
How often should I replace it?
According to the regulations for the ninth generation, replacing the Toyota Corolla cabin filter must be performed at even-numbered maintenance, that is, every 20 thousand kilometers.
In most modern cars, this periodicity is more frequent, and the filter is not always able to work adequately for such a long time.
Therefore, in most cases, it makes sense to talk about the wisdom of replacing the cabin filter on Corollas every 10,000 km, with the only exception being the northern regions - their winters are long, so the rate of filter contamination with dust and organic matter is noticeably lower.
The most severe operating conditions are in non-chernozem regions: in the summer, the filter actively collects pollen, fluff, road dust and soot microparticles from the exhaust; in the fall, wet leaves are added to this, which quickly lead to the development of rot on the filter curtain.
What are car filters?
All interior cleaners can be divided into two types: dust-proof and carbon. Dust protection devices are a rectangle of corrugated cellulose paper or synthetic fibers laid in rows. The fiber, in addition to dust particles, is capable of retaining soot, pollen, and heavy compounds. The paper on some models is pre-treated with chlorine and may prevent the spread of bacteria.
More on the topic:
- How to choose the right auto parts
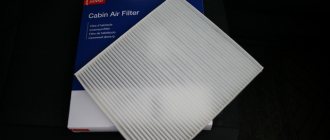
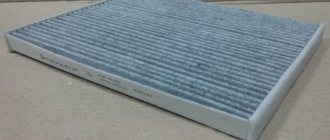
Cabin dust filter
The carbon version is a more “advanced” continuation of the anti-dust version. The filter fiber contains formed carbon particles, which are known to be excellent absorbents. The carbon filter element has a higher density and is able to capture smaller particles such as nitrogen and sulfur oxides, benzenes and phenols. These carcinogens are very dangerous to human health and can cause the development of diseases of the respiratory system. When carcinogens interact with charcoal, the charcoal particles absorb and partially neutralize them.
Carbon cabin filter
Article number and cost of the original cabin filter for Corolla 150 and its analogues
Filters with different catalog numbers are installed on the Toyota Corolla 150; the set depends on both the country to which the car is exported and the year of manufacture. At the same time, the replacement filter cassettes are completely interchangeable. The cost of standard brand filter elements varies from 450 to 800 rubles. Below are the catalog numbers of cabin filters:
- 8713952020;
- 87139YZZ20;
In addition to the original filter for the Toyota Corolla 150, a number of analogues are produced from third-party manufacturers. The best are presented in the table below.
Table - Analogues of the cabin filter on the Corolla 150
| Director | Seller code | Cost, rub |
| Sakura | CAC1112 | 280-320 |
| Knecht-Mahle | LA395 | 300–350 |
| Starline | SFKF9470 | 200–220 |
| Planimetry | ADT32514 | 240–260 |
| Dense | DCC1007 | 360-400 |
| Spare parts-Mall | PMF081 | 180-200 |
| Masuma | MC2038 | 300–340 |
The carbon filter is also used on the Toyota Corolla 150. Its cost is from 700 to 1200 rubles. Here are the article codes of the original carbon filters installed on the car:
- 8713902020;
- 87139YZZ16;
- 17801YZZ06;
- 0897400820;
- 871396080;
- 8713950100;
- 87139YZZ08;
- 87139YZZ10.
Third-party manufacturers produce branded analogues of carbon-based products that are not inferior to the original in terms of characteristics and quality. The table below provides a list of the best brands.
Table - Analogues of the carbon filter on the Corolla 150
| Business | Article number | Estimated cost, rub |
| Nipparts | J1342027 | 320–370 |
| Planimetry | ADT32522 | 240–280 |
| Benefit | 15203112 | 220–260 |
| Spare parts-Mall | PMF077 | 200–280 |
| Parts of Japan | FAATY13 | 140-200 |
| Brother star | XDK113 | 160-1900 |
| Interparties | HICP107 | 190–240 |
Replacement process
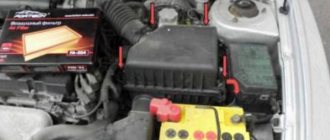
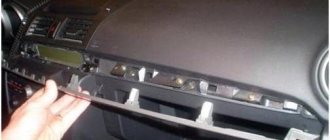
1. Initially, you need to purchase a new filter for the car’s interior, and open the glove compartment as far as possible.
2. Next, using a screwdriver, you need to unscrew the screws that are located on the lower right wall of the glove compartment. After unscrewing the screws, you need to pull the loop out of the rod into which the screw was screwed, thereby releasing the glove compartment itself. During this procedure, it is important not to lose the screw.
3. In order to remove the glove compartment from its hinges, you need to squeeze the glove compartment on the sides and pull it towards you, this will allow the compressed protruding linings to pass through the edges of the glove compartment compartment.
4. In the depths of the compartment under the glove compartment, there will be a small plastic box in which the Toyota cabin filter is located. To get directly to the filter, you need to remove the plastic cover from the box; to do this, you need to squeeze the fixing tabs.
5. After removing the cover, the filter must be pulled towards you, so it will be removed from the housing. The removed filter must be held horizontally so as not to spill any debris that has accumulated on it.
6. A new one is installed in place of the removed filter. When installing the filter, the arrows or the inscription UP on it should be located at the top, that is, towards the installer (after the filter is installed correctly, the inscription or arrow should be visible).
7.After the filter element is installed, it is necessary to close the cover of the filter housing; to do this, you need to lightly press it until you hear a characteristic clicking sound.
8. Next, the glove compartment container is installed in place; it should be squeezed from the sides again, as when removing it. The hinge is reinstalled and the screws are tightened in the lower right side of the glove compartment.
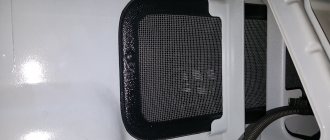
Cabin filter location
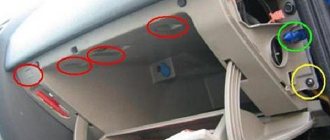
The cabin air filter on the Corolla 150 is located directly behind the glove box on the passenger side. Unlike previous Toyota models, the filter does not have a special frame, but is installed in the body.
Cabin filter position
The filter element is located in the path of the air flow, which enters the radiators of the stove and air conditioner. For this reason, it directly affects the creation of a comfortable climate inside the car.
Instructions for replacing the cabin filter on a Toyota Corolla
On both modifications, access to the cabin filter will require removing the glove compartment, so we first empty it of its contents. In winter, the interior needs to be preheated - frozen plastic bends worse, but cracks more easily.
On the Corolla 120, you need to push on the sides of the glove compartment at the very rear to disengage the stops.
We do the same for the Corolla 150.
Next, the glove compartments are easily removed from the lower fastening, made in the form of hooks.
The cabin filter cover is located horizontally and is held in place by plastic latches on the sides.
On 120 body:
On the 150 body:
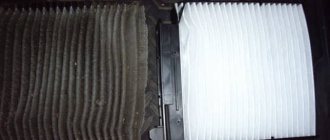
Once you open the lid, simply pull the old filter out. At the same time, the leaves that have accumulated on it can fall down into the stove fan, so you should do this carefully.
Having taken out the old filter, we push the new one into its place, after which you can snap the lid and return the glove compartment to its place.
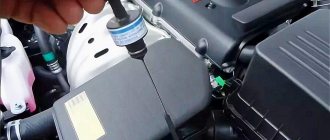
Preventative cleaning of the air conditioner on Corolla is performed through the drain, so choose an aerosol with an extension tube. Lifting the rug at the passenger's feet, we find the drainage and pull it out of the hole in the body.
Next, insert the tube of the aerosol can into the drainage and spray the product inside. After this, you need to quickly return the drainage to its place - the product will begin to actively flow out immediately after removing the tube. After waiting about ten minutes, turn on the car’s air conditioner in recirculation mode at low fan speeds, direct the air to the legs - the air flow will finally blow through the evaporator, and the remaining product will flow out into the drain.
The problem of choosing a cabin filter
The SF standard installed on the Toyota Corolla is a regular dust-proof product with catalog number 87139-YZZ07, the cost of which is within 400 rubles. Analogues of comparable quality can be found for half the price, so even if the presence of foreign odors is not a problem for you, using a non-original filter element may be preferable from a financial point of view. The original coal product (catalog number 88568-52010) costs much more - 1000 rubles, but here you can find analogues with a much lower price. We invite you to familiarize yourself with the list of cabin filters suitable for installation on Toyota Corolla cars in both body styles (120/150):
- Asam (catalog number 70345, price from 210 rubles);
- Agautoparts (catalog number AG5099, price from 220 rubles);
- Ashiika (catalog number 21TY-TY2, price from 220 rubles);
- BIGFilter (catalog number GB9859, price from 220 rubles);
- Denkerman (catalog number M110060, price from 220 rubles);
- AMCFilters (catalog number TC1006, price from 310 rubles);
- Amd (catalog number AMD-JFC111, price from 310 rubles);
- BluePrint (catalog number ADT32505, price from 310 rubles);
- Champion (catalog number CCF0123, price from 320 rubles);
- Jakoparts (catalog number J1342001, price from 320 rubles);
- JapanParts (catalog number FAA-TY2, price from 320 rubles);
- JcPremium (catalog number B42002CPR, price from 330 rubles);
- Asakashi (catalog number AC101J, price from 330 rubles);
- Meyle (catalog number 30-12-3190001, price from 330 rubles);
- Nipparts (catalog number J1342001, price from 340 rubles);
- Four (catalog number QF20Q00002, cost from 340 rubles);
- SCT (catalog number SA1209, cost from 350 rubles);
- Starline (catalog number SF / KF9198, price from 350 rubles);
- Tamok (catalog number F406101, price from 350 rubles).
We also provide a list of coal SF:
- Alco (catalog number MS6188, price from 400 rubles);
- Delphi (catalog number TSP0325173, price from 400 rubles);
- Denso (catalog number DCF357P, price from 400 rubles);
- Filtron (catalog number AP142/1, price from 400 rubles);
- Fortech (catalog number FS-070, cost from 400 rubles);
- Fram (catalog number CF9466, cost from 400 rubles);
- Goodwill (catalog number AG162CFC, price from 450 rubles);
- InterpartsFilter (catalog number IPCA107, cost from 400 rubles);
- Kolbenschmidt (catalog number 50013944, price from 400 rubles);
- Kortex (catalog number KC0014S, cost from 400 rubles);
- Cartridge (catalog number PF2095, cost from 400 rubles);
- Profit (catalog number 1521/2144, cost from 400 rubles);
- Bosch (catalog number 1987 432084, price from 500 rubles);
- LYNXAuto (catalog number LAC-105, price from 500 rubles);
- Knecht (catalog number LA 109, price from 500 rubles);
- Mapco (catalog number 65550, price from 500 rubles);
- Mann (catalog number CU1828, price from 550 rubles);
- Nac (catalog number 77190CH, price from 550 rubles);
- Febi (catalog number 24433, price from 700 rubles);
- Micro (catalog number RCF1801B, price from 700 rubles);
- Avantech (catalog number CFC0108, price from 1000 rubles);
- Corteco (catalog number 80000419, price from 1000 rubles).
When replacing the cabin filter on a Toyota Corolla 2008 and other model years, it is advisable to pay attention to its dimensions: they may differ depending on the year of manufacture, the number of power units and its volume. In total, filters of the following sizes (length / width / thickness) are suitable for Corolla, starting from the eighth generation:
- 0x219.5×20.5;
- 0x215.0x19.0;
- 0x221.0x20.0;
- 0x217.0x16.0.
You can find out the size of your SF by referring to the owner's manual or by measuring it after disassembly.
Where is the SF Toyota Corolla located?
The element that purifies oxygen in a car is located in the air duct of the ventilation system.
The E120 modification in terms of location coincides with the E150 model, so there is no point in describing the location twice.
Due to its purpose, the consumable is installed on the border between the outside of the car and the interior. To access, you do not need to lift the entire panel, as in some cars, disassemble the body or crawl under the hood. In the 2008 Toyota Corolla - one of our most popular models - the seat for the filter element is located immediately behind the glove compartment, and access to it is very easy, with literally three movements of the hand.