Toyota Corolla 150 is a compact C-class passenger car, produced from 2006 to 2012. It replaced the ninth generation Corolla, compared to which it increased in size and became more similar to the flagship Camry sedan of the 2005 model. Initially, the car was available with 1.4 liter petrol engines (4ZZ-FE) with a power of 97 hp. s., as well as 1.6 (1ZR-FE) with a multimodal gearbox (robot). This transmission was later abandoned in favor of a more modern and “smooth” four-speed automatic.
In addition to the automatic transmission, the updated Corolla in 2009 received a new economical 1.3 liter engine (1NR-FE) with the Dual VVT-i system and a power of 101 hp. With. It was coupled with a manual 6-speed gearbox. The Corolla 150 had a standard suspension for this class - a rear torsion beam and a MacPherson beam at the front. As for the interior space, given the distance between the axles of 2600 mm, there was plenty of space in the rear. In terms of practicality and adaptation to Russian conditions, the Corolla was considered one of the best among competitors - Honda Civic, Mazda 3, Volkswagen Jetta and Ford Focus. Sales of the Corolla 150 ended in 2012, after which the next generation model debuted.
Checking the oil level and condition
A running engine, a level platform and the P gearbox set are prerequisites for properly checking the lubricant level. It is advisable that the car not be driven for 4-5 hours before the inspection. However, the automatic transmission and engine must be warmed up to an operating temperature of 80-90 degrees. You can drive 15-20 kilometers or let the engine idle for a while (the air conditioning is turned off). The gearbox lever must be smoothly switched through all steps, then returned to parking mode.
You cannot diagnose the oil level on a car that has previously been driven at high speed for a long time, operated in the heat, or towed a trailer. In this case, you need to stop the car for a day, and only after that proceed to the check.
Instructions for checking the ATF level and condition:
- open the hood of the car, pull out the dipstick with the yellow/red handle;
- wipe it with a dry, lint-free cloth so that the Cool/Hot marks are visible;
- insert the dipstick into place, remove it again and check the level.
It should be in the Hot zone - quite often it is distinguished by notches on both sides. If the level is lower, add the required amount of fluid. Then check again. It is also important to check the color of ATF and its consistency. The oil should not smell like burning, otherwise this will indicate the need for replacement.
The Cool zone shows the fluid level on a cold engine. It is intended to approximately determine the amount of lubricant in case of replacement.
For most modifications of Toyota Corolla with front-wheel drive, the dipstick is located on the left side of the car in the direction of travel. It displays the amount of fluid in the automatic transmission - not to be confused with the dipstick on the right! But in rear-wheel drive Corollas, which have a longitudinal engine, the dipstick is located in the opening between the rear side of the internal combustion engine and the body - here it is almost invisible.
After 2000, Aisin Warner began producing boxes without a probe. The technology for controlling the lubricant level in this case is different. The manufacturer has provided a special hole at the bottom of the crankcase, through which it is possible to much more accurately determine underfilling or overfilling of automatic transmission fluid.
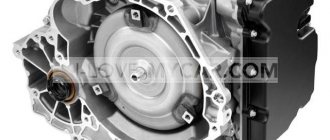
Automatic Toyota Corolla 150 - how much oil to fill
Tenth generation 150, 2006-2012
In Russia, the Corolla 150 was available in a single four-door sedan body, since the platform hatchback was called Auris and thus became a separate model. The design of the sedan was dominated by stylish and presentable forms, like the Camry business model. However, the interior, against the backdrop of such a bold appearance, looked calm due to the lack of bright design solutions. But drivers could appreciate improved ergonomics, comparable to German models of that time.
The level of comfort and noise insulation has increased, and new security systems have appeared. For example, the Japanese version of the Corolla 150 received Intelligent Parking Assist technology for automatic parallel parking in reverse. In addition, the Pre-Crash Safety System became available, which in emergency cases increased the tension of the seat belts and activated automatic braking.
When to change the oil in an automatic transmission?
The timing of replacement directly depends on the specific operating conditions and driving style. According to the regulations, an average interval of 50–80 thousand kilometers is recommended, taking into account the active operation of the car all year round in urban conditions. As for the inspection time, it is recommended to do this regularly, every 30–40 thousand km. If driving conditions are even more severe, the vehicle is often loaded above normal, or is driven in difficult conditions in winter, lubrication renewal and quality control must be carried out more often.
Interesting! The official Toyota dealer directly states that the ATF is not replaceable for the entire guaranteed period - 100 thousand km or 3 years of operation. But the gearbox manufacturer Aisin, on the contrary, recommends changing the technical fluid at least once every 2 years or every 20 thousand km. From their point of view, only a complete change using a professional installation seems to be a priority.
You can determine oil wear by the color of the fluid. At first, Toyota ATF is red, then it becomes transparent. If the lubricant becomes cloudy or has a burning smell, it must be replaced without delay, without waiting for the scheduled date. Also, the liquid should not have a dark brown tint. To more accurately determine its quality, you need to drip a little from the probe onto a white napkin. If the lubricant is completely absorbed without leaving mechanical inclusions on the paper, it is clean and does not need to be replaced. The presence of large chips, metal shavings and other foreign inclusions in it will indicate the need for urgent transmission diagnostics and repairs.
Time for changing lubricant in manual transmission and required volume
According to the manufacturer's recommendations, replacing the lubricant in a manual gearbox on a Toyota Corolla E150 should be done at least every 40 thousand kilometers. In practice, subject to moderate driving, fluid renewal can be done half as often; this procedure is carried out on average once every three years.
Factors indicating the need for another lubricant change in a manual gearbox:
- difficulty changing gears;
- the appearance of extraneous sounds and noises at the moment of gear shifting;
- the appearance of traces of engine oil leakage.
If any symptom occurs, it is necessary to prepare for the fluid renewal procedure, even if the next service is not due yet. In practice, it has been established that a Toyota six-speed manual transmission will require 2 liters of lubricant.
How to choose an oil change?
It is advisable to use the original oil from the manufacturer - Toyota ATF Type T−4. The Totachi Type T−4 analogue is also suitable. As a last resort, any lubricant such as Dextron 3 from a reputable company is acceptable. At the same time as the fluid, you need to change the filter, pan gasket and drain plug seal.
For a complete replacement you will need approximately 8 liters of ATF. A partial replacement will require no more than 4 liters of fluid, since half of the lubricant remains in the deep and hard-to-reach niches of the automatic transmission.
Replacement procedure: step-by-step instructions
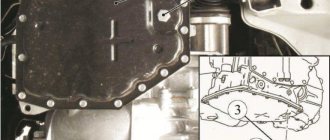
It is recommended to carry out replacement in the classical way, partially by removing the pan. This is necessary in order to clean the magnets located on the inside. The dirtiest grease settles on them and should not be left. In addition, dismantling the pan will make it possible to install a new oil filter.
Required tools and accessories:
- funnel with a thin neck;
- new fluid;
- empty container for drainage;
- wooden spatula for removing the tray;
- 1 liter of gasoline or kerosene.
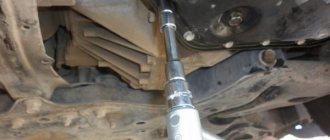
Before doing this, the car must be warmed up and then parked in the pit. Under no circumstances should you confuse an automatic transmission with a transfer case, which often happens on Toyotas with all-wheel drive. The drain plug, under which an empty container is placed in advance, should be unscrewed first. The liquid will drain for approximately 15–20 minutes.
- after draining the oil, you need to unscrew the pan bolts, leaving one fastener on each side as “fixed supports”;
- Using a wooden spatula, remove the tray from the glue along the entire perimeter;
- slightly lift the cover to completely unscrew the remaining two bolts;
- unscrew the differential magnetic plug located on the right side - it should be thoroughly washed with gasoline;
- replace the filter;
- carefully remove all the magnets, rinse thoroughly with kerosene and dry the tray elements, including the lid itself;
- install the magnets and the tray itself, along with a new gasket, in place;
- tighten the plug, replacing its O-ring;
- pour fresh oil through the neck - no more than 3.5–4 liters;
- warm up the engine to operating temperature;
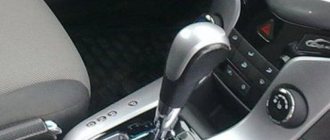
- Switch the automatic transmission lever three times through all modes and back, holding in each position for 7–8 seconds;
- check the fluid level.
It is better to entrust the service of a complete replacement with pumping out the old fluid under pressure to services specializing in the repair of Japanese cars. For example, in Moscow, they have all the advanced equipment and necessary spare parts.
Old automatic transmission oil quickly loses one of its most important properties - resistance to pressure. As a result, it removes heat from the loaded parts of the gearbox less well, its level quickly drops, and lubrication of the rubbing elements is poor. Prolonged operation in this mode will definitely damage the gearbox, which should not be allowed. Therefore, changing the oil in the Toyota Corolla automatic transmission should be done in due time.
Source
How to change it yourself?
Changing the oil in an automatic transmission with removing the pan is a fairly simple operation that you can do yourself.
When performing work, it is necessary to take into account that machines for the European and Japanese markets are equipped with gearboxes that differ in design and crankcase volume.
On European Corollas 120 and 150, the gearbox design is simple, and the replacement process is therefore simple. And in the Toyota Spasio, which is a version of the Corolla 120 with right-hand drive, as well as the Toyota Fielder 121, all-wheel drive is installed. Therefore, when changing the oil in these cars, it is important not to confuse the transmission pan with a similar part of the transfer case.
Tools and materials
To change the oil you will need:
- oil - 4 liters for left-hand drive cars and 8 liters for right-hand drive cars;
- filter device;
- filter gasket;
- new drain plug gasket;
- stable, wide container with a volume of at least 5 liters for collecting used oil;
- a funnel with a thin spout or rubber hose for pouring new lubricant;
- set of keys and sockets;
- a narrow wooden wedge for removing the pallet;
- approximately 1 liter of gasoline to clean the outside of the box tray;
- rags and gloves.
In the video shot by user Maxim Denisov, you can see how the oil is changed in a Toyota Corolla 120 automatic transmission.
Algorithm of actions
Before starting the procedure, the car must be warmed up to operating temperature and placed on a lift or inspection hole in the garage.
The procedure for changing the oil in the gearbox of a 2008 Toyota Corolla is as follows:
- You need to unscrew the drain plug and drain the oil from the pan.
- After draining the main part of the liquid, it is necessary to loosen the 19 10 mm bolts securing the pan.
- Then you should unscrew all the bolts, except for any two located oppositely.
- You need to insert the tip of a wooden wedge into the gap between the pan and the crankcase and disconnect the parts from each other. It is important not to damage the sealing gasket.
- Unscrew the last two bolts and carefully remove the pan, tilting it to the side to drain the remaining oil as much as possible.
- After this, you need to unscrew the magnetic cover of the differential box and drain the lubricant from there.
- Wash the pan and plugs with gasoline, paying special attention to the chip-collecting magnets installed on the pan body.
- You need to unscrew the three 10 mm bolts securing the filter and replace the device. It must be remembered that it contains a certain amount of oil. The tightening of the filter bolts should be no more than 10 Nm.
- Reassemble the box in reverse order. The pallet bolts must be tightened crosswise, ensuring an even fit of the parts. At the same time, they should not be overtightened (torque no more than 8 Nm), since the body and pan gasket are very easily deformed. The tightening torque for the drain plug is 49 Nm.
- New oil must be poured through the hole for the dipstick in an amount of no more than 3.5 liters. In this case, it is necessary to check that there are no leaks through the plugs and the pan gasket. Then warm up the car and once again make sure there are no leaks.
- On a warm box, it is necessary to move the gear selector to all positions, holding it in each position for about 10–20 seconds. The car does not move. Perform these steps three times.
- Then you need to park the car on a level surface and measure the oil level, which should correspond to the level on the dipstick. Volume deviations up or down are unacceptable. If there is not enough oil, it must be added. In case of excess lubricant, it is convenient to use a regular medical syringe of maximum volume to drain it. You need to put a long tube on it, which should be lowered into the hole for the dipstick.
When changing the oil in the crankcase of a Toyota Corolla automatic transmission, a certain amount of old lubricant remains. Therefore, if the car has a long mileage, then after 1 thousand kilometers traveled after the replacement, you can additionally partially change the fluid. This procedure will increase the percentage of new oil in the box and will remove accumulated wear products that can settle in various places in the automatic transmission crankcase.
Algorithm of actions when changing the oil in right-hand drive cars
Right-hand drive Toyota Corolla Fielder and Spasio cars are equipped with a separate radiator for cooling the lubricant. When changing the oil in the sump, the liquid from the radiator is not drained, since there are special valves in the pipeline design. Since the volume of lubricant in the radiator is comparable to the amount in the pan, it must be drained and replaced with a new one. This procedure will require the help of one more person.
The sequence of actions is as follows:
- Remove the oil drain hose from the radiator, extend it to a length that allows it to be brought into the engine compartment.
- The free end of the hose must be placed in an empty container with a volume of at least 4 liters.
- After this, the assistant must start the engine.
- Used lubricant will begin to flow out of the hose; at the same time, fresh oil must be poured into the hole for the dipstick.
- At the end of the procedure, almost 4 liters of liquid will come out of the radiator, and the same amount should be poured into the crankcase.
The amount of fluid when filling is controlled by marks on the dipstick in a warm box and with the engine running.
In the photo you can see the moments of changing the oil in the gearbox of a Toyota car.
- Having everything you need for work, you can start changing the oil in the robotic box of a Toyota Corolla automatic.
- We warm up the Toyota Corolla engine and drive onto an overpass or pit to change the fluid. If possible, we use a lift.
- Open the drain plug of the automatic transmission pan.
- Unscrew the bolts securing the pallet using a wrench. We unscrew the first two bolts completely, but we do not unscrew the opposite pair completely.
- Carefully remove the pallet using a wooden spatula; it will not damage the gaskets or crease the pallet. When it hangs on two not completely unscrewed bolts, make sure that the gasket remains on the automatic transmission body or on the pallet itself.
- Then, lifting the hot pan due to warming up and unscrewing the remaining bolts, remove it completely using gloves. The pan contains hot oil, be extremely careful.
- After removing the pan, unscrew the differential magnetic plug, and then drain the remaining fluid.
- Wash the magnetic plug, magnets and the inner surface of the pan thoroughly in kerosene or gasoline. Then wipe the parts with a dry cloth, removing any remaining fuel.
- Using gasoline or kerosene, wipe the area where the gasket is installed and the seal itself. If the pan gasket needs replacing, replace it.
- After this, the filter and sealing ring must be replaced.
- Return the magnets back to their places.
- Now that you have completed replacing the constituent elements. It is necessary to assemble everything in the opposite order: tighten the magnetic plug, carefully place the pallet in place and tighten the bolts.
- Screw the drain plug into place.
- Now, through the control hole, filler hole or dipstick hole, fill in the appropriate oil. You need to fill in a little less liquid than was drained. Next, if necessary, add more.
- We start the Toyota Corolla car and leave it until the engine warms up to operating temperature.
- While the engine is running, move the automatic transmission selector one by one to modes R–N–D–2–L, and then in the reverse order. Take a break of about 10 seconds between positions. Do this operation three times.
- Use a dipstick to check the lubricant level. It should reach the top mark of the dipstick. Remember, when checking the oil level and filling it, the car must be strictly on a flat and only horizontal surface. If it happens that you have filled in too much oil, then you should lower its level. Draw out the oil using, for example, a syringe and a tube from a dropper. You can buy this set at any pharmacy.
For a Toyota Corolla automatic transmission, excess oil level is a critical factor. It can lead to incorrect operation of the automatic transmission components and foaming of the liquid or slipping of the car. Now you know how to perform a partial oil change in a Toyota Corolla automatic transmission in a garage. The entire process may take about two hours the first time. Therefore, you need to stock up on a little attentiveness and confidence, and then success awaits you.
Remember that carrying out a complete oil change in an automatic transmission is not an easy task. It is better to entrust it to an experienced professional with special equipment.
Transmission oil change interval
To find out after how many kilometers it is recommended to change the oil in the automatic transmission of a Toyota Corolla, you need to refer to the manufacturer’s instructions.
The recommendations given in the Toyota Corolla operating instructions state that the “transmission” must be updated every 50–60 thousand kilometers.
But these data refer to a car that was operated under ideal conditions: without significant temperature changes, on a good road surface, etc. Our country does not fit these conditions.
Experienced car enthusiasts claim that it is necessary to change the transmission fluid on a Toyota Corolla every 40 thousand km. At the same time, it is not recommended to change the entire volume of lubricant (about 6.5 liters) using hardware pumping, since the protective film on the mechanism parts will be damaged. A partial replacement is welcomed, in which half the volume of fluid is renewed, and a complete one - by running the transmission through the hose from the radiator.
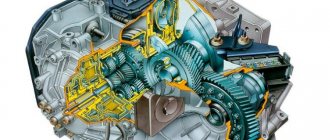
What gearboxes and what kind of oil for them can be found on a Corolla
The manufacturer installs manual and various automatic transmissions in Toyota Corolla. It all depends on the modification of the car. For example, the Toyota Corolla 150 has a K311 variator. Therefore, only the following brands of oil are used in the box:
- for warm climates - Toyota CVT Fluid TC under catalog number 08886-125;
- for the harsh regions of the far north, the manufacturer recommends Toyota CVT Fluid FE.
Attention! If you fill in any other oil, then there will be no such clutch between the belt and the pulleys in the automatic transmission that the original provides. This means that the service life of the variator will decrease. Therefore, it is so important to comply with the regulations of the Japanese manufacturer.
If the driver is in doubt about what kind of oil to pour into a robotic gearbox, it is recommended to read the manual for the operation of the automatic transmission. Or fill in the following oil in the box, which the manufacturer initially uses:
- Geniune Manual Transmission Gear oil LV under catalog number 08885-81001.
For a four-speed hydraulic automatic, the manufacturer recommends ATF Type T IV. This oil is found in almost all automatic transmissions from the birth of vehicles at the Toyota plant. Such oils are suitable for early Corolla models up to 2004.
After 2004, the manufacturer recommends ATF WS for hydraulic automatic transmissions. But you can use analogues, since the U340E automatic transmission itself is quite durable and, with proper care, covers 300 thousand kilometers without major repairs.
Analogues include:
- Total Fluid XLD FE;
- Mobil ATF 3309.
If the car owner has an 11th generation Corolla and does not know what oil is in the box, then he should refer to the owner’s manual. It should be taken into account that from the 11th generation the manufacturer stopped producing automatic cars. Only mechanics and a variator are used.
- for mechanics, all lubricants that have the specification APi GL IV, SAE 75 W are suitable;
- The same oils that were listed above for CVT gearboxes are suitable for the CVT.
Experienced car owners and mechanics do not recommend saving on CVTs and robots. You cannot fill them with cheap oil or use them without changing the lubricant and carrying out preventive maintenance until the last breath of the box. Since restoring a CVT transmission or purchasing a contract one will cost the car owner a high price.
It is recommended to replace the filter device along with the transmission fluid. Usually it is a rectangular metal case with a felt membrane inside or mesh.
It can only be reached by opening the automatic transmission pan. It will also need to be cleaned and metal dust or shavings removed from the magnets. You also need to change all gaskets and seals on the drain and fill plugs to prevent the rubber from drying out and lubricant leaking as a result.
If a car owner doubts not only what kind of oil should be poured into a Toyota Corolla vehicle, but also how much, then the operating book for the machine will help him with this. Usually it takes 4 liters for a partial shift, and up to 10 liters for a full shift.
If a car owner wants to know what oil to pour into the engine, then the next block will tell him about it.
Practical advice on choosing automatic transmission oil
When changing the oil yourself in an automatic transmission of Toyota Corolla in bodies 120, 150, you need to approach the choice of consumables wisely. The further service of the unit depends on their quality. The choice of transmission brand must correspond to the modification and year of manufacture of the Japanese. For the Toyota Corolla E120, produced between 2000 and 2006, and the E150 model, the production of which continued until 2011 - 2012, it is recommended to buy different “transmissions”.
When purchasing oil for a Toyota Corolla automatic transmission, you need to pay special attention. Even if you plan to update the oil not with your own hands, but with the help of service station specialists, you need to purchase all the necessary materials yourself in trusted stores. This way, the risk of purchasing a low-quality product will be significantly reduced.
Original oil
An original transmission is a product of a certain brand that was specifically designed for a given vehicle and recommended by the manufacturer.
This type of oil for the Toyota Corolla 120 automatic transmission is Toyota ATF Type T-IV. For cars in the 150 body, it is recommended to use Toyota ATF WC. Both types of fluid are interchangeable, and if necessary, their partial mixing in one automatic transmission is allowed.
The prices for the original product are very affordable. The cost of a 1-liter plastic canister with code 00279000T4-1 is 500 – 600 rubles. For a four-liter canister with article number 08886-01705 or 08886–02305 you will have to pay from 2 to 3 thousand rubles. The price range is explained by different manufacturers and different packaging.
Analogs
Any original products are copied by other manufacturers and released under their own brand. If all necessary standards are met, the resulting analogue is almost no different from the original. But the cost of the goods may be significantly reduced. Below are the brands of transmission fluid for automatic transmission Toyota Corolla 120/150.
| The product's name | Canister volume in liters | Average retail price in rubles |
| IDEMITSU ATF | 4 | 1700 |
| TOTACHI ATF TYPE T-IV | 4 | 1900 |
| GT ATF T-IV Multi Vehicle | 1 | 500 |
| GT ATF T-IV Multi Vehicle | 4 | 2000 |
| TNK ATF Type T-IV | 4 | 1300 |
| RAVENOL ATF T-IV Fluid | 10 | 4800 |
Price issue
To change the oil in the automatic transmission of a Toyota Corolla in the 120/150 body, it is not necessary to seek help from specialists at expensive service centers. Updating the transmission fluid yourself will not be difficult for the average car enthusiast, and at the same time will save money.
A partial oil change will cost the owner 4–5 thousand rubles. A full cycle using two or even three canisters of liquid will cost 6–7 thousand.
The total cost of replacement consists of the cost of transmission fluid, oil filter, and gaskets for Toyota Corolla. Any service station mechanic will ask for work from 3 to 7 thousand rubles, depending on the level of the service center and region.
Checking the level
Before you begin the procedure for updating the transmission on a Toyota Corolla, you need to measure its level. To do this correctly, you need to follow the algorithm of actions:
- drive a car for about 10 kilometers to warm up the oil in the Toyota Corolla automatic transmission to operating temperature;
- stop on a flat surface;
- lift the hood and remove the automatic transmission oil dipstick;
- wipe it with a dry cloth and put it back in its original place;
- after that, take it out again and check the level at the upper mark marked “HOT”.
If the transmission fluid level is low, it should be topped up. If the level is exceeded, then use a syringe and a thin tube to pump out the excess.
Materials for a comprehensive oil change in a Toyota Corolla automatic transmission
To change the oil in the automatic transmission of Toyota Corolla in bodies 120, 150, without resorting to outside help, you need to be patient and have the necessary list of materials. This can take from two to three hours if you have all the tools at hand.
List of required materials:
- transmission fluid 4 liters;
- automatic transmission oil filter catalog number 3533052010 (35330–0W020 for Toyota Corolla models in the 120 body of 2007 and for cars in the 150 body of 2010 and 2012);
- set of keys;
- wide container for draining the transmission;
- degreaser 1 liter (gasoline, acetone or kerosene);
- new gasket for the pallet (article 35168-12060);
- sealing ring for the drain plug (article 35178-30010);
- sealant (if necessary);
- rags and water for wiping dirty surfaces;
- funnel with a narrow end;
- container with a scale for measuring volume;
- protective gloves;
- torque wrench.
This list is necessary for partially updating the oil in a Toyota Corolla automatic transmission. For a full cycle, you will need at least 8 liters of oil and an additional plastic container, as well as the help of another person who will periodically start the engine. In addition to all this, the event requires an overpass, inspection pit or lift to provide convenient access to the Toyota Corolla automatic transmission.
Preparation for replacement and necessary tools
Preparing to change the oil in a Toyota Corolla E150 manual transmission involves studying safety precautions and preparing tools.
Safety rules when changing oil in a manual transmission:
- find special clothing and gloves;
- turn on bright lighting;
- Replacements can only be made 15-25 minutes after arrival. The oil should cool down a little.
List of necessary tools for changing the oil in a Toyota Corolla E 150 manual transmission:
- set of wrenches and hex keys.
- pharmaceutical syringe.
- screwdriver.
- empty container for waste liquid.
- fresh oil.
- additional gaskets for the drain and filler holes.
Draining old oil from the gearbox and cleaning the pan
Draining old oil from the tank into a manual transmission on a Toyota Corolla E150:
- The car is placed in the garage on a pit or a lift.
- The filler plug is unscrewed at the bottom of the vehicle. The car oil is drained within 15-25 minutes.
- The plug is screwed back in.
- Using a wrench, unscrew the pan and carefully drain the residual oil. The condition of the liquid is assessed. If there are chips, the tray is thoroughly washed, cleaned with a wire brush and wiped with a clean rag.
- The tray is installed in the reverse order. All bolts are carefully tightened.
Filling new oil in the manual transmission
Step-by-step process for adding new fluid:
- The filler plug opens. Located on the crankcase.
- Using a syringe, the oil is filled to the maximum level.
- The plug closes. The engine starts and warms up for 10-15 minutes.
- The oil fluid level is rechecked. If necessary, top up.
In order not to overpay for transmission fluid, many people dilute semi-synthetic and synthetic oil. This is strictly not recommended. If the proportions are incorrect, the liquid will begin to foam, which can cause the box to jam.
This completes the oil change process for the Totota Corolla E150.
Do-it-yourself automatic transmission oil change
Having prepared all the materials and measured the level of hot fluid, you can begin changing the oil in the Toyota Corolla automatic transmission. Before starting work, you should wear thick gloves to avoid burns if hot oil gets on your hands.
Draining old oil
The automatic transmission of a Toyota Corolla contains as many liters of oil as the working volume of the unit can accommodate - approximately 6.5 liters. When you unscrew the drain plug, not all the oil pours out, but only half. The rest remains in the unit. Therefore, you need to prepare a container for the waste liquid so that it can fit about 3.5 liters. Most often, a five-liter water canister with a cut off neck is used.
To get to the automatic transmission plug on a Toyota Corolla, you need to remove the engine protection. Then, using a 14mm wrench, unscrew the drain plug, after which the transmission will immediately flow out of it. You need to try to collect all the leaking oil, since this is the amount of fresh liquid that will need to be poured back.
Washing the tray and removing chips
The box pan plays an important role in the Toyota Corolla automatic transmission - carbon deposits and used dirty oil accumulate in it. Magnets installed at the bottom of the part attract chips formed as a result of friction of the mechanisms. To get rid of accumulated dirt, you need to remove the pan and clean it thoroughly.
The bottom of the Toyota Corolla automatic transmission is unscrewed with a 10mm wrench. To prevent sudden removal of the part and to avoid spilling the oil contained in it, it is advisable not to completely unscrew the two bolts diagonally. Using a flat screwdriver, pick up the flange of the pallet and carefully disconnect it from the mating surface. After this, you can unscrew the remaining bolts and remove the pan. It contains about half a liter of oil.
We wash the bottom of the automatic transmission with a degreasing compound. We clean the magnets from chips. Then wipe the part dry with a soft, lint-free cloth and set it aside.
Preparation, tools and replacement
The preliminary stage is studying the safety precautions for servicing a car, as well as preparing tools. Changing the oil in a Toyota Corolla E150 manual transmission is carried out in special clothing and protective gloves, as well as in a sufficient level of lighting. Before performing the procedure, you must allow the car to cool for 20 minutes.
Tools:
- screwdriver, wrenches, and hex keys;
- an ordinary watering can and a half-meter hose;
- special gaskets for filler and drain holes;
- free container for draining used consumables.
Step-by-step instruction
After purchasing a new consumable, you need to prepare the tools and garage space for the oil change procedure in a 2008 Toyota Corolla box.
- First of all, we drive the car into the “pit”, remove the protection and dismantle two plugs: drain and filler, and then drain the old lubricant into an empty container.
Location of drain and filler necks
In order to remove the protection, you will need a 17-size wrench, and to remove the plugs, you will need a 24-size wrench. On the dismantled plugs, the car owner may see a warning about the need to first study safety precautions. The spent consumables are completely drained within 20 minutes.
- After draining, we evaluate the condition of the lubricant.
If chips appear, rinse and clean the tray. As a rule, the color of the drained lubricating fluid is practically no different from the new one, otherwise there is a malfunction in the operation of the gearbox. The drain plug on the model in question is not equipped on the inside with a special magnet that effectively collects chips, as in cars of other brands.
You need to buy new O-rings
- Then you need to tighten the plug on the drain hole.
Next, using a watering can and hose, you need to pour new fluid into the filler hole.
- Be sure to check the oil level in the box; lubricant should be at the bottom edge of the filler hole.
Upon completion of the oil renewal procedure in the Toyota Corolla E150 manual transmission, you should tighten the filler cap and also return the protection to its place.
This is interesting: Nissan Tiida cabin filter: where is it located, replacement