As you know, an injection engine, unlike an outdated carburetor engine, is considered more economical and much more environmentally friendly. Moreover, the power system of such an internal combustion engine has a large number of sensors.
The lambda probe sensor (oxygen sensor) is an important element of the power supply system of injection engines. Moreover, this sensor does not have a long service life for a number of reasons.
If the lambda probe fails, the engine may operate unstably, lose power, etc. Next, we will look at what a lambda sensor is in a car, the main purpose of a lambda in a car, what signs indicate problems with this element, and also how to check the oxygen sensor
Oxygen sensor in a car: purpose and principle of operation
The main task of engine sensors is to transmit signals to the ECU, many of which allow the control unit to flexibly adjust the fuel-air mixture taking into account constantly changing operating conditions and loads on the internal combustion engine.
In turn, among other ECM sensors, it is difficult to overestimate the importance of the lambda probe (sometimes car enthusiasts on forums mistakenly call this element lambda probe or lambdazone). Simply put, oxygen sensors in a car measure the excess air ratio in the air-fuel mixture.
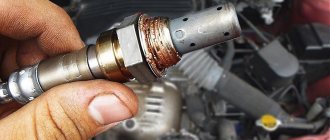
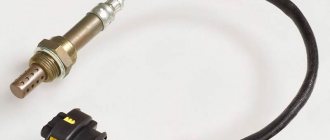
The general design of the lambda probe is as follows:
- metal case;
- ceramic insulator;
- sealing ring;
- wiring and cuffs for sealing;
- protective housing with a hole for ventilation);
- conductive contact;
- ceramic tip;
- spiral in the tank;
- protective shield with a hole for releasing gases.
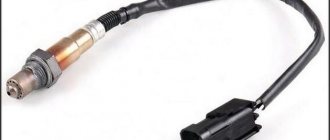
To produce sensors of this type, heat-resistant materials are needed, since the device operates at high temperatures. In total, oxygen sensors are divided into several types, depending on the number of wires per sensor.
In fact, this sensor determines the excess air ratio by “sniffing” the exhaust and detecting residual oxygen in the exhaust gases. The main task of the oxygen sensor is to transmit important information to the engine ECU, which allows the controller to determine how efficiently the fuel combustion process is occurring in the cylinders.
This information is needed in order to maintain optimal conditions for the operation of the catalyst (catalytic converter), which filters vehicle exhaust and reduces the amount of harmful emissions into the atmosphere.
The main reason for such control is that the most efficient operation of the catalyst is possible only when 14.6–14.8 parts of air and 1 part of fuel are burned in the engine. When such a mixture burns, lambda will be equal to 1 ± 0.01.
It is quite obvious that in order to constantly prepare such a mixture in different modes, you need a developed power system with electronic fuel injection, which constantly receives signals from sensors (including the oxygen sensor).
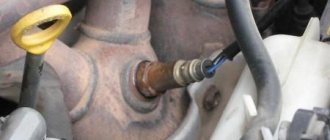
At the same time, the lambda probe itself is located in the exhaust system, operates under high heating conditions, and can also fail if there are faults in the engine. Let's look at the signs and causes of lambda failures.
Lambda probe: signs of malfunction
As a rule, the oxygen sensor (lambda probe) may fail or work intermittently if the engine itself is worn out or faulty.
For example, if the oil rings are not working properly, engine oil will leak into the cylinders and then into the exhaust. Antifreeze or antifreeze, etc. may also get into the cylinders. All this leads to the fact that the sensor resource is reduced or the element stops working.
Problems with mixture formation or ignition, overheating, short circuits and faulty wiring, and contamination of the sensor (including after combustion of gasoline with a high content of additives to increase the octane number) can also damage the lambda.
One way or another, in the case of a faulty lambda probe, the CO content in the exhaust gases increases from 0.1–0.3% to 4–6% or more. In this case, usually:
- the engine loses power;
- the engine jerks, the speed fluctuates;
- fuel consumption increases;
- the check light is on on the instrument panel;
- The internal combustion engine may operate unstably, in emergency mode, etc.
By the way, some cars may only have one such sensor, while others may have a second lambda probe, and there may be more sensors. In the first case, the lambda can often be disabled programmatically.
On cars with two lambda probes, especially if the second oxygen sensor fails, solving the problem is much more difficult. The fact is that you will need to actively interfere with the operation of electronic systems, reflash the ECU, install so-called lambda probe decoys, etc.
Stories from our readers
“Fucking basin. "
Hi all! My name is Mikhail, now I’ll tell you a story about how I managed to exchange my two-wheeler for a 2010 Camry. It all started with the fact that I began to be wildly irritated by the breakdowns of the two-wheeler, it seemed like nothing serious was broken, but damn it, there were so many little things that really started to irritate me. This is where the idea arose that it was time to change the car to a foreign car. The choice fell on the melting Camry of the tenth years.
Yes, I had matured morally, but financially I just couldn’t handle it. I’ll say right away that I am against loans and taking a car, especially not a new one, on credit is unreasonable. My salary is 24k a month, so collecting 600-700 thousand is almost impossible for me. I started looking for different ways to make money on the Internet. You can’t imagine how many scams there are, what I haven’t tried: sports betting, network marketing, and even the volcano casino, where I successfully lost about 10 thousand ((The only direction in which it seemed to me that I could make money was currency trading on the stock exchange, they call it Forex. But when I started delving into it, I realized that it was very difficult for me. I continued to dig further and came across binary options. The essence is the same as in Forex, but it’s much easier to understand. I started reading forums, studying trading strategies. I tried it on a demo account, then opened a real account. To be honest, I didn’t manage to start earning money right away, until I understood all the mechanics of options, I lost about 3,000 rubles, but as it turned out, it was a precious experience. Now I earn 5-7 thousand rubles a day. I managed to get the car buy after half a year, but in my opinion this is a good result, and it’s not about the car, my life has changed, I naturally quit my job, I have more free time for myself and my family. You’ll laugh, but I work directly on the phone)) If If you want to change your life like me, then here’s what I advise you to do right now: 1. Register on the site 2. Practice on a Demo account (it’s free). 3. As soon as you get something on the Demo account, top up your REAL ACCOUNT and go to REAL MONEY! I also advise you to download the application to your phone, it’s much more convenient to work from your phone. Download here.
During the first 5-7 minutes after starting the engine, the ECU adjusts the mixture composition based on the readings of other sensors and averaged parameters. After this time, when the oxygen sensor has warmed up to operating temperature, then the ECU connects its parameters to the general calculation formula.
An oxygen sensor error may be caused by a faulty heating circuit. As a result, the sensor will not have time to warm up in the allotted time, which means that incorrect signals from the oxygen sensor . The fuel mixture will not be suitable, which will negatively affect engine performance (high fuel consumption, idle speed fluctuates, the car does not drive). As soon as the oxygen sensor warms up to operating temperature, all symptoms disappear.
The service life of a VAZ oxygen sensor can reach 100-150 thousand km, but the service replacement of an oxygen sensor on a ten should take place in the interval of 60-80 thousand km.
How to check the oxygen sensor ? To make an accurate conclusion about the performance of the sensor, you need to use an oscilloscope. In other cases, the condition of the lambda probe can only be determined indirectly.
Lambda probe restoration
A common cause of malfunctions is carbon deposits, which prevent the capture of oxygen and, accordingly, distort the output signal.
Therefore, in order to
restore the oxygen sensor, you need to clean the platinum electrodes on the ceramic rod from carbon deposits.
It is impossible to clean carbon deposits by mechanical means, since this method will damage the metal coating. All that remains is to resort to the help of chemistry. We open the sensor, to do this we saw off first the first and then the second protective cap. Goal: get to a white ceramic rod with carbon deposits of the same color. To clean the sensor rod from carbon deposits, you will need phosphoric acid, which may be part of the rust converter. Before using cleaning products, make sure that they do not leave a protective layer behind.
We immerse our sensor in the cleaning solution for 20 minutes. During this time, the liquid will begin to become cloudy and the deposits will disappear (using a soft brush is allowed).
Heating also allows you to get rid of carbon deposits, especially if you cool the rod sharply after heating. Temperature changes cause carbon deposits to crack and fall off like a shell.
Heat the ceramic rod over an open fire a couple of times.
After cleaning, we attach the caps to several points of semi-automatic camp welding.
The VAZ 2110 oxygen sensor , like the sensors of foreign cars, has a similar structure, so this cleaning of the lambda probe is suitable for every car enthusiast.
Were you able to repair your car's oxygen sensor?
DIY lambda probe repair
How to check the lambda, repair or replace the oxygen sensor
- The most effective way to check is computer engine diagnostics, which allows you to determine errors using the lambda probe. Deciphering engine computer diagnostic errors allows you to localize the problem.
- You can also install a known working sensor on your car. Afterwards you need to reset the errors. If engine operation returns to normal, then the cause is the oxygen sensor.
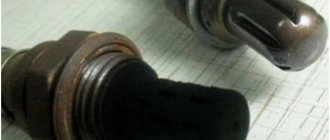
- The performance of the lambda probe can also be assessed visually. This visual check will not be accurate, but is sometimes effective. To begin with, inspect the wire connectors. Everything must be in place and securely fastened.
Then you can unscrew and inspect the oxygen sensor. If soot is visible (most often resulting from problems with the lambda probe heater or after combustion of a rich mixture), the dirty sensor loses its ability to properly assess the composition of the exhaust.
The problem will also be indicated by the presence of shiny gray deposits, which indicate an excess of lead in the fuel. Typically, lead leads to failure of the sensor and often the catalyst. If there are visible whitish deposits, this is also a bad indicator. In this case, the lambda can be “killed” by additives in the fuel or engine oil.
- Another way to check is to test the lambda with a voltmeter tester. To quickly check the lambda probe, the tester is switched to constant voltage measurement mode. The car is started by disconnecting the oxygen sensor from the block before starting. Next, its signal wire is connected to a voltmeter.
Then you will need to raise the engine speed to 2.5 thousand rpm and release the gas pedal. Then you need to remove the vacuum tube from the fuel pressure regulator. After this, you can evaluate the tester readings. If diagnostics and testing of the lambda probe shows 0.8V or less, or there is no reading at all, then it is clear that the lambda probe is faulty.
The test must also be repeated by creating a lean mixture. To do this, you need to suck air through the vacuum tube. If the oxygen sensor is working properly, then the voltmeter reading will be 0.2 V or less.
If all checks show that the sensor is faulty, then the lambda probe needs to be replaced. Also, in some cases, cleaning can help, but this method is not always effective.
How to replace it yourself?
As you can see, in most cases of lambda probe failure, repairing it makes no sense, so the best solution to the problem would be to replace the faulty element, especially since this process is not complicated.
Before replacement, it is necessary to turn off the power to the vehicle's on-board network, and then remove the block from the sensor (on some models it can be additionally secured with clamps). Since lambda is included in the design of the exhaust system, the element therefore constantly operates under high loads. It is not always possible to unscrew it the first time. This should be done carefully so as not to damage the threads in the exhaust manifold pipe.
After the failed element is removed from its seat, we clean the threads from dirt, install a new lambda probe and screw it in, being careful not to overtighten.
The importance of the oxygen concentration sensor in the exhaust system of a car cannot be overestimated, since its failure will provoke incorrect operation of the power unit, which is extremely detrimental to its elements. For this reason, you need to learn to identify its breakdowns in a timely and correct manner.
How to clean a lambda probe
Let us note right away that the part is officially non-repairable, that is, the lambda probe is not supposed to be repaired and the sensor needs to be replaced. However, often the element fails precisely because of carbon deposits on the sensitive element. This element is under a protective cap.
It is quite obvious that if you remove the carbon deposits, there is a chance that the sensor will work. As a rule, you can try to clean the lambda in orthophosphoric acid. This acid removes soot and dirt in 20-30 minutes without causing harm to sensitive electrodes.
The difficulty is that you can effectively clean the oxygen sensor by removing the protective cap. If external washing does not help, the cap is removed on a lathe. Next, after cleaning, the cap must be re-attached. It is usually secured using argon welding. If such cleaning does not produce results, the only solution is to replace the lambda sensor.
Is it possible to clean the lambda
Modern cars are equipped with sensors to monitor a number of operations. They transmit information to the on-board diagnostic system (OBD-II). These components take the guesswork out of identifying vehicle complications. It is natural for sensors to become dirty with regular use. Fortunately, most systems do not need to be cleaned frequently.
Symptoms that indicate that the lambda needs to be cleaned:
- Higher gas consumption.
- Exhaust smoke.
- Reduced engine performance. The car will not be able to accelerate normally and misfires may occur.
The most reliable way to diagnose a dirty device is to use an OBD-II scanner. The error code will tell you whether there is a problem with the emissions system, and if so, what parts are affected.
Clean the old one or buy a new one
Each car enthusiast must make a decision independently, but statistics must be taken into account. The fact is that after cleaning the oxygen sensor, it is not always possible to completely return it to normal operation.
How can I clean the lambda probe?
Most common cleaning products contain solvents designed to break down accumulated dirt without damaging anything. Only special solvents should be used. The chemical structure of different products may vary depending on the intended use. This will require the use of a catalytic converter cleaner (emission system cleaners). The product must be selected according to the type of sensor.
| For zirconium oxide (ZrO2) | For titanium oxide (TiO2) |
| Hydrofluoric acid (hydrogen fluoride solution HF), concentrated sulfuric acid (more than 70% H2SO4) and alkalis | Sulfuric acid (H2SO4), hydrogen peroxide (H2O2), ammonia (NH3) |
Before purchasing a product, you need to make sure that the product matches the type of engine. Some brands are not universal and may only be suitable for diesel or petrol engines. You need to read the instructions on the package or the included instructions. This will tell you how much gas should be in the tank before treating it with the product. You may have to run the tank almost empty or top up with fuel.
Replacing the oxygen sensor
Let's start with the fact that if the car has a heated oxygen sensor, it can often be replaced with an unheated lambda probe. You can also make a reverse replacement with a heated part. Even if the electrical circuit connectors do not match, you can use universal contacts.
As for the replacement itself, you need to change the oxygen sensor only after the engine has cooled down. The lambda probe must be replaced after the ignition is turned off. It is optimal to buy a lambda probe that has a marking similar to that of the element installed on the car.
The replacement itself is performed as follows:
- First you need to disconnect the wires from the sensor;
- then the lambda probe is unscrewed with a wrench;
- then a new element is screwed in and the wiring is connected;
- the final stage is checking the functionality of the sensor;
Please note that when unscrewing and tightening the lambda probe, it is important not to break the thread, that is, you should not use unnecessary force.
Cleaning methods at home
Since the oxygen sensor can sometimes be restored, car owners have a logical question. They are interested in how to properly clean the lambda probe without going to a car service center. There are indeed methods that can be used at home. But you need to be extremely careful, since the work involves the use of potentially dangerous substances. Please note that the oxygen sensor is quite fragile by design. Therefore, causing any damage during cleaning directly indicates that work needs to be stopped and a new controller purchased. This one is no longer suitable for further use. The need to replace the lambda probe arises when the vehicle begins to consume a large amount of fuel, exceeding normal values, without objective reasons. Warning lights also appear on the dashboard, which recommend diagnostics. Quite often, such symptoms indicate problems with the oxygen sensor. And there are two cleaning methods:
It is recommended to immediately abandon the idea of performing mechanical cleaning. This is explained by the fragility of the element, which is very easy to damage when working with your own hands. If any damage is caused, further operation of such a controller is not permitted. It is also dangerous to use any power tools with abrasive attachments. They act with too much force, which causes the sensor to instantly break. Sitting and picking at the sensor with different toothpicks or needles is also long and exhausting. As a result, experienced motorists agree that the chemical method is the most optimal, easy to perform at home and effective.
When choosing a chemical cleaning method, it is important to choose the right product. Here you can use liquids from different manufacturers who offer their own solvents for solid carbon films. And many are interested in whether it is possible to clean the lambda probe at home with carburetor cleaner. This product can really help, as can an injector cleaner. But still, orthophosphoric acid has gained great popularity. It is able to cope with more serious pollution. Phosphoric acid is characterized by the ability to quickly dissolve metal oxides and organic alkaline films without damaging the oxygen sensor itself. This cleaning gives a good result, so it is often done with your own hands at home if the controller has not failed, but has simply become dirty.
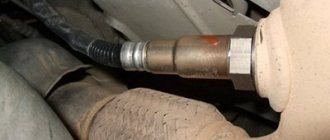
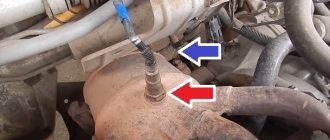
Phosphoric acid can be used in the usual and improved ways. To carry out cleaning work, you first have to find the oxygen sensor itself. It is located in the engine compartment in front of the catalyst installed on the car. But keep in mind that on modern cars, manufacturers install two lambda probes at once. The first one stands in front of the catalyst, and the second one is located behind it. Therefore, sometimes it is easier to find devices by moving from the engine compartment under the car. If there is a hole in your garage or you have the opportunity to lift the car on a lift, finding oxygen sensors will not be difficult. The controllers are dismantled using a key of the required size. Once removed, you can begin cleaning. You will use the usual method or the accelerated one, everyone chooses for themselves.
Conventional acid cleaning
It cannot be said that self-cleaning the lambda probe with phosphoric acid is extremely simple. And this is not about the acid itself or the procedure. The difficulty lies in the fact that the ceramic-platinum base, on which carbon deposits and soot accumulate, is hidden under a protective metal cap. If it is not removed, the treatment will be useless. To remove the cap, you need to be extremely careful and delicate. If you pick up a hacksaw, you will probably damage the entire device, so further cleaning will not be necessary. You will have to change the oxygen sensor. A lathe is suitable here, which can be used to cut off the cap near the thread. In the absence of a machine, files are used. It will not be possible to completely remove the cap with a file. But you can make a small window, the dimensions of which will be about 5 millimeters. The optimal method that does not require additional tools. When you manage to get to the working rod, you can begin cleaning the lambda probe. Below are step-by-step instructions for cleaning the oxygen sensor.
This type of cleaning takes a lot of time, but often gives good results. Therefore, motorists are ready to endure, just not to spend money on buying a new oxygen sensor. Although it is possible to speed up the procedure.
Accelerated method
Those who want to clean the oxygen sensor with their own hands, but who do not have the patience for the usual method, are interested in how they can help so that the lambda probe quickly returns to its original appearance. To increase the cleaning properties of orthophosphoric acid, you will need to additionally take another device. After using it and completing all procedures, do not forget to rinse the surface of the cleaned core. To speed up the procedure, you will need a gas stove or burner. If you use a regular home stove, then it will be more convenient to work on the smallest burner. Here everything is done like this:
It is necessary to achieve a metallic shine on the working surface of the oxygen sensor. Typically this procedure takes about 15-20 minutes. Before putting the device back in place, be sure to treat the threads on the oxygen sensor with graphite lubricant. Now feel free to return the lambda probe to its socket. If you have two devices, a similar procedure should be performed with the second controller.
Useful tips
As you can see, diagnosing lambda problems requires separate knowledge of what signs indicate malfunctions of the oxygen sensor, as well as how to check the lambda probe with a voltmeter.
By the way, it is recommended to check the lambda probe every 30-40 thousand km. mileage, especially if there are problems with mixture formation. To check, you need to warm up the engine, then raise the idle speed to 2 thousand rpm. On the voltmeter, the lambda probe voltage should be between 0 and 1 V (taking into account the exhaust temperature of 300–400 degrees Celsius).
Please note that it is under heating conditions that the zirconium electrode becomes able to conduct current, and the amount of oxygen in the atmosphere and oxygen in the exhaust causes an output voltage to appear on the electrodes of the lambda probe. It is for this reason that the lambda probe is checked on a well-warmed engine.
We also note that if there is such a possibility, it is better to use an oscilloscope rather than a multimeter to check. It is the first option that allows you to more accurately assess the signal quality. You also need to measure the resistance of the sensor heater. Measurements are first taken with the plug removed, the norm at normal temperatures is 2 -14 Ohms.
Then the voltage on the heater is measured (with the ignition on and the sensor connector connected). Normally, the indicator should be at least 10.5 V. If the value is less, the battery, wiring, contacts, etc. are checked.
It should also be noted that in the case where the lambda probe was previously unscrewed and put back, it is recommended to treat the threads with a special mounting paste. However, such paste should not be allowed to come into contact with the protective tube in order to avoid contamination and possible malfunctions of the sensor.
We also recommend reading the article about what signs indicate a malfunction of the crankshaft position sensor (CPS). In this article, you will learn about the symptoms that indicate problems with this sensor, as well as how to check the DPKV.
If the device is new, large manufacturers already supply sensors treated with paste from the factory. The main thing is to observe the recommended tightening torque when installing the lambda probe (usually 40, 50 or 60 Nm).
Finally, we note that the lambda probe is a very fragile and sensitive sensor. It must be carefully screwed in, not dropped during installation, it must not be knocked on the oxygen sensor, it must not become oily or dirty, etc.
Considering that the sensor takes outside air for comparison with the exhaust, and the intake occurs through the connecting connector, such a connector cannot be filled with contact sprays or lubricated.
Particular care should be taken when washing the engine or underbody of the car. The lambda probe connector must be separately and properly insulated. Even when driving off-road, the sensor can be mechanically damaged or contaminated. To avoid this, you should take into account the features and location of its installation on the machine. As a rule, engine protection allows partial protection of the lambda.
What should you be wary of?
As soon as the driver notices changes in engine performance, it is worth thinking about a lambda probe . The fuel mixture enters the combustion chamber worse, virtually becoming uncontrolled. This cannot be allowed. Among the reasons that provoke a part to break, experts noted the following.
- Violation of the seal of the housing.
- Exhaust gas penetration.
- The sensor overheats due to poor-quality engine painting or unstable functioning of the ignition system.
- Wear according to manufacturer's regulations.
- Problems with electrical wiring, unstable current supply to the control unit.
- Mechanical shock, as a result of which the sensor was deformed.
In these situations, except for the last point, failure does not occur spontaneously. In this regard, drivers who do not have much driving experience and are not familiar with the structure of the car and the location of the sensor may miss the problem. Although the skill of recognizing a problem comes with experience.