The lambda probe is an oxygen controller. It is used to control and balance the proportions of air and fuel during the formation of a combustible mixture. Correct functioning of the element will prevent destabilization of the motor's operating process. To determine the cause of the breakdown, you need to know the signs of a malfunctioning lambda probe.
External signs and causes
If the lambda probe heating system or the device itself in the car does not work, the symptoms of the malfunctioning condition will be as follows:
- The power unit began to operate less stably. The revolutions can spontaneously increase and fall. The engine often stalls, especially at traffic lights.
- The quality of the combustible mixture, which is pumped with air into the cylinder system, has decreased. If the sensor is not functioning properly, this will cause excessive fuel consumption.
- The fuel supply has become ineffective, fuel enters the combustion chambers uncontrollably. This can lead to malfunctions in the operation of the unit, as well as the electronic system of the car.
- Over time, the engine may experience intermittency when operating at idle speed. At maximum, the efficiency of the internal combustion engine will also be less low.
- There were problems with the functioning of electronic systems. Due to the need to repair the sensor, individual compartments of the power unit will operate unstably. This is due to the fact that pulsed fault signals are sent with a delay.
- While driving, the vehicle began to jerk. Especially when the car is going uphill.
- When the engine operates at any speed, popping noises may appear.
- The engine began to respond slowly to pressing the gas pedal. Acceleration occurs, but not immediately.
One of the important symptoms is the lightning of the Check Engine indicator or the oxygen controller failure light on the car’s dashboard.
The reasons why the performance of the oxygen sensor will be impaired may not arise immediately, so failure of the part occurs in several stages:
- At first, the oxygen sensor begins to function unstably. Periodically, the signal from the device disappears, information is provided over a wide range. This leads to deterioration in the quality of the combustible mixture, as well as unstable speed operation. At the initial stage, the car jerks when moving, popping noises uncharacteristic of the operation of the internal combustion engine appear, and a malfunction indicator may light up on the dashboard.
- At the next stage, the lambda probe stops functioning on a cold engine until the unit warms up. The symptoms of the problem will be similar, only they will appear with greater force. The engine power of the car may decrease, and a response will appear when you press the gas pedal. As a result, this can lead to overheating of the internal combustion engine.
- At the third stage, the oxygen sensor usually fails completely. The power of the power unit drops even more, this is clearly evident when driving at high speed. An unpleasant and pungent odor appears from the muffler.
Reasons that may cause a breakdown of the oxygen sensor:
- The device casing has depressurized. Because of this, exhaust gases and air began to get inside.
- Controller overheating. The reason may be due to malfunctions in the ignition system or incorrectly performed tuning of the power unit.
- Long-term exposure to external factors. This reason can be attributed to natural wear and tear, since any oxygen sensor fails over time.
- The working surface of the oxygen sensor is covered with combustion products, which block its operation. This is usually due to the regular use of low-quality fuel.
- There is a power failure or the wiring leading to the central control unit is damaged.
- Mechanical damage to the device. A strong blow to the case may destroy the internal components of the controller. This often occurs during regular off-road driving.
The “Online auto parts store” channel talked about the causes of malfunctions in the operation of oxygen controllers.
Operating principle of the oxygen sensor
The principle of operation of the oxygen sensor is quite simple. The lambda probe must compare the readings with some ideal results in order to understand how the percentage of oxygen in the mixture changes, so measurements are taken in two places - atmospheric air and combustion products .
This approach allows the sensor to feel the difference if the fuel mixture ratio changes.
The ECU must receive an electrical impulse from the lambda probe. To do this, the sensor must be able to convert measurements into electrical signals. For measurements, special electrodes are used that can react with oxygen.
Lambda uses the principle of galvanic cells - changing the conditions of chemical reactions leads to a change in the voltage between the two electrodes. When the mixture is rich and the oxygen content is below the lower threshold, then the voltage rises. If the mixture is lean, the voltage will drop.
Next, the impulse that occurs at the stage of chemical reactions is sent to the ECU, where the parameters are compared with the fuel maps stored in the memory. As a result, the operation of the power system is adjusted.
Related article: How to make a foam generator for a car wash with your own hands
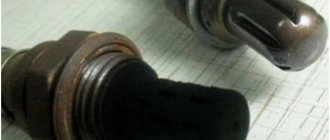
The oxygen sensor operates on chemical reactions, but its design is relatively simple. The main element is a special tip made of ceramic materials. Zirconium dioxide and, less commonly, titanium dioxide are used as raw materials.
The tip is coated with platinum - it is this layer that reacts with oxygen. One side of this tip is in contact with the exhaust gases, the other side with the air in the atmosphere.
The lambda probe electrodes have one feature. So that the reaction is more efficient and the indicators are accurate, measurements of the oxygen content in the exhaust are carried out under certain temperatures.
In order for the tip to reach the performance characteristics and the required electrical conductivity, the temperature of the environment should be 300-400 degrees.
To ensure the required temperature regime, the lambda probe was initially installed in close proximity to the exhaust manifold. This ensured the desired temperature after warming up the internal combustion engine. The sensor did not start working immediately. Before the lambda warmed up enough and began to produce accurate parameters, the ECU used signals from other sensors. The optimal mixture was not prepared during the heating process.
Some oxygen sensor models are equipped with electric heaters. Thanks to them, the lambda can quickly reach operating temperature conditions. Heating uses energy from the vehicle's on-board network.
How to check with a multimeter
Before diagnosing the oxygen sensor itself, its heating device is checked.
The tester can check the operation of the heating component of the oxygen sensor:
- The diagnostic device switches to the resistance parameter measurement mode.
- The probes of the device are connected to the heater contacts. These elements are usually made of cable with a large cross-section.
- The contacts of the heating device are ringing.
- If the heating element is working, then the resulting resistance value will be less than 10 ohms. If this parameter is higher, then the electric heating device has failed and needs to be replaced.
The tester checks like this:
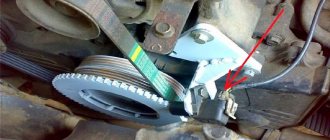
- Locate the controller mounting location under the hood of your vehicle.
- Connect the multimeter probes to the signal outputs of the sensor or electrical circuits. The tester itself sets the measurement limit to 2 volts.
- At the next stage, it is necessary to artificially create a situation of an over-enriched combustible mixture. To do this, you can use the throttle change method by periodically pressing the gas pedal. Or you can remove the pressure sensor connector.
- Then the readings given by the tester are read. Ideally, they should be from 0.8 volts, this indicates that the oxygen sensor is working properly.
- It is necessary to artificially create a lean mixture situation. To do this, you can create an air leak by slightly loosening the air duct clamp. With a lean mixture, the tester reading should be no more than 0.2 volts.
V_i_t_a_l_y talked about diagnosing the oxygen controller using a multimeter.
Methods for cleaning a lambda probe at home
Since the oxygen sensor can sometimes be restored, car owners have a logical question. They are interested in how to properly clean the lambda probe without going to a car service center. There are indeed methods that can be used at home. But you need to be extremely careful, since the work involves the use of potentially dangerous substances. Please note that the oxygen sensor is quite fragile by design. Therefore, causing any damage during cleaning directly indicates that work needs to be stopped and a new controller purchased. This one is no longer suitable for further use. The need to replace the lambda probe arises when the vehicle begins to consume a large amount of fuel, exceeding normal values, without objective reasons. Warning lights also appear on the dashboard, which recommend diagnostics. Quite often, such symptoms indicate problems with the oxygen sensor. And there are two cleaning methods:
- mechanical;
- chemical.
It is recommended to immediately abandon the idea of performing mechanical cleaning. This is explained by the fragility of the element, which is very easy to damage when working with your own hands. If any damage is caused, further operation of such a controller is not permitted. It is also dangerous to use any power tools with abrasive attachments. They act with too much force, which causes the sensor to instantly break. Sitting and picking at the sensor with different toothpicks or needles is also long and exhausting. As a result, experienced motorists agree that the chemical method is the most optimal, easy to perform at home and effective.
When choosing a chemical cleaning method, it is important to choose the right product. Here you can use liquids from different manufacturers who offer their own solvents for solid carbon films. And many are interested in whether it is possible to clean the lambda probe at home with carburetor cleaner. This product can really help, as can an injector cleaner. But still, orthophosphoric acid has gained great popularity. It is able to cope with more serious pollution. Phosphoric acid is characterized by the ability to quickly dissolve metal oxides and organic alkaline films without damaging the oxygen sensor itself. This cleaning gives a good result, so it is often done with your own hands at home if the controller has not failed, but has simply become dirty.
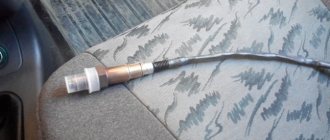
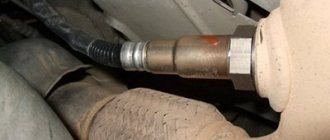
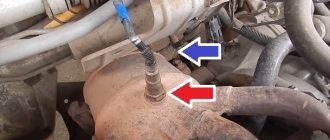
Phosphoric acid can be used in the usual and improved ways. To carry out cleaning work, you first have to find the oxygen sensor itself. It is located in the engine compartment in front of the catalyst installed on the car. But keep in mind that on modern cars, manufacturers install two lambda probes at once. The first one stands in front of the catalyst, and the second one is located behind it. Therefore, sometimes it is easier to find devices by moving from the engine compartment under the car. If there is a hole in your garage or you have the opportunity to lift the car on a lift, finding oxygen sensors will not be difficult. The controllers are dismantled using a key of the required size. Once removed, you can begin cleaning. You will use the usual method or the accelerated one, everyone chooses for themselves.
Conventional acid cleaning
It cannot be said that self-cleaning the lambda probe with phosphoric acid is extremely simple. And this is not about the acid itself or the procedure. The difficulty lies in the fact that the ceramic-platinum base, on which carbon deposits and soot accumulate, is hidden under a protective metal cap. If it is not removed, the treatment will be useless. To remove the cap, you need to be extremely careful and delicate. If you pick up a hacksaw, you will probably damage the entire device, so further cleaning will not be necessary. You will have to change the oxygen sensor. A lathe is suitable here, which can be used to cut off the cap near the thread. In the absence of a machine, files are used. It will not be possible to completely remove the cap with a file. But you can make a small window, the dimensions of which will be about 5 millimeters. The optimal method that does not require additional tools. When you manage to get to the working rod, you can begin cleaning the lambda probe. Step by step it looks like this.
- Take about 100 milliliters of acid. If you buy less, it will not be very convenient to work due to the small amount of liquid in the container. As an alternative to phosphoric acid, rust converters and soldering acid work well. The same injector and carburetor cleaners are also suitable. But acid usually shows its best side.
- The purchased cleaning liquid should be poured into a glass container. A small jar, glass or shot glass will do.
- The oxygen sensor core is placed in this container with cleaning acid. Just be careful. There is no need to immerse the entire device in cleaning agent. Only the core needs to be processed.
- The sensor is soaked in acid for at least 15 minutes. For severe contamination, it is better to leave the core in orthophosphoric acid for 20-30 minutes.
- Now the device is removed and washed with plain clean water. Wait until the element is completely dry.
- If necessary, repeat the procedure several more times. The purpose of cleaning is to remove the black-brown deposits and obtain a metallic tint to the oxygen sensor core.
- In some cases, even 3-4 dips of the lambda probe in phosphoric acid for 20 minutes do not help get rid of contaminants. You shouldn’t give it up, because you can increase the effectiveness of the procedure with your own hands.
- If you only made a hole, then use a small brush with fairly stiff bristles. Wet it in acid and wash the sensor. Gradually, such mechanical action will allow you to see how the soot falls off.
- Those who are able to completely remove the protective cap can use an old toothbrush to thoroughly rub the tip of the oxygen sensor.
- When cleaning is complete, the sensor will take on a bright metallic hue.
- Rinse it again with cold running water. But don't rub with your hands. Dry the device.
- If the cap was removed when gaining access to the oxygen sensor core, it will have to be returned to its place before reinstallation. The optimal solution for this problem would be to use argon welding.
This type of cleaning takes a lot of time, but often gives good results. Therefore, motorists are ready to endure, just not to spend money on buying a new oxygen sensor. Although it is possible to speed up the procedure.
Accelerated method
Those who want to clean the oxygen sensor with their own hands, but who do not have the patience for the usual method, are interested in how they can help so that the lambda probe quickly returns to its original appearance. To increase the cleaning properties of orthophosphoric acid, you will need to additionally take another device. After using it and completing all procedures, do not forget to rinse the surface of the cleaned core. To speed up the procedure, you will need a gas stove or burner. If you use a regular home stove, then it will be more convenient to work on the smallest burner. Here everything is done like this:
- The lid is removed from the burner, turned over and placed so that the gas flow is slightly shifted;
- In this position, the pipe will partially close, which will direct the gas flow in a convenient way, plus prevent the acid itself from getting inside;
- The fire is lit;
- The oxygen sensor core is dipped in phosphoric acid;
- Next, the element is heated thoroughly over a fire;
- When heated, the acid will boil and spatter;
- At this moment, green-blue salt will begin to appear on the surface of the controller;
- Phosphoric acid should completely boil away;
- Now the part is washed again in clean water and dried;
- The sensor is dipped into acid again, and the heating and washing procedure is repeated.
It is necessary to achieve a metallic shine on the working surface of the oxygen sensor. Typically this procedure takes about 15-20 minutes. Before putting the device back in place, be sure to treat the threads on the oxygen sensor with graphite lubricant. Now feel free to return the lambda probe to its socket. If you have two devices, a similar procedure should be performed with the second controller.
Other diagnostic methods
If signs of a lambda probe malfunction appear, you can use computer diagnostics to check its functionality. It allows you to monitor the operating parameters of the oxygen sensor online.
You can use an oscilloscope for diagnostics. If the test shows that the lower limit of the device drops to zero volts, then the controller is working, but it will need to be changed soon. If the time dependence of the voltage at the signal contact is characterized by greater smoothness, then it is time to replace the sensor.
It is correct to start diagnosing four-pin oxygen sensors with a visual inspection; this procedure is recommended to be performed every 10 thousand kilometers. For testing, the controller is removed from the manifold; WD-40 or brake fluid cannot be used, since their contact with the working surface will cause it to break. If special means are used when unscrewing coked threads, their residues are removed before removing the device.
Assess the color and condition of the operating area of the oxygen controller. If traces of soot are visible on it, this indicates an over-enriched combustible mixture in the engine. Its presence leads to contamination of the device, so to ensure better performance, soot must be removed. A gray or white coating indicates the use of additives in motor fluid or fuel. The presence of a shiny coating indicates that the concentration of lead in the fuel used is exceeded. If the coating is intense, then the sensor cannot be repaired; it must be replaced.
Why is a lambda probe needed in a car, location
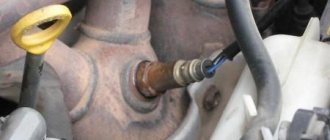
A lambda probe is necessary to measure the oxygen content coefficient in a combustible mixture. It is always installed in the area of the exhaust pipe before the catalyst and measures the volume of unburned oxygen in the combustion products. This information will allow the ECU to prepare the optimal mixture.
A mixture containing 14.7 parts air and one part fuel burns most efficiently. These are optimal indicators; if oxygen is present in large quantities, then the mixture is lean; if there is less air, then it is rich.
Instructions for repairing and replacing the sensor
You can replace or restore the controller yourself.
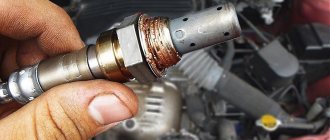
How to remove the sensor
Removing the device, regardless of the machine model, is done as follows:
- Warm up the surface of the part to approximately 60 degrees. To do this, you can use a regular lighter or torch. Warming up will make it easier to remove the device from the seat.
- Disconnect the wires connected to the part.
- Carefully unscrew the oxygen sensor. It is not recommended to use special tools for dismantling.
- Remove the protective cap.
Diman Stepanenko spoke about dismantling the lambda probe on his own.
Cleaning and Soaking
There are two options for restoring the oxygen sensor:
- the first - using orthophosphoric acid;
- the second - with phosphoric acid and a burner.
It must be taken into account that phosphoric acid or another similar product belongs to the category of hazardous substances. When working with a substance, it is important to remember safety rules. Acid should not be allowed to enter the mucous membranes or inside the body.
First way
This method cannot be called accelerated, since the consumer needs to gain full or at least partial access to the ceramic surface of the device. This component is hidden behind a protective cap made of metal; it is not easy to dismantle. Do not use a hacksaw for removal as it will damage the work surface. Dismantling is carried out using a lathe - at the base of the oxygen sensor, you need to cut off the protective cap using a cutter. The cutting is done close to the thread.
If it is not possible to use the machine, you can use a file. It is not possible to completely remove the cap with this tool, but you can make small windows about 5 mm in size on it. Approximately 100 ml of orthophosphoric acid is used for cleaning. If it is not available, you can use a rust converter.
Device recovery:
- Pour the liquid into a glass container. You can use jars, glasses, etc.
- Place the oxygen sensor core into the container. The controller cannot be completely immersed in liquid. Wait about twenty minutes.
- Remove the sensor from the container and rinse its base with tap water. Wait until the device is completely dry.
- If you are unable to remove the dark deposits on the core the first time, repeat the procedure. It is necessary to ensure that the element again becomes a metallic color.
- If, after several attempts, high-quality cleaning fails, you can use a brush to enhance the effect of the product. The base of the device is wetted and treated with it. As a result, the plaque should be removed. If the protective cap has been removed, then the brush will not be needed. It is better to use a toothbrush instead.
- After cleaning has been completely completed, the sensor is washed. If the cap has been removed, then after restoration it must be put back in place. For this, argon welding is used.
When using this method, please note:
- If the device is heavily soiled, then twenty minutes will not be enough to restore it. For critical blockages, the soaking procedure can be extended to three hours. In some situations, cleaning may take a full night, at least eight hours.
- After cleaning, you need to check how effectively the procedure was performed. Diagnostics will require some time for the car owner to understand how the car behaves and how much fuel it “eats.” If the malfunction indicator on the device remains lit, then the controller could not be repaired.
- If the machine is equipped with a sensor whose protective cap is equipped with a double shell, then it will not be possible to make a hole in it with a file. To solve the problem, you need to soak the device in acid or another product with the cap itself.
The process of cleaning the oxygen controller is shown by Alexander Sabegatulin.
Second way
To restore the controller you will need the same acid, as well as a gas burner or stove. When using a household stove, give preference to a small burner.
Cleaning procedure:
- The lid is removed from the burner. Then it is turned over and installed back, with a slight offset to the side. It is necessary to install the lid so that it covers the pipe itself from liquid getting inside.
- The fire on the burner is lit.
- The lambda probe core must be dipped in a container of acid, then taken with pliers and heated over a fire. This will cause the acid to boil and the substance will begin to splash. A greenish tint of salt will appear on the working surface of the device.
- Wait until the substance has completely boiled away. Rinse the controller with clean water and then repeat the cleaning procedure. These steps must be continued until the controller is completely shiny. This may take ten minutes or more. Before further installation, the thread of the lambda probe must be treated with graphite lubricant, which will prevent the oxygen sensor from sticking to the threaded hole.
Installing a lambda probe
Installation of the device is carried out in the reverse order:
- A protective cap is installed on the sensor.
- Wires are connected to the device.
- The controller is installed in the seat and screwed in.
Lambda probe service life
The average life expectancy on Russian gasoline is 40,000–100,000 km. To increase service life, it is recommended to fill with high-quality fuel with a low content of impurities and heavy metals. It is quite difficult to determine a malfunction by self-diagnosis, and it is almost impossible to establish the cause. This may be wear and tear, low quality gasoline, mechanical damage and other factors.
If you suspect a DC malfunction, contact professional diagnosticians. Using an oscillogram, a specialist will determine the causes of the malfunction and suggest solutions.
How to make a corrector (fake) lambda probe?
There are several types of correctors for oxygen controllers. The mechanical device is the simplest and most affordable in terms of corrector design. It is necessary to machine a special adapter into which the lambda probe is installed, as well as a mini-catalyst. After this, the assembled device is mounted in the standard place of the car muffler.
If the catalyst device or the oxygen sensor installed after it breaks down, a signal will be sent to the control unit. The module will be warned that the exhaust gases contain harmful substances, the volume of which exceeds the permissible value. The control unit will perceive this event as an emergency and increase the fuel supply to enrich the air-fuel mixture.
When installing such a corrector, exhaust gases will flow through a small hole in the adapter into the catalyst device. The latter is filled with ceramic dust with a catalytic layer. The concentration of harmful substances in the exhaust gases will be lower. The control module will perceive this as the correct operation of the controller and standard catalyst device. The manufacture of blende is carried out using a lathe and a diagram; steel or bronze can be used as a material.
Scheme of a mechanical corrector for a lambda probe
Universal drawings that can be found on the Internet may not be suitable for making a lambda probe blende for a specific car model; you need to look for a proven option.
Making an electronic controller fake:
- Using the SprintLayout program and a printer, a layout drawing and arrangement of circuit elements are printed. Printing is done on glossy paper.
- When sending a file for printing, you must select 100% black for layer K1. In the program, check the box next to Mirror and Scheme Outline. All other layers are deleted.
- Then the next layer is sent for printing. For the M2 layer, the color is black. The checkbox opposite the Mirror item is removed, but it remains opposite the second element. Other layers are removed.
- When performing the task, it is recommended to use foil textolite. It must be one-sided, and its thickness will be no less than 1 and no more than 2 mm.
- When the printout is in hand, it must be transferred to the LM324 board using an iron. The board itself is cut out taking into account the dimensions, and printouts must be made along its contour. After cutting, attach the diagram to the drawing; the dimensions must match exactly.
- Using fine-grained sandpaper, the copper layer is cleaned. The board is cleaned using fuel or solvent.
- Then you need to transfer the printout with the tracks to the working surface of the board. A printed layer of elements is installed on the reverse (copper surface). To do this, foil paper is applied to the board and heated with an iron; the procedure takes no more than 10 minutes. When warming up, the surface of the iron should be pressed as close as possible to the board. As a result, the toner should be reprinted from the foil surface onto the circuit. If the paper density is low, the tracks will be visible. The problem can be corrected using a permanent black marker.
- The next step will be etching, this will require ferric chloride or sodium perchlorate.
- Then holes are drilled on the board and the elements are soldered.
- At the final stage, the operating parameters of the corrector are adjusted. To do this, +950 mV is supplied to the input, and the voltage value is adjusted in the range from 950 to 1000 mV. For the LM324 board, the procedure is done by setting up elements VR3 and VR4.
Circuit for making electronic decoy
Printout of the circuit for installation on the board
Connecting all components on the decoy board
How does an oxygen sensor work?
The ECU measures the amount of fuel supplied using injectors, setting the volume at a certain moment. The probe provides feedback, which allows you to accurately determine the proportions of gasoline, diesel or gas. The ECU requests information once every 0.5 seconds at idle. At higher speeds, the frequency of requests increases proportionally. Analyzing the data, the control unit adjusts the composition of the fuel assembly, making it poorer or richer. Maintaining optimal fuel assembly is the purpose of lambda probes. The ideal air to fuel ratio is 14.7:1 (gasoline), 15.5:1 (gas) and 14.6:1 (diesel).
Types of recreation centers according to their design and operating principle:
- Point-to-point, narrowband (simple). It works based on measuring the amount of oxygen in the exhaust gases. The poorer the fuel assembly, the lower the voltage; the richer, the higher.
- Broadband. Generates a wider range signal for accurate estimation of proportions in fuel assemblies.
What is the price?
The cost of the device will vary depending on the manufacturer and brand of the machine.
| Name | Price, rub |
| Lambda probe for Volkswagen Golf | From 2900 to 8000 rubles depending on the brand |
| Oxygen sensor for VAZ cars | From 1900 to 4200 rubles depending on the car brand |
| Lambda probe for Daewoo cars | From 800 to 6 thousand rubles on average |
| Oxygen controller for Renault cars | From 1800 to 8 thousand rubles depending on the brand |
| Prices are relevant for three regions: Moscow, Chelyabinsk, Krasnodar. | |
Characteristic
This part is a device for determining the amount of oxygen contained in exhaust gases. Why is it so important for a car? The fact is that the oxygen sensor regulates the optimal ratio of air and fuel in the combustible mixture at different engine operating modes. The process of dosing these components is called “lambda regulation”.
It is worth noting that if there is insufficient air in the combustible mixture, carbon monoxide does not oxidize completely. And with an excessive concentration of O2 in the fuel, nitrogen oxides are not able to fully separate into several components (nitrogen and oxygen).
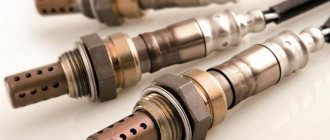
Device
The design of this sensor assumes the presence of the following elements:
- Metal case with thread for fastening.
- Sealing ring.
- Postings.
- Electric signal current collector.
- Cuffs for sealing wires.
- Outer protective shell. It also has a special hole for air circulation.
- A tank with a filament spiral.
- Tip (most often ceramic).
- A protective shield with an opening for exhaust gases.
All of the above parts are made from materials that are resistant to high temperatures.
Where is the lambda probe located?
On most modern cars, the oxygen sensor is installed in the exhaust system. Some manufacturers equip their cars with two lambda probes.
In this case, one of them is mounted before the catalytic converter, and the second after it.
The use of such an installation scheme significantly enhances the device’s control over the composition of exhaust gases and makes the operation of the converter more efficient.
How to check the serviceability of the lambda probe? Symptoms of a problem
As practice shows, such sensors have a fairly long service life. However, when it is exposed to third-party factors, such as the low quality of the fuel used (we will talk about this a little later), its service life is significantly reduced. So, what symptoms indicate a malfunctioning oxygen sensor?
The most likely sign indicating poor performance of the lambda probe is a sharp increase in exhaust toxicity. It is impossible to determine this indicator “by eye”.
The toxicity level of exhaust gases is determined by measuring with a special device. Only by its results can one judge whether the level of CO emissions into the atmosphere has increased or not.
If the device shows an overestimated value, most likely the oxygen sensor has become unusable.
But not only the results of the toxicity test can determine the serviceability of the device. The second symptom indicating a faulty lambda probe is increased fuel consumption. This factor, unlike the previous one, can be determined without third-party devices, that is, “by eye.”
However, one point is worth noting here: increased fuel consumption does not always indicate a malfunction of the oxygen sensor.
This symptom may indicate a number of other problems, such as an incorrectly adjusted carburetor, dirty injectors, or deposits in the fuel system.
Very often, a malfunction of the lambda probe is indicated by a red lamp on the car’s instrument panel - “Check Engine”. Together with it, you will notice how the car's behavior has changed significantly. This may include jerks during acceleration, unstable engine operation, tripping, etc.
What affects the service life of a lambda probe?
As we said earlier, the oxygen sensor is one of the most “tenacious” elements in the car system. But there are a number of factors that affect the service life of this device. The main one is low fuel quality. When it burns, some of the lead is released at the oxygen sensor. This metal accumulates over time and its layer reduces the sensitivity of external electrodes to oxygen. It is impossible to restore or clean such an element from lead. The sensor can only be replaced. Note that before checking the lambda probe with a tester, it should first be inspected externally. If there is a persistent metal coating on it, only replacing the element with a new one can save the situation.
Less commonly, the lambda probe malfunctions due to mechanical deformation. Such damage may include a violation of the integrity of the element housing, heating windings, etc. Repair here, as in the first case, is impractical. Therefore, before checking the lambda probe, make sure that there are no mechanical deformations on it. If they are, the sensor must be replaced immediately.
A lambda probe failure can also be caused by a malfunction of the vehicle’s fuel system itself. When a larger amount of mixture enters the combustion chamber, part of it does not burn completely and follows out through the exhaust channels in the form of a black coating.
These deposits tend to accumulate on vehicle components, including the oxygen sensor. The way out of this situation is simple - to restore normal operation of the element, it is enough to clean the surface of the probe from soot.
It is recommended to send the vehicle itself for diagnostics, since incomplete combustion of fuel, in addition to contaminating the system, provokes increased consumption, which will significantly affect the driver’s wallet.
Design features of modern sensors
It is worth noting that the design of today's lambda probe differs significantly from the design of its early prototypes.
If earlier the oxygen sensor was only a sensitive element without additional heaters, now, due to strict toxicity standards, manufacturers had to modify its design. The whole point of the complications was the installation of a built-in heater.
The first samples of sensors were not equipped with this element, and therefore were activated by heating the exhaust gases.
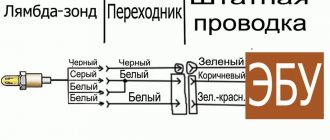
Now, thanks to the built-in heater, the lambda probe comes into operation immediately after starting the engine, that is, the level of CO emissions does not vary depending on the time the engine is started and the car is moving. A modern oxygen sensor is equipped with 4 outputs. Two of them go to the heater, one to ground, and one more to the signal.
How to check the functionality of the lambda probe? Diagnostic methods
There are two main ways to diagnose this device:
- Using a scanner.
- Using a motor tester.
The latter option is more suitable, since the motor tester allows you to not only evaluate the current and peak value, but also the shape of the signal, as well as the rate of its change. The last characteristic is precisely an indicator of the performance of the lambda probe.
Checking the lambda probe with a multimeter yourself
Temporary loss of performance of individual components and parts forces some car enthusiasts to rush to replace problematic elements. However, it is possible to carry out timely, comprehensive diagnostics even in a garage environment in order to make informed decisions about further steps.
Problems often occur with various sensors in modern cars. Drivers are especially often interested in how to check the lambda probe with a multimeter to determine its current condition. In some cases, competent testing allows you to avoid spending money on purchasing a new part, since the problem turns out to be in a different plane.
What is a lambda probe
In fact, this device is an oxygen sensor.
It is installed by the manufacturer in the exhaust manifold area and helps determine the concentration of remaining oxygen in the exhaust gases.
Due to the readings of this device, the electronic control unit of a modern vehicle has information on the basis of which the next portion of the air-fuel mixture is prepared.
The probe calculates the volume fraction of oxygen in the exhaust and gives a signal to the electronics to prepare an enriched or lean mixture. Possible malfunctions with the unit can lead to imbalance in the operation of the fuel system as a whole .
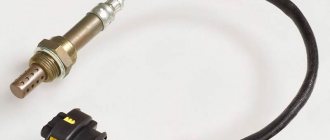
A modern sensor is made in the form of a small device that includes certain elements:
- The metal case has a cut thread, which facilitates clear fixation of the device in the designated place.
- Electrical insulator made of ceramic.
- One or more conductors.
- O-rings.
- A protective shell with ventilation holes.
- Contacts.
- Ceramic tip.
- Electric heater.
- Exhaust gas outlet channel.
- Shell made of steel.