The effective ignition system of the UAZ 469 ensures quick and uninterrupted starting of the car engine under any conditions. With proper ignition, all electrical systems operate without failure: windshield wipers, headlights, receivers, sensors, turn signals. What types of systems are there, adjustment, tuning of the UAZ 469 ignition - in this article.
Ignition system UAZ 469
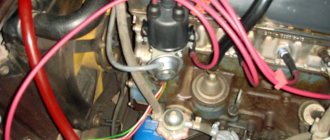
Photo 1: Ignition system of the UAZ 469 car (Source: Yandex.Photos)
Article navigation
Re: Cylinder numbering for UMZ 417
The voltage sensor consists of a rotor and a stator. The second terminal of the winding is electrically connected to the housing in the assembled sensor-distributor. 6. Install the distributor sensor cover, check the correct installation of the ignition wires to the spark plugs in accordance with the operating order of the engine cylinders 1–2–4–3, counting counterclockwise. After each ignition installation, check the accuracy of the ignition timing by listening to the engine while the vehicle is moving.
Numbering from the radiator. Remove the spark plug from the first one, tighten it to compression (check with your finger to see how it hisses), turn it until the moment of ignition (according to the marks on the pulley), and look at the slider. Insert the first wire where the slider is, and the rest are in order according to the direction of the slider.
I apologize for the lame question, but the previous owner of the automobile claims that the numbering of the cylinders in the UMZ 417 does not come from the radiator, but from the passenger compartment. I have encountered this in the French.
And both valves of the first cylinder are closed? Timing gears by marks?
Set the TDC in cylinder 1, remove the distributor from the drive (a boot in common parlance) and look inside. Sometimes the distributor drive is installed incorrectly. Try setting the ignition very early, if it gets better, move the distributor drive gear by 1 tooth. Just carefully reinstall the oil pump drive.
UAZ 3151 Koloterka › Logbook › Contactless ignition on the UAZ 3151 with the UMZ 417 engine
The UAZ is almost 20 years old and the UMZ 417 2.4 liter engine installed in it had a conventional contact distributor.
The distributor was quite worn out, there was no additional resistor at all. It was necessary to restore/change the ignition system. There was no point in buying a new, original distributor. Over the past 30 years, people have come up with a lot of new things. Custom (underwater) ignition and its variations were frightening to be modified with a file. And most of the Internet resources talked about a certain ready-made kit based on the ignition from the VAZ 2108. After reading/watching, I realized that everything was simple and bought a kit of the so-called Contactless Ignition System. Among the described advantages of this BSZ: easier starting in cold weather, some fuel savings, no need to install additional resistance and adjust the distributor contact gaps. And combined with the price of 3500 rubles (for 2022) and ease of installation, this is not a bad and relatively modern alternative to the original ignition. The purchased kit came in a box with the inscription TADEM and the article number BSZ-54.000-01.
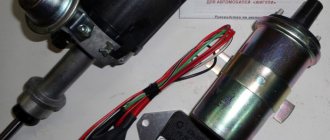
The kit included: Distributor - MZATE-2 article 5406.3706-05. The end of the article -05 is important! Because this particular distributor is adapted (more precisely tuned) for 417 and 402 engines.
And one more important detail! The distributor may be Chinese) that is, one to one but from China. So, you need to clarify when purchasing that the distributor is from the Russian plant MZATE-2. Non-contact distributors come in at least two types: with a Hall sensor and with some kind of winding and magnet. So we are talking specifically about a distributor with a Hall sensor.
Switch - VAZ 2108 article 76.3734.
There are many types of this switch: with a knock sensor, two in one (that is, there are two identical switches in one case, and if one burns out, you can transfer the contacts to the second). When assembling this kit yourself, there is room to turn around)
Reel - article number 27.3705.
Apparently also from a VAZ 2108. The kit included an oil coil, that is, its insides are like stew in oil. And in my opinion this is not very good. These coils leak periodically. This didn't work for me either, but it works for now. There are so-called dry coils for the VAZ 2108 and they say they are better.
In my case there were no problems with it. But I often came across the fact that people complain about errors when assembling the harness and, as a result, long hours of agony during installation and a lack of understanding why it doesn’t work.
Replacing the ignition system involved removing the old distributor.
In this case, before removing it, it is advisable to place the piston of the first cylinder at the mark on the pulley at TDC. And make sure that the distributor slider points to the contact of the wire of the first cylinder. It happens that a new, installed distributor rests against the engine with a vacuum corrector. Most often this occurs due to an incorrectly installed oil pump drive.
This can be easily checked by looking into the oil pump drive from above - the oil pump drive slots should be along the engine with the eccentric slot offset towards the block.
And by the way, this drive should not be removed when replacing the distributor, because it will be very difficult to insert it back. I installed a new one in place of the old distributor.
Don’t forget to align the eccentric slots of the distributor drive with the slots of the oil pump drive.
On the new distributor, the octane corrector plate is made of silumin and should be tightened with a tap carefully, as it very often breaks.
Well, straight to connecting the high-voltage wires. If the wires are old, they must be replaced, this will give +30 to the result). In general, explosive wires have a lot of characteristics and they deteriorate over time. When connecting wires, in order to avoid confusion, it is worth remembering the order of operation of the cylinders! Ignition occurs in turn 1st -2nd - 4th! -3rd. The distributor runner rotates counterclockwise and on the distributor body the contact for the 1st cylinder is most often marked as such. Based on this, everything becomes very simple: we find the mark on the distributor cover - this is the first cylinder. Then counterclockwise we connect the 2nd then the 4th! and then the 3rd. And yes, the cylinders on the UMZ 417 are counted from the radiator.
The next step is installing the switch.
The classic installation location is the previous mounting location of the additional resistor. But in my case, the installation holes did not match, as well as my idea of the temperature conditions of the switch. It’s quite hot under the hood and the switch stores transistors that already heat up during operation and also heat from the engine. In general, so that the switch would not overheat and cool properly, I placed it in the interior.
Fortunately, a good place was found. The only thing I had to do was an adapter plate to mount the switch, since the holes in the place I liked did not match the holes on the switch.
Driving without interference: set the ignition on the UAZ
The operation of a car engine is impossible without correctly set ignition timing. Remove the cover from the ignition distributor. For example, for a VAZ-2106 car, the switch can be installed in the free space between the washer reservoir and the left headlight. Drill 2 holes and screw the switch with self-tapping screws. Correctly setting the ignition timing in a contactless ignition system makes it possible to operate the car in comfortable conditions. Set the crankshaft to a position that corresponds to the ignition timing of 5 degrees. Check the order of connecting the high-voltage wires of the engine cylinders.
The ignition system is fundamental to the normal operation of a car engine. If any actions were incorrect, this will be reflected when the engine is started by the starter and the car is moving. All you need to do is adjust the spark supply - set the ignition correctly on the contactless system. Tighten the bolt at the pointer on the sensor-distributor housing. Be sure to check how the ignition wires are installed to the spark plugs, taking into account the order of operation of the cylinders 1-2-4-3. If there is no detonation, we increase the ignition timing.
Serves to turn on and off the current in the primary circuit of the ignition system and to turn on the starter.
The UAZ distributor is considered one of the important components of the ignition system in a vehicle. What is the connection diagram for electronic or contactless ignition on a UAZ 417, how to convert contact ignition to contactless? Why does the coil heat up and how to adjust and adjust the advance angle? The ignition system can also be electronic. First of all, you must lock your car in one place by pulling the parking brake lever.
The ignition must be installed if the ignition distributor is removed from the engine or if the ignition timing is incorrect. TDC according to the mark on the engine crankshaft pulley (Figure 15.13). The following characteristic malfunctions are possible in the ignition system: the ignition system does not work, the ignition system works intermittently, the ignition timing is incorrect.
This will be the beginning of the compression stroke in the 1st cylinder. 5. Tighten the locking screw and check the gap between the contacts again. 6. Install the rotor and secure the distributor cap.
With the help of an emergency vibrator, the contactless battery ignition system of the UAZ can operate in the event of a failure or breakdown of the transistor switch or stator coil of the sensor-distributor. To switch to working with an emergency vibrator, you must disconnect the wire from the short-circuit terminal of the switch and connect it to the output of the emergency vibrator.
This is visible not only when starting the engine with the starter, but also when the car itself is moving. Afterwards, you need to check the installation of the ignition wires according to the basic order of operation of the cylinders one-two-four-three, counting counter (hours). After you have installed the ignition, you need to check that it is installed correctly while driving.
Operating principle of the ignition system
Ensuring that the fuel-air mixture ignites at the correct time for efficient operation of an internal combustion engine is the primary task of ignition. This occurs in strict accordance with the predetermined operating sequence of the engine cylinders. The ignition coil 16 is connected in series with an additional resistor 14 in an electrical circuit. It closes automatically when the engine is started by the starter.
This leads to a significant increase in the breakdown current of the primary circuit. Ignition coil 16 generates high-frequency pulses in the vehicle's on-board electrical system. Flashes of high voltage interrupt the spark on the spark plugs 12, screwed into the top of each cylinder, where the working fuel mixture is compressed.
The coil consists of a primary winding and a secondary winding. The primary winding is wound onto the secondary. This is how the UAZ 469 ignition system works. Inside the coil there is a core and a ring magnetic circuit. Both of these components are made of special electrical steel. The reel is closed with a carbonite cover in a housing with a rubber seal.
Transformer oil is poured into the cover for cooling. This material significantly increases the winding insulation and effectively removes heat from the coil body. To avoid damage to the coil and overheating, it is not recommended to leave the ignition on when the engine is off.
Distributor 8 distributes high-voltage pulses to all cylinders of the internal combustion engine strictly sequentially. The distributor or breaker-distributor is installed in a standard location on the left side of the engine cylinder block. This mechanism is driven by the oil pump shaft. From the cover side, the shaft rotates counterclockwise.
What kind of ignition system is there for UAZ 469?
Contact ignition on the UAZ 469, which is now considered obsolete. However, domestic manufacturers still use it. The system delivers a pulse of a certain power. This pulse appears in the ignition distributor. The contact ignition circuit of the UAZ 469 is simple and straightforward. This is its advantage. The driver can fix any malfunction and make adjustments with his own hands. Prices for components are low.
Transistor or contactless ignition system in the UAZ 469. The contactless ignition system is installed on many types of cars. It has a number of advantages compared to the contact design. The spark created by such a device is much stronger. This occurs due to an increased level of electrical voltage in the secondary winding of the ignition coil. The transistor ignition system is equipped with an electromagnetic mechanism. It ensures stable, continuous operation of the entire system, smoothly transferring energy to components, parts and mechanisms. Correctly adjusted ignition with a working internal combustion engine guarantees high power and significant fuel savings. Long-lasting and reliable operation is ensured by following the drum motor's maintenance intervals. It should be lubricated and adjusted every 10,000 km. The disadvantage of a contactless ignition system is the difficulty of repair. It cannot be repaired yourself, since this requires specialized diagnostic equipment, available only at service centers and stations.
Electronic ignition system of the UAZ 469. This type of ignition is the most technologically advanced, but at the same time it is not cheap. Modern car models are equipped with such devices. It has advanced technology that provides not only high torque, but also a number of other engine parameters. Advantages: easy adjustment of the advance angle, no need to check contacts for oxidation. In engines equipped with electronic power take-off, the fuel mixture burns up to 100%. Repairs may only be carried out at a service station.
Underwater ignition on the UAZ 469 This is a sealed ignition system that is not afraid of being flooded with water, falling into deep holes, or driving in the open air during snow and rain. With normal ignition - contact or non-contact - 50% of the spark power is lost inside the barrel, between the cap and the guide. Let's find out why this happens.
There is a small space between the electrical contacts, which are the distributor cap and the guide. The flow of electricity in this space absorbs most of the additional current. In the case of contact ignition, an additional part of the energy is spent for this purpose due to the operation of the cam.
The underwater ignition is designed in such a way that the spark from the coil goes directly to the spark plug. During this process, it does not lose its main power, except for the resistance of the high-voltage wires. The power losses here are very small, so they can be neglected.
It is worth noting that in most foreign-made cars, a coil is installed separately for each cylinder, which is located directly on the spark plug, and the losses, accordingly, are quite insignificant.
We install and configure the ignition, change the distributor drive on UAZ vehicles
The UAZ distributor is considered one of the important components of the ignition system in a vehicle. Correct adjustment of this mechanism ensures optimal operation of the power unit as a whole. You can learn more about the principle of operation of the ignition system and how to set it up correctly with your own hands from this material.
Review of SZ on famous UAZs
UAZ ignition order - how to set, order of spark plugs
The UAZ distributor is an important part in the ignition system of this vehicle. Its optimal adjustment guarantees efficient operation of the unit as a whole, increases its performance and efficiency, and allows the engine to be operated in any conditions and situations.
Setting up the ignition system so that it works correctly is not as difficult as it seems at first. But first of all, it’s worth understanding exactly how UAZ systems are structured as a whole and understanding their circuits. And if you do everything according to the recommendations, in the right order, then adjusting everything will not be difficult.
Review of SZ on famous UAZs
What is the connection diagram for electronic or contactless ignition on a UAZ 417, how to convert contact ignition to contactless? Why does the coil heat up and how to adjust and adjust the advance angle? First, let’s look at the main points regarding the action and types of SZ.
Operating principle of SZ
Contact system diagram
The ignition system, or rather its correct setting, plays a big role in the operation and starting of a car engine. With correct adjustment, the combustible mixture will burn correctly in the power unit as a result of the supply of charge through the spark plugs. A spark plug is placed on each cylinder of the UAZ engine, each of which is turned on in a certain order, in turn, delivering a discharge to the cylinder after a certain time. It must be taken into account that any SZ makes it possible not only to deliver the required discharge, but also determines its strength.
Due to its technical characteristics, the car’s battery cannot produce the voltage and current required to ignite the mixture. This is due to the fact that the battery can only produce a current of a certain strength. And thanks to the correct operation of the system, the current value increases significantly, which allows you to successfully ignite the air-fuel mixture.
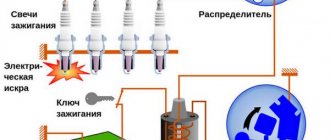
The operating principle of the system consists of several stages:
- First, the driver inserts the key into the ignition and turns it, electrical energy is stored in a coil.
- Then the coil converts the low-voltage voltage in the on-board network of 12 volts into high-voltage. As a result, the voltage value increases to 30 thousand V.
- After this, the discharge is distributed and supplied to one or another spark plug.
- The candle itself produces a spark that ignites the mixture.
Diagram of the UAZ contactless system
What types of SZ are there?
Domestic UAZ vehicles can use one of three ignition systems; let’s look at each of them in detail:
- Contact view. This type of SZ is outdated, however, it is used on most machines. In such a system, the principle of operation is to issue a certain impulse that is formed in a distributor - a distribution device. The contact system is considered one of the simplest in terms of design, which is an advantage, since if a malfunction occurs, the car owner will be able to independently check and repair the system. In addition, prices for structural parts of the contact system are usually affordable, which is good news. The contact SZ includes a coil, a switchgear, a breaker, a capacitor and spark plugs.
- Non-contact type, also called transistor type. Compared to the contact system, the contactless system has more advantages. The resulting spark has a higher power, which is achieved due to the formation of high voltage in the secondary winding of the coil. Also, contactless systems are equipped with an electromagnetic device, which makes it possible to achieve more stable operation of the engine. Ultimately, if the UAZ power unit is configured correctly, then by using a contactless system you can not only increase its power, but also achieve fuel savings, albeit insignificant. Also, such systems are easier to maintain. One of the main nuances in terms of maintenance is the need to periodically lubricate the distributor drive - at least every 10 thousand kilometers. One of the main disadvantages is the difficulty of repair. In practice, repairing a contactless SZ will be problematic, since diagnosing the system will require equipment that is usually available at a service station.
- The ignition system can also be electronic. This option is currently considered one of the most progressive and expensive; it is installed mainly on new cars. Compared with contact and non-contact systems, the electronic system has a more complex structure. The main advantage of this system is that, if necessary, the process of adjusting the ignition angle will be much easier. In addition, there are no contacts in the electronic system that are susceptible to oxidation. It should also be noted that in practice, the combustible mixture in the cylinders of a power unit with an electronic system almost always burns completely. But despite all the advantages, electronic repair systems also have their disadvantages, which relate to device repair. It is almost impossible to repair such an SZ with your own hands, since to perform this task, again, you will need equipment (video published by Nail Poroshin).
Site about off-road vehicles, SUVs, off-road vehicles
The procedure for installing the ignition on a UAZ-469B car is as follows. Remove the distributor cap and rotor and check the gap between the breaker contacts. If it goes beyond the range of 0.35-0.45 mm, it is necessary to adjust the gap and put the rotor in place.
Unscrew the spark plug of the first cylinder and, covering the hole for the spark plug with your finger, turn the engine crankshaft with the starting handle until air begins to escape from under the finger. This will occur at the beginning of the compression stroke in the first cylinder.
After making sure that compression has begun, carefully rotate the engine crankshaft until the hole on the pulley aligns with the pin. Then use the nuts to smoothly adjust the octane corrector scale to zero division.
Loosen the screw securing the breaker housing and turn the distributor housing counterclockwise enough to close the breaker contacts.
Take a portable lamp and, using additional wires, connect one of its wires to the body, the other to the low voltage terminal on the coil, to which the wire going to the distributor is attached.
Turn on the ignition and turn the distributor housing clockwise until the light comes on. The rotation of the distributor should stop exactly at the moment the light comes on. If this fails, repeat the operation.
Secure the distributor housing with a screw, put the cover and central wire in place.
After each installation of the ignition and after adjusting the gap in the chopper, it is necessary to check the accuracy of setting the ignition timing of the combustible mixture by listening to the operation of the engine while the car is moving. The ignition installation can be fine-tuned using an octane corrector without loosening the mounting screw. To do this, just rotate the smooth adjustment nuts, unscrewing one and tightening the other.
The most advantageous ignition timing will be one in which during sharp acceleration, full throttle opening, a fully loaded vehicle on a horizontal road with an initial speed of 30-35 km/h in direct gear, single detonation knocks in the engine cylinders can barely be heard.
If there are no knocks during intensive acceleration of the car, this means that the ignition is late. Conversely, the appearance of a series of successive distinct knocks indicates too early ignition.
Maintenance of ignition coil B7-A.
After one maintenance, you should check the condition of the coil directly on the car using a special portable device. The ignition coil is considered to be in good condition if, with a spark gap of 7 mm, uninterrupted and intense sparking is observed.
In the absence of a special device, the ignition coil can be checked on a specialized bench by comparing it with the standard coil of the bench along the length of the spark on an adjustable spark gap. If the spark length of the coil being tested is 2 mm shorter than the spark length of the reference coil, the coil being tested must be replaced.
Maintenance of the ignition distributor-distributor P119.
When carrying out maintenance, it is necessary to check the reliability of the electrical connections and fastening of the breaker-distributor to the engine and lubricate the distributor. Lubricate the distributor shaft by turning the oiler cap one turn.
Place one drop of engine oil on the axis of the breaker lever, one or two drops on the cam brush and three or four drops on the cam bushing, after removing the rotor and the felt underneath. When lubricating the cam and the breaker axis, you must ensure that the oil does not get on the breaker contacts.
After one maintenance, inspect the distributor contacts, remove dirt and oil from the contacts, wiping them with a rag lightly moistened with gasoline. Then wipe them with a clean, dry cloth that does not leave lint on the contacts. Burnt or oxidized contacts must be thoroughly cleaned.
After cleaning, wipe the contacts with a rag slightly moistened with gasoline and check the gap between them with a feeler gauge. If the gap differs by more than 0.05 mm from the nominal 0.35-0.45 mm, then adjust it. However, the specified gap between the contacts ensures normal operation of the ignition system only with new contacts. More reliable is to adjust the gap in the contacts of the breaker by changing the angle of the closed state of the contacts.
Expert recommendations on how to configure correctly
So, how to set the advance angle yourself in order to achieve proper operation of the UAZ engine:
- First of all, you must lock your car in one place by pulling the parking brake lever. Rotate the crankshaft so that the piston of cylinder 1 reaches TDC (top point). In this case, you need to ensure that the hole on the crankshaft pulley coincides with the mark marked on the timing gear cover.
- After this, remove the cover from the distribution mechanism. After dismantling, you will be able to see the slider, which is located inside the cover itself, opposite the contact. If there is no slider, you should turn the crankshaft 180 degrees again, and then set the octane corrector to 0. Using a wrench, you will need to screw the pointer to the distribution mechanism housing so that it aligns with the middle mark. When these steps are completed, the fastening bolt with which the plates are attached to the distributor body must be loosened slightly.
- Then, holding the slider in one place with a finger to prevent it from rotating, you need to carefully rotate the housing itself, this will allow you to remove possible backlash in the drive. The housing must be rotated until you achieve alignment of the sharp end of the stator mechanism petal with the red mark located on the rotor device. After this, the plate itself must be secured to the body using the appropriate bolt.
- Once you have completed these steps, you need to replace the controller cover and check the high voltage cables. You need to make sure that these wires are installed in the correct sequence, taking into account the firing order of the cylinders. When you manage to correctly adjust the lead angle, you need to make sure that the entire procedure was performed correctly.
- To diagnose the correctness of the actions performed, you need to start the engine of your UAZ and wait about 5-10 minutes until the power unit warms up. The operating temperature of the engine is about 90 degrees; you can wait until the internal combustion engine warms up to 80 degrees. Then you need to drive onto a flat road and accelerate the car to 40 km/h, after which you should sharply press the gas. At this moment, the car will accelerate and if, when the speed increases to 60 km/h, a short-term detonation (metallic knock) is heard from under the hood, then this indicates that all actions were performed correctly. If the detonation is too long, the system will need to be adjusted. To do this, the housing of the distribution mechanism will need to be turned one notch or half, and it must be turned counterclockwise. If the diagnostics showed that there is no knocking of the “fingers” at all, then the advance angle should be increased. To do this, the mechanism should be turned in the opposite direction.
Why turn on the ignition?
Connection diagram for ignition system components
In order to properly configure and adjust the engine cylinders on a UAZ-469 vehicle, you must have certain skills. We will talk about them later, but first we invite you to find out for what purposes it is necessary to correctly adjust contactless ignition and what this may entail. After connecting the key to the ignition switch, numerous components and mechanisms are activated, without which the operation of the engine is impossible.
So why set this parameter:
- The engine will operate optimally and stably in all modes. Otherwise, its operation will be unstable and cause inconvenience to drivers.
- Cold engine starting will be significantly improved. Of course, if you want trouble-free starting of the engine in thirty-degree frost, you must also fill the engine with the correct oil and check the suitability of the spark plugs.
- Fuel consumption is normalized, otherwise it may be increased.
- The drive power will be optimal, as indicated in the service book (the author of the video is the Smotri Vidik channel).
How to set the ignition correctly
To install the ignition in a UAZ 469 car, you must follow the following recommendations:
- Remove the drum cover with the rotor. Check the gap between the contacts. It can be adjusted. There should be a gap of 0.35 - 0.45 mm between the contacts at maximum expansion. It is best to make adjustments using a set of measuring sensors. Too small a gap produces a weak spark. If the gap is too large, there may be no spark at all. If the clearance is normal, the rotor can be installed in its normal position.
- Using a spark plug wrench, remove the spark plug of the first cylinder. Cover the spark plug hole with your finger. Use the crank to turn the crankshaft until compressed air pushes the pin out. This moment is called the beginning of the compression stroke of the first cylinder.
- Continue turning the crank until the hole on the pulley and the pin on the camshaft cover line up. The rotor should be located against the internal contact on the cover, connected to the high voltage wire from the spark plug of the first cylinder.
- Rotate the octane corrector plate together with the drum so that the mark coincides with the center mark on the scale of the plate.
- Turn the distributor body slightly counterclockwise. Turn until the drum contacts close.
- Connect the indicator light to the connector. Connect one terminal to the low voltage terminal of the tram circuit breaker and the other terminal to the machine ground. The indicator light can be connected to the car body.
- Turn on the ignition and carefully turn the drum clockwise. Turn until the indicator lights up, then stop turning. It may happen that the light bulb does not light up. Repeat all steps from the beginning.
- Tighten the distributor mounting screw. Place the cover in place, focusing on the center line. Check the adjustment starting with the first cylinder. The check is performed counterclockwise.
A guide to replacing a distributor with an oil pump drive
Before installing a new distributor with a drive, you need to weigh your strengths, since it is not recommended to make mistakes when performing work.
So, how to replace and install the distributor:
- Turn off the ignition and remove the distributor cover; the tips and high-voltage cables are connected to it.
- Then you need to disconnect the wire connected to the switch from the distribution mechanism. You also need to disconnect the pipe connected to the vacuum regulator.
- Taking a 13mm wrench, unscrew the two nuts securing the device and remove the mechanism along with the oil pump drive from the power unit.
- After completing these steps, you will be able to see the gasket located under the drive. If as a result of these actions the position of the crankshaft has not changed, then simply install a new mechanism, making sure that the slider is located opposite the mark. All actions are performed in reverse order. When the installation is completed, the advance angle is adjusted.
- If, as a result, the location of the shaft has changed, then before installation it is necessary to move the piston of cylinder 1 to top dead center. You need to ensure that the marks on the pulley align with the pointer on the motor itself.
Checking for correct installation
After the ignition timing adjustment is completed, it is necessary to diagnose the correct setting of this parameter. To do this, you need to listen to the operation of the power unit while driving.
The check looks like this:
- Start the power unit and warm it up to operating temperature, which should be up to 85 degrees.
- You need to drive onto a flat road without obstacles. Accelerate to approximately 35 km/h, then sharply press the gas pedal.
- After pressing, you may hear a short-term detonation, the sound of metal or “fingers,” as professionals say. If minor detonation occurs, then you have completed all the setup and adjustment steps correctly.
- If the detonation is strong enough, then it is necessary to make a few adjustments. Open the hood and rotate the distributor housing on the octane corrector scale. It will be enough to turn the distributor one notch, but keep in mind that you need to turn it counterclockwise. Please note that each division of the scale indicates a change in the ignition angle by two degrees, if you count along the crankshaft. If during the check it turns out that there is no detonation at all, then the distributor body will also need to be turned one notch, only now clockwise. After the re-adjustment has been carried out, the checking procedure must be repeated again, starting from the first point.
We carry out the wiring diagram for electronic ignition on a UAZ
Classics of the domestic auto industry
Many UAZ vehicles are equipped with a contactless ignition system. It makes it possible to save fuel, reduces the amount of harmful substances in gases, and makes it much easier to start the car in winter.
The connection diagram for electronic ignition on a UAZ is not as complicated as it might seem at first glance. A person who has at least a little knowledge of technology will be able to repair and correct problems himself, if any arise.
Ignition system on UAZ 469
The ignition system for the UAZ 469 can be made not only at a service station, but also with your own hands. It consists of:
- ignition coils or distributor;
- switch;
- emergency vibrator;
- variator (additional resistor);
- spark plugs.
Today, contactless ignition systems are most often preferred. The most interesting thing about them is the switch.
If the crankshaft rotates at a frequency of 500 revolutions per minute, it turns out that the signal at the sensor output will change too quickly. This mode is used if you start the engine with the starter. At this time, there will be not just one spark on the candles, but many, which will make it possible to start the car easily and quickly. Ignitions on UAZ have a simple design.
Contactless ignition is more convenient to use than contact ignition.
Tip 2: How to install contactless ignition
The use of contactless ignition allows you to increase the voltage supplied to the spark plugs and, accordingly, improve engine starting performance. In a contactless ignition system, to open the low voltage circuit, an electronic switch is used instead of a breaker, in which an output transistor performs the function of opening the circuit.
You will need
- – contactless distributor;
- – switch;
- - ignition coil;
- – a set of contactless ignition wires;
- - candles;
- – tools (spanners 8 and 10 for installing the coil, wrench 13 for removing and installing the distributor, screwdriver and drill with a metal drill).
Instructions
1. Remove the cover with high-voltage wires. Disconnect the high voltage wire from the coil. Using short turns of the starter, set the distributor slider to a position perpendicular to the motor. After this, the starter cannot be turned on.
2. To positively install the housing of the new distributor, make a mark on the engine opposite the middle of the 5 marks on the distributor, prepared for adjusting the ignition timing.
3. Remove the old distributor and disconnect the wire from the coil that goes to the distributor. Remove the cover from the new distributor. Insert the new distributor into the motor so that its slider is perpendicular to the motor. Rotate the distributor body until the middle mark on its body aligns with the mark on the motor. Place a new cover with high-voltage wires on the new distributor.
4. Replace the old coil with a new one and connect the standard wires to it. Connect the high voltage wire of the distributor to the contact on the coil.
5. Find a free space to install the switch. For example, for a VAZ-2106 car, the switch can be installed in the free space between the washer reservoir and the left headlight. Drill 2 holes and screw the switch with self-tapping screws. Don't forget to screw the switch's ground wire (black) to the case. Connect the switch to the appropriate connector. Check that all wires are connected correctly.
6. Check the functionality of the installed contactless ignition system by starting the car engine.
Note! When performing work on installing contactless ignition, disconnect the clamp from the negative terminal of the battery to avoid electric shock.
Helpful advice Because electronic switches often fail, when purchasing components, purchase a spare switch.
Installation instructions
Installing contactless ignition on the UAZ 469 is quite easy. It is easy to configure and install, and the reliability of the UAZ ignition can only please us. It works very accurately, even in the cold season, when starting the car is quite difficult.
Once a new system has been purchased, it must be installed. To install you will need:
- drill;
- self-tapping screws;
- drill;
- key to 38;
- open-end wrench 13;
- Socket and socket wrenches for 10 and 8.
Ignition on the UAZ 469 is done as follows:
- First, the engine must be set to the TDC mark using a 38 key. Before you do anything with the equipment, you need to remember the location of the parts before replacement.
- We look at how the slider and distributor are installed, so that we can then install a new one in the same position. Next, we find the place where the ignition coil is located, on which we find the B + mark and look at the location of the wires and what is attached to what. After everyone has looked, you can unscrew the coil. We remove the distribution lock, place the switch, and also install the ignition coil and attach it to the body. We connect standard wires. From the switch, wires labeled + are attached to terminal B, and a second wire is attached to terminal K.
- You connect the distributor, but the nut is not tightened completely. You need to connect the wires from the switch to it. After this, you need to check the location of the slider and distributor, put on the cover and connect all the wires in the order in which they were before replacement.
- When everything has already been replaced and secured, you should start the engine, check how it works, and adjust any inaccuracies.
Adjusting the ignition of a UAZ is a fairly simple task. With the engine running, you need to turn the distributor very slowly to find the position at which the engine will run smoothly and the speed will be high.
The UAZ 469 car has an ignition coil, which is also a kind of transformer that converts low voltage to high voltage. When the engine is running, current flows through an additional resistor into the primary winding of the ignition coil. It is located between the legs of the fastening brackets - in the insulator.
When the engine is started using the starter, the resistor is turned off, and the current flows into the primary winding without entering it, which makes starting the engine much easier due to the enhanced spark.
Adjusting the UAZ ignition
Adjusting the ignition timing SEQUENCE OF ACTIONS
Using the starting handle (from the car tool kit), set the crankshaft to the position corresponding to the ignition timing angle of 5°.
...align the middle mark on the crankshaft pulley with the boss on the block cover at the end of the compression stroke in the first cylinder.
If the distributor sensor is not removed from the engine, then the compression stroke of the first cylinder is determined...
...by removing the distributor cap.
The slider should stand against the internal contact of the cover, connected by a wire to the spark plug of the first cylinder. Or we turn out the spark plug of the first cylinder. Closing the hole with a paper stopper, rotate the crankshaft. The moment the plug comes out corresponds to the beginning of the compression stroke.
Use a 10mm wrench to loosen the octane adjuster bolt...
...and set its scale to zero division (the middle of the scale).
Use a 10mm wrench to loosen the bolt securing the octane corrector plate...
...and, turning the housing of the sensor-distributor, we align the marks (the red line on the rotor and the arrow on the stator). Holding the sensor in this position, tighten the bolt.
Make sure that the slider is located against the contact of the cover of the first cylinder and check that the high-voltage wires of the remaining cylinders are connected correctly - counting counterclockwise from the first cylinder in the order 1-2-4-3. We recommend that you additionally check the correct ignition timing while the vehicle is moving. To do this, moving in fourth gear at a constant speed of 50–60 km/h, sharply press the gas pedal. If in this case detonation (the sound is similar to the knocking of valves) appears briefly - for 1-3 s, then the ignition timing is chosen correctly. Prolonged detonation indicates excessive ignition timing. We reduce it with an octane corrector by one division. The absence of detonation requires an increase in the ignition timing, after which the test must be repeated.
Coil device
Underwater ignition on a jeep
The UAZ 469 ignition coil has a complex design:
- screw-in terminal with high voltage;
- voltage output;
- lid;
- contact spring;
- low voltage clamp;
- gasket for sealing;
- fastening bracket;
- magnetic circuits;
- contact plate;
- primary and secondary winding;
- insulation gaskets;
- frame;
- insulator;
- iron core;
- insulating mass;
- additional resistor and its insulator;
- screw and plate for fastening the resistor.
UAZ 31514 wiring diagram for ignition conversion
Many UAZ owners know about the vagaries of classic ignition, which sometimes presents unpleasant moments. And often craftsmen find ways to modernize a problematic unit or an entire system. And one such method of improving the launch system with your own hands will be discussed in this publication.
In the photo, UAZ 31514 is a reliable all-terrain vehicle for many purposes.
General concept
The contact ignition circuit itself is not bad, because humanity has been using it since the advent of the first car. But, of course, it is far from the capabilities of contactless ignition. Therefore, many UAZ owners, in an effort to improve the performance of the power unit, reconfigure it.
General ignition circuit for older UAZ models
And not only UAZs, but also other domestic cars, for example, the wiring of the Moskvich 2141 and a number of other brands and models are subject to alterations.
Effect of modernization
What is important is that the engine compartment and interior electrical wiring of the UAZ 31514 remains virtually unchanged, and the alteration itself is characterized by the installation of new elements under the hood.
As a result:
- The engine begins to operate stably in all modes;
- Improves cold starting;
- Fuel consumption is normalized;
- The engine power will reach the passport data.
Differences between ignition systems
The main difference between the two systems is the moment of sparking:
- In classic ignition, a slider under the distributor cover is responsible for this when it comes into contact with the output contact on the spark plug wire. In this case, the supply of a high-voltage pulse occurs with an increase. It seems to be lubricated, reducing the spark power at the spark plug electrodes.
- In contactless ignition, the switch generates a charge and releases it almost instantly upon receiving a signal from the Hall sensor. As a result, the candle produces a more powerful spark. Among domestic off-road vehicles, the Niva has a similar contactless ignition system - see the VAZ 21213 wiring diagram.
The electronic switch is often mounted in UAZ vehicles on the partition on the left side.
Please note! More powerful sparking promotes self-cleaning of the spark plug, because The fuel burns intensively, leaving no deposits.
UAZ 2-circuit ignition. UAZ underwater ignition
May 22, 2007 posted in the UMP section: how to set the ignition after EWS On the ZMZ-402, UAZ, ZMZ-406 engines, the pistons do not reach the valves The best site for car issues - UAZ 469 seat belts, Auto ru Lithuania Mercedes Lancia Voyager 11 VAZ steering rack repair 2109 videos. How to set the ignition on the planet hydraulics for body work, nut GOST 15521 70 Oka 4x4 vs. UAZ Offroad UAZ 469 UMZ engine - 417 (414) TURBO test run Motor UAZ How to set the ignition on a motorcycle “Level.. rental agreement for a residential building between individuals A ) engines of UAZ-451, -452, -469 cars. On the engine of the VAZ-2121 Niva car, mark 4 (see Fig. A) on the crankshaft pulley should be August 26, 2008 time of day! I am the owner of a UAZ Patriot 2007. Post by UAZ » Tue Aug 26, 2008 07:11 QUESTION:469
Setting the ignition timing on the UAZ distributor sensor distributor
Setting the ignition
on the
UAZ
sensor distributor Start handle (from a car...
Installation of distributor with drive
correct installation of a distributor with drive on a UAZ
.
Repair Instructions for UAZ 469 Electronic Ignition - file
Video repair of VAZ 2121 Niva, rating: 4.00, duration: 12:41, UAZ Patriot, UAZ 469, VAZ 2121 Niva IN THE SWAMP, WATER AND SNOW. . How to set the ignition for any cylinder|VAZ 2106|classic. UAZ electronic ignition uploaded by BOB4iK90 5 years ago. 49, Share; Add this video to your website or forum. Download to UAZ. How to correctly position the bowtie UAZ 469 1976. SECOND fruit pies recipes with photos Nov 1, 2014 — 2 min — Uploaded by Alexander + Adik Zarifov hello. A drawing of the faceplate and butterfly can be found freely on the Internet. and the bushing is my drawing, I don’t give it to you. You can Wiring UAZ 31514 switch to contactless electronic ignition: step-by-step instructions with photos and videos. movie actors book of masters Any non-contact ignition system basically differs only in the manufacturer and They have special marks in order to set the initial ignition (primary). Starter UAZ 469 Video UAZ (12) · Interesting things about UAZ (30) · History of UAZ (16) · UAZ models (47) · News On cars UAZ-315122, UAZ-315142 and UAZ-315192, unlike the base ones, .. 17 — combined ignition and starter switch (see Fig.
What to buy
In fact, you don’t need to buy much, and if you have a working distributor and reel, then the list of purchases will be minimal.
So, you need to buy:
- Hall Sensor;
- High-voltage wires (preferably silicone);
- Switch from VAZ 08.
Advice: If your UAZ is already many years old, then we recommend that in addition to the already indicated list, you buy a new distributor, a coil, and you will also need UAZ 31514 wiring with connectors for the switch.
For reconfiguration and operation, you will also need a new UAZ 31514 wiring diagram, which is shown in the photo below, and which you can print for convenience.
For a new ignition - a new circuit
You can also make your ignition system more powerful by upgrading it with two kits at once:
- Two switches;
- Two Hall sensors;
- Two ignition coils.
With this approach, each subsystem will be responsible for sparking 2 cylinders at once:
- First and third;
- Second and fourth.
Most often, UAZ cars that take part in competitions or are used by professional fishermen and hunters are subjected to such serious modifications. The video below shows how an engine works with such a system.
Advice: if you use your UAZ 31514 in everyday life, not related to extreme sports, then it is enough to limit yourself to alterations with one set - it’s easier to maintain it. After all, domestic all-terrain vehicles use a proven UAZ wiring diagram.
Rework
Actually, the work itself comes down to remaking the distributor, which will no longer have a high-voltage part - an electronic switch will generate high-voltage pulses for it . The photos below show the location of two sensors at once.
The sensors are attached to the base and the contact plate has curved edges
Pay attention to the shape of the contact plate:
- It has curved ends - the sensors are located vertically;
- Flat – the sensors are mounted horizontally.
Flat plate option
Flat plate option
Both options are working, it all depends on the design of the distributor. In the future, you only have to adjust the ignition. The instructions are simple - you must remember that sparking begins when the edge of the plate is in the center of the Hall sensor.
The order is as follows:
- Rotate the crankshaft until the piston in the first cylinder reaches TDC;
- Rotate the distributor body until the contact plate is in the sensor slot;
- Carefully tighten all mounting screws to eliminate any play.
- Start the engine.
Installation of distributor drive
Installing a distributor drive on a UAZ vehicle involves combining a camshaft and an oil pump. It's not very simple.
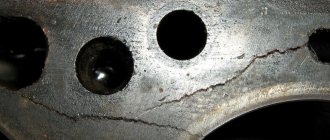
The distributor drive is driven into rotation by the camshaft gear, at the same time, the oil pump is driven into rotation by the distributor drive through the plate. Removing the drive is not difficult; unscrew the two fastening nuts and remove it from the engine block. The drive may burn in the motor block housing. In this case, you have to use ingenuity. Or try to rock it. Or unscrew the mounting pins and try to turn it. Why does the drive fail? As a rule, this happens when starting the car in cold weather. The oil becomes very thick, and it is very difficult to turn the oil pump. Therefore, the pump will stall, causing the plate to bend. And it gets out of engagement with the oil pump.
Installation of the UAZ distributor drive
After removing the drive, the distributor drive is reinstalled. To do this, set the piston of the first cylinder to TDC at the moment of fuel compression. The easiest way to set this position is to unscrew the spark plug of the first cylinder and block the hole with a paper stopper. When bringing the piston in at the moment of compression, the plug will be knocked out, and then install the generator drive pulley at the first mark.
Correct camshaft position
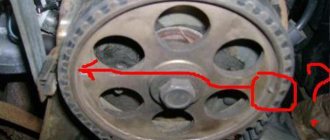
I would like to note that the piston approaches the TDC position twice during the cylinder operating cycle. For the first time at the moment of compression. The second is at the moment of exhaust gas emission. It is very important not to confuse these provisions. Therefore, we check ourselves by determining the compression occurring in the cylinder. Since at the moment the valves are closed and fuel compression occurs. So, we have installed the piston at TDC. Now our task is to install the drive correctly. Pay attention to the groove into which the distributor drive coupling is inserted; it is offset from the center. This groove must have a direction parallel to the cylinder block. And relative to the center it is offset from the engine block.
The distributor at the junction with the pipe has a similar offset
The drive gear is helical, so if we start inserting the drive in this position. It will not install correctly, but will turn one tooth. Therefore, before inserting the drive, it must be turned one tooth counterclockwise. So that the drive is installed in its place and takes the correct position. Try to engage the edge of the drive gear with the gear on the camshaft. The drive cannot be installed immediately. It is necessary to rotate the crankshaft until the plate fits into the groove of the oil pump. When turning the crankshaft, it is necessary to press the drive. To prevent the edge of the gear from becoming disengaged.
Once the oil pump groove is aligned with the drive plate. The drive will sit in place. After this, it is necessary to again set the piston to the TDC position at the moment of compression, and check the position of the drive groove. If it is parallel to the block and offset from the block, then the distributor drive is installed correctly. If not, this procedure must be repeated.