From this video clip you will learn how to correctly install the ignition on the 406 engine of a Gazelle car. In some cases, there are some nuances to the correct installation of TDC marks on the timing mechanism.
In this case, we consider the classic ignition installation in the ZMZ 406 engine on the Gazelle when everything is in order with the chains and camshafts.
We immediately look for the mark on the crankshaft (its location is clearly visible in the video). Then we install the camshafts according to the mark (small holes in the shaft stars should be installed along the edge of the cylinder head).
I set the ignitions, I want to please you, how you found 3 marks on them and there is no way to set them, there is a nuance and you can fuck with it for a long time and for a long time you still have to look so that the piston of the first cylinder comes to the top position when you set the flywheel and that’s the whole trick, otherwise you can set it like that on 1 and you will have the cylinder set to 4 and put everything on the mark!
And when rotating the flywheel with a 36mm wrench, I came up with a very funny thing, well, I didn’t have a head pipe and an extension cord nearby!
And recharging the hydraulic tensioner took me 5 minutes, I needed to unscrew the key to 19 and a large chisel with a key, I don’t remember how long I inserted the chisel into the upper slot and the key to 19 into the lower groove and quickly untwisted it, but I took the charge and cut it off from the bottle, not a big one rolled up a piece
and pressing the cartridge with the help of this piece, I put the retaining ring in the groove and, one might say, for carving wood, I finished it to the end, inserted the spring, wrapped the lid and put it in a special box so that it would not run out because I still had to go!
Adjusting and installing the ignition ZMZ 402: secrets and tips
The ZMZ 402 engine is one of the products of the Russian automotive industry, widely used in the automotive industry. These power units were equipped with certain models of Volga, UAZ, and Gazelle cars. To ensure normal engine operation, the machine must have the ignition set correctly. In this article we will tell you how to install a distributor on a 402 engine and what should be taken into account when performing the task.
In order to properly configure and adjust the ignition of the ZMZ 402, you need to know some nuances about the operation of the power unit. Such motors have a non-contact distributor installed, supplemented by a control signal generator and mounted advance regulators - vacuum and centrifugal (video author - smotri Vidik).
The distributor is designed to perform certain functions:
- determines the moment of spark occurrence;
- transmits high voltage signals through the cylinders of the power unit, taking into account the order of their operation.
For the correct distribution of impulses, a slider mounted on the mechanism pulley is used. The slider is equipped with a resistor and is designed to suppress interference. The switching device performs the function of opening the ignition coil winding circuit, converting control signals from the regulator into short-circuit current signals.
To correctly install the ignition on a 402 engine, it is necessary to take into account the system characteristics presented below:
- the order of operation of the cylinders is first the first, then the second, then the fourth and third;
- the rotor of the distribution element rotates counterclockwise;
- on a centrifugal device the advance angle is from 15 to 18 degrees;
- on a vacuum device this indicator is from 8 to 10 degrees;
- the play on the NW should be no more than 0.8 mm;
- the resistor resistance value should be from 5 to 8 kOhm;
- the SZ resistance parameter should vary around 4-7 kOhm;
- in the stator winding the resistance level should be no more than 0.45 and no less than 0.5 kOhm.
Disassembled distributor for ZMZ
How to install the ignition yourself?
How is the ignition installed on the ZMZ 402? The crankshaft must be placed in a position that corresponds to an advance angle of 5 degrees.
You need to set the moment like this:
- On the power unit, we combine the average mark on its shaft on the cylinder head cover, that is, at the end of the compression stroke on cylinder 1.
- If the distributor has not been removed from the power unit, the compression stroke on cylinder 1 can be detected by opening its cover. It is necessary that the slider be installed opposite the internal contact, which is connected via a cable to the spark plug. If it is not possible to determine the compression in this way, you can dismantle the SZ installed in the first cylinder. After this, the hole will need to be covered with a rag, or better yet, with paper. The crankshaft needs to start rotating, and at the moment when the paper plug is knocked out by the air flow, the compression stroke begins.
- Now you will need a 10mm wrench - with its help you need to slightly loosen the octane corrector bolt, but you do not need to unscrew the screw itself.
- Next, you should set its scale to zero, this is approximately the middle of the scale.
- After completing these steps, using a 10mm wrench, you need to loosen the bolt that secures the octane corrector plates.
- Now you need to rotate the distributor body so that the marks are aligned. In particular, we are talking about the red mark located on the rotor, as well as the risk on the stator. When the installation of the device drive is completed, the distributor must be held in this position with one hand, and the bolt must be tightened with the other hand.
1. Place marks. 2. Set the scale to zero. 3. Align the distributor marks.
Many people set the ignition to a strobe light. Sometimes setting the ignition timing does not produce results - the engine continues to stall and not operate at full power. The reason is the inoperability of the distributor as a whole. The problem can be solved by replacing or repairing the distributor.
Video “Step-by-step installation of distributor on ZMZ 402”
see also
Comments 22
The crankshaft sensor is crap and it will work haphazardly
There the damper is already rubbing against the cover, the whole front is covered in oil, from where it is running away at a gallop
You try to practice. What will you see in the video? The output of the plunger in the grooves is less than 1 mm in each. I didn’t come up with a fairy tale to make a description in 10 lines.
I charged the GN without anything. You just need to push the inner plunger out of the outer one and onto the detector. space, no more, no less. Only in one position will it lock and will not move forward under the action of the spring during assembly. And in front of the mouth. cap, check this place by pressing the spring. Try it, and everything will work out just fine. Just a few. attempts before assembly. I always do this and not only for myself. To make sure the assembly is correct, screw the cap with the spring onto several. threads and tap the working side of the plunger on a workbench, etc. discharge the GN. Check, then reassemble. If everything is hockey, screw on the cap completely and carefully install the GN in place. Then discharge as soon as you put it in place.
I just tried it without anything, it’s impossible because... Is the retaining ring located inside and how to knock it out? You can’t put anything on the groove without anything! And if you can do it like that, make a video and show it to everyone!
It’s kind of difficult for you with the tensioner, a knife or a needle and 5 seconds of time
Operation depends on correct ignition
Automotive power units work productively if the ignition system is adjusted to 402 fuel-air mixture. The carburetor forms the fuel composition and supplies the prepared mixture to the engine cylinders.
At the moment of the highest position of the pistons, the spark plugs generate a spark that ignites the fuel mixture in the combustion chamber. A mini explosion of fuel with the resulting gases presses on the pistons, turning their forward motion into torque of the crankshaft.
The algorithm for igniting the mixture highlights one important point in the sequence of events. Will the engine work fully if the mixture is ignited at the beginning of the piston lifting or lowering? The correct answer is no.
Any internal combustion engine works like a clock, provided the fuel is properly ignited. The power of the power plant increases, approaching the established standards. To do this, it is necessary to fix the correct spatial position of the distributor, which alternately closes the electrical circuit from the high voltage coil to the car spark plugs.
Let's start assembly
We put on a new crankshaft sprocket and immediately set a mark.
Then we screw on the lower damper and tensioner and install a new chain.
Install the intermediate shaft
, set a mark.
We bend the edges of the locking plate. We put a chain on it and lubricate everything with new engine oil. The right side of the chain should be taut.
Let's check again that the marks match.
We put the upper chain on the intermediate shaft and install the damper. Lubricate everything with clean oil.
The exhaust camshaft sprocket, so that the right branch is tensioned, and the mark on the sprocket is at the level of the upper edge of the cylinder head. Same with the second camshaft.
We install the hydraulic tensioner and screw on the cover. We unscrew the plug and sharply press the hydraulic tensioner with a screwdriver until it discharges. When discharged, it will push out the screwdriver and tighten the chain.
We install the upper damper and check all the marks again.
Carefully place the front cover, having previously lubricated the gaskets and all adjacent surfaces with sealant. Putting the cover on is not easy because you need to hold the tensioner and make sure that the marks do not get lost. We turn the crankshaft two turns and, if the valves do not meet the pistons and all the marks are in place, we put everything else in the reverse order of removal. Fill with oil and antifreeze and start the engine.
Malfunctions and their elimination
Like any technical product, the Gazelle-Business motor is susceptible to breakdowns. Sometimes it needs repairs for various reasons. The most common problems that arise are:
- The motor does not start. Most likely there is no fuel supply to the injectors. It is necessary to use the appropriate fuel, rinse and clean the fuel intake.
- The tightness of the pipeline between the tank and the electric pump is broken. The connection points should be checked and the tightness restored.
- There are problems with the control electronics. It is necessary to replace faulty parts of the unit.
- Poor power delivery indicates problems in the electronic control system. After testing, it is necessary to replace the unusable element.
- The fine filter is clogged. In this case, the filter element must be replaced.
- Air appears in the fuel block. It is necessary to check and ensure the tightness of the system.
- If problems are detected in the fuel pump, the faulty injectors should be replaced.
Tools for replacing timing chain
Before installing timing marks on the ZMZ-406 engine, you need to prepare the necessary set of tools:
- Heads and ratchet.
- Socket and open-end wrenches.
- Hexagons.
- Torque wrench.
- Chisel and hammer.
- Pullers with two or three legs.
It is imperative that all threaded connections that are covered with dust, rust, dirt must be treated with penetrating lubricant; this will allow for much faster disassembly of the units.
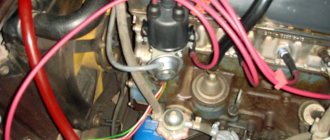
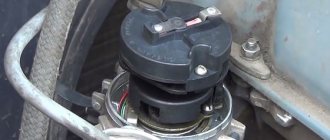
Ignition system elements
One of the main systems necessary for a successful engine start is the ignition system. For gasoline engines, the fundamental design of ignition systems differs very slightly - there are two types: • Contact system • Contactless system
The ignition system consists of the following components: 1. Coil 2. Distributor-spark breaker (distributor) 3. Switch 4. Spark plugs 5. Ignition switch 6. Starter 7. Additional resistance (in some cases)
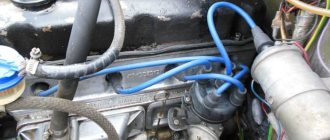
Connecting high-voltage wires ZMZ 405, ZMZ 406
ZMZ carburetor and Euro-2 engines are equipped with a DIS (Double Ignition System) ignition system. The DIS system uses ignition coils with two high-voltage wires. Each coil operates a corresponding pair of cylinders.
The first coil works with 1 and 4 cylinders, the second coil works with 2 and 3 cylinders.
How to connect the ignition coils?
The ignition coil of cylinders 1 and 4 is located closer to the intake manifold, the coil of cylinders 2 and 3 is closer to the exhaust manifold.
Low-voltage coil wires must be connected to the coil in pairs. The pair of wires for coil 1-4 is slightly shorter than the pair of wires for coil 2-3.
Adjusting and installing the ignition ZMZ 402: secrets and tips
The ZMZ 402 engine is one of the products of the Russian automotive industry, widely used in the automotive industry. These power units were equipped with certain models of Volga, UAZ, and Gazelle cars. To ensure normal engine operation, the machine must have the ignition set correctly. In this article we will tell you how to install a distributor on a 402 engine and what should be taken into account when performing the task.
Design Features
Before installing timing marks on the ZMZ-406, you need to consider the features of this engine.
There are a total of four phases in which the gas distribution system operates:
- Inlet of the fuel mixture into the combustion chamber.
- Compression stroke.
- The piston stroke is moving from top dead center down.
- Exhaust gas release.
To ensure maximum efficiency and prevent damage to the valves, an actuator must be used. On ZMZ-406 and similar motors a metal chain is used.
But the camshafts and crankshafts must be installed according to the marks - this ensures the synchronized operation of all mechanisms. The gas distribution mechanism allows the valves to open and close the holes in a timely manner, supplying the fuel mixture and emitting combustion products into the atmosphere.
Draining antifreeze from the system
First, prepare containers into which you will need to drain the liquids. First of all, empty the cooling system - there should be quite a lot of antifreeze, about 10 liters. To drain the antifreeze, you need to unscrew the plug located in the lower half of the radiator.
As soon as you unscrew the plug, the pressure will be very strong; as the level decreases, it will decrease. It is advisable to use a wide container so as not to lose liquid. In order for the antifreeze to drain faster, you need to unscrew the cap on the expansion tank, increasing the pressure in the system.
Engine 402 ZMZ - valve adjustment, operating procedure
Author:
Maxim Markov
During the operation of the car, the need for adjustment work periodically arises, be it correcting the ignition angle or adjusting valve clearances. And the 402 engine needs to perform a valve adjustment procedure every 15 thousand kilometers, since if the thermal clearances are broken, the internal combustion engine (ICE) will lose power and fuel consumption will increase. This article will discuss exactly this.
Checking for correct installation
If the order is followed without errors in the ignition of the 402 engine, then the next task will be to check the power plant while the car is moving:
- We go out onto the highway and, when driving 60 km/h, turn on fourth gear. We are accelerating. The appearance of short-term detonation knocks indicates that the ignition is installed correctly.
- Prolonged detonation knocks are confirmation of incorrect setting of the advance angle.
In this case, you should reduce it with an octane corrector, moving it to one notch. If detonation cannot be heard at all, then the advanced ignition angle of the fuel mixture should be increased. And check again for correct installation by accelerating the car to 60 km/h and shifting to fourth gear.
We finished the examination, let's start strength exercises
First, remove the engine protection and mudguard. Drain the antifreeze and oil from the engine. Remove the upper radiator pipe.
Disconnect all interfering pipes.
We remove the wiring harness to the side. We remember or sketch the location of the connectors on the ignition coils.
Using a 12mm socket, unscrew the eight bolts in a circle holding the valve cover and remove the last one.
While the service belt is tense, loosen the three bolts on the 10th pump pulley.
We loosen the bolt by 13, the tension roller and unscrewing the bolt by 10, we loosen the tension of the auxiliary belt.
Remove the service belt, roller and coolant pump pulley.
We unscrew the four screws of the upper timing case cover and remove the last one.
We remove the generator along with the triangular plate.
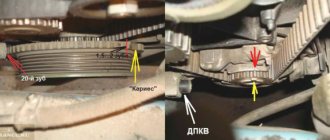
Unscrew bolt 10 of the crankshaft position sensor.
Read
We move the sensor to the side so that it does not interfere.
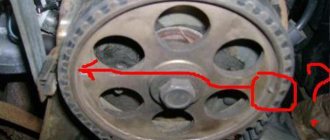
Using a 36mm socket, use the pulley bolt to turn the crankshaft clockwise until the marks on the camshafts point to top dead center.
The mark on the intake camshaft should be level with the top edge of the cylinder .
Likewise for the exhaust camshaft.
Installation of ignition 406 car engine
The old man is a true master)))))))))))
GAZELLE - installing camshafts according to marks
New method with modifications Do you want more video lessons?
We unscrew the crankshaft pulley bolt, having previously locked the crankshaft. To do this, the assistant in the cabin engages fifth gear and presses on the brake with all his might, while we, with a slight movement of the hand, using a meter-long pipe and a 36mm socket, unscrew the bolt. We remove the crankshaft pulley, you will have to suffer because it sits tightly on the shaft.
Loosen the clamps of the pump pipes.
Use a 6mm hex to unscrew the four screws on the front side of the pump and a 12mm wrench to one on the back side and remove the coolant pump.
Unscrew the two bolts of the upper hydraulic tensioner cover. Since the tensioner in a discharged state will put pressure on the cover, we hold it so that it does not jump out.
Remove the cover and the hydraulic tensioner itself.
Likewise for the bottom one.
We unscrew the six bolts on the 14 amplifier and remove it. The oil pan mounting nuts were hidden under it.
Use a hexagon to unscrew the remaining screws of the front timing cover (5 pieces), as well as everything that holds the oil pan (11 screws and 4 nuts).
The pallet goes down about two centimeters, the beam does not go any further. But this is enough to pull out the old gasket and, remembering the kind words of the engineers from Gorkov, clean the adjacent surfaces before installing a new gasket.
Read also: Obidi 2 car diagnostics
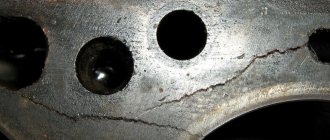
This is the terrible picture that appears before our eyes.
Now remove the lower timing cover.
Using a hexagon, unscrew the screws of the upper damper and remove it.
Same with the second one. It will come off along with the chain.
The camshafts have a special 30 mm square so that the shafts can be held when unscrewing the sprocket bolt. We hold the shafts with a 30 wrench and unscrew the camshaft sprockets with a 17 wrench.
We remove the camshaft sprockets and the chain with the damper.
Read
Use a hexagon to unscrew the chain tensioner fastening and remove it. Same with the bottom one.
We bend the edges of the locking plate and use a 12mm wrench to unscrew the bolts securing the intermediate shaft
.
We remove it together with the chain. Then use a hexagon to unscrew the two bolts of the lower damper and remove it.
Remove the retaining ring and the crankshaft sprocket. In the photo the ring is slightly shifted for clarity.
A two-legged puller is best suited for this.
And here is the secret why we change as a set. If you look at the sprockets, you can immediately see the difference, so the old chain will not fit the new sprockets and vice versa.
Now that everything that bothered us has been dismantled, we can wash all the removed parts and the cylinder block, at least from the front.
Preparatory process
Before you begin adjustment work with your own hands, you need to prepare the necessary tools and consumables, which include:
- set of measurement probes;
- a set of wrenches (socket or ring);
- new valve cover gasket;
- crankshaft ratchet key;
- spark plug wrench Needed to remove spark plugs;
- Phillips and flathead screwdrivers;
- clean rags.
Upon completion of preparation, when all the required tools are prepared, you can proceed directly to the adjustment work.
Reasons why shafts are not aligned with marks
It happens that the crankshaft is set to the mark, but the camshafts just don’t want to become as they should.
- The camshafts operate not on the 1st, but on the 4th cylinder. The solution is simple - you need to make a full rotation of the crankshaft, 360°. After this, you can set marks on the camshafts
- The timing chain has stretched. The problem is solved by replacing the chain and gears, because they probably also have wear.
- The damper rotated on the shaft. Unfortunately, this also happens. In this case, you have to do it the old fashioned way: unscrew the spark plug from the first cylinder block and set the piston to its highest position. This will correspond to the coincidence of the marks on the crankshaft.
In general, setting the ignition on the ZMZ 406 is not such an abstruse procedure. If you do it yourself once, then in the future this work will seem no more difficult than changing the oil in the engine.
Procedure for replacing the timing chain ZMZ-406 Volga GAZ-31105 (video)
The dream of our fathers and grandfathers Volga. Not long ago, an old friend of mine visited us in his favorite GAZ 31105. There seemed to be extraneous noise from the timing drive, as well as increased consumption and poor throttle response, which condemned the timing chains. So, GAZ 31105, engine 406, timing chain replacement.
Let's say right away what we need: engine oil with a filter and a sump gasket, it would be better if it was cork, high-temperature sealant, gray 999 from ABRO, kerosene and a metal brush for washing parts. I have only seen a clean engine in the new Volga. It’s not for nothing that they say: “If the Volga doesn’t leak oil, it means it doesn’t exist.” Another set of keys and sockets with a reinforced 36mm, a 6mm hexagon, a lot of rags, instant coffee and several sausage sandwiches. As well as patience and a great desire to carry out this procedure yourself, since the temptation to entrust this to someone else is very great. After reading the article to the end, you will understand why.
Most importantly, this is a complete kit for repairing the gas distribution drive of ZMZ-405,406,409 engines - this is its official name. It must include the following ingredients:
- Two chain tensioners.
- Two hydraulic chain tensioners.
- Two drive chains, small and large. For ZMZ-406 there are 70 and 90 links, for ZMZ-405 there are 72 and 92 links.
- Three chain guides.
- Gaskets for the upper and lower chain covers, pump and hydraulic tensioner covers, as well as two soundproofing ones.
- Sprockets of the crankshaft, camshaft, intermediate shaft, drive and driven with a locking plate.
Under the hood there really is a ZMZ-406 engine.