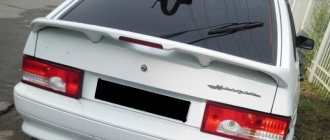
When carrying out repair work with an electrician on VAZ 2108, 2109, 21099 cars and their modifications, as well as when problems arise, the brake lights or side lights do not light up, the rear light does not work, the turn indicators do not have a flash, very often you have to understand the wiring leading to rear lights.
In such a situation, you just need information about where the cable fits, what it is intended for in the taillights. In this article we will take a closer look at the wires going to the rear lights of VAZ 2108, 2109, 21099 cars. For example, we use the left light (the one behind the driver). All wires in the terminal block of the left lamp are located in a certain order. In some cases, they may also be numbered at the ends of the pads.
purpose of wires in the connection block of the left rear light of VAZ 2108, 2109, 21099 cars
1. Yellow wire with a black stripe, the top one in the connection block - more for the side light.
2. Brown or orange wire with a black stripe, the second one in the connector block (located under the yellow one) - more for the fog lamp.
3. Blue wire with a black stripe, the third one in the connection block is the turn signal plus.
4. Green wire, fourth in the block - positive for the rear light bulb.
5. Black wire, fifth in the block (penultimate) - negative for all lamps in the lantern.
6. Red, sixth (newest) - more about the brake light bulb.
Each wire in the terminal block has its own trace on the rear light board. For more information about checking the rear light panels, see “Checking the rear light panels of VAZ 2108. 2109, 21099”.
Notes and additions
— The wires and connections of the right lamp of VAZ 2108, 2109, 21099 cars are similar to the left one and duplicate them.
Five more articles on the site about the electrical system of VAZ cars
Content
The exterior of each car consists of several basic elements that determine its design characteristics. There are optics in front and behind, which determine not only the characteristics of the car’s exterior, but also perform quite important functions: indicate the direction of movement, illuminate the road and indicate the car when driving at night. Headlights for VAZ 2114 tuning are performed to refine the exterior of the car and improve its driving performance. There are several methods for replacing headlights, some involve the use of new units, others involve a major overhaul of existing ones.
Side panel: Important: Please note that the headlights must still perform their primary functions, otherwise the safety of the vehicle will be significantly reduced.
Let's take into account all the features of the problem under consideration and give several examples of dismantling.
Features of tuning the optics of the VAZ 2114 car
When considering the optics of the VAZ 2114, the following points should be noted:
- The new optics are equipped with special lenses necessary to focus the light. It is with the help of the installed lens that the light is redirected over a long distance.
- Below and on the side there is a strip of daytime running lights.
- If necessary, you can install xenon and fog lights.
- When carrying out tuning, it is necessary to first disassemble the factory headlights. Dismantling work can be done using a screwdriver, wrenches and a tester.
- When disassembling, for full access to the optics, remove the washer and the hydraulic corrector cylinder.
- The terminals powering the headlights are discarded.
- The optics should also be folded into a block using threads. After this step, the lens body can be disassembled using a Phillips screwdriver.
- The headlights are removed by pressing them.
- The next step is to remove the protective glass.
You can disassemble the optics in a similar way. After installation and installation of new optics, you can independently adjust the angle of incidence from the front optics. To do this, a corrector is installed, which is made in the form of a cylinder and pipes. Headlights for tuning a VAZ 2114 can be installed in a few hours, which can be called an advantage of the car. In some foreign cars, disassembly work takes several hours due to the fact that many different parts have to be removed.
Front track, mm
Rear track, mm
Another way to modify the optics is to apply tint to the surface of the protective glass.
This work is not difficult to do; all you need to do is purchase the necessary film and follow a number of simple steps:
- First, we make a selection of the color of the film or paint.
- Dry the headlights thoroughly before starting work. If paint needs to be applied, the optics must be disassembled. Places where paint should not come into contact should be sealed with tape.
- In order for the masking tape and paint to adhere well to the surface, they should be degreased.
- When applying paint, keep the bolt at a distance of 30 centimeters. Otherwise, the substance will be sprayed unevenly over the surface.
- After the paint has dried, the surface should be polished.
- When using film, it must first be cut to fit the optics using a knife.
- The film is applied by wetting the surface with soapy water, the support is removed from the film, and the surface is glued.
- When using film, air must be removed from the surface with a rubber spatula. If bubbles remain on the surface, it will block the light from spreading.
You can paint the headlights for tuning a VAZ 2114 quite quickly. The main thing is to carry out work under certain conditions: humidity, temperature, presence of impurities in the air.
Installation of fog lights
You can adjust the car's optics by installing fog lights. An additional light source allows you to increase road illumination at night, in case of fog or rain. Installing additional fog lights can be quite simple:
- First you need to create a website for new optics. To do this, you need to purchase a new bumper or make special niches. Please note that making homemade niches for fog lights is quite difficult, since changing the structure of the plastic can damage the paint.
- You should pay attention to the fact that there must be a special switch in the cabin, with which you can turn on the headlights at the right time. To do this, the speaker is dismantled. After disassembly, two connectors will be available: one for the indicator, the second for the fog lights.
- The next step is to remove the fuse box under the hood.
- Next you need to stretch the wires from the relay to the fog unit.
- We connect the terminals to the connector in the mounting block.
- We ground the housing.
- We connect the PTF to the power harness.
Fog lights not only improve road illumination when driving at night or in the rain, but also significantly change the appearance of the car. Holes in the bumper for fog lights make the car's exterior more aggressive and sporty. Using a new bumper can significantly change the appearance of your car.
Main reasons
Almost all problems related to automotive electrical systems can be solved in approximately the same way. You need to look for a potential or probable cause of malfunctions in the problematic object itself, or understand the system responsible for supplying power.
The situation is exactly the same with devices called brake lights. If they stop working, then you should look for the reason in one of the following points:
- There were problems with the fuse. It has oxidized or completely failed;
- There are faults in the lamps themselves or in one lamp, depending on how many stops are not working;
- The reason lies in the mechanism responsible for turning on the warning signal when the brake is applied;
- In the socket where the stop light is installed, the contacts have oxidized;
- More serious problems appeared related to damage to the wiring.
Angel eyes
A fairly popular tuning is the use of LEDs to create “angel eyes”. They look quite attractive. To perform optics replacement work you will need the following tools:
1. Resistors. 2. LED. 3. Jars with an outer diameter of 7 centimeters. 4. 9 volt batteries. 5. Plexiglas sticks with a transparent structure.
Headlights for tuning a VAZ 2114 will look quite interesting, for which you need to do the following work:
- First you need to heat the stick until it becomes soft. Thermal deformation is necessary for the stick to become flexible and become a kind of ring.
- After heating, you should take a stick and twist the jar with it. After giving the required shape, it is left to cool. When the stick cools, its shape will not change.
- After hardening, you can trim off the excess ends.
- The two LEDs must be connected in series using a resistor.
- We sand the ends.
- Using a tape measure, make a notch at the same distance around the circumference of the rod. This must be done to ensure uniform lighting.
- The formation of grooves should be done at the ends.
- All LED connections must be isolated.
- The gap in the ring should be covered with foil.
- You must use sealant to secure the ring to the projector. In this case, the notches should face the inside of the projector.
The last step is to connect the system to a power source. The results obtained will be very interesting.
Changing the taillights
The taillights can be changed by purchasing a special tuning kit. An example would be special kits DLK, Osvar, ProSport. You can install the tail light kit yourself.
In this case, you should pay attention to the following points:
1. When choosing a kit, you should pay attention to options made of high-quality plastic. 2. When inspecting the kit, you should check for squeaking. 3. Gaskets to provide a seal to keep the projector in good condition. 4. Pay attention to versions that have a socket for each light bulb.
Some kits are quite expensive. However, the simplicity of installation work determines the attractiveness of the proposal. Another method for replacing tail lights is to use LEDs. Headlights for tuning VAZ 2114 with LEDs can significantly transform the exterior of the car. To complete the work you will need:
1. Construction tape. 2. Tape with diodes. 3. Fiberglass. 4. Resistors. 5. Epoxy resin. 6. Film glued to the surface.
You can do the job as follows:
- First you need to carry out dismantling work. At this point, separate the body from the glass. Often all elements are fixed with sealant.
- dismantling of deflectors and reflectors continues.
- On the outside, the points are marked with a marker. This step must be carried out in order to significantly simplify further assembly.
- Self-adhesive rims are attached to the inside - about 20 millimeters.
- Using a can of silver spray paint, paint the inside.
- After the applied paint has dried, the self-adhesive paper is removed, and in its place you need to attach a tape with diodes.
- Next, assemble the headlights in reverse order.
You can also significantly change the appearance of the car. The diode strips look quite attractive, and the work does not take much time. In addition, the cost of all components used is relatively low. In conclusion, we note that it is possible to independently modify the optics using ordinary elements that do not have a high cost. In most cases, diodes are used because they look nice.
Recommendations
Comments 28
And that’s it., finally)) the mounting block turned out to be working, but still left a new one as a spare, because everything on the old glass heating fuses burned out. I replaced the rear boards and harnesses with wire plugs, all the wiring was rotted in the plugs, and the stop on the spoiler was also replaced with a new one, the old one somehow broke along with all the stops for the company.
Total. Stop in spoiler 250 rub. Boards cost 220 rubles each assembled. Flagella 20 RUR, mounting block from disassembly 1000 RUR.
The new stop spoiler is of much worse quality, the factory one was much brighter. The lamps in the new stop are terrible
We got around to replacing the mounting block with a new one. I rearranged everything and ooooopppppaaaa. The feet still don't work)))
To be honest, I don’t know where to dig anymore...
In the meantime, I’m waiting for my salary, I’ve already gotten used to pressing the rear PTF button when braking))) so that no one will correct my ass))) at least somehow attract attention that I’m braking)))
Still, I decided to disassemble the mounting block and the forecast is disappointing, fuse f4, which seems to be used for heating the rear window, the cigarette lighter and somewhere else, melts the board, everything around it is scorched, the board can’t even be reached, the plastic has already melted to it, next to fuse f3 it is is responsible for the brake lights, perhaps the whole reason is this, how reluctant I am to buy a new unit... but I’ll have to go on a hike. So far I have only treated it with liquid electrical insulation before replacing the unit
That's all we have. all 3 brake lights (spoiler) do not work. The light bulbs are intact, the grounds have been cleaned, the boards are in more or less perfect condition, the tracks are intact, the lamp serviceability relay has been replaced with a new one, the frog is working, the frog is receiving power. for a mystic?))))
In short: in the footsteps, today it was the same, two lamps stupidly burned out at the same time. The spoiler most likely has some wiring cut somewhere. Regarding the turn signal: this is a jamb of the board, either change the lights completely, or just start the car, turn on the lights, turn signal and lightly hit the glass with your palm several times until it is fixed (the contact comes off there). Cleaning doesn't help for long.
stripping does not save for very long. If the weather is rainy or winter, then a month at most (
Check the limit switch (frog) under the brake pedal, it may be damaged. Better yet, buy it and replace it right away, the price is reasonable.
I removed the wires from the frog, shorted it out, nothing lights up, I’ll buy a tester, I’ll have to see if there’s any current flowing to it at all
Check the limit switch (frog) under the brake pedal, it may be damaged. Better yet, buy it and replace it right away, the price is reasonable.
There are 12 V on the wires to the frog, so what?) I shorted the wires, everything is quiet. Let's go to the relay then
And if it burns out, the stops don’t burn? It is also responsible for the fact that if they do not light up, it signals or I do not understand its essence correctly
How can I check the relay? With others, it’s clear they click) should this also be?)))
if it’s burnt, you’ll know by the smell)) and you can open it, there are 2 latches on the sides, you can pry them off and the relay housing will come off
The problem with the blinking of the fog lights along with the turn signals was solved by cleaning the contacts of the headlight. My feet don't still burn. I'm looking at the relay
Are both feet missing? Look at the relay for monitoring lamp malfunctions (the largest in the ChYa) when I paralleled the stops with the PTF, the relay burned out from overload, but yours may have just burned out from a bad ground))
Video tuning of VAZ 2114 rear lights
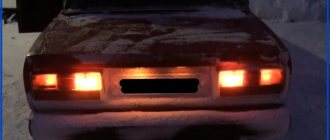
One of the most problematic areas in domestic cars is the rear lights of the VAZ 2114. In most cases, the problem lies in low-quality and unreliable rear light shields. As a result, over time, contact with incandescent lamps disappears or is lost.
Often the problem is solved by brute force, hitting the body or base of the lamp. However, such actions do not completely eliminate the problem; periodic malfunctions occur in the operation of the turn signal, side lights or brake lights.
Connection diagram
Before troubleshooting, you need to get acquainted with the electrical circuit of their power supply. Let's take a look at the diagram for switching on external lighting devices.
We are interested in:
How it works? When button 6 is turned on, the on-board power supply voltage is supplied to the mounting block. Having passed through fuses F10 and F11, it goes to the control relay K4. Fuses are necessary to protect the power circuits of the left (F10) and right (F11) side dimensions.
The relay controls the correct operation of the side light - if any of the lamps or its circuits malfunctions, it commands the on-board control system 12 to turn on the warning light located on the instrument panel. Having passed through the relay, the voltage is supplied to the side lamps 1 and 8.
Important! In some modifications of the VAZ 2114, instead of the K4 relay, there may be jumpers in the mounting block. Their location in the diagram above is indicated by arrows.
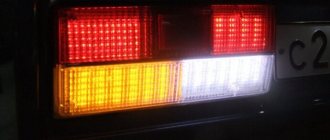
Design of the rear lights of the VAZ 2114
In order to carry out repairs, diagnose and fix emerging problems, you need to understand the device and the diagram of the VAZ 2114 rear lights.
The rear light group consists of three main elements:
— boards with fastenings, connections for connecting light bulbs;
— external decorative cover, light diffuser.
Connection diagram of components (lamp):
1 direction indicator;
2 general glows;
3 signal (stop lights);
5 reverse designation.
Causes of breakdowns
The most common reasons for node failure:
- the bottleneck in the entire structure is the elastic board;
- secondly, banal burns or mechanical damage to light bulbs;
- the third is a problem with the fuse or relay;
- oxidation of contacts;
- wiring is broken.
First of all, it makes sense to check those elements that do not require removing the entire headlight (for example, fuses, relays). Then the quality of the connections, the presence of oxidation and the power level of the illuminator are checked. The last step is to disassemble the tail light and remove and inspect the circuit board.
How to Change the Dimensions Light Bulb on a VAZ 2110
Installation, repair and replacement of front and rear dimensions of the VAZ 2110
The SDA clearly states that it is not possible to drive in the dark or in poor visibility conditions without the dimensions included on both the front and rear of the vehicle. Today we will look at how the dimensions are placed on the VAZ 2110, what could be the cause of the breakdown, and how to fix them.
Vas 2110 with markers and DRLs
Business date, meeting
The front dimensions are called headlights and are found in the headlights in front of the car on either side of it. They are extreme on the sides of the lighting system and their name comes from the fact that they show the size of the car and the width of oncoming cars.
Various options for side and daytime lights
The rear dimensions are designed for the same mission. for you to move on. This is especially true when overtaking if you don't want someone who didn't make the real size hit your Swallow.
Adjustable position of rear lights
This is an important tip: if you suddenly have to go at any cost and you get burned, the flask cannot be replaced with a new one in the left dimension, due to its absence, do not be lazy and move it to the right. And we will tell you how to do this.
READ How to Start a BMW If the Battery is Dead
device
Headlights (front dimensions) are part of the headlight. The rear dimensions are part of the rear light of the VAZ 2110, this is one of its sections. Nearby are the rear fog lights, tail lights, turn signal, reflector, brake light and size.
Causes of breakdowns
There can be many reasons for malfunctions. The most common is that the lamps are on, which naturally prevents the side lights from turning on. Particularly unreliable in this regard are the lamps brought to us from the Middle Kingdom.
Detailed description of the submersible lamp High beam, rotation and dimensions
Do it yourself.
REPLACING HEADLIGHT BLANKS BASED ON VAZ 2110, 2111, 2112
REPLACING TUBERS
Front side lights VAZ 2110
, 2111, 2112. REPLACEMENT OF LAMP
OVERALL DIMENSIONS
OF LADA.
Although they attract more than the “democratic” price, and at any wholesale outlet, you cannot encounter them. Therefore, it may be worth mentioning the saying that we are not such rich people that we buy cheap things twice.
READ Change Timing Belt on Ford Focus 2
Good branded light bulbs will last several times longer, and you won't have to change them forever.
Bulb Dimensions
Sometimes the dimensions “blink” or the instrument panel lights flash when they turn on the parking lights. Many blame this size on the relay but can't find it. The VAZ 2110 carburetor does not have a side relay, there is only a relay for high and low beams.
For a vehicle with an injection relay, locate all fuses in the mounting block. Moreover, if the relays light up one after the other, you should immediately contact an electrician as this indicates a short circuit somewhere in the circuit and therefore a burnt out vehicle.
Mounting block and relays and fuses
Never, under any circumstances, replace a blown fuse with a larger one, or one that is not a “fault” at all.
Repair
As already mentioned, it is prohibited to move the car in the evening or at night unless it is on fire. parking lights so we will look for the cause and then fix it.
If you are sure the electrical paths are working, first make sure the bulbs haven't burned out. And if they need replacement, do it.
READ How to Change the CV Joint Boot on a Renault Logan
For the headlight, the replacement procedure is as follows:
- Open the lid;
- Disconnect the battery, or better yet, remove it. We're talking about electricity, which is dangerous;
- From the engine compartment, take the lamp with your hand, disconnect the wires going directly to the lamp from the unit;
- Remove the rubber cover;
- Move the lock to the side by unhooking the spring using the hook;
- Take this flask;
- We replace it with a new one and put everything back together.
When replacing, make sure the main lights are on.
Rear marker lamps on the VAZ 2110 are installed as follows:
- Turn off the car;
- Remove the contact part from the body side (open) the epiphany with the lamps. To do this, press the latches;
- Take this flask, replace it with a new one.
Remember that bare hands cannot touch the halogen lamp. Replace gloves. The fact is that when you touch the light bulb there will be dark spots. Moreover, this has been proven. This bulb burns out much faster.
Replacing the rear lights of a VAZ 2114
To remove the rear lighting you will need:
— Convenient Phillips screwdriver.
The whole job consists of seven simple steps:
- The first step is to open the trunk of your car. If it's full of things that could interfere with your workflow, clear out the interior space.
- To ensure unobstructed access to the rear light housing, it is necessary to remove the decorative fabric cover. It is secured with several self-tapping screws that can be easily unscrewed with a screwdriver. We remove the coating in such a way that it does not interfere with the future process. On more modern VAZ 2114 models, the trim is fixed using regular fabric Velcro.
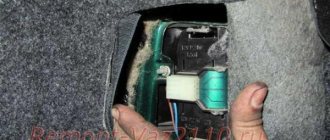
- We felt the contact chip that is attached to the headlight circuit board and carefully pulled it out of the connector. At the same time, do not shake the chip from side to side; carry out all manipulations with extreme caution.
- It's time to take out and take out the card itself. To do this, press the corresponding plastic clip and remove the product from the headlight housing.
- At this stage, unscrew the rear light holders. Using a key “8” we need to unscrew the nut from the four fixing pins, which are located in the corners of each lamp.
- All that remains is to disconnect the device housing from the body. To do this, grab the headlight with both hands and pull it towards you.
- Reconnecting the rear lights to the VAZ 2114 is carried out in the same way as the removal process.
Conclusion
To get rid of the annoying VAZ plague with taillights, there are two solutions. The first is to periodically inspect, modify, repair or replace the board. The second is replacing the two (complete) tail lights with more reliable alternative products. Now there are several types of them on the automobile market.
Tail light: The car performs many functions, firstly it warns other road users when turning in any direction (Turn the turn signal on), and also thanks to this lamp, your car is visible at night, in addition, when you press the brake pedal, the brake light comes on -rear light signals, and then the person driving behind you understands when you are braking, so this lamp is very important for the car, and if it becomes unusable (breaks), then it will need to be changed, this gives safety to you and your car , you must admit, this is not convenient when you are driving behind the car in front, and because of the broken lamp you do not understand when the car is braking, and whether it has a turn signal or not.
To replace this bulb on your car, you won't need many tools, the most important of which you will need to stock up on: a small set of wrenches and a screwdriver that you may just need!
When should you change your tail light?
At the beginning of the article, we already pointed out that the lantern is not a purely decorative element, but still greatly affects your safety, so if it breaks and the light bulbs inside it stop working, it is better to replace it; if not, you still have money for a new one, then you can install new light bulbs, but they will quickly become unusable, since all the dirt will get on them, and therefore the light from the light bulb will not disperse properly (there is a lot of dirt on it for some time), and the lamp itself will become very hot and, therefore, will fail in a very short period of time.
1) To a large extent, on many cars, the rear lights are attached to nuts, this is what happened with cars of the Samara 2 family, so it will be very easy for you to remove the rear light; at the beginning of operation, you will have to open the trunk and throw aside the original (factory) carpet (B on the carpet, the stitching will be cut exactly where it can be folded, so where you need to change the tail light and look for a place where you can fold the carpet), once folded you immediately have access to the beacon, first you need to disconnect the block of wires, which is indicated by the red arrow in the photo below, but keep in mind that the block is tight and therefore be careful with it, in addition, we recommend that you remove the negative terminal from the battery before disconnecting the wire block, because you are working with electronics and if water gets into it, and at the same time the battery will still supply voltage, then a cuito short circuit will occur, and therefore you need to connect the wiring and the flashlight will become unusable (If you do not know how to remove the terminal from the battery, read the article entitled: “Replacing the battery on a VAZ”, everything is written in paragraph 1).
2) Continue, once the block is disconnected, take the wrench in your hands and use it to unscrew the four nuts that hold the tail light in place, in the photo below you can see how two of the nuts are indicated by red arrows, the other two are from a different part and here you will find them immediately when you remove the headlight; by the way, after unscrewing all four nuts, remove the headlight from the car.
After removing the headlight, you need to check a few things (this is if you removed the headlight to access any part), namely the lamp socket, it is easy to remove, if you decide to replace it, to do this, tighten the latch that is present on it (see photo 1 ), and then remove it from the taillight (see photo 2), also check the seal on the beacon (indicated by the red arrow), it is removable and if it is too worn, then replace it with a new one!
The new rear light must be put in place in the reverse order of removal, if you dropped the battery terminal a little earlier, then stick it in place and secure it with a key, after completing all the operations, make sure that the new headlight works by turning on the ignition and turning on the turn signals again .
You can also clearly see how the rear light is replaced on a VAZ 2115 car; on other cars of the Samara 2 family, the rear light is replaced in the same way, so watch the video located just below and go deeper into it, even if you have a different car (does not mean VAZ 2115).
I bought a new projector, installed it, but for some reason it is much brighter than the old one, is clearly visible and does not look very nice, this means that I got the wrong company projector or that there may be a problem, should I change to another one?
Okay, let’s say, most likely they took care of the headlight from the wrong company, each manufacturer does everything differently, and even if the headlights are somewhat similar to each other, there will still be a difference, especially since the headlight glass could still be burned, so they look different from the outside!
Plastic bumpers are installed on VAZ 2113, 2114, 2115 cars. During operation, this part may fail in the event of a collision. If the damage is severe, the rear bumper is easier to remove and replace than to repair, and you can do it yourself.
The bumper for any car plays an important role - it allows you to give the car a finished look and ensures safety in the event of a collision. On modern machines, such a part is usually made of plastic. The curved edges of the bumper increase downforce, preventing turbulence at the rear of the car.
During operation of a car, several situations are possible: from a collision during an accident to an accidental collision with an obstacle. In such situations, the bumper needs to be replaced.
The main reasons for purchasing a new part:
- the bumper cannot be reset after an accident;
- there is no time to repair a damaged bumper (it’s faster to replace a part than to repair it);
- installing a new part is part of car tuning.
When to install a new part
If the bumper is damaged, it is not always possible to restore it. If the car service condition has minor cracks and scratches, the part can be repaired. If the bumper is simply divided into several parts, it will not be possible to restore it. In this case, there is only one way out - replace the part. Depending on the extent of the damage, it is sometimes necessary to purchase bumper holders.
For such cars of the domestic automobile industry as VAZ 2113, 2114, 2115, getting a new bumper is not difficult. In this case, you can buy both a “native” part and a product from third-party manufacturers. However, it is recommended to install original bumpers, which is due to their excellent quality.
For those who are faced with the need to replace a bumper, it is important to know how to properly remove and install this element. First of all, when choosing a new bumper, you need to adhere to the following tips:
- pay attention to the thickness of the plastic of the new part (thicker products are preferable);
- It is important to choose the right color if you are buying a painted part;
- The VAZ 2114 bumper fits the VAZ 2115 bumper with spaces provided for fog lights.
If a damaged bumper is not replaced, the car becomes less attractive, and in the event of a possible collision, a strong impact can seriously damage the body. First of all, parts such as the fan and radiator of the cooling system, the TV frame and fenders will be attached. Therefore, it is worth protecting yourself from possible problems and replacing the damaged bumper.
In order to make a replacement, it is not necessary to contact the service, because you can do all the work yourself. This event does not require special tools. Let's take a closer look at what to do and in what order.
How to replace the front bumper on a VAZ 2113, 2114, 2115
First of all, it is worth noting that the bumper is removed from the VAZ 2113, 2114, 2115 in the same way. There may be some differences for new versions. Before you start, you will need to prepare the following list of tools:
- screwdriver or Phillips screwdriver;
- fixed or fixed key on 8 and 10;
- 13 head with handle.
It will take a little over an hour to replace the part. It is recommended to drive your car to the observation deck or to the elevator. This will make removing the bumper easier.
Next, let's proceed directly to disassembly:
- Using a screwdriver, unscrew the 3 screws that secure the front wheel housing to the bumper.
- Using a wrench (open or cap) we unscrew the 2 self-tapping screws in the wheel arch by 8.
- To gain access to the bumper from the inside, you will need to fold back the protection.
- If we look from below, we will see 2 10mm nuts. To unscrew them, use a wrench. We perform a similar procedure on the other side of the machine.
- Use a screwdriver to unscrew 4 screws from the front: two in the lower windows and two under the license plate.
- All that remains is to remove the bumper from the car.
- If the vehicle is damaged in an accident, the bumper reinforcement may also be damaged. Therefore, it may be necessary to remove and replace this part. So, with a 13 head you will need to unscrew two nuts on each side.
- The amplifier can be adjusted during installation. To do this, there may be adjusting washers on the studs; there is no need to remove them.
- The new bumper is installed on the car in the reverse order.
Photo gallery: dismantling the front bumper
To install the mounting brackets on the new bumper, remove them from the old one. Fastening with three screws.
How to remove and install the rear bumper
The rear bumper needs to be replaced for the same reasons as the front. Since the part is made of plastic, it is not particularly durable. In principle, it is cheaper and faster to replace a bumper than to repair it. To complete the work you will need the following list of tools:
- 2 sockets;
- wheel chocks;
- a series of socket head heads with handle;
- set of open-end wrenches;
- metal brush.
Disassembly is carried out in the following sequence:
- We place the car on a flat surface, placing stops under the front wheels, suspend the rear wheels with jacks and remove them.
- After removing the wheels, access to the wheel arch liners opens. You need to clean off the dirt with a wire brush and remove the cap screws that hold the fender liners in place. Then they are removed.
- To dismantle the bumper from the VAZ 2115, you will need to disconnect the wiring from the license plate light.
- Under the fender protection there are 4 bumper mounting bolts (2 on each side). We turn them with a head at 10 ends using a wrench.
- Under the bumper there are four 13-piece nuts that secure the bumper reinforcement. It will take some effort to unscrew them. It would be a good idea to pre-lubricate them with a penetrating liquid.
- Unscrew the nuts and remove the rear bumper.
Self-diagnosis of car lighting devices
There are several situations in which you can determine that optics need diagnostics:
- The turns do not flash, but light up. Such a malfunction indicates the failure of the relay, in particular, we are talking about its electromagnetic component. The electromagnet itself could close in one of the positions, as a result of which it cannot return to its initial state.
- The turning lights flash very quickly or very slowly. In this case, the problem may lie not only in the relay. In some cases, this type of malfunction occurs when the driver uses inappropriate lighting sources. So when purchasing new light bulbs, you need to make sure that they correspond to the rating set by the car manufacturer.
- The optics don't work at all. That is, the turning light bulbs do not flicker, and the corresponding indicators on the dashboard also do not light up. In addition, there are no characteristic clicks that appear when turning on the turning lights. With such symptoms, there can be many reasons for the problem; we will tell you more about their diagnosis below (the author of the video is the Steel Horse channel).
As for diagnostics, it is performed in several stages:
- First of all, you need to make sure that all sensors and indicators on the device are working. If they do not function, then it is necessary to diagnose the safety devices.
- If all devices are operating in normal mode, then you next need to turn on the light alarm button and diagnose all light sources in the headlights. That is, check the front, rear, and side (if any) lights.
- If the alarm does not function when activated, you need to check the functionality of the relay, and also check the power supply at the terminals. To do this, remove the relay from its mounting location, and then, using a test light, connect one of its contacts to the installation site (to the positive), and the other to the car body or battery. There is no need to turn on the ignition. If there is no power, then most likely the reason lies in a failed safety device, a broken hazard warning button, or a damaged electrical circuit. Also, the essence of the problem may lie in poor contact in the connecting plugs.
- If there is a plus on the contacts, then try shorting the two relay terminals using copper wiring. If all electrical circuits, as well as the connection plugs, are working properly, then all turn signals should light up. In this case, the fault must be looked for in the relay.
- If the lights do not light up after the steps you have performed, then most likely the cause of the malfunction lies in the emergency light control button. However, in practice this happens quite rarely; there is often a short circuit in the circuit. By the way, it is a short circuit that can lead to a breakdown of the relay, therefore, before replacing the failed element, you need to eliminate the short circuit.
- If the emergency signal is functioning, this indicates that the safety devices and relays are working; accordingly, you need to start diagnosing the button itself. First of all, you need to diagnose the positive terminal, as in the case of checking the relay, while the ignition, as well as the hazard warning button, must be activated. If the diagnostics showed that there is no plus, this indicates that the button itself needs to be checked in more detail. Remove it from its seat and check the connection circuit. If there is no power, then you need to look for a break in the wiring from the tidy to the button itself. If there is power, then it will be necessary to short-circuit the terminals at the installation site, the ignition does not turn off, after which the direction indicators must be activated (on either side). When the lighting sources are turned on, the control button must be replaced, but if there is no power, then you need to check the power in the emergency relay. If there is no power, the problem most likely lies in a break in the connecting electrical circuit from the control key to the block with safety devices.