Torpedo is the modern name for the dashboard. Initially it was used for foreign cars, but today this name is used by motorists in the CIS countries. The dashboard in the VAZ 2114 car is a collapsible metal structure that contains plastic elements. It also uses polymer film and polymer foam to cover some of the controls. The instrument panel includes many monitoring instruments and controls.
Tip: a great way to decorate the interior of a VAZ 2114 is to reupholster the dashboard with genuine leather or eco-leather. The costs of such an update are minimal, but with proper design you can achieve high results. Also in the VAZ 2114 they practice covering the visor and roof. Tuning can be done independently, but if you don’t have time, you can contact a car workshop.
Removing the dashboard may be necessary if the owner of a VAZ 2114 wants to change the heater radiator or even the entire stove. To get to these parts, you will certainly have to disassemble the dashboard. Depending on the purpose, the analysis may or may not be complete. For example, dismantling a heater core requires only partial removal of some elements. For some body work, it is necessary to remove the dashboard, as the structure may be damaged during repairs. Disassembly of the structure is also required when the motorist decides to increase sound insulation in the car interior - for this it is necessary to seal the wheel arches, hood, doors and dashboard.
Regardless of the number of dismantled parts, the following tools are required to disassemble the dashboard:
- Several types of screwdrivers (flat and Phillips);
- A set of keys;
- Flashlight;
- An adhesive base, which is required if the panel is planned to be sealed.
Experience of car enthusiasts
The 10 and 14 have absolutely identical panels. I immediately installed the cover and changed all the light bulbs to LEDs... and in general I installed LEDs everywhere I could. Energy consumption on the car has dropped significantly.
Denis
https://www.2114.ru/forum/showthread.php?t=73
The overlay is the same combination of arrows, you don’t need to remove anything extra on top of the original one, everything that is sold ready-made, like a new panel, is basically *waste, they take a standard Vase panel, put inserts there and sell it for 5 rubles more.
Alik 115
https://www.2114.ru/forum/showthread.php?t=73
3.5 years have passed, the panel feels great) the paint is not peeling, everything is fine in this regard) You can safely paint it.
mr-ruslan89
https://www.drive2.ru/l/8309496/
Folks, I generally found a simple solution for myself. This paint is sold under the name BMWSHWARTSMATT or what it is (I don’t remember exactly). The paint is specially designed for painting the dashboard in a matte black color (It turns out one-on-one like on a BMW. Hence the name) It is sold from BMW officials, it costs about 1000 rubles per can for the torpedo and the interior trim for the VAZ 2114 required 4 cans. Since I work at Land Rover, we have paint and purchasing it costs about 700 rubles. It reacts to heat in parallel, does not stink in the car, it smells like a BMW)))
Bimmer
https://club2108.ru/forum/viewtopic.php?id=2757
The backlit arrows are cool. I once wanted to do it myself, but then I somehow changed my mind, I just decided not to bother. And the options for upgrading the panel are really normal.
Bojarin
https://vsepoedem.com/story/panel-vaz-2114-vozmozhnye-varianty-modernizacii
Europanel is undoubtedly good. But it still starts to creak after a while, no matter how you look at it.
2108
https://vsepoedem.com/story/panel-vaz-2114-vozmozhnye-varianty-modernizacii
There are many options for changing the dashboard and each owner can choose the one that suits them. Almost all the work can be done independently. Experts point out that you should not cut off the protruding parts yourself or build up additional walls. This is due to the fact that when developing a factory panel, certain calculations are carried out to make it safe for both the driver and passengers.
Motor modification
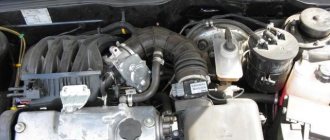
Tuning the VAZ-2114 engine can consist of both partial improvements and fundamental modifications. If we consider the first option, then it is the one that is most popular among car owners. There are relatively few opportunities to increase the power of the VAZ engine, since there is no turbocharging.
The most that can be achieved is the regulation of fuel supply and ignition timing (the gain in performance is no more than 8%). Chip tuning of the VAZ-2115 gives slightly better results. It is also practiced to change fuel and air filters and a number of other elements. Note that the goal of the work is both to increase power and reduce fuel consumption, and to achieve greater smoothness in engine operation.
More serious tuning of the VAZ-2114 engine involves its deep modernization (changing the receiver, boring the cylinders, grinding the intake manifold channels) or completely replacing the engine with a newer one. However, with all the opportunities that open up, such tuning can cost very, very merciless sums. It's up to you to decide whether the opportunity to increase the power of the VAZ engine is worth such expenses.
Any serial Lada can be improved by replacing the engine. If you are not satisfied with the standard 8 valves, then you can always install a 16-valve engine taken from the Priora.
As practice shows, its fastening scheme does not differ from the original. The easiest thing is with the gearbox: you can either not change it at all, or limit yourself to changing a few parts. It is somewhat more difficult with the clutch, which should preferably be turned on a lathe. The ideal fuel line is from the 12th model. When you install the engine removed from the Lada Priora car, start by installing the receiver (you will need a jack). Install longer wiring for the injectors and install high voltage wires from the 12th model. This completes the installation of the new motor.
However, something else can and should be done. Namely: adjust the injector. It is undesirable to invent something or experiment again. Find a ready-made program for the mode you need, upload it to the car’s electronic system and stop there. More subtle settings are also possible, but they should be done by professionals.
Withdrawal procedure
- Remove the negative cable from the battery.
- Unscrew the left trim of the instrument panel console.
- Remove the cover. To do this, you need to remove the lower protrusion from the bracket.
- Unscrew the right panel of the instrument panel console.
- Disconnect the wires from the cigarette lighter.
- Disconnect the wires from the cigarette lighter light bulb.
- We push from the inside and take out a niche for small items.
- Unscrew the 2 screws and push the diagnostic connector block inside.
- Remove the heater fan switch handle.
- Using a narrow screwdriver, remove the handle from the lever.
- Unscrew the 2 screws above the instrument panel.
- Unscrew the two screws under the instrument panel.
- Remove the plug and unscrew the screw of the upper fastening of the lining.
- Unscrew the 2 screws of the lower fastening of the lining.
- We move the cover to the side.
- Mark the order in which the blocks are connected to the switches.
- Disconnect the wires from the switches.
- Remove the instrument panel.
- Unscrew the bolts securing the steering column and lower it down.
- Unscrew the 2 screws securing the panel to the bracket.
- Unscrew the 2 screws securing the bracket to the right cross member.
- Unscrew the 2 screws of the lower bracket fastening.
- We move the bracket to the side.
- Unscrew and remove the light guide from the instrument panel.
- We unscrew the 4 screws securing the stove control unit and recess it inside.
- Remove the lamp socket for the heater fan switch handle.
- Press the right lock and remove the air duct from the panel.
- Pull out and remove the headlight hydraulic adjustment handle.
- Remove the instrument lighting control knob
- Remove the decorative insert of the instrument panel.
- Unscrew the light guide.
- Unscrew the nut securing the hydraulic corrector and recess it inside the panel.
- Unscrew the nut securing the instrument lighting control.
- We take out the hydraulic corrector illumination lamp.
- Disconnect the wires from the instrument lighting control.
- Disconnect the wires from the immobilizer sensor.
- Disconnect the wires from the immobilizer unit.
- Disconnect the wires from the glove compartment light bulb.
- Disconnect the wires from the socket of the portable lamp.
- Unscrew the 2 screws of the top panel fastening
- Unscrew the 2 screws on the bottom fastening of the panel.
- Unscrew the self-tapping screw securing the panel to the left cross member.
- Remove the instrument panel.
- Installation of the instrument panel on the VAZ 2114 is carried out in the reverse order.
6 Pingbacks
- How to remove and install the heater radiator on a VAZ 2114 | Repair 2114
- What to do if the heater fan does not work on a VAZ 2114 | Repair 2114
- How to remove and install the heater on a VAZ 2114 | Repair 2114
- How to remove and install the electronic control unit of a VAZ 2114 - Repair 2114
- How to remove and install a heater on a VAZ 2114
- How to remove and install the electronic control unit of a VAZ 2114
Categories
How to remove and install the headlight unit on a VAZ 2113, 14, 15.
How to remove and install the front turn signal on a VAZ 13, 14, 15.
How to remove and install the brake light switch on a VAZ 13, 14, 15
How to remove and install the reverse light switch.
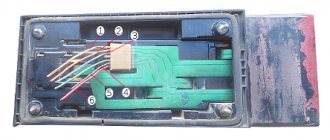
Replacing switches on the instrument panel of a VAZ 13-15.
https://bumper.guru/klassicheskie-modeli-vaz/tyuning/panel-priborov-vaz-2114-tyuning.htmlhttps://remont2114.club/kak-snyat-i-ustanovit-panel-priborov-vaz-2114/ https://fb.ru/article/470222/tyuning-torpedyi-vaz—svoimi-rukamihttps://expertvaz.ru/2114/torpeda-zamena-modifikatsiya.htmlhttps://remont2114.club/kak-snyat-i- ustanovit-panel-priborov-vaz-2114/
Equipment:
- Under-panel wiring harness - 1 pc.;
- Instrument panel - 1 pc.;
- Instrument cluster - 1 pc.;
- Heater control unit - 1 pc.;
- Glove compartment lid - 1 pc.;
- External lighting switch - 1 pc.;
- Rear fog light switch - 1 pc.;
- Rear window heating switch - 1 pc.;
- Switch plugs - 4 pcs.;
- Heater air duct deflector - 5 pcs.;
- Cigarette lighter - 1 pc.;
- Center console — 1 pc.;
- Iron frame - 1 piece;
- Floor tunnel - 1 pc.
Weight, kg: 17 Dimensions, cm: 100 x 170 x 90 Volume, m3: 1.53000
Car dashboard cover
Another way to get rid of low-quality plastic in the car interior is to cover the dashboard. As a rule, leather or a high-quality substitute is used for this. It is quite difficult to do the covering yourself; the plastic, which was previously part of the interior design, will serve as the basis.
Sidebar: Important: It is recommended to carry out the covering only after creating all the necessary niches for installing additional equipment. Otherwise, costs increase significantly
When choosing a material, you need to abandon fabric, since the front panel is constantly exposed to direct sunlight and is often exposed to greater impact than other upholstery elements. When choosing a color, you need to give preference to not bright shades that will not be very noticeable. Quite often you can find examples of tuning that use bright fabric: red, blue and other colors. Note that this option looks quite attractive, but during a long trip the driver and passengers will be very tired.
How to easily update the “tidy” of a VAZ 2114
Upgrading the 2114's dashboard is actually not as complicated as it might seem at first. Buying such a “device” is quite simple. You should consider what options owners can use to update their VAZ 2114 wardrobe (examples in photos and videos).
1. AMS. This model has several features.
- To begin with, it is worth noting that you can order its design yourself;
- This panel is equipped with an integrated oil indicator, which is missing in the classic version. Its appearance is associated with the very persistent requests of many car enthusiasts to install this “component” as standard.
- This instrument panel looks more interesting due to the colored scales with chrome trim.
2. PRO-SPORT. This “tidy” is designed as an overlay for the instrument panel on the presented model. The updated design of this device gives them an impressive, completely new look. There are two options for its execution: with a light and dark backing. The backlight of the VAZ 2114 panel has a special brightness adjustment, but there is only one color - blue. The scales are glued after installing the insert. This is to give this element of the car an original look.
3. AMS-2. The central instrument was the tachometer, which was moved from left to center. The white scales create an overall sporty look for the entire panel. This allows you to quickly read the necessary information from it. The backlight has been redesigned and LEDs are used, with the help of which it is not difficult to read information at night. Installation is recommended to be carried out by qualified specialists, since its installation involves significant “redevelopment” of the classic model.
4. STREET STORM. The main feature of this model is its color design. Nothing was changed in the classic arrangement of instruments,
the emphasis was on the color scheme. The “appearance” of the dashboard has undergone certain changes, however, at the same time, its style fits harmoniously into the existing interior. Another feature of this model should be noted – its backlight. During the day it is light with red symbols. In the dark, you can easily change not only the brightness, but also the color.
5. "North Wind". This model is different in appearance. The developers have shown that even with a standard arrangement of instruments, the entire panel looks dynamic and bright. It clearly shows sporting features. The color of the backlight depends on the shade of the insert scales.
Product delivery options
Note! Below are the shipping methods available specifically for this product. Payment options may vary depending on the shipping method. Detailed information can be found on the delivery and payment page.
Transport companies
Available payment methods:
- Using cards Sberbank, VTB, Post Bank, Tinkoff
- Yandex money
- QIWI
- ROBOKASSA
Delivery is possible to any locality where there is a representative office of the transport company. Delivery time is from 2 to 10 days. Sending large parcels is approximately 50% more profitable than by Russian Post.
Courier delivery in Togliatti
Available payment methods:
- Cash upon receipt
- Using cards Sberbank, VTB, Post Bank, Tinkoff
- Yandex money
- QIWI
- ROBOKASSA
Delivery time from 1 to 12 hours.
Torpedo tuning
The top front panel of a car is called a torpedo. It is a solid metal structure covered with polymer foam and film. It contains an instrument panel, glove compartment, interior heater, air duct deflectors, and a clock.
The front panel is an important element of the interior, which can be tuned in different ways: replace the dashboard completely with a new one, paint it with liquid rubber, cover the smooth surface of the dashboard with leather, film or flock. Before starting tuning work, you need to remove the panel.
Torpedo dismantling
Removing the console occurs as follows:
- After unscrewing the four fastening screws, we remove the storage shelf.
- Remove the radio panel. To do this, unscrew the screws at the very bottom on both sides, then unscrew the top right screw securing the panel. Carefully, prying it with a screwdriver, remove the bar with additional controls from the radio panel. Under this bar there are two more screws, which also need to be unscrewed and, holding the mounting bar, remove the radio panel.
- We dismantle the left and right decorative trims of the windshield pillars.
- We disconnect the decorative linings of the steering column, which are secured with five self-tapping screws.
- Next, remove the instrument cluster panel. To do this, use a screwdriver to hook the panel at the fastening points and pull it out a little. Disconnect the cable from the speedometer. We mark the bundles of wires so that they do not get tangled during installation, and disconnect them. Remove the instrument panel.
- We raise the torpedo up and towards ourselves. Now you can get it out of the car.
Tuning options for the VAZ 2106 torpedo
There are several options for tuning a torpedo:
- You can replace the standard torpedo with a new one from domestic or imported cars. It is installed entirely with devices. Since the parts in the “classic” are interchangeable, panels from the VAZ 2105, VAZ 2107 are suitable for the “six”;
- cover the torpedo with liquid rubber. This option is labor-intensive, and such a coating is short-lived and will begin to crack over time. It will need to be updated periodically. The big advantage of this method is its low cost;
- reupholstering the dashboard with vinyl film, flock, automotive leather or leatherette. This method of improvement is the most effective, but scrupulous and time-consuming. To carry out the work, it is necessary to dismantle the torpedo and take measurements from it. It is best to make a pattern from non-woven fabric. Using the pattern, cut out the component parts. Sew all the pattern pieces together with strong threads. It is advisable to work carefully so that folds do not form on the material, which will spoil the appearance. Then treat the surface of the console with hot glue and pull on the cover. And, using a hair dryer, glue the cover.
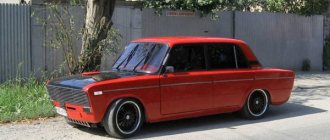
The leather-covered torpedo looks impressive
TUNING OPTIONS
You can perform tuning in several ways:
- cover the panel with leather;
- paint;
- install overlays;
- combine materials.
Before tuning the dashboard yourself, you need to familiarize yourself with the rules and the car’s passport. You cannot use fur or ordinary fabric to cover the panels; the paint must be automotive grade. This is due to the operation of the stove, since as a result of high temperatures, ordinary paint and the described materials will begin to disintegrate and release harmful substances.
Before tuning the dashboard yourself, you need to familiarize yourself with the rules and the car’s passport.
You also need to take the choice of colors seriously. The color of the covers and interior trim are taken into account. If black and white are combined in any way, then when selecting other shades you need to use special tables of color combinations.
PAINTING THE PANEL
One of the simplest and most affordable options for tuning the VAZ 21114 dashboard is painting it. Here you can do everything yourself.
The procedure for painting the dashboard:
- The surface is thoroughly cleaned from dust and dirt. To do this, use a soft sponge and a regular soap solution.
- Sanded with fine sandpaper (P240, P280, P320, P360), this will help improve paint adhesion. The panel is also degreased using a special product for plastic; if this is not available, you can use compositions based on white spirit, dishwashing detergent or wet hand wipes.
- The sealant is applied. This is done at the points where the panel comes into contact with other body elements.
- Painting in progress.
In order to properly paint the VAZ 2114 panel, it must be dismantled
The paint can be applied with a brush, roller or spray. In any case, if the panel is not removed from the car, it is necessary to completely cover all areas that will not be painted. To do this, use masking tape. To properly paint the dashboard, it is recommended to remove it from the car. Although this is an easy way to remodel a dashboard, the work must be done carefully, and if you doubt your abilities, it is better to leave it to the professionals.
PANEL COVER
Another option for tuning the dashboard is covering it with artificial or natural leather or carbon fiber.
The procedure for covering the dashboard:
- The dashboard is being dismantled.
- The pattern is being prepared. To create a pattern for a specific panel element, remove it and cut out the required piece of material in accordance with the shape that will be pasted over, doing this with a small allowance.
The pattern is made in accordance with the shape of the element to be pasted - The dashboard is cleaned of dirt and degreased.
- The panel is pasted over. The adhesive composition is selected taking into account the material used for pasting, so as not to damage it during interaction. It should be taken into account that the panel gets very hot in the sun, so the glue must withstand high temperatures. A one-component polychloroprene adhesive is suitable for this; it must be heated to 60 °C to ensure a reliable connection (“Glue-88”, GTA Boterm, Mah). There is no need to heat polyurethane glue; it can be “Moment” (good for leatherette), Kaiflex K414, “Titan”, “Demoskol”.
Most often, the panel is covered with artificial or natural leather, carbon fiber
VIDEO: COVERING A PANEL WITH RUBBER MATERIAL
INSTALLING COVERS
You can transform the dashboard of a VAZ 2114 using special overlays. They are sold in almost all auto stores. This tuning option allows you to change the color of the backlight. This occurs through the use of transparent elements and light filters of different colors. Such overlays must be installed correctly so that there is no distortion or displacement, otherwise the illumination of the devices will be uneven. It should also be taken into account that if light filters are too dark, the power of the factory light bulbs will not be enough, and they will not be able to properly illuminate the devices through such overlays.
The dashboard can be transformed using special overlays
In addition, you can install soft pads on the instrument panel. Unlike a rigid standard panel, they have better sound absorption, are more scratch resistant and have a shelf for small items. The cost of the instrument panel overlay is 1200–1500 rubles.
You can install a soft pad on the instrument panel
INSTALLATION OF EUROPANELS
Relatively recently, European-style dashboards began to be installed on the VAZ 2114. They have a more modern design and are made of high-quality materials, so they have become very popular among owners of the old-style VAZ 2114.
Europanel has a more modern design and is made of high quality materials
Installing the Europanel is not difficult, since it is designed specifically for the VAZ 2114 and is simply mounted in place of the old panel. The presence of several drawers for small items makes this solution more convenient. Among the disadvantages of the Europanel, owners note that the movement of the heater control levers is rather tight.
VIDEO: INSTALLATION OF EUROPANELS
IMPROVING BACKLIGHT
To achieve a unique visual effect, one of the options for tuning the dashboard is to change the instrument lighting.
Work order:
- Removing the instrument panel.
- Removing protective glass.
- Removing the arrows.
- Removing the standard cover.
- Replacement of standard light bulbs.
Green backlighting is installed at the factory. It can be changed so that the illuminated dashboard is in harmony with the rest of the dashboard and interior of the car. Typically, multi-colored LEDs in a plastic socket, a DSM LED or LED strips are used for this. It must be taken into account that the car's electrical voltage is 12 V, and the LEDs operate on a power supply of 2–3.5 V (this depends on the color) and have polarity. If you mix it up, the LEDs will immediately burn out. You can purchase ready-made clusters designed for 12 V, or make such a cluster yourself. To do this, several diodes are connected in series to achieve the required voltage. If you take 3 diodes of 3.5 V, then you also need to additionally set the resistance to 100–150 Ohms. Changing the dashboard lighting improves its appearance - Reassembly of the structure.
VIDEO: CHANGING INSTRUMENT PANEL LIGHTING
TUNING INSTRUMENT POINTS
It is quite simple to implement this type of dashboard tuning, such as improving the instrument needles. In the standard design, the lighting of the heating equipment is yellow, the buttons are green, and the indicators are orange. Many people don’t like it because it resembles a parrot and makes it difficult to feel comfortable while driving at night.
To improve the instrument arrows, you need to disassemble the instrument panel and install a red, blue or other color LED under each arrow. To prevent light from scattering, a piece of heat-shrinkable tubing is placed over the diode. The wires from the diode are connected to the heater backlight. As a result of such changes, the instrument needles glow with a rich color.
You can make additional illumination of the arrows
We remove the dashboard of a VAZ 2114 with our own hands
The need to remove the “torpedo” can arise either quite unexpectedly - due to a breakdown of the stove or radiator, which can only be reached with the panel removed, or as planned - to replace a worn out “torpedo”.
We present to your attention a diagram of the fourteenth dashboard.
Dashboard structure
Let's look at its components:
- The main part of the structure, which, as a rule, is called the “torpedo” - all the auxiliary elements and components of the dashboard are fixed on it;
- Overlay for the VAZ 2114 panel, on which the air duct openings are located;
- Fixing brackets;
- Plugs;
- Ashtray;
- Right support frame (cross member);
- Right shield covering the wiring cable;
- Instrument panel VAZ 2114;
- Central bracket;
- Left wiring panel;
- Left support frame.
To do all the work at home we will need the following tools:
- Flat and Phillips screwdriver;
- A set of keys;
- Flashlight;
If the “torpedo” rattles and you plan to glue the panel. You need to stock up on an adhesive base or non-expanding foam for sealing.
If you first study the theory of how to remove the instrument panel on a VAZ 2114, then the whole job will take you no more than 3-5 hours.
And so, let's move on to step-by-step instructions on how to remove a torpedo on a VAZ 2114 with your own hands.
First of all, it is necessary to remove the shields covering the wiring (in the diagram they are indicated by numbers 7 and 10). Let's start from the left. It can be removed quite simply - use a Phillips screwdriver to unscrew the three fixing screws; Next, remove the right shield - the procedure is the same, only there are 2 more screws in it
You must remove the screen carefully, since the plastic can damage the wiring located underneath it; Before removing the radio, you must remove the negative terminal from the battery. To dismantle the tape recorder, you need to disconnect the wiring block that connects it to the power supply, acoustics and antenna; Now you need to remove the cigarette lighter and ashtray, do not forget to pull out the light bulb from it; We take out the stove control knobs
To do this, you need to pick them out with a flat screwdriver or a knife, since the handles are connected to the base by grooves; We remove the knob for setting the power mode of the stove; to dismantle it you just need to pull it towards you; On the left and right sides of the instrument panel there are screws with which it is attached to the car interior. Unscrew them with a Phillips screwdriver; We unscrew the screws on the instrument block (speedometer), one of them is located on top, the second is located on the bottom of the block. The cover on the instrument panel can be easily removed after unscrewing the fasteners; We disconnect all wiring connected to the instrument panel. You can remove the arrows from the panel by carefully prying them off with a knife; Let's move on to the steering wheel. To remove the steering wheel on a VAZ 2114, you need to unscrew the bolts that secure the steering column bracket at the top and bottom. To do this you need a key of 8; On the right side of the headlight and rear window heating control buttons there is a plastic plug; you need to remove it and unscrew the screw hidden under it; Next, we dismantle the clamp that holds the heating control unit, after which we pull out the entire cartridge of the unit; We remove all the remaining decorative elements of the “torpedo”: the algorithm is still the same - unscrew the screws under the plugs and dismantle the plastic panels;
If you plan to completely remove the panel from the car, then you need to disconnect all the wires, harnesses and wiring to the backlight bulbs located on the dashboard.
https://youtube.com/watch?v=Ab1W1UaFjJM
Design features of the VAZ 2114 dashboard
In addition to a certain functional purpose, the VAZ 2114 dashboard also performs an aesthetic function. It is she who is seen most by the driver and front passenger; she is the first thing that catches your eye when getting into the car. When tuning the interior, it is impossible to do without upgrading the dashboard. Before you do this, you need to familiarize yourself with the characteristics of the dashboard, design features and the main components that make up it.
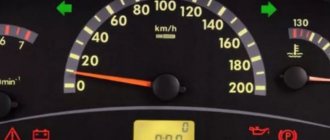
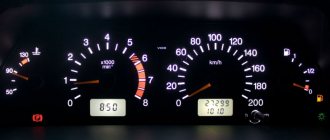
The peculiarity of the VAZ 2114 panel is that it is equipped with electronic devices. Unlike its predecessor VAZ 2109, where the panel was illuminated from the outside, here it is illuminated from the inside. While the vehicle is operating, the dashboard displays 19 characteristics of the vehicle’s technical condition, the main ones being mileage, speed, engine speed and temperature, and fuel level.
The VAZ 2114 dashboard displays 19 characteristics
There is a temperature sensor on the left side of the dashboard. Its red zone is between 105–130 °C. Next is the tachometer, speedometer and fuel level sensor.
Why is the VAZ 2114 dashboard and dashboard tuned?
Although the standard dashboard of the VAZ 2114 looks quite attractive and is made of high-quality plastic, owners often try to tune it and make their car exclusive, unique, so that it differs from similar cars. In addition, correctly performed tuning allows you to feel more comfortable in the cabin.
How to remove the dashboard
To make it easier to dismantle the VAZ 2114 dashboard, you need to familiarize yourself with its design. The dashboard includes the following elements:
- Dashboard base.
- Overlays.
- Bracket.
- Stub.
- Ashtray.
- Two crossbars.
- Right dashboard screen.
- A shield that blocks access to the wiring.
- Central bracket.
- Left screen of the instrument panel.
- Left cross member.
The elements that make up the VAZ 2114 dashboard are arranged in a certain sequence
Before you begin tuning the dashboard, you must first remove it. For this you will need:
- a set of keys;
- flat and Phillips screwdrivers;
- flashlight.
Complete dismantling of the dashboard is performed in the following order:
- Remove the left screen. Using a screwdriver, unscrew the 3 mounting screws.
The left screen of the VAZ 2114 console is removed with a Phillips screwdriver
- Remove the right screen. It is secured with 5 screws.
- They remove the tape recorder. To do this, disconnect the negative cable from the battery. Pull out the tape recorder and disconnect the block with wires from it.
- Disconnect the wires from the cigarette lighter and ashtray illumination, and then remove them as well.
- Remove the heater damper control levers, do this using a flat-head screwdriver and the handle of its switch.
Use a screwdriver to remove the heater damper control levers.
- Remove the center console panel. Unscrew the 4 screws located on its left and right sides, and then remove the plastic cover. There is a plug next to the heated rear window button; pull it out and unscrew the screw. Now the trim is removed and the instrument panel can be removed.
Open torpedo - there is access to the necessary elements
- Disconnect the panel posts from the floor. Unscrew all the screws and also remove the cross member.
The panel stand is dismantled using a wrench
- The intermediate body is pulled out of the torpedo socket.
- Disconnect the nozzles of the ventilation and heating system and unscrew the bracket fastenings.
- Remove all elements, including the APS block, master cylinder, and harnesses. This is done when the panel is completely removed.
- Measuring instruments are removed. The console is pryed up with a screwdriver, the cable is unscrewed from the speedometer, the wires are disconnected, but the sequence of their connection is remembered.
- Dismantle the linings that go onto the windshield.
- Remove the console.
At the last stage, the dashboard is finally removed
This procedure for performing work is provided only in the case of a complete replacement of the dashboard. When it is necessary to replace or tune individual elements, it is enough to provide access to the selected parts.
Torpedo for VAZ 2114: possible upgrade options
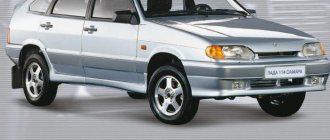
The instrument panel, also known as the “torpedo”, is the most important part of the car’s interior, which largely determines the comfort of both the driver and the front seat passenger.
Torpedo VAZ 2114
There are three key requirements for a “torpedo”:
- Functionality - it must include all the necessary control levers, buttons and indicators to monitor the condition of the vehicle;
- Ergonomics - all functional elements of the “torpedo” must be placed so that their use is convenient for people of different heights and builds;
- Design – by the way the instrument panel is made, you can determine the class of the car. In cheap models, as a rule, developers do not pay due attention to the visual appeal and quality of the materials used, while the distinctive feature of all expensive cars is a beautiful, detailed “torpedo”.
It is worth noting that the designers working on the VAZ 2114 dashboard did their best. The fourteenth “torpedo” is made according to modern European standards. It is made of high-quality wear-resistant plastic, which does not lose its appearance even after several years of using the car, and the “torpedo” design evokes positive emotions even among those who switched to the VAZ 2114 after a foreign car.
The dashboard of the VAZ 2115 and VAZ 2113 cars is in many ways identical to the “torpedo” of the fourteenth, so all the instructions given in this article can be used for the above models.
Not the best options
There are materials that are actively advertised and at first glance seem like an ideal choice. However, in reality, certain shortcomings are revealed quite quickly. The following materials can be called such dubious options for re-upholstering torpedoes.
Film known as brushed aluminum
" It has a number of advantages: it is easy to use because it stretches when heated and has an adhesive layer; Wide range of colors available; looks quite elegant; is relatively inexpensive. However, the advantages are offset by significant disadvantages.
Firstly, if the console has a textured surface, which is far from uncommon, the film will adhere disgustingly. Manufacturers recommend using a primer - an adhesive enhancer - in such cases. This complicates the work, but does not help very well. Secondly, in the heat the film quickly shrinks and begins to move away from the console. Accordingly, the latter takes on a completely depressing appearance.
Plasti Dip, is actively recommended for finishing a torpedo.
. Since it is applied by spraying, even complex shapes can be sealed with it, which is a definite plus. However, chips and deep scratches appear through the liquid rubber; palm prints often remain on it (and are not removed by anything); Plasti Dip is resistant to gasoline and all its derivatives, white spirit, alcohol solutions, many adhesives and solvents. And if the edge comes off and water gets under it, ugly bubbles and tears are guaranteed. One of the most budget-friendly options for covering is carpet. This is the most harmless material on this list. The only downsides include the tendency to become dirty and the difficulty of subsequent cleaning. If you choose carpet, you should take the choice of glue seriously: many compounds are not resistant to heat, and in the summer it will be significant. Well, the look, to put it mildly, is also budget-friendly. Everything is described in more detail in the article “How to glue a car carpet”.
Improvements in the interior
Salon, it should be given special attention. This is where the driver himself spends most of his time and it should be no worse than outside
Lux salon
It is necessary to add more luxury to the car. If your 2114 is not a luxury build, then you can buy a trip computer and install it instead of the plug. You can also install heated seats and much more.
Cases
Covers help not only protect seats from wear and contamination, but also even give a stylish look to the interior. In some cases, if the seats on a car are already damaged and in order to hide the defects, it is necessary to remake them, which is very expensive, and this is where covers come to the rescue.
Steering wheel cover
When the steering wheel in a car reaches 100,000 km, it begins to fall into, let’s say, a sad state. To protect the steering wheel or, on the contrary, to hide shortcomings, you can install a steering wheel braid. Currently, braids that completely hide the steering wheel are very popular. Such braids are put on the steering wheel and sewn together.
Rugs
Rugs also give the car interior a pleasant look, it’s like an excellent wool rug in an apartment that is pleasant to step on. Currently, EVA mats have gained great popularity in the automotive market; these mats not only have a good appearance, but also collect up to 2 liters of moisture, which is very useful in winter.
Interior noise insulation
Soundproofing the interior will not only help get rid of unnecessary crickets in the cabin, but will also help achieve greater comfort from the car. Sound insulation can be carried out either in stages or completely. It is recommended to start with the doors and you will immediately feel the difference.
Acoustic shelf
This shelf is installed to replace the standard shelf of the VAZ 2114. As you know, the standard shelf is not capable of serving faithfully for a long time. Therefore, many motorists install acoustic shelves made of more durable material on their cars. This shelf not only becomes stronger, but also provides better sound quality for the acoustics.
How to install europanel 2114?
All actions are performed in the following sequence (for greater convenience, you can remove the seats and column):
- The old panel is removed.
- The europanel is “attached” to the installation site and screwed (together with the column).
- The central frame is installed.
- The stove control is screwed on.
Please note that even new VAZ 2114 cables may not be suitable for installation. In this case, you can make them yourself.
Installing the panel will not take much time, since it does not require special adjustment to the interior features.