HF wires (stand for high-voltage) are needed as direct impulse conductors from the ignition device to the fuel ignition system (directly to the spark plugs). If the pulse does not flow or does not flow properly, the gasoline will not burn properly in the cylinder and the engine will not operate as it should.
In today's article we will talk about malfunctions, methods for checking resistance and replacing high-voltage (armored wires) ignition of the VAZ 2112
Introduction
High-voltage wires of VAZ cars are one of the most important elements in the ignition system. It is the wires that transmit high electrical voltage from the module to the spark plug.
Failure of the wires affects not only the formation of a spark, but also the operation of the entire power plant. This article will talk about how to correctly select and independently replace high-voltage wires on a VAZ car.
Below we discuss the procedure for connecting wires to the ignition module, as well as examples of the highest quality and best wires that can be purchased in terms of price and quality.
Ignition adjustment
The injection modification of the VAZ 2107 does not require adjustment of the ignition timing. The electronic control unit, using a sensor, determines the optimal ignition timing. The participation of the car owner in adjusting the operation is limited to setting the engine timing belt to the marks.
To check the performance of the ECU and the functionality of the sensors, it is necessary to connect a computer with specialized software. In this way, the cause of most electronic ignition system malfunctions can be determined.
It is also worth checking the operation of the throttle position sensor yourself. When the throttle is closed, the voltage on the sensor should be no higher than 0.55 volts, and when fully open - 4.5 volts. Measurements must be made with a voltmeter with the ignition on.
The ignition module is one of those mechanisms in which it is quite difficult to determine the presence of malfunctions. They pay attention to it when serious deviations in the operation of the car are observed. If the VAZ 2107 engine does not start immediately, it is recommended to adjust the ignition, and if the engine is running unevenly, a proper check is required. The main thing here is not to forget that the ignition module of an injection engine is a system that, using coils, generates electrical energy to generate a spark and further start the vehicle.
Operating principle and device
High-voltage wires are the link between the coil (ignition module) and the spark plugs. The voltage generated in the ignition module is transmitted to the spark plug through a high-voltage wire, after which the spark plug produces a spark in the combustion chamber of the internal combustion engine.
The wires have powerful insulation that can withstand enormous voltages without breakdown of the insulation. People quite often hear the name armored wire; high-voltage wires received this name because of their powerful insulation.
Device
A high-voltage wire consists of a core (also a conductor) placed in powerful shielded insulation. The core in the wire is shielded to preserve the voltage pulse from external influences and protect against breakdown.
At the ends of the wire there are tips made of a special alloy with the lowest resistance coefficient to ensure the best contact with the spark plugs and the ignition module.
When to change spark plugs
Checking spark plugs, or rather replacing them, is carried out strictly according to technical regulations - they are indicated in the service book or operating manual.
Resource of a regular candle
with a nickel central electrode when operating on a fully serviceable and adjusted engine is about 10-15 thousand kilometers.
What happens during this time? With each spark, small particles of metal are chipped off and burned out. This is the so-called electric spark erosion. As a result, the side electrode wears off, which increases the gap and worsens the ignition of the working mixture.
For a multi-electrode spark plug
service life is longer due to spark distribution. Two electrodes - and a spark plug can last 40 thousand kilometers, three - up to 60 thousand, but a further increase does not extend the life cycle, because the central electrode inevitably wears out, for which 60 thousand kilometers is the limit.
If precious metals
, then the service life also increases, but along with it the price.
If you are not bothered by the high cost of a platinum or iridium spark plug
(standard - up to 100 rubles, and iridium - up to 400 rubles), then with it you will receive an extended service life, improved ignition and, as a result, uninterrupted engine operation.
We have provided general information about the types of candles - in reality, it is necessary to approach each situation individually. Follow your vehicle manufacturer's recommendations and always check your specific model's owner's manual.
Signs of faulty wires
There can be many different signs of faulty high-voltage wires, but there are several signs that, once detected, require the wires to be replaced.
Signs:
- The car jerks when you press the gas pedal. This is due to the fact that with a higher load the engine needs a large amount of fuel and its timely combustion, but since the wires are not able to give a spark at the right time, the car begins to twitch.
- When starting the car, one or more cylinders may not fire. This is due to the fact that when a spark is transmitted, it breaks through to the housing due to breakdown of the insulation.
To check the wires in more detail, you need to remove them from the car and carefully inspect them.
The wires should not contain:
- Gusts;
- Zadirov;
- Insulation breakdowns;
- Cracks in the plastic case;
Rupture of the protective cap of the GDP
If such problems are found on the wires of your car, then they need to be replaced.
Procedure for replacing spark plugs
Although the replacement procedure is quite simple, I would still like to draw attention to some points that help to avoid mistakes during the replacement process.
Disconnecting high-voltage wires from spark plugs
To do this, grasp the rubber tip of the high-voltage wire and pull toward you to disconnect the wire from the spark plug.
Each high-voltage wire is numbered and corresponds to the sequential arrangement of the cylinders in the engine.
Numbering greatly facilitates the reverse sequence of putting on high-voltage wires. You won't confuse them anymore.
Cleaning the area around the candle
To do this, it is better to use an aerosol engine cleaner, which is sold in every spare parts store. The jet pressure is strong enough, so any dirt flies off instantly.
This procedure is not mandatory, but desirable, as it prevents dirt from accidentally entering the cylinder through the spark plug hole. Having removed the dirt, you can begin to unscrew the spark plugs.
Unscrewing the spark plugs
For 8th grade. engines use spark plugs with a 21 key. Often such keys are called “spark plugs” and have the shape of a tube with a profile hexagon at the end. But increasingly, in tool kits, ordinary elongated 21 sockets, specially designed for loosening spark plugs, are beginning to be found.
After you have removed the old spark plug, do not rush to install the new one.
Cleaning the spark plug well
Before installing a new spark plug, make sure there is no dirt in the spark plug well. If you have a powerful vacuum cleaner at hand, then this dirt can be removed with its help. However, the vast majority may not have it at hand, so we take a screwdriver, a piece of rag and begin to carefully remove the remaining dirt from the well.
The cleaned candle hole should look something like this.
If there is dirt on the contact plane between the sealing ring and the cylinder block, this will cause the sealing ring to skew (when tightening the spark plug) and reduce the tightness.
Screwing in new spark plugs by hand
Once you have removed all the dirt from the spark plug well, you can begin screwing in the new spark plugs. To begin, wrap all the candles all the way by hand. Yes, by hand!
Subsequently, this will help to tighten the candles with the required tightening torque.
Tightening the spark plugs ½ turn
When we twisted the spark plugs by hand, they came into close contact with the cylinder head with their O-ring. Next we have to tighten them with the required torque. In the absence of a torque wrench, the required tightening torque can be achieved by turning the spark plug ½ turn or 180 degrees, which is what we will do.
Please note that my extension collar has a head with a tetrahedron. It will serve as an excellent guide. Rotating the socket head 180 degrees will tell us that the required tightening torque has been achieved. Tighten all four spark plugs in this manner.
IMPORTANT: 1/2 turn is made by the new spark plug by compressing the sealing washer. When you tighten the spark plug again, the sealing washer is already jammed. Therefore, the “old” spark plug should be tightened not 1/2 turn, but 1/12 turn, which corresponds to “5 minutes” on the clock dial.
Consequences of over-tightening spark plugs
If you tighten the spark plugs excessively, this may lead to the following malfunctions:
- Thread failure in the cylinder head;
- Damage to the ceramic insulator of the spark plug;
- Candle breakdown;
- Breakdown of a high-voltage wire;
- Breakdown of the high-voltage ignition coil;
- Piston burnout.
The malfunctions listed above, as a rule, follow from one another. For example, if a spark plug is “broken,” then the next malfunction (after some time) will be a “breakdown” of the high-voltage wire, and then a “breakdown” of the coil itself. Due to insulation failure (breakdown), sparking in the spark plug will be uncontrollable, as will ignition of the combustible mixture in the engine cylinder. And this will lead to detonation and subsequent burnout of the piston. It would seem that you just overtightened the spark plug, but here you are - the piston has burned out. Of course, all this will not happen immediately or suddenly, but why bring it to this?
Putting high-voltage wires on spark plugs
The final stage in replacing spark plugs will be to put on the high-voltage tips, each in its place. Due to the fact that the high-voltage wires are numbered, you will not mix them up when installing. If you do everything correctly, the engine will give you a long service life, and replacing the spark plugs in the Lada Granta engine can be considered complete.
Cost and articles
Below are prices and articles for good and high-quality high-voltage wires for VAZ cars, both for 16 and 8 valve engines.
| Manufacturer | Number of valves | vendor code | Price, (rubles) |
| Standard | 16 | 21120-3707080-81 | 990 |
| SLON | 16 | 2112-3707080 | 1450 |
| VOLTON | 16 | VLT-2112005 | 915 |
| TESLA | 16 | Т516M | 1710 |
| LADA | 8 | 21110-3707080-82 | 695 |
| TESLA | 8 | Т514M | 875 |
| Standard | 8 | T684H | 620 |
| Original | 8 | 21110-3707080-12 | 710 |
Recommendations for replacement
Never remove or touch high-voltage wires with your hands while the engine is running, as there is very high voltage that can cause serious harm to human health.
Replacement must be made only with high-quality and reliable wires, and best of all with a new set of spark plugs. Which spark plugs are best for VAZ cars can be read in our article here.
HF wires (stand for high-voltage) are needed as direct impulse conductors from the ignition device to the fuel ignition system (directly to the spark plugs). If the pulse does not flow or does not flow properly, the gasoline will not burn properly in the cylinder and the engine will not operate as it should.
In today's article we will talk about malfunctions, methods for checking resistance and replacing high-voltage (armored wires) ignition of the VAZ 2112
Tips for selection and installation (replacement)
When choosing armored wires, you must be guided by the following parameters:
- they must ensure voltage transmission of at least 40 thousand volts;
- minimal losses during pulse transmission;
- the insulation of “high voltage” should not allow current leakage;
- proper operation in a wide temperature range from minus 30 degrees Celsius to plus 100 degrees;
- minimal interference with radio-electronic devices.
In addition to these parameters, when choosing wires you need to consider:
- type of ignition system;
- brand of candles used;
- type of contacts on the coil;
- location and distance of spark plugs from the distributor.
Non-contact ignition systems use wires with high resistance, up to 16 kOhm. With a contact ignition system, choose wires with low resistance, no more than 2 kOhm. These are wires with a copper core. They are found on all old cars.
For modern engines with very sensitive electronics, wires with a spiral core and silicone insulation are suitable. Tesla wires meet these requirements. Fiberglass and silicone insulation are used as a conductor here.
In “high-voltage” devices under the Fenox brand, aramid thread is used, insulation is a layer of latex and silicone. When using a standard motor, carbon core wires will do.
When purchasing wires, you should carefully study the manufacturers' recommendations indicated on the packaging regarding their applicability to a specific car. Using a wire of a different type or size disrupts the operation of the ignition system. Having decided on the choice of armored wires, it is necessary to install or replace them correctly.
When replacing high-voltage wires, the ignition must be turned off. If all the wires are removed at the same time, then to install new ones you need to know the order of operation of the cylinders and the direction of rotation of the ignition distributor shaft, as well as the numbering of the cylinders. In most cases they are counted from left to right.
But the best way would be to replace them one by one. Having removed the old wire, we compare its length with the wire from the new set and put it in place of the defective one. After replacing the wires, you need to start the engine. If it works without interruption, then the replacement was made correctly.
Armored wires, as a rule, do not fail suddenly. In order not to stand on the road far from an auto parts store, it is necessary to regularly care for them and service them during maintenance.
Well, if defects are found, replace them.
Source
What are the armored wires for the VAZ 2112 needed for and what functions do they perform?
Expert opinion: The main task of the high-voltage wires of the ignition system of gasoline engines is to transmit the ignition pulse from the coil (coils) or ignition distributor to the spark plugs of the internal combustion engine.
Along with this, the high-voltage wires on the VAZ 2112 car perform the following functions:
- ensuring high-quality isolation of high-voltage pulses;
- minimizing radio interference;
- protection against failure of ignition system elements.
If the electrical parameters of the high-voltage wire are violated, the car engine begins to “triple”, there is a large loss of car power, and the car’s starting system may fail. Such a malfunction must be corrected immediately, as it can lead to a complete failure of the ignition system, malfunction of the vehicle’s mechanical components due to uneven engine operation.
New armored wires for VAZ 2112
Tips for selection and installation (replacement)
When choosing armored wires, you must be guided by the following parameters:
In addition to these parameters, when choosing wires you need to consider:
- type of ignition system;
- brand of candles used;
- type of contacts on the coil;
- location and distance of spark plugs from the distributor.
Non-contact ignition systems use wires with high resistance, up to 16 kOhm. With a contact ignition system, choose wires with low resistance, no more than 2 kOhm. These are wires with a copper core. They are found on all old cars.
For modern engines with very sensitive electronics, wires with a spiral core and silicone insulation are suitable. Tesla wires meet these requirements. Fiberglass and silicone insulation are used as a conductor here.
The main signs of a malfunction of the armored wires of the VAZ 2112
High-voltage wires of the VAZ 2112 are subject to some typical faults:
Lost connection. The electrical circuit is often interrupted at the junctions between the metal contacts of the wiring and the conductor (conductive). A break can also happen:
- when disconnecting the wire;
- in case of unreliable interaction of certain components of the ignition system;
- when the vein oxidizes.
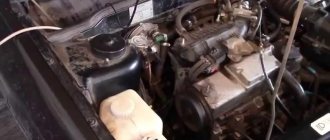
Photo: Wear of armored wires of VAZ 2112
Current leaks. The cause of the leak may be:
- dirty wiring;
- dirt on spark plugs;
- distribution cover;
- ignition coil;
- the insulating layer is damaged.
- faulty wiring caps. The voltage drops due to clogging of the wiring, spark plugs, distribution cap, ignition coil, when the insulation and wiring caps are damaged.
Expert advice: A typical prerequisite for connection failure is heat/sparks. This is fraught with burnout of the core/metal contacts.
How often should spark plug wires be changed?
Spark plugs provide uninterrupted electricity needed for combustion by igniting atomized fuel in the engine cylinders. However, for this they need a constant supply of electricity. Automotive spark plugs, plugs, and wires wear out over time. Once they begin to wear out, the electrical charge sent to the spark plugs does not always reach the spark plugs properly, which creates problems with the engine's operation, including rough idling, stalling and other problems.
How to check the spark plug wires of a VAZ 2112 with a multimeter
Before checking with a multimeter, it is worth conducting a visual inspection of the high-voltage line yourself for insulation damage, melting or chips.
Expert advice: Frequent causes of cable breakdowns are careless repairs or contact with hot motor parts. The cause may also be contact with active chemical elements on the insulation.
It is necessary to pay special attention to the contact part of high-voltage wires; they should not show signs of soot and oxidation. During inspection, you can also check for breaks in the high-voltage cable. To check, you need to start the engine and look at the high-voltage line. Sparks will jump at the rupture points.
Checking armored wires with a multimeter
The main problem with wiring is considered to be a problem with the spark plugs due to insufficient voltage. The cause of this malfunction may be:
- broken wires inside the insulation;
- voltage leakage due to poor insulation quality;
- cable resistance is higher than permissible;
- absence or poor contact between spark plugs and high-voltage lines.
In a ruptured high-voltage cable, an electrical discharge occurs, which causes voltage loss. As a result, it is no longer the rated voltage that is supplied to the spark plug, but an electromagnetic pulse.
How to check high voltage wires
Finding high-voltage wires under the hood is not difficult, and diagnosing them is not fraught with any difficulties. There are three ways to check high-voltage wires, each of which allows you to determine whether there is a breakdown in them.
Visual diagnostics
The easiest way to check spark plug wires for insulation damage is to visually inspect them. It is necessary to carefully check that there are no cracks, cuts or severe abrasions across the insulation area.
Another way to visually check spark plug wires is to observe their operation at night. It is necessary to open the hood of the car at night, start the engine, turn off the headlights and watch the high-voltage wires. If they have strong insulation breakdowns, in the dark the “crickets” will be visible to the naked eye.
Wire check
To check the spark plug wires, an ordinary wire with stripped ends on both sides can be used. In the dark, with the engine running, it is necessary to short-circuit one part of the wire to ground (the car body), and run the other part along high-voltage wires in search of a place where the stripped tip will begin to produce a spark. It is important to check not only the insulating material around the conductor, but also the plastic caps.
Diagnostics with a multimeter
A multimeter in automotive diagnostics is most often used as a voltmeter, but it also has another useful function - the ability to measure resistance. To take measurements, you must completely remove the high-voltage wires (or disconnect one wire on both sides). Next, with the probes of the device set to ohmmeter mode, you should touch both sides of the wire, as a result of which the multimeter will display information about the resistance.
The resistance of serviceable high-voltage wires is up to 10 kOhm. At the same time, it can vary practically from zero. This depends on the type of wires themselves, the insulation used in them, the length, the presence of microdamages, and so on.
Video: How to check the armored wires of a VAZ 2112 with a multimeter
If there is a large variation, replace the wires. By the way, they are changed as a set, that is, all together. In conclusion, your resistance reading of the most popular high-voltage wires:
- Tesla - 6 kOhm
- Slon - from 4 kOhm to 7 kOhm (4 kOhm - 1st cylinder and up to 7 kOhm - on the last cylinder)
- ProSport - almost zero resistance
- Cargen - 0.9 kOhm
Note! The resistance of high-voltage wires varies depending on the length, thickness, and material from which the wires are made.
Do-it-yourself replacement of armored wires on a VAZ 2112
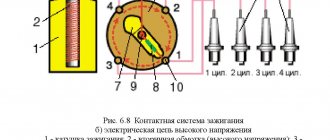
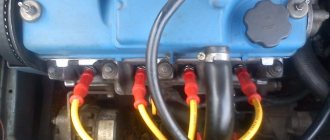
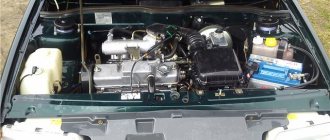
1 – tip of the wire of the first cylinder; 2 – tip of the wire of the second cylinder; 3 – tip of the wire of the third cylinder; 4 – plastic bracket securing the high-voltage wire of the third cylinder; 5 – ignition module; 6 – tip of the wire of the fourth cylinder; 7 – plastic bracket for fastening high-voltage wires of the first, second and fourth cylinders
In order to replace the armor wires of a VAZ 2112, you must perform the following procedure:
- We prepare the car for work (see “Preparing the car for maintenance and repair”) and turn off the ignition.
- Remove the engine decorative trim.
- Remove the wire tip from the spark plug well.
- Disconnect the other end of the high-voltage wire from the ignition module.
- Remove the wire from the first cylinder.
- Similarly, we remove the high-voltage wires of other engine cylinders.
High voltage wires are not interchangeable. The wires must be connected to the ignition module in accordance with the cylinder serial number
The key to high-quality circuit testing
The contactless ignition system checks for short circuits. First, pay attention to the coil winding. To get started, connect a multimeter, which determines the resistance value. There is a recommendation regarding the lubrication of the tip of a high-voltage wire: a special product for the VAZ 2107 or technical petroleum jelly is used here.
The coil itself is diagnosed as follows:
- the module is disconnected from the tips;
- one terminal of the device is connected to the central contact, which has a coil;
- the other terminal of the device is connected to ground.
If the display of the infinity device indicates that there is no short circuit, then the coil is in order. Important: unchanged display indicators when ringing the circuit will indicate infinity.
Checking the primary ignition circuit involves installing a multimeter to its left and right contacts, which are assigned the ignition function. This setting of the ohmmeter should cause a change in readings. If this is not observed, you can prepare not only to replace the coil, but the entire device. Here they focus on the norm, which is 3-3.5 ohms.
The process of checking the secondary windings of the module includes:
- Disconnecting wire tips from it.
- Level position in front of you.
- Installing the module to the right outputs of the upper and lower locations. We focus on the indicators that the device displays in seconds.
- The previous manipulation is carried out similarly with the left outputs of the upper and lower locations.
Here we focus on an indicator whose value will be no less than 7 ohms. Recommendation: if at least one coil does not meet the specified indicator, the module as a whole must be replaced, otherwise it will not be possible to avoid a malfunction of the system with a VAZ 2107, where an injector is used.
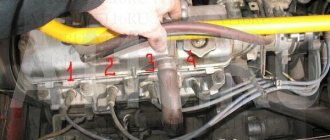
First, let's decide which of the four cylinders is first?
The first cylinder in front-wheel drive VAZs is located closer to the timing belt. If you look at the engine from the front, the first cylinder is the leftmost). And then everything is simple - from left to right - 1, 2, 3, 4.
In rear-wheel drive VAZ Classic and Niva, the first cylinder is located closer to the front bumper of the car.
The product portfolio for electrical installations additionally includes various spacers for mounting floodlights in insulated ceilings and acoustic ones. For example, safety is taken into account from the very beginning of product design. In addition, our portfolio includes automatic clamps that can be used in any socket, wall or recessed box. In the field of electrical installations, insulating tapes can be used, among other things, for insulating, fastening, gluing, waterproofing and identifying cables.
Checking high-voltage wires. To check the wires, you will need a multimeter tester. Check the resistance of the wires - it should be no more than 20 KOM (in practice, the longest wire of 1 cylinder has a resistance of up to 10 KOM). If the wire resistance is more than 20 Kom, it must be replaced. Carefully inspect the wires for chafing on parts of the motor or other wires. In case of significant abrasion, replace the wire. In case of minor abrasion, it is possible to lay the wire so that it does not rub and fix it in this position.
Automatic clamps are ideal for professional electrical installations in buildings and buildings. Different colors make it easy to distinguish automatic clamps in electrical installations. It is a multi-functional tool that simplifies any cable installation. These push-pull sensors are available in a variety of kits, each consisting of a durable carrying bag and various useful accessories. Thanks to the fiberglass reinforcement, cable installation is also greatly facilitated in hard-to-reach areas, saving time.
Laying wires. Do not try to connect the wires in a bundle. Disassemble the wiring harnesses, release the wires from the plastic holders. Connect the high-voltage leads to the corresponding cylinder spark plugs. Lay the wires so that they do not rub against each other, engine parts, or hoses. Avoid sharp bends and tension on the wires. After connecting all the wires, secure them into the bundle with special comb holders included in the delivery kit.
Spotlights installed in countertops create so much heat that they can cause overheating or cause insulation materials to leak, causing dangerous fires. This innovative product can be easily inserted into panels or drywall during electrical installation, allowing air to circulate around the floodlight and thus avoid dangerous overheating.
These gaskets also extend the life of the built-in floodlights. Rubber bands can be used to waterproof and insulate cables and connections in low, medium and high conditions. Fabric straps are extremely durable and ideal for identifying, securing and repairing cables. Insulating tapes are ideal for low voltage applications and are available in a variety of sizes and colors.
The procedure for connecting I/O wires to a VAZ carburetor (2108, 2109, 21099)
The central wire from the distributor cover always goes to the ignition coil (bobbin).
The outlet of the distributor cover, which faces towards the front of the car, is connected to the first cylinder.
Insulating tapes can be used to waterproof and insulate cables and connections in low and high voltage applications. Tapes are available in different colors and sizes and are useful for a variety of applications. They are very tear resistant and can be written on.
To help installers in their daily work: connecting lines and electrical devices in civil applications require adequate tools to make their use fast, easy, safe and efficient. We develop solutions for our customers that meet industry-specific needs, meet application needs, reduce installation and component costs, and improve the quality of the final product. Thanks to their compact design, the range clamps allow cable connections in civil installations with limited space.
The outlet of the distributor cap, looking down, is connected to the third cylinder.
The outlet of the distributor cap, looking rearward, is connected to the fourth cylinder.
Connection diagram of VAZ 2112 armored wires to the ignition coil
Injection VAZ produced before 2004 with an old-style ignition module (4-pin low-voltage connector)
Actually, on the module body it is already indicated which cylinder the pins correspond to - but we duplicated them in red in case the module gets completely dirty, and you might not be able to see it in the photo.
Injection VAZ produced after 2004 with a new ignition coil (3-pin low-voltage connector)
As with the old-style ignition modules, the new coils are also marked with pins corresponding to the cylinders. But the connection order is different from the order on the old-style ignition module. Be careful.
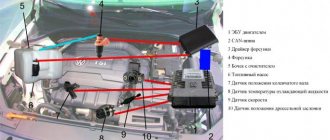
Ignition module
The ignition module is a device designed to convert DC voltage from the on-board network into electronic high-voltage pulses with their subsequent distribution among the cylinders in a certain order.
Design and operating principle
The design of the device includes two two-terminal ignition coils (transformers) and two high-voltage switches. The voltage supply to the primary windings of the transformer is controlled by the controller based on the information received from the sensors.
In the ignition system of an injection engine, voltage distribution is carried out according to the idle spark principle, which provides for the pairwise division of cylinders (1–4 and 2–3). A spark is formed simultaneously in two cylinders - in the cylinder in which the compression stroke is coming to an end (working spark), and in the cylinder where the exhaust stroke begins (idle spark). In the first cylinder, the fuel-air mixture ignites, but in the fourth, where the gases burn out, nothing happens. After turning the crankshaft half a turn (180 0), the second pair of cylinders enters the process. Since the controller receives information about the exact position of the crankshaft from a special sensor, problems with sparking and its order do not arise.