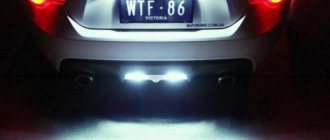
In the interior of a VAZ 2107, with standard lighting, you can poke out an eye: Two C5W incandescent lamps are not serious. Therefore, to begin with, I installed lamps with the same base, but with brighter and more economical LEDs, in the standard lampshades.
Installation is simple. Take out the lampshades and replace the lamps. Polarity is not important.
Shines brightly day and night. I am very glad. They have been in license plate lighting for over a year now, and in interior lighting for almost a year. I bought a pair for 336 rubles. Now they cost less than 300. I give the link in the description of the video.
During the day, this backlight is of absolutely no use, but in the dark it looks very nice and unusual. You can choose any color of your choice or shimmering, iridescent colors. The device can also change color depending on the surrounding sound. I couldn’t appreciate this function, because I think it’s unnecessary. This miracle works in a wide voltage range from 5 to 15 volts. Therefore, it can be powered both from USB and directly from the car’s on-board network ⎓12V without any voltage stabilizers, since the power supply has its own controller that controls the supply of electricity to the LEDs. In any case, a standard 2.1 x 5.5 mm connector can be used for connection. I already had such a connector with a piece of wire from such and such another device, so I didn’t have to plug the original plug into the cigarette lighter.
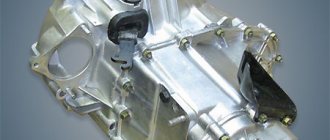
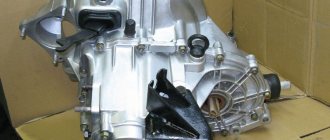
The connection was made to the wires that power the standard cigarette lighter, and the LED power supply itself was placed in the “beard” behind the panel where the clock is located. An infrared sensor for control from the remote control was located nearby (see photo).
The LED elements themselves were secured in four places under the feet of each passenger and driver in the car in such a way that, firstly, they were securely held, secondly, they were invisible, and thirdly, they could be easily dismantled, if necessary.
To make everything look neat and not interfere with driving, the front strips were placed under the steering shaft and under the storage shelf, and the rear strips were placed under the driver and passenger seats between the springs and foam rubber.
And to run the wires, there is no need to lift the carpet; you can run them through the air ducts in the “beard” - this is practical and neat. Although lovers of absolute aesthetics can also carry them under the carpet. But to do this, the “beard” will have to be removed.
Now a few words about connecting the electrical part. Since the connection is made directly to the wiring of the standard cigarette lighter, and the backlight needs to be controlled somehow, we install a button. The button was set to three-position KCD-1 on-off-on. I placed the button in the place of the plug on the panel where the clock is installed. She drives there perfectly, without finishing. The button opens the ground that goes to the backlight controller. Therefore, since we control the mass, we can turn it on in one position by a button, and in another position it can be turned on at the moment the doors are opened, since the door limit switches are connected to ground when triggered (when the door is opened). The middle position turns off the power from the controller, that is, the backlight does not work at all.
As practice has shown, the most popular operating mode in a VAZ 2107 car is the one in which the backlight turns on when the doors are opened and illuminates the floor of the cabin. The second most popular mode is the constant operation of the backlight when the car is stationary and the passengers are busy with something in the cabin. And the least popular mode is when the car is in motion, since in this case the backlight distracts the driver from driving and impairs visibility, because, as you know, visibility is best from darkness to light.
Summary: The functionality of this LED lighting kit is redundant for the needs that were originally presented for organizing interior lighting. It would be quite enough just 4 LED lamps with 9-10 LEDs in each + a power controller for them, shining in one of the colors of your choice. And there are such ones in Alibaba too. But the quality of workmanship of this device and its versatility leave it out of competition compared to simpler lamps that are sold without a controller and wires for connection.
I also tried to show how the strip lighting in the cabin works with the help of a short video. In it I also provide links to the materials used - lamps, switches, lighting.
How to change standard lighting
Standard lamps can be replaced with more powerful and modern ones. The most suitable option is considered to be the main lamp for interior lighting, borrowed from Priora.
To install it you will need to have:
- masking tape;
- sharp knife (can be a stationery knife);
- wrench 12;
- Screwdriver Set;
- pencil or marker for making marks.
Carefully remove the visor next to the rearview mirror. Please note that its weight is quite high, so if you are not careful, the ceiling may collapse completely. Outline the place of the new shade on the visor with a pencil, cut a hole along the contour. Secure the new lamp in this hole using sealant.
Since the old wiring does not work with more modern devices, make a new one. You will need to throw at least 2 wires - “minus” to the body and “plus” to the contact of the new lamp. In foreign cars, the light comes on when the doors are opened, this is very convenient. If you want to do the same, then place the third wire on the limit switch in the door. Route the wiring along the right pillar.
Popular faults
If we talk about the dashboard of VAZ 2109 cars, then they are characterized by certain problems. We will tell you about them, and also tell you how to act correctly in a given situation.
| Fault type | Your actions |
| Gasoline level and temperature indicator does not work | In most percent of cases, this situation occurs due to breakdown of devices, sensors of these devices, or an open circuit of the power supply. Therefore, first check the circuit for continuity, make sure that the fuses have not blown. If this is not the case, check whether the gas level and temperature sensors are working. Only if none of the actions allowed you to get rid of the breakdown, you can begin to replace the devices themselves. No options, the problem lies in them |
| When the fuel tank is full, the arrow points to zero | If you have worked on the fuel level sensor, the fault most likely lies with you. When manipulating this device, the float limiter is often knocked down. Either the limiter is installed incorrectly or adjusted, causing the resistor winding to end. To resolve the problem, remove the sensor and then adjust the limiter again |
| The fuel gauge needle regularly jumps and ends up at zero | Here, most likely, the resistor has weak contact with the current collector. Another possible option is that there is a break in the resistor. To resolve this situation, we recommend replacing the hot level sensor with a new measuring device |
| The fuel level lamp is constantly on | If this lamp is constantly on, there is probably a short circuit in the fuel level sensor supply wiring to ground. Another option is that the sensor’s flexible bus is shorted to the fuel intake pipe. You will have to disassemble the device to align the bus and get rid of the resulting short circuit |
| Indicator lamps do not work on the dashboard | There is a high probability that the light bulbs have simply burned out, or they are poorly held in their seats due to loose contact. Replace the bulbs, but first try tightening the contacts. Traces of oxidation may be detected. When cleaned, the light bulbs can work normally again. Also, do not exclude the possibility of wiring breakage or oxidation of the tips of the supply wiring. Try going over the wires with a tester, cleaning the contacts if necessary. |
| The speedometer does not work, the flexible shaft is noisy | In such a situation, you will have to change the speedometer drive cable or replace the entire speedometer assembly. But before you bother so much, check that the fastening nuts of the tips are tightened correctly and properly. The flexible shaft may make noise during operation due to deformation or violation of the permissible bending of the shell of less than 10 centimeters during installation |
The instrument panel of the VAZ 2109 is not so complicated that you cannot figure it out on your own. But in the absence of experience, it is better to entrust the repair to specialists, or to enlist the support of a partner who understands this matter.
If you find an error, please select a piece of text and press Ctrl+Enter.
Floor lighting
One of the popular and modern methods of tuning is the production of floor lighting with a 12 V LED strip.
Many people are interested in where the wires go in this case:
- The tape at the driver’s feet extends from the steering column, and a bundle of wires for connection is also located there.
- If you are lighting the passenger seat, the wires should be at the passenger's feet.
- To illuminate the rear seat, the tape is placed under the shelf.
Car enthusiasts can even place LEDs in the trunk or on the bottom of the car. It looks unusual and beautiful. For the floor, bottom, trunk, it is recommended to choose types of tapes that are protected from moisture and contamination. They cost an order of magnitude more. Don’t try to save money, buy only high-quality LEDs. Carefully insulate the backlight connection points to prevent short circuits and protect the wiring from combustion.
Choose the color of the ribbon yourself. The most advantageous option is to match the color of the car with the shade of the backlight. You can choose exotic combinations. Some drivers of such cars specially repaint the body or cover the interior with leatherette. This requires a significant investment of effort. Large-scale tuning is recommended only for those who are familiar with the intricacies of this work.
We make a unique design with our own hands
Everything is much more complicated here, but you can save money. In this case, no sets are purchased. Everything is created independently and exclusively to your taste. True, you can first look at photographs of ready-made solutions. They will help you move in the right direction.
This option is preferable not only because of saving money. You can create something truly individual and unique. First, you should replace the arrows and stickers. Here you can again go to the store or create something of your own. You can also order arrows and stickers from a studio specializing in tuning. It will cost you a little more, but the effect will be much stronger.
Connection diagram for the interior lighting of the VAZ 2107
VAZ 2107 cars produced until 2000 were equipped with one interior lamp.
We present a diagram of its connection.
Connection diagram for the interior lighting of a VAZ 2107 car
Connection diagram for interior lighting of a VAZ 2107 car
Description of the connection diagram for the interior lighting of the VAZ 2107
- Plus is supplied to the electrical circuit of the VAZ 2107 interior lamp lamp from output “30” of the generator. It is constantly powered, regardless of whether the ignition is on or not. The circuit is protected by fuse F11(10A) in the mounting block.
- “Ground” has two wires: one from the lamp switches (“limit switches”), the other from the car body.
- “Limit switches” (switches) are installed in the pillars of all four doors. They are connected by one wire (black and white in the diagram). When the doors are closed, their contacts are recessed and the electrical circuit is open. After opening at least one door, the circuit is closed, ground is supplied to the ceiling lamp and it lights up.
- You can forcefully turn on the interior lights with the doors closed by pressing the lamp button. In this case, the “ground” to the lamp will be supplied not from the “limit switches”, but from the car body.
FakeHeader
Comments 65
I have the same ones, I leave them on the sidelights, they all say that the headlights weren’t turned off, the battery is good, right?))))
Same crap.” that the Acoma is good? Exactly.
They look beautiful. In my photo the dimensions actually look bluish =)
Think about it, they don’t fit in mine, I also bought one of these)))) I put one of them in the interior for additional lighting and in the glove compartment, now it’s as bright as day)))))
It turned out great, just describe the process in more detail? I plan too, but there is no diagram anywhere. Tell me please?
what the hell is the process, I took out a regular light bulb from the dimensions, installed a diode, that’s it! 1 minute business.
very useful information, probably no one knew how to change a light bulb on a Lada. Also show me how to replace the air filter.
I've met dudes who can't even install a spare tire (they don't know how).
It's like the neighbor is on)))
They look really cool! They'll just burn out soon. ... You need to immediately install a voltage stabilizer on them. Look on Ali or eBay. It's worth a penny.
They won’t burn out, I’ve been driving for a long time and there are no problems.
And I have a month and a month for a replacement, a month and a replacement. Here I connected the DRL through a stabilizer.
what kind of stabilizer is this? show me a link at least
It’s a hat for me) The yellow ones look somehow more menacing or something))))
You are a MEEEEEGAATUNER! Well done Ida!
When will such vehicles be banned? It seems like 25 years already, but it feels like 16.
I agree, I don’t even know what to say...
A guy found something like Instagram for himself
Choosing a belt for the machine
I will try not to pour water, but will briefly look at what to look for when choosing an LED strip.
LED Matrix Type
Firstly, we get an average power of 4.4-4.8 W per linear meter with a luminous flux of about 250-300 Lm. With such power, LEDs do not require heat dissipation and the LED strip can be easily mounted on plastic elements. And the luminous flux is sufficient to fully illuminate any interior elements.
If you don’t have enough brightness, take 120 pcs/m.
Secondly, this is the most common tape on sale, we buy it in the first store we come across.
Options like SMD 5050, 5630, 5730 are not suitable due to their high power. Unpleasantly high brightness and the need to mount a heat sink make them not the best choice for LED car interior lighting.
Exterior car lighting. Here we turn on the head. If there is LED lighting under the bottom of the car, you can choose more powerful LEDs - SMD 5050 30/60 pcs/m. The aluminum profile will be our heat sink (more about installation later). For LED illumination of license plates or (God forbid) headlights, this is a bad choice. Such LED lighting will be a bait for traffic police inspectors (read about installation rules and fines at the end of the article).
Regular LEDs or RGB - there is no difference. RGB is a little more expensive, it is more difficult to connect and requires an additional control controller (read more about connecting an RGB strip). But it allows you to change the backlight color.
Protection class
There are mainly three protection classes on sale - IP20, IP65, IP68.
- IP20 – open tape without protective coatings, suitable for use indoors in dry rooms. Afraid of moisture, dust, and any mechanical influences.
- IP65 – with a protective silicone layer that can protect against condensation.
- IP68 - sealed, waterproof LEDs that can be placed on the bottom of the car.
LED class IP68
For LED illumination of the glove compartment or the bottom of the dashboard, IP20 is also suitable if no one pulls it or pours water on it.
For illumination of other elements, IP class 65-68 is desirable.
Pros.
The advantage of the tape is that it has better illumination qualities compared to neon lighting. Thanks to a wide range of color shades, you can choose the necessary product of the desired color that matches the body of your car. Some lighting models come with controllers that allow you to control the entire system with 1-2 keys. One of the main advantages is the ability to install it yourself, since to carry out such an operation it is not necessary to be a master. The usual skills and knowledge that a car enthusiast usually has will suffice.
Introduction to the matter.
Such lighting appeared on the markets not so long ago, but it has managed to gain a secure foothold there and acquire a whole army of fans who decorate its elements of their cars. The tape is equipped with a silicone shell, which provides protective functions, so that external factors, dirt and debris, water, do not affect it. This fact makes such a “garland” a unique tuning element, which is applied to both headlights and car interior elements.
Installing a new audio system
This is the dream of not only music lovers, but all car enthusiasts in general. And even if you don’t plan to throw parties every day, turning your VAZ 2107 into a mobile DJ console, you’re probably already pretty tired of the standard radio. The easiest option is to install a new system and change the standard speakers. You will achieve better sound quality. We can stop there. But if you want to do more, you'll have to fork out more.
Instead of a standard radio, a modern system is installed in the central panel, possibly even with a liquid crystal display. In this case, get ready to make some changes to the central panel. If you don’t want to do this yourself, you can contact specialized workshops. Installing the speakers in the front door panels is another important aspect to pay attention to. In principle, there is nothing complicated here. You buy the speaker itself, cut a hole for it in the door panel. The wires are passed through the corrugation.
Finally, the most interesting thing is installing a subwoofer in the trunk. This is why we recommended improving sound insulation at the beginning of the article. True, you will have to prepare for the fact that after installing the subwoofer, you will no longer be able to transport, for example, vegetables from the dacha in the luggage compartment. The space is significantly reduced in volume. The final touch is the purchase of various little things like rugs and pads. They will help make your salon design complete. If you have created a sporty interior, there are a large number of pedal covers that will emphasize the aggressive nature of your VAZ 2107.
In specialized stores you can also find such an accessory as an armrest bar. It is installed in the space between the front seats. This is a very convenient item in which you can store drinks and food for a long trip. Also, you can purchase special pockets for door panels. There are backlit options so you can easily navigate in the dark. Finally, to complete your design concept, you can buy rugs. For winter, rubber ones are quite suitable, they are easy to clean and will prevent dirt and moisture from getting on the floor of the car. In summer, you can put down decorative rugs. There are many options from classic to sports.
As you can see, a detailed study of the interior of the VAZ 2107 allows you to make significant changes to the interior design. A little imagination and you can create your own unique style that will meet all modern requirements and standards. And if you want to use ready-made ideas, there are plenty of photographs and videos on the Internet. Dedicated to tuning the interior of the VAZ 2107.