It's no secret that you can't get far in a car without gasoline. Therefore, for the engine to operate, it is simply necessary that the entire fuel system functions in optimal mode.
In many ways, the fuel pump is responsible for supplying fuel to the engine, which the VAZ 2114 model is not without, of course. To solve a problem with a faulty fuel pump, you need to make sure it is at fault.
Models of fuel pumps for VAZ 2114/2115 cars
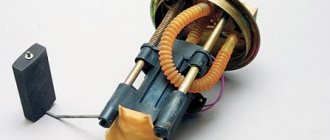
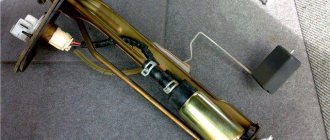
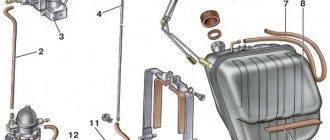
VAZ 2114/2115 cars are equipped with 1.5 cm 3 and 1.6 cm 3 gasoline engines with a distributed injection system. A submersible electric fuel pump is used to supply fuel. It is part of the fuel module installed at the top of the gas tank (under the rear seat). In addition to the pump, the module includes a fuel accumulator (cup), a coarse filter and a fuel level sensor with a float.
The VAZ 2114/2115 fuel pump is a conventional DC electric motor in a sealed housing with a one-way valve at the outlet. An impeller of a special shape is located on the electric motor shaft. Its rotation ensures the fuel supply.
The fuel pump is powered from the vehicle's on-board network. The electrical circuit of the pump, protected by a fuse, is closed using a separate relay.
Electric fuel pumps for VAZ cars are produced by both domestic (Utes, SAAZ, Pekar) and foreign companies. The latest modifications of the VAZ 2114/2115 are equipped with BOSH pumps, which are distinguished by their high reliability, long service life and relatively low price.
Catalog numbers of standard fuel pumps for VAZ 2114/2115:
- 2112–1139009–12 - for engines with a volume of 1.5 cm 3;
- 2112–1139009–01 - for engines with a volume of 1.6 cm 3;
- 580453453 (BOSH) - for engines with a volume of 1.5 and 1.6 cm 3.
These models differ in operating pressure. The former are capable of creating a pressure of 2.8–3.2 kPa in the fuel system, the latter - 3.7–3.9 kPa. BOSH fuel pumps are rated at 3.5 kPa.
Fuse
This is the final stage of diagnosis.
For those who do not know where the VAZ-2114 fuel pump fuse is located, it is located in the same place as the relay. You can see it from the salon. The best way to get to it is through the hood.
So, under the hood, near the windshield, there is a box. You need to open it and find the top fuse. Its current strength is 15 A. It is also written on it that it is for the fuel rail. If the fuse contact is intact, it means it is alive. If the contact is not OK, the fuse must be replaced.
These are the typical faults this unit has, and in the manner described above you can diagnose it.
Symptoms of a problem
A malfunction of the fuel pump of VAZ 2114/2115 cars can be diagnosed by the following symptoms:
- when the ignition is turned on, there is no sound of the pump running;
- the engine does not start or starts with difficulty;
- the power unit is unstable at idle, the speed “floats”;
- “dips” appeared during acceleration;
- the motor has lost power.
The same signs also appear when other elements of the fuel system malfunction.
Before you begin diagnosing or replacing the fuel pump, you should make sure that:
- the fine fuel filter is not clogged (it is changed every 7 thousand kilometers);
- the injectors and fuel pressure regulator are operating normally;
- The sensors for mass air flow, throttle position, and oxygen quantity are working properly.
If the detected malfunction is accompanied by the lighting of the “CHECK” lamp on the dashboard, you should set the error code and decipher it.
Operating principle of an electric fuel pump
The functional work of the fuel pump is to supply fuel to the injectors. For normal operation of the injectors and creation of the required pressure, the supply of gasoline must begin before the engine starts.
The electric fuel pump is turned on by a special controller using a relay. When the ignition key is turned to the “starter” or “ignition” position, the controller instantly energizes the fuel pump switch relay, and as a result of the created pressure, fuel is supplied to the injectors.
Electric fuel pump VAZ 2114
If the engine does not start running within a few seconds, the controller turns off the relay until the engine is cranked again. After scrolling, the controller turns on the relay again, determining the start of rotation using the reference signal from the crankshaft position sensor.
Diagnostics of electric fuel pump faults
The service life of the electric fuel pump on the VAZ injector is quite long, but everything has its limit. Poor fuel quality primarily damages the discharge part of the unit.
An uncorrected fuel pump in a car prevents it from working at full power, and the engine also becomes unstable at idle. Due to a lack of fuel, when trying to start, the engine begins to “sneeze”, starts with difficulty for a few seconds or does not start at all.
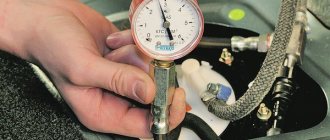
Another available method is to check the pressure in the fuel system with a pressure gauge while the engine is running. But it is recommended to first replace the fuel filter in order to avoid distortion of the device readings.
A decrease in performance also indicates a pump malfunction; this is easy to notice when driving in 3rd or 4th gear. If, when you press the accelerator pedal, the car reacts with dips or does not react at all, most likely the fuel pump on the VAZ 2114 has failed.
Self-replacement of the electric fuel pump
The fuel pump on a VAZ injector, as a rule, cannot be repaired, however, like most electric fuel pumps.
Do-it-yourself is not particularly difficult and does not require special equipment and tools. You will need:
The unit is replaced in the following sequence:
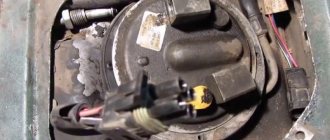
- The rear seat is removed. To do this, remove two plugs and, using a ratchet with a 10-mm head, unscrew the two bolts. After removing the seat, a slot in the sound insulation should open in the shape of the letter P. The fuel pump cover is located under it.
- Use a Phillips screwdriver to unscrew the cover, revealing the upper part of the fuel pump module underneath.
- The wiring harness suitable for the module is disconnected.
- Now you need to relieve the pressure in the power system. To do this, the car engine starts and runs until the fuel from the line is completely used up, that is, until the car stalls.
- The battery turns off.
- Using a 17 key, unscrew the fuel line tubes one by one.
- 8 nuts are unscrewed around the perimeter of the clamping ring. To do this, use a ratchet with a 7-mm head. The pressure ring is removed.
- The fuel pump module is carefully removed from the gas tank.
After the fuel pump module is removed, it is possible to either completely replace it with a new one, or replace only the electric fuel pump itself, but this will require disassembling the fuel module.
Disassembling the fuel module and removing the electric fuel pump
- The block of wires is disconnected from the connector of the cover and the fuel pump, then the sensor indicating the fuel level is removed. To do this, two latches are pressed out and the sensor moves along the grooves towards the cover.
- The drain pipe is separated from the body; to do this, you need to slightly pry it with a screwdriver. Then the four housing latches are pressed out one by one and the module cover is removed along with the fuel pump.
- The mesh filter is carefully pryed off with a screwdriver and removed. The lock washer is removed from the installation hole.
- The plastic latch is pressed out with a screwdriver and the pump is pushed out of the holder with your finger.
- The plastic corrugated tube is removed from the pump nozzle. To make removal easier, it can be heated over steam.
- Reassembling the fuel pump is done in the reverse order.
After installation, you should connect the battery and start the car briefly to check for gasoline leaks from the connections. If there is no leak, it means that the replacement of the electric fuel pump in the VAZ 2114 injector fuel module was successful.
Diagnostics
A malfunction of the VAZ 2114/2115 fuel pump can be caused by:
- malfunctions in the device’s power supply circuit;
- failure of starting and protection elements (relay and fuse);
- wear of electric motor parts.
Checking the electrical circuit
At the beginning of the diagnosis, you should check the electrical circuit of the fuel pump. To do this you will need:
- car tester (multimeter);
- crosshead screwdriver;
- two pieces of wire about 2 m long.
Checking the electrical circuit is carried out in the following order:
- Turn on the ignition without starting the engine. When the key is in the first position, a click should be heard, characteristic of turning on the relay, followed by a slight whirring of the pump electric motor. If there is no click, the relay is faulty or is not receiving power. If there is a click, but no buzzing, the wiring coming from the relay or the pump motor itself is faulty.
- Under the glove compartment, find an additional mounting block consisting of three relays and three fuses. The pump relay is located in the middle, and the fuse is located to the left of it. Remove the fuse from its socket, test it with a multimeter, and if the result is negative, replace it. When replacing the fuse, please note that it is rated for a maximum of 15 A.
The relay and fuse for the fuel pump on the VAZ 2114/2115 are located in the mounting block under the glove compartment.
Set your multimeter to voltmeter mode. Connect one probe of the device to the relay terminal to which the pink wire fits, and the second to the car body. Turn on the ignition. The device should show the on-board network voltage in the range of 11.7–12.4 V. If there is no voltage, the problem may be a broken wiring or a malfunction of the ignition contact group. In this case, it is better to contact an auto electrician. If power is supplied, check that the relay is working. With the ignition on, use a screwdriver or a piece of wire to close the contacts to which the pink and gray wires go. This closes the circuit bypassing the relay. If the fuel pump works, replace the relay.
Pressure check
If the pump is working properly, but the engine begins to operate intermittently, you should check the fuel pressure in the system. For this you will need:
- pressure gauge (can be a tire gauge with a measurement limit of 5–7 kPa);
- petrol-resistant hose with a diameter of 10–12 mm and a length of 50–80 cm;
- two clamps for a hose of the appropriate diameter;
- Phillips screwdriver;
- nipple cap;
- dry rag.
In addition, the presence of an assistant is desirable.
The verification procedure is as follows:
- In the engine compartment on the engine fuel rail, locate the pressure measuring fitting (on the right side).
- Remove the plastic cap (plug) from the fitting.
CHECKING WIRING CONTACTS AND ELECTRIC MOTOR SERVICEABILITY
The first thing that is checked after a fuel pump failure is the supply voltage to the unit. This procedure is carried out using a conventional 12-volt probe light bulb. The light bulb is connected to the positive (gray and black wires) and negative contacts of the pump, after which the ignition is turned on. The light coming on for 3 to 5 seconds at this moment indicates that the wiring is working properly.
The voltage at the fuel pump terminals is checked with a tester and should be more than 10 V. A drop below this value indicates oxidation of the contacts and an increase in resistance. The malfunction is eliminated by cleaning. Both contacts are checked.
Checking the fuel pump contacts
Then, using the same light bulb, the serviceability of the electric motor is checked. To do this, the contacts of the improvised probe are connected directly to its terminals. A burning light with the ignition on and the engine stopped clearly indicates a failed electric motor.
Selecting and replacing the fuel pump
Russian car owners prefer BOSH fuel pumps. You should only buy a new pump in specialized stores. The original product must be packaged in thick plastic film filled with special preservative oil. At the same time, a branded BOSH pump cannot cost less than 2 thousand rubles.
Video: how to distinguish an original from a fake
To replace the electric fuel pump on a VAZ 2114/2115 you will need:
- screwdriver with Phillips bit;
- thin slotted screwdriver;
- key or head 7;
- key to 10;
- key to 17.
Video: dismantling the fuel pump
The sequence of actions is as follows:
- Using a 10mm wrench, remove the negative terminal from the battery.
- Open the gas tank cap to reduce the pressure in it.
- Remove the rear seat cushion and peel back the carpet and sound insulation.
Video: disassembling the fuel module
If, when disassembling the fuel module, it is discovered that the coarse filter is clogged, it should be replaced. The fuel level sensor with a float must also be replaced if the readings on the front panel do not correspond to reality.
Thus, diagnosing and replacing the fuel pump of a VAZ 2114/2115 car is quite simple. And in order for the pump to serve for a long time, always refuel only with high-quality gasoline.
It's no secret that you can't get far in a car without gasoline. Therefore, for the engine to operate, it is simply necessary that the entire fuel system functions in optimal mode.
In many ways, the fuel pump is responsible for supplying fuel to the engine, which the VAZ 2114 model is not without, of course. To solve a problem with a faulty fuel pump, you need to make sure it is at fault.
ACCESS TO THE PETROL PUMP AND ITS DISASSEMBLY
Before starting work, to eliminate the risk of a vapor explosion and a fire, you must first de-energize the vehicle by removing the negative terminal from the battery. Gasoline is completely drained from the tank. It is necessary to work with open doors to minimize the risk of poisoning by gasoline vapors.
Dismantling the device
To access the VAZ 2114 fuel unit module, you must completely remove or tilt forward the rear seat cushion, under which there is a square-shaped hatch on the bottom of the body that covers the fuel pump. The hatch cover is secured with two bolts and closes the unit itself.
The unit is dismantled with the electrical wires disconnected, then using two 17mm wrenches, the two fuel pipelines are removed and the eight fastening nuts are unscrewed with a 10mm wrench. After this, the fuel pump can be removed from the fuel tank.
When removing the pump from the tank and installing it in a standard workplace, care should be taken due to the low mechanical strength of the individual components of this unit.
Signs of breakdown
There are several situations in which the pump or its components can be at fault. This will definitely have to be checked. Otherwise, you can spend a lot of money buying and installing a new fuel pump, but in the end it turns out that the problem is completely different.
- The engine will not start. This is not a clear sign of problems with the pump, but still. Therefore, first check the condition of the spark plugs, the presence of a spark, and the absence of traces of oil on them. Also check the electronic control unit.
- Pressure inside the fuel system. If the pump is operating normally, it will create a pressure of 3.2 bar. Depending on the type of engine in your VAZ 2114, the characteristics may differ slightly: For a 1.5-liter engine, the optimal values are 285-325 kPa;
- For a 1.6-liter engine, these characteristics in optimal operating mode will range from 375 to 390 kPa.
New and old coarse filter
Many people purchase the entire fuel module assembly at once, which includes a filter, sensor, float, intake chamber and the pump itself. Such a purchase will cost approximately 3,000 rubles. It is much more profitable and practical to buy a separate pump, which costs up to 1000 rubles. This is due to the fact that when the pump fails, the remaining elements almost always remain intact and are fully suitable for further use.
Electric fuel pump module VAZ 2110, 2114, 2170 “SAN-D”
Description:
Applicability:
| Basic | |
| Manufacturer | san-d |
| Manufacturer country | Russia |
| Spare part code | 21101-1139009 |
| State | New |
| User characteristics | |
| Brand | Lada |
| Model | VAZ |
| Compatibility | 2110 |
| Part type | Gasoline pump |
| Type of equipment | VAZ |
| Day | Working hours | Break |
| Monday | 10:00 — 17:00 | |
| Tuesday | 10:00 — 17:00 | |
| Wednesday | 10:00 — 17:00 | |
| Thursday | 10:00 — 17:00 | |
| Friday | 10:00 — 17:00 | |
| Saturday | Day off | |
| Sunday | Day off |
* Time specified for the region: Russia, Tolyatti
Return and exchange conditions
The company returns and exchanges this product in accordance with legal requirements.
Return deadlines
Returns are possible within 7 days after receipt (for goods of good quality).
Return delivery of goods is carried out by agreement.
According to current legislation, you can return a product of good quality or exchange it if:
- the product has not been used and has no signs of consumer use: scratches, chips, abrasions, stains, etc.;
- the product is fully assembled and in its original packaging;
- all labels and factory markings are preserved;
- the product retains its presentation and its consumer properties.
Source
Popular breakdowns
Problems with the fuel pump can occur for several reasons. Therefore, your first priority is to determine the source of the problem. These may be:
- Fuel pump fuse;
- Fuel pump relay;
- Pump weight;
- Motor;
- Contacts;
- The pump itself.
If one of these elements fails, it can stop the normal functionality of the entire module.
Let us consider the situations with each of the specified elements of the fuel module in more detail.
Pressure
What exactly is a fuel pump? This is an element of the fuel system that allows fuel to pass through due to pressure. Therefore, if you take pressure measurements, you can get answers to many questions.
Let's give an example of normal pressure readings when checking in certain modes.
Check mode
Normal indicator
At idle
Without pressure regulator tube
When the drain is pinched
When you press the gas pedal
We recommend measuring with a small range of atmospheres on a pressure gauge (up to 7 atm). This will reduce errors to a minimum. Having a pressure gauge at hand will allow you to significantly save on professional diagnostics.
Contacts
The fuel pump includes three wiring:
- Plus (positive);
- Minus (negative);
- Fuel level indicator.
So, failure of the pump may occur due to a simple violation of the integrity of the wires. So if the pressure check shows normal, then we definitely examine the condition of the wiring.
To check, you will need a 12V lamp, which is attached to the external connectors of the pump with positive and negative contacts. Turn the ignition key. If the lamp blinks, contact is present. In this case, you will have to check the condition of the internal contacts.
Checking contacts
Motor
If the pressure and wiring are normal, let's try to check the serviceability of the motor. It is this element that is responsible for moving fuel through the system.
- To check it, you will need the same 12V lamp;
- Attach it to any motor terminal;
- Turn the ignition key;
- If the lamp blinks, you will have to get rid of the motor and buy a new one.
Motor
Don't make hasty conclusions. Before checking, look at the condition of the terminals and motor wiring.
Fuel pump weight
The contacts are fine, but the fuel level sensor may provide incorrect information. In this case, you definitely need to check the weight of the pump responsible for dispersing the fuel.
It often turns out that after prolonged use or driving on difficult road sections, the mass simply loses its fastening strength. Accordingly, if the mass falls off, the pump will not be able to work.
The mass is attached to the pump under the dashboard in the area of the hand brake. Therefore, when the driver turns on the handbrake, there is a possibility of hitting the ground contact, which is why it will fall off.
Putting the mass back in place is not that difficult. The problem is caused by the path to it. You'll have to:
- Get to the bottom through the interior;
- Remove the plastic under the handbrake;
- Remove the floor covering;
- Remove the grounding contacts;
- Clean;
- Secure it to the fuel pump as firmly as possible.
The fuel pump relay is located exactly where the ground is. Therefore, there should be no problems with the search.
With an ideally working fuel supply system, when the ignition is turned on, the relay instantly creates pressure inside the system, and then turns off.
If this process is disrupted, you will have to:
- Lift the front facing panel, which covers the contacts of the audio system and air conditioning;
- Take a look from the front passenger side;
- Find three relays;
- The lowest one is our desired pump relay;
- Turn the ignition key;
- If you hear a characteristic click from the relay, it is working properly;
- If there is no click, check the contacts. The reason is either them or a failed relay.
Fuse
All that remains is to check the condition of the fuse. This stage will make sure who the real culprit of the problems is - the pump itself or its fuse.
Fuse location
- Getting to the fuse is as easy as getting to the relay - through the hood or from the inside. The first option is preferable.
- Raise the hood and look in the area near the windshield.
- There is a dark-colored box located directly on the electronic engine control unit.
- Open the box and look inside for the topmost fuse.
- It has a current strength of 15A, as well as an inscription in English - Fuel Pump, that is, a fuel pump.
- Examine its external condition by removing it from the box.
- If the contacts are intact, then everything with the fuse is normal.
- If burnt contacts are clearly visible, consider purchasing a new device. Its price is affordable, so finding and replacing should not be a problem.
What to do if the fuel pump does not work
Before deciding anything regarding the repair or replacement of this device, it is worth remembering that the function of the gas pump is to create a certain pressure in the fuel system of the car. Accordingly, the first step is to measure the fuel pressure, quite possibly in order to accurately diagnose the failure of the fuel pump.
Measuring pressure in the fuel system
Normal atmospheric parameters in the VAZ-2114/2115 fuel system are as follows:
- at idle - 2.5;
- after turning on the ignition - from 3;
- without pressure regulator tube - 3.3;
- with pinched drain - 7;
- after pressing the gas pedal - from 3 to 4.5.
You will need to measure the pressure in five operating states of the fuel system at once in order to obtain accurate data. There is a pressure fitting under the hood of the car; you will need to unscrew the cap from it and attach a pressure gauge with a hose. By turning on the ignition, holding the drain, pressing the gas, it is necessary to take all five pressure measurements.
Using a pressure gauge, you can measure the fuel pressure and, based on this indicator, look for a malfunction
Wiring check
If the pressure readings are almost identical to normal, you will need to check the wiring for a short circuit. It is quite possible that the fuel pump itself is in working order, only the contacts that go to it have been damaged.
It is necessary to check the fuel pump wiring for short circuits.
You need to know that the wiring system, which goes directly to the fuel pump itself, has three wires: positive, negative and an indicator of the fuel level in the tank. You will need to take a regular light bulb with a power of no more than 12 V and attach its wires to the “+” and “-” contacts on the external connector of the pump. After starting the engine, if the lamp blinks, then there is contact.
If there is a flaw in the wire circuit, the light bulb will not light up. The internal contacts of the fuel pump are checked as follows:
- one by one, the light bulb wiring is connected to the “+” and “-” connectors of the fuel pump, then to its ground and relay;
- if the lamp blinks when connected to the negative contact, then the fuel pump contact is considered not working, and if it does not blink, then the “+” contact is not working.
After this, you will need to first check the relay and fuse: if they are normal, then the wiring is damaged somewhere between the pump and the relay.
What problems might you encounter when replacing?
The main problem that arises when replacing a fuel pump is the lack of the expected result: there is no fuel supply, or it is supplied intermittently.
Therefore, before starting all work, you need to make sure that the problem is really in the pump itself. After all, a weak fuel supply can be caused by a clogged fine filter, problems with the fuel lines - sometimes they can simply bend somewhere in an unexpected place, or dirty injectors on the fuel rail.
Even an air filter that is not replaced on time or a coked throttle valve can cause effects that look similar to insufficient fuel supply. But the most common problem is a poor contact in the electrical connector of the fuel module or a simply blown fuse.
Good luck to you and your car friend! Be always healthy!
