Characteristics of side lights VAZ-2114
VAZ-2114 belongs to the Samara modification of the second generation. The side lights in them are located, in accordance with technical regulations, at the edge of the front and rear parts of the body, next to the turn signals. These lamps are included in the headlight units.
- Unlike the front side lights, the rear ones are painted red.
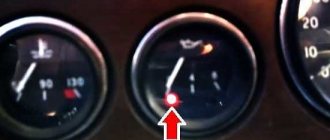
- The button to turn on these headlights is located in the exterior lighting control unit. It is located in the center of the dashboard above the on-board computer. If the dimensions are turned on, the green light on the switch lights up.
In the engine compartment under the hood of the car there is a mounting block with fuses. If your lights only on the left or right side do not work, then most likely one of the fuses has failed. The easiest way to notice a malfunction is element F10, since it is responsible not only for the operation of the right side of the side lights, but also for the warning lamp to perform its duties.
If the lights refuse to work on the left side, then fuse F11 must be replaced.
TECHNICAL DEVICE
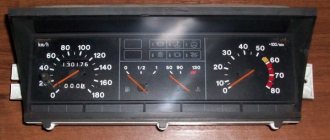
In some situations, it happens that the rear lights of a VAZ 2114 do not light up, in other cases only the front ones, but their structure and operating principle are identical. The side lights are located in the turn signal housing, while the front and rear lights find a place in the headlight housing in the same area. There is a special button for the side lights on the dashboard, which allows you to control them; next to it there are headlight switches and other lighting. When the driver touches this button and turns them on, at the same time the corresponding light on the dashboard lights up, which will not allow the driver to forget about the action taken.
Why might the tail light not light up?
Not a single motorist is insured against faulty side lights. It is important to quickly understand what the reason is and carry out repairs. Most often one of the lamps fails, then we can assume the reason for the failure:
- she burned out;
- poor contact;
- breakdown in the wiring leading to this lamp.
The first occurs most often; in this case, it is enough to replace the failed lamp. If the lamp only works if you hit it, then there is a problem with the contacts (although physical impact does not always help). If during testing you find that the light bulb is intact, and there is no oxidation or carbon deposits in the socket, then you need to check the conductors.
Replacing a damaged lamp in the rear headlight unit is carried out according to the instructions:
- turn off the lights and open the trunk;
- remove decorative upholstery;
- squeeze the latches and pull out the flashlight contact panel;
- click on the burnt out lamp and turn it counterclockwise;
- Check the light bulb on the tester and install a new one if necessary.
Assembling the lanterns is carried out in the reverse order. The lamp can also be replaced as an assembly. To do this, it is only important to purchase a high-quality version that is no different from the original. Car enthusiasts often recommend purchasing stock components or paying attention to. We recommend replacing the assembly if there is significant damage to the structure.
Often, taillight lamps do not immediately burn out or refuse to work, but indicate problems with a faint glow. First, clean the group of contacts located in the mounting block, and then, if the fault cannot be corrected, check the groups leading to each lamp.
Electrical wiring faults
One of the reasons why LED lamps glow is the natural aging of electrical wiring and the appearance of leaks through the insulation. This can cause tension to appear in completely unexpected places. In most cases it is small, but enough for the LED device to glow faintly.
Old aluminum wiring, laid in a hidden way, after 30 years of operation.
The insulation condition can be checked with a megger (checking with a multimeter in most cases is a waste of time due to the low measuring voltage). For a 220 V network, the insulation resistance should not be less than 0.5 MOhm. But even if a deterioration in the condition of the insulation is detected, often nothing can be done - it is impossible to accurately determine the location of the damage. And since the electrical wiring in residential and public buildings is hidden, its complete replacement is carried out during a major renovation of the premises.
Effect of capacitive conductivity
It must be taken into account that the leak may be capacitive in nature. In this case, one plate of the capacitor is a wire, the other is a second wire, a grounded conductive element (fittings), a damp wall, etc. It is much more difficult to detect such a fault with a megger without experience. It must be borne in mind that this problem cannot be solved even by completely replacing the electrical wiring. The capacity will not go away from this, and moreover, it directly depends on the quality of the insulation.
The influence of parasitic capacitance between the neutral and phase wires.
Also, stray capacitance can cause unauthorized glow if there is voltage on the neutral wire relative to ground. Its source is voltage asymmetry in phases, characteristic of end-user networks (220 V). Through the interwire capacitance, this voltage creates a small current, at which the LED lamp lights dimly even when turned off.
And we should also note the influence of interference. There is a situation when another phase wire is laid parallel to a phase wire over a long distance and at a short distance. If a sufficiently powerful load is connected to it, the current flowing through such a conductor creates an electromagnetic field that induces voltage in the LED power wire. It may be enough to constantly or periodically light the LED.
What is especially important to control at the rear dimensions
If the control light on the key does not light up, but the dimensions work, then first look at the panel wiring.
Remove the key block from the socket, then wipe the contacts with alcohol. If the dimensions on the right side do not work simultaneously with the warning lamp, then check the fuse. It is worth noting that they rarely fail, since the VAZ-2114 began to install wide options that have a reliable contact pad. If F10 or F11 still breaks down frequently, then it is necessary to check the mounting block; it may be faulty. If this unit is in working order, then check the entire electrical circuit. Sometimes constant failure of fuses indicates a short circuit in the wiring, which can lead to a car fire for no apparent reason.
Oxidation is the most common cause of headlight failure, so check your rear light units regularly. First of all, when repairing your car, test the lamps for integrity, and only then look for faults in other places. Many people believe that the probability of lamp failure is minimal, but this is not so - according to statistics, the reasons are often hidden precisely in them.
What to do if the lamps are constantly on?
Some car enthusiasts are faced with the problem of chaotic starting of lamps that turn on regardless of reverse gear or burn in constant mode. Auto mechanics note several reasons for this situation:
- the connection of the power sensor and the wires from the lamps led to a short circuit;
- frayed wire;
- The sensor is stuck in a closed state.
For cars operating on an automatic transmission system or CVT gearbox, breakdowns can be caused by a number of other reasons. Repairing the lighting here will be a little more difficult. This is due to the presence of a gear controller. Therefore, it is safer to contact a specialist workshop.
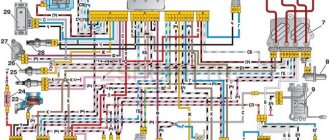
Scheme for switching on headlights, side lights and turn signals for VAZ-2113, 2114 and 2115
Headlight switching diagram for VAZ-2113, 2114 and 2115
Scheme for switching on headlights and fog lights:
1 – headlights; 2 – mounting block; 3 – headlight switch; 4 – ignition switch; 5 – external lighting switch (fragment); 6 – fog lamps in the internal rear lights; 7 – fog light switch with control lamp; 8 – indicator lamp for high beam headlights in the instrument cluster; K8 – headlight high beam relay; K9 – relay for low beam headlights; A - the order of conditional numbering of plugs in the headlight block; B - to power supplies
Main causes of malfunctions
Why might the tail light not work? There are quite a few reasons, but we will list them all:
- the light bulb burned out;
- fuse is blown;
- wiring fault;
- faulty connecting blocks;
- flashlight malfunction;
- malfunction of the control relay in the mounting block;
- Side light switch malfunction.
The most common malfunction of the above, of course, is the failure of the side light bulb. In this case, it is enough to replace it. How to do it?
How to change tail light bulbs
Replacing lamps in the rear light of a VAZ 2114 is extremely simple and does not require any tools. We open the trunk lid and opposite the lantern we find this pocket on the upholstery.
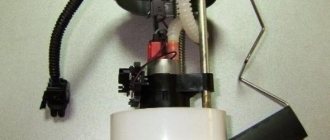
It's on Velcro. Just pull the edge and open it. In front of us is the back of the flashlight and the power supply.
Carefully remove the block by simply pulling it out.
Removed power supply
There are three latches on the lantern: on the top, bottom and side.
We press them out and take out the board.
Removing the lantern
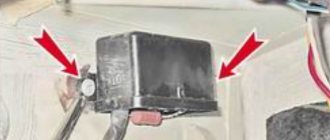
Place the board face up. The side light bulb is the smallest, marked with an arrow in the photo below.
Slightly recess the lamp, turn it counterclockwise and pull it out of the socket. We install a new one in place of the burnt one, mount the board in place, connect the power supply, and close the pocket in the upholstery.
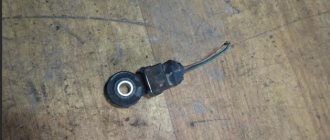
Lada 2114 Low-E › Logbook › The front lights do not light up. VAZ 2114. Help needed!
Maybe I’m completely stupid or what I don’t know... The fact is that once I installed baseless diode lamps (white light) in place of the original dimensions (photo 1), they burned for 3 months, everything was fine, only the sensor complained that the lamp does not light (well, that’s understandable). and then, out of the blue, both stop working (or rather, they blink occasionally and turn off on their own). But I put my own regular ones (photo 2) and they don’t work at all. The low and high beam lights are on, the rear lights are all on, the instrument panel is also on, the headlights button is on, all the fuses are intact. I don’t understand what the point is. Who can tell me what?!
Like 4 Subscribe
Lada 2114 2010, 81 l. With. - breakdown
Comments 11
Participate in the discussion can only registered users.
If the problem is in the relay and it needs to be replaced, will the diodes work or will they flash again in a month? is there any info?
Sorry. There is not. I didn't install them again... I installed orange from the repeater
Same problem, I installed the diodes, after a month the right one started blinking, I thought the diode had gone bad, I bought a new one and installed it, now the left one is blinking.
Yesterday the left front marker went out (the lamp is intact), but I need to go to the maintenance urgently! I connected the wires from the right block - now both do not light, I removed the wires that I connected, still both do not light. The fronts are intact, the lamps too. I measured it with a multimeter - there is no voltage on the socket and there is no voltage on the block either. The middle one is on, the rear lights are on. I feel the same sadness, I’ll try to change this relay on Monday.
Yes, relyushka is a common problem.
Yes, she was