Payment for goods and downloading of the book in electronic form (PDF format) is made on the website.
To do this, you need to find the book you are interested in and click on the “Buy” button. The price of the book is indicated on the button.
For convenience, the price on the website for residents of Russia, Belarus and Kazakhstan is presented in rubles.
For residents of Ukraine in hryvnias, and for all other countries - dollars.
After clicking on the “BUY” button, a payment window will open where you can select a payment system with which you can pay for the selected book using any bank card (Visa, MasterCard, MIR, etc.)
When you click on the “Pay by bank card” button, the Portmone payment system will open, which is the easiest way to make a payment.
In addition, the website offers four payment systems for payment:
- Yandex (payment from any bank cards, Yandex Money account, QIWI Wallet, terminals, etc.);
- Portmone (payment from any bank cards, Portmone account);
- PayPal (payment from any bank cards, PayPal account);
- WebMoney (payment from any bank cards, payment from WebMoney wallets).
Vacuum brake booster device
The vacuum brake booster is designed to improve the usability of the braking system. A car without VUT would brake very hard - the force transmitted to the pedal in this case would be very significant, which would affect driving safety for the worse.
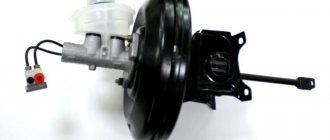
The VUT is usually located directly behind the engine shield. Structurally, this element is made in the form of a non-separable metal block connected to the main brake cylinder and the brake fluid reservoir.
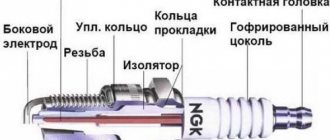
The vacuum sealer includes the following elements:
- Frame.
- Separating membrane (made from flexible material).
- Check valve.
- Brake pedal pusher.
- Hydraulic cylinder rod.
- Return spring.
- Follow-up valve.
The principle of operation of the vacuum seal is based on the difference in atmospheric pressure, as a result of which a vacuum is created, which ensures the formation of pressure (and at the same time the transmitted force) in the brake system.
Inside the VUT there is a diaphragm in the form of a partition. Each of the chambers (cavities) separated by a diaphragm is sealed. Moreover, the chambers are equal to each other in volume.
One of the chambers communicates freely with the atmosphere (it is called the atmospheric part), the second is connected to a hose leading from the engine exhaust pipe. On this side, a lower pressure compared to atmospheric pressure is formed. This cavity is called vacuum; it is located on the GTZ side.
The atmospheric chamber, located closer to the brake pedal, contains a reverse valve. It is designed to prevent a decrease in pressure in the intake manifold of the engine. Due to this, fuel cannot enter the VUT mechanism.
The amount of vacuum in this cavity is controlled by a follow-up valve. The vacuum chamber, thanks to the reverse-acting valve, maintains the pressure at the same level. In other words, the membrane experiences the same pressure values from both chambers. The follower valve moves through a pusher, which is connected to the brake pedal. The purpose of the spring is to ensure that the diaphragm returns to its normal state after stopping braking.
In some situations, when the car is equipped with an emergency braking mechanism, the rod is equipped with a specialized electromagnetic drive.
As you can see, the design of the vacuum unit is not so complicated - in some cases, troubleshooting some VUT faults can be done on your own.
Cast iron brake drums
Needless to say, this metal is much stronger, but also many times heavier than its opponent. Some manufacturers sacrifice suspension lightweighting and still install cast iron on their cars.
There are a number of reasons for this, but as you probably guessed, they stem from the competitor’s disadvantages, let’s list:
- Durable. A very durable option in terms of wear and tear.
- The sticking is not so strong; in extreme cases, you can beat them off with a hammer; here you are unlikely to damage them.
- Do not deform from temperature loads.
That's all! Of course there are more disadvantages.
- It is much more difficult to cool down, because of this, braking efficiency decreases.
- Heavy. Create a large load on the vehicle axle.
- Prone to rust. You have to paint the outside , they don't look aesthetically pleasing.
By the way, here is a short video after painting such a drum.
Stories from our readers
“Fucking basin. "
Hi all! My name is Mikhail, now I’ll tell you a story about how I managed to exchange my two-wheeler for a 2010 Camry. It all started with the fact that I began to be wildly irritated by the breakdowns of the two-wheeler, it seemed like nothing serious was broken, but damn it, there were so many little things that really started to irritate me. This is where the idea arose that it was time to change the car to a foreign car. The choice fell on the melting Camry of the tenth years.
Yes, I had matured morally, but financially I just couldn’t handle it. I’ll say right away that I am against loans and taking a car, especially not a new one, on credit is unreasonable. My salary is 24k a month, so collecting 600-700 thousand is almost impossible for me. I started looking for different ways to make money on the Internet. You can’t imagine how many scams there are, what I haven’t tried: sports betting, network marketing, and even the volcano casino, where I successfully lost about 10 thousand ((The only direction in which it seemed to me that I could make money was currency trading on the stock exchange, they call it Forex. But when I started delving into it, I realized that it was very difficult for me. I continued to dig further and came across binary options. The essence is the same as in Forex, but it’s much easier to understand. I started reading forums, studying trading strategies. I tried it on a demo account, then opened a real account. To be honest, I didn’t manage to start earning money right away, until I understood all the mechanics of options, I lost about 3,000 rubles, but as it turned out, it was a precious experience. Now I earn 5-7 thousand rubles a day. I managed to get the car buy after half a year, but in my opinion this is a good result, and it’s not about the car, my life has changed, I naturally quit my job, I have more free time for myself and my family. You’ll laugh, but I work directly on the phone)) If If you want to change your life like me, then here’s what I advise you to do right now: 1. Register on the site 2. Practice on a Demo account (it’s free). 3. As soon as you get something on the Demo account, top up your REAL ACCOUNT and go to REAL MONEY! I also advise you to download the application to your phone, it’s much more convenient to work from your phone. Download here.
- vehicle maneuverability improves;
- the trajectory of movement becomes clearer when cornering;
- the car's response to turning the steering wheel becomes clearer;
- the lateral roll of the car when going around an obstacle is reduced;
- the car's handling in icy conditions improves, the car becomes more predictable in these conditions;
- better “swallowing” of small irregularities.
- the car becomes more collected.
The process of replacing the vacuum booster on a VAZ-2110
Vacuum brake booster.
To replace a vacuum brake booster, you must have some knowledge of vehicle design. On a VAZ-2110 it is not so difficult to replace a part with your own hands.
You need to stock up on a set of tools - keys and screwdrivers and you can begin the procedure. Let's consider, step by step, the process of replacing the vacuum brake booster of the VAZ-2110:
- Remove the negative terminal from the battery.
- Disconnect the wire block on the brake fluid level sensor.
Disconnect the power from the brake fluid level sensor.
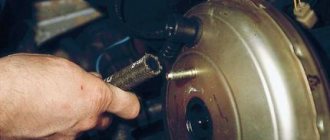
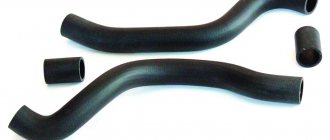
- We hold the vacuum booster return valve and with the other hand remove the hose from it.
Unscrew the hose from the check valve.
- Remove the master brake cylinder. There are only two nuts, but they can stick.
In the engine compartment, you need to unscrew the two fastening nuts of the brake master cylinder.
- Without disassembling the brake, namely, without disconnecting the brake pipes, we move the master brake cylinder to the side.
We remove the cylinder with tubes from the amplifier.
- From the interior side, unscrew the four nuts securing the brake pedal bracket.
We remove the vacuum booster mounts from the passenger compartment.
- After this, you can dismantle the vacuum booster.
- Using a screwdriver, remove the locking plate of the pin. We push out the finger and disconnect the vacuum booster pusher from the pedal.
Remove the locking plate with the finger.
- Next, we are interested in the two nuts securing the amplifier to the plate, unscrew it, most likely you will have to use wd-40. We dismantle the bracket.
After unscrewing the fasteners, remove the bracket.
- Assembly is carried out in the reverse order of disassembly.
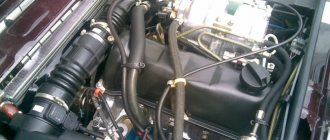
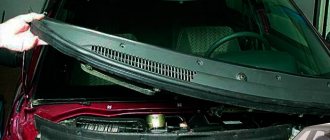
This is what the engine compartment looks like without an amplifier!
Part selection
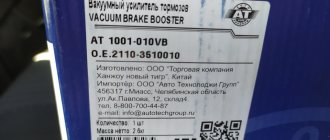
Amplifier Torgmash.
The original catalog number of the VAZ-2110 vacuum brake booster is 21103510010.
The price of this part is 4000 rubles. In addition, there are a number of analogues that can be used. Thus, the automotive market offers the following non-original parts:
- Pekar 2110-3510010 with an average cost of 2500 rubles.
Pekar 2110-3510010 is an amplifier with a sporty twist.
- DK 2110-3510010 - low quality and cost around 2000 rubles.
- Master-sport 2110-3510010 is an expensive but high-quality product.
Vacuum brake booster master-Sport
Symptoms of malfunction (check options)
There are several signs of a malfunction of the vacuum brake booster, and, accordingly, diagnostics of performance. Let's consider each of the options:
- We start the engine and let it run for a few minutes, after which it is necessary to turn it off. Press the brake pedal several times. During normal operation of the amplifier, the pedal will be depressed the first time, but subsequent times the stroke will be less and less. If the pedal stroke does not decrease the second and subsequent times, then there is a breakdown in the system and the part is not sealed. This means that the vacuum booster needs to be replaced.
- The second option assumes that the first option did not produce any results, and doubts have crept in. Depress the brake pedal and start the engine. With this turn of events, after starting the power unit, the pedal should go all the way down. If this does not happen, then there is an air leak and the amplifier does not work.
- With the engine running, hold down the brake pedal and then turn off the engine. Hold the pedal for another 1.5-2 minutes without releasing it. If there are malfunctions, the pedal will rise.
The amplifier has gaskets and O-rings, and these are the ones that most often fail.
Camshaft VAZ 2110 8 valves characteristics
I decided to highlight the question of whether the camshafts 2108 differ from 2110 (eng), and how much. The values are not reference, but very close to the actual ones, no worse than +- 2.5 g. The measurement was carried out with a marker disk, with the valves raised by 0.5 mm (+- 0.015), the thermal gap was no more than 0.03.
As a result, I intended: 1. Camshaft 2108, from a 1.3 engine, 2108 block. Intake cam lift - 8.95mm Exhaust cam lift - 8.95mm Intake valve opening angle - 220 degrees. (240 degrees) Exhaust valve opening angle - 220 degrees. (240g.r) Cam camber angle - 108g. The valve overlap height is practically absent. 0.20-0.3mm, by eye. In parentheses, given the measurement according to the methodology of OKB "Engine".
2.Camshaft 2110, from 1.6 engine, 11193 block. Intake cam lift - 9.5mm Exhaust cam lift - 9.2mm Intake valve opening angle - 230 degrees. (251gr.) Exhaust valve opening angle - 230gr. (251g) Cam camber angle - 106g. Valve overlap height - 0.725mm (+- 0.25) In parentheses, given to measurements according to the methodology of OKB "Engine".
3. Camshaft MS-04, OKB "Engine" Inlet cam lift - low pressure (10.9) Exhaust cam lift - low (10.9) Intake valve opening angle - 268 degrees. (294 degrees) Exhaust valve opening angle - 266 degrees. (290g) Cam camber angle - 117.5g. Valve overlap height - n.a. (1.9mm) Factory values in brackets.
I tried to re-measure, the closest result was obtained with a thermal gap of 0.25mm and a rise of 0.05mm. Didn't bother to fix anything.
If for 2108 and 21083 there is one camshaft, then... According to the Murzilka 21083 and 2110, we find that the r-shaft 2110 shifts the torque peak from 3500 rpm. at 3000 rpm (credit to the cam camber), but due to the wider phase and higher valve lift, there is an increase in torque of 2.8% and maximum power at the same 5600 rpm. increases by 4.3%. Of course, this is not much, but the 10th shaft can also be found for a spear.
Here's another Murzilka, tyts Intake valve lift 2108 - 8.8mm
| home |
| Place an order / ask a question |
| Product prices |
| Contacts |
| Patents and know-how |
| Camshafts of the XXI century |
| 25 years of DynaCAMS camshafts |
| RS pushers |
| Experience using RS pushers |
| Camshafts: |
| VAZ 2110/2111 |
| VAZ 2112 |
| VAZ 2112 RS |
| VAZ 2112 SR |
| VAZ "classic", Niva and ChevyNiva |
| UZAM 331x...3320 |
| ZMZ 402/410, UMZ 417 |
| ZMZ 405/406/409 |
| CHEVROLET / DAEWOO / OPEL SOHC-8v |
| PEUGEOT / CITROEN / SAMAND XU7 JP SOHC-8v |
| Accessories |
| Tuning examples |
| VAZ |
| Foreign cars |
| Partners |
| Publications |
| FAQ |
2110/11–26 For engines of 1.5 ... 1.6 liters. “Lower”, economical camshaft, increasing torque in the range from 1000 to 6000 rpm.
2110/11–49 For engines of 1.5 ... 1.6 liters. Universal camshaft up to 6500 rpm.
2110/11–52 For engines of 1.5 ... 1.7 liters. Universal camshaft up to 7000 rpm.
2110/11–54 For engines of 1.5 ... 1.8 liters. Increases torque at mid and high frequencies up to 7500 rpm.
Camshafts VAZ 2110/2111–58 … 684 DynaCAMS ®
* with a base cam diameter of 36 mm and lightweight valves.
- 2110 – camshafts with an eccentric for the fuel pump, 2111 – with a pin for the phase sensor.
- All camshafts work with standard lifters and shims.
- Camshafts with a basic cam diameter of 38 mm do not require modification to the cylinder head. With a base cam diameter of 36 mm, it is necessary to countersink the valve seats by 1 mm and modify (lighten) the valves.
- Modified valve spring retainers must be used.
- The phases are given when the valve overlap is set to TDC.
2110/2111–58 For engines with a volume of 1.5 ... 1.8 l. Smooth XX 900 rpm. Increases torque at mid and high frequencies up to 8000 rpm.
2110/2111–62 For engines with a volume of 1.6 ... 1.8 l. Smooth XX 1200 rpm. Increases torque at mid and high frequencies up to 8500 rpm.
2110/2111–68 For engines with a volume of 1.6 ... 1.8 l. Sports camshafts up to 9000 rpm.
2110/2111–584, 588, 624, 684 Additionally increase torque relative to the basic options. To ensure smooth engine operation, it is necessary to increase the idle speed.
Device
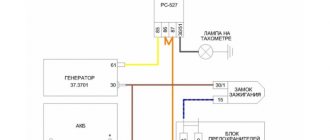
Hydraulic brakes are installed on the machine and operate generally reliably. They are double-circuit and have a diagonal distribution. That is, if one part suddenly fails, then braking by another circuit is possible. For the sake of safety, the VAZ 2110 brakes operate diagonally, one circuit is the right front and left rear wheels, the other is also diagonal.
This device allows you to brake efficiently (without skidding and other troubles) even in the event of a malfunction, if the brakes in one of the circuits are lost.
Let's consider the design of the brake system. The hydraulic drive includes a vacuum booster, as well as a dual-circuit regulator that creates pressure in the rear brakes.
In addition, the hydraulic drive is equipped with pipelines divided into two circuits, hoses and brake mechanisms that provide braking to the front and rear mechanisms.
The hydraulic drive is activated by a pedal located in the cabin (middle). Here are the main components of the hydraulic drive:
- Vacuum booster. It is designed in such a way that it creates pressure on the master cylinder piston, and thus causes braking; Vacuum brake booster
- Pressure regulator drive. It is through it that the working brake fluid flows to the rear brake mechanisms; Brake pressure regulator drive
- The pressure regulator itself. Already from the name it is clear that this device is responsible for the force of pressure, its decrease or increase. He does this depending on how loaded the rear axle of the car is; Pressure regulator
- Main cylinder with pistons, equipped with a reservoir. The filler neck of the tank is equipped with an emergency fuel level sensor; Master brake cylinder
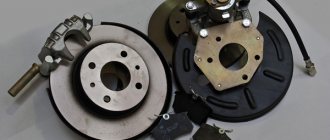
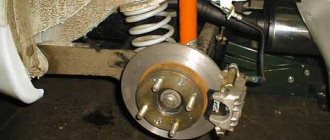
- Brake mechanism for the front wheel. Its main parts are the disc, pads and wheel cylinders. The mechanism also provides an indicator to prevent complete wear and malfunction of the linings; Front wheel brake
- Brake mechanism for the rear wheel. Unlike the front disc brakes, the rear ones are drum brakes. This is the factory configuration. However, many car owners believe that their device does not provide high-quality braking, and change them to disc ones. Rear wheel brake
The brakes require attention. Without waiting for the warning light to come on, indicating a critical level of fuel fluid or wear of the linings, and even more so, without allowing the brakes to completely disappear, you need to carry out preventive checks.
Particular attention should be paid to all connections and hoses, since the “escaped” brake fluid will not make it possible to brake, and from here it’s not far from tragedy.