Body repair is a rather labor-intensive job, but with the right approach to repair, experienced advice is more useful than ever, knowing what is needed for repair, where to start, where to avoid mistakes, then the work is not as scary as it seems at first glance.
The most important thing would be the desire, “
The devil is not as scary as he is painted.
”
This article will be useful to anyone who has the need and desire to carry out body repairs with their own hands, but lacks experience, does not know where to start, what is needed for this, approximately how much financial and time costs are required.
How to replace it yourself (step by step with photo)
- The car is installed on the overpass.
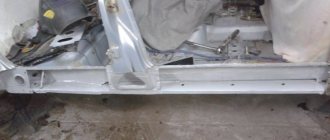
- A visual inspection of the bottom and sills is carried out. Places of maximum corrosion are identified, as well as places that can still be restored by straightening, priming and painting. It must be remembered: the larger the area of the damaged areas, the more material and effort will be required to repair them. A completely rusted VAZ 2110 threshold
- After determining the area of damage to the thresholds, the front and rear doors are removed from the car.
- Once the doors are removed, the aluminum threshold is removed (it is located under the door seals). The bottom of the door seals is also removable; the floor mats should be removed from the interior or raised as high as possible so that they do not interfere with further work.
- The cutting lines of the old thresholds are outlined. A series of holes with a diameter of at least 4 mm are drilled along these lines, located at a distance of 5-8 cm from each other.
- Rusted thresholds are cut off using a grinder. The grinder should follow exactly the lines with the previously drilled holes (this greatly simplifies the cutting process). As a rule, the front door sills are cut off first, then the rear door sills, and then the area in the area of the cab's B pillar is removed. Thresholds from the VAZ 2110 are cut with a grinder
- When cutting off the outer sill panel, be sure to leave sections of metal at the front and rear fenders. The length of these sections is at least 5 cm; it is to them that the new panel will be welded later. You should also leave a small section of metal under the middle pillar. A section of metal left under the center pillar of the VAZ 2110
- The threshold amplifier is removed.
- The freed space is thoroughly cleaned of dirt and rust using a metal brush mounted on the grinder. If there are small rusty areas left somewhere, they are cut out. Places where welding will be performed should be cleaned especially carefully.
- The new connector is welded to the subframe reinforcement, usually with an overlap. The bottom edge of the amplifier and connector is aligned. A new connector is welded to the subframe
- The outer panel is adjusted to the connector as precisely as possible. If necessary, the recess in it should be widened for the most precise fitting of the panel in place. The outer threshold panel is adjusted
- The final fitted panel is secured with clamps.
- After this, the connector should be welded to the bottom of the body. The bottom of a VAZ 2110 with a new connector welded
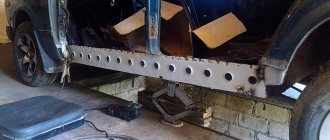
- Then, without loosening the clamps, you should weld the upper part of the threshold. Fully welded VAZ 2110 threshold
- All seams remaining after welding must be thoroughly cleaned, puttied, checked for leaks, primed and painted.
Generating Device Replacement Procedure
Before starting work, check the serviceability of the regulator relay. It is advisable to choose a model with the highest possible temperature compensation. This characteristic allows models 2106-2107 to operate at high speeds without failure. This indicator should be studied especially carefully if the VAZ 2106 or later modifications are used in areas with a hot climate.
Removing a broken device and installing a new one does not cause problems, thanks to the clear mounting method.
Difficulties arise at the stage when you need to connect a new VAZ generator. To begin with, the wires coming from the relay regulator are disconnected and subsequently insulated. Further connection of the VAZ 2108 generator is carried out as follows.
The wires, formed in the form of a ring terminal, are connected to the old place in the VAZ 2108. It is imperative to insulate the gray wire, which is not connected anywhere. Completes the installation procedure by connecting the yellow wire to the terminal. If the car owner was unable to find a device with the required power, then a model from a VAZ 2108 to a VAZ 2106 can be installed, provided that the total power of consumers is taken into account.
Careful attitude and regular preventive inspections will ensure long-term reliable operation of the machine. Even with a slight drop in speed or problems when starting the engine, there is a reason to look under the hood. The faster this is done, the less likely it is that the problem will spread further.
Determining the scope of work for restoration of thresholds
So:
- Whether the VAZ 2112 thresholds need to be replaced or cosmetic repairs performed in the form of straightening and then painting the car will suffice, you can determine after installing it on an overpass or pit and lifting it on a lift.
- Places of possible corrosion, the presence of dents, and paint peeling are visually inspected.
- Areas to be replaced and still “living” elements are identified. If the thresholds on a VAZ 2112 car are completely replaced, this will increase the cost of repairs and add costs for painting work. The price may decrease if a small faulty section of the threshold is replaced. But this repair option is only possible if the threshold on a VAZ 2112 car received a pinpoint impact, the paintwork was damaged, which led to the formation of rust. An insert will help correct the situation; its length is 15 centimeters longer than the corrosion area.
How do the thresholds of a VAZ 2112 car change?
The first thing that needs to be done is to clearly determine the size of the areas requiring restoration. When removing excess, you will have to weld a patch onto these areas, which will look ugly and sometimes interfere with closing the door.
Section of the threshold that requires replacement
On a VAZ 21123 car, the thresholds consist of three main elements:
- External panels.
- Connecting part.
- Amplifier.
They are joined together by spot welding. The instructions suggest fastening the VAZ 2112 thresholds in the following order:
- All doors are removed.
- The aluminum threshold under the door seals is cut off, the lower part of the door seals is removed, and the mats are partially raised for ease of work.
- Rotten thresholds are pulled out. First of all, the area located near the front door is dismantled, then near the rear and only then near the B pillar.
- Using a grinder or fine drilling, old thresholds are removed. In the second case, the centers of the holes for spot welding are marked, then they are carefully drilled.
- When completely replacing the thresholds, holes must be drilled in the rear of the car, on the side where the reinforcement is located to install the jack, and in the front where the old connector is kept.
- It is necessary to leave small areas on the side of the rear and front fenders when removing the outer panel. This section will be about 50 millimeters of the old element; the new outer part of the part will be attached to it end-to-end.
- There should be a small part of the connector left at the front, on the wing side.
- The threshold amplifier is removed.
Tip: Before removing the threshold amplifier, you need to leave a small part of it under the middle pillar for further connection with the new element.
- After the old threshold has been removed, the remaining metal elements are cleaned of rust, if necessary, the place of reinforcement for installing the jack is corrected, rotten areas on the bottom of the body are removed, and the places where welding will be carried out are cleared of old paint and rust.
- Attaching the thresholds of the VAZ 2112 must begin with a connector, which must be overlapped at the rear on the subframe reinforcement; at the front it must be laid end-to-end to the old section of the connector.
- The threshold is welded with high quality.
- The amplifier is cut to the required length, a cutout is made on it in the area where the stand is located, otherwise during assembly it will be interfered with by an extra piece of the amplifier left from the old one.
- The edges of the connector and bottom amplifier are aligned.
The elements are welded together. Welding must be done to the edges, starting from the middle, in order to avoid parts being pulled together:
- All weld points are cleaned.
- First, the outer threshold panel is adjusted with maximum precision.
- Panel installation.
- Final revision of the dimensions of parts on site. You need to start trimming from the top of the element, while leaving minimal gaps.
- They are cleaned of the soil that protects the parts during transportation and the welding areas.
- In the outer panel, in its lower part, holes are drilled for welding.
- The outer panel is mounted and fixed at the top with self-tapping screws or clamps, as seen in the photo.
Fastening the threshold of VAZ 2112
- The bottom of the panel is welded to the amplifier, and the connector to the underbody. For this, previously drilled holes are used.
- A metal sheet is welded at the top of the threshold.
- On the bottom side, patches are fixed by welding.
- All welded joints are cleaned, puttied, checked for leaks, and painted.
Preparing newly installed thresholds for painting
How to choose a part: average prices
In 2022, the original thresholds for 2112 are produced by more than twenty companies. The most popular remain:
- assembly shop and related companies AvtoVAZ, Tolyatti;
- Kamaz company in Naberezhnye Chelny.
The cost of one replica is from 800 rubles. The part is made of carbon steel, with a thickness of 0.8 mm; by prior agreement it can be galvanized. The replicas have precisely adjusted dimensions, amplifiers and external boxes do not need to be trimmed or straightened. Before repairs, the transport soil must be removed from the factory thresholds. It is recommended to remove the coating manually; do not use a tool such as a grinder.
Iron thresholds and components
When overwelding the body, it is recommended to use either factory parts for the threshold or make them to order. As an alternative, drivers use profile pipes. They cut out a section of pipe themselves, weld additional amplifiers and transitions. The profile has a thickness of 1.4 mm and is hot-dip galvanized.
Thresholds made from the profile are practically not subject to corrosion, have maximum resistance to mechanical shocks, collisions with obstacles, etc. During replacement, drivers do not install a reinforcement; the design of the metal pipe itself implies maximum strengthening of the car’s structure.
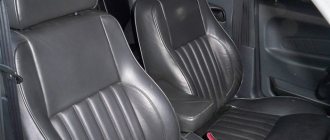
Plastic covers
Plastic linings perform a decorative function on the car. When installed correctly, the plastic additionally protects the body from moisture, salt reagents and flying gravel. If you install the linings in violation of the technology, the part can contribute to the rapid destruction of the metal.
If you install a plastic cover on the screws, do not treat the entry points of the bolt into the part, and do not carry out full anti-corrosion protection, water and dirt will quickly get under the cover. Moisture will cause rust to spread quickly.
Plastic body kits improve the aerodynamic performance of the car and make the VAZ more stylish. The reliability effect will be maintained if the linings are installed correctly: to protect the metal from moisture, to prevent the occurrence of electrochemical corrosion, which occurs in places where aluminum linings or screws come into contact with bare carbon metal.
Tools you will need for DIY repairs
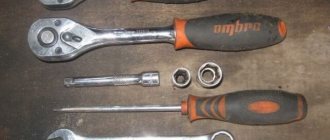
In order to save several thousand rubles, the car owner will need the following set of tools:
- Bulgarian.
- Electric drill with a set of attachments for stripping.
- Cleaning discs for grinders.
- Standard set of automotive tools.
- Semi-automatic welding machine and a couple of spools of wire.
- The new thresholds themselves, if they are planned to be replaced. It is strongly recommended to change the entire threshold at once, as this will help avoid problems in this place for 2-3 years;
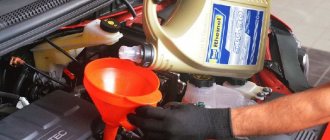
- Primer, solvent, paint, putty and other materials that will be needed to process welds and paint new thresholds.
If the garage does not have good ventilation, then it is better to paint the car outside.
Preparation for repair
If there are holes in the threshold, it must be completely replaced.
Before you begin repairs, you need to carefully inspect the car's sills. It may be possible to get by with some cosmetic repairs. For inspection, the car must be driven onto an overpass or pit.
The process of removing the old threshold
It is also recommended to remove the wheels. In practice, only a few do this. Most often, independent repairs occur without removing other body elements. Those elements that may be damaged during welding or painting are simply covered with suitable material.
Before dismantling the sills, the fenders, seats and doors must be removed.
The replacement process itself occurs as follows:
- First you need to disconnect the battery.
- Next, using a grinder, the old threshold is cut out, or the damaged part of the threshold is removed.
- After the threshold is removed, the body must be thoroughly cleaned of rust.
- Those places where welding will take place also need to be cleaned of rust, putty and primer.
Only careful preparation of the base for welding will help to avoid welding seams in the future.
Video about dismantling the old VAZ-2110 threshold
Installing a new part
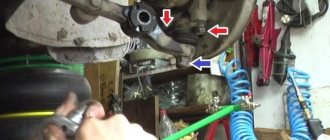
Before installing a new threshold, you need to weld the connector of the new threshold to the subframe amplifier.
We weld a new connector to the subframe reinforcement.
Welding should begin from the center of the part, gradually moving towards the edges. After the connector is welded, you need to clean all weld points. The further installation process is as follows:
- The front panel of the new threshold is adjusted to the vehicle.
- After the front part, the entire threshold is adjusted. Clamps are used for fixation.
- The welding area must be cleared of paint and primer.
- Holes are drilled at the bottom of the threshold panel.
- Next, the outer part of the threshold is hung on the car, after which it is secured with self-tapping screws.
- The lower part of the panel is welded through the holes made.
- The connector is welded to the bottom of the body.
- The metal must be carefully welded on top of the threshold.
- After this, the welding seams are cleaned and processed.
Next, the entire surface of the threshold is prepared for painting. Primer and putty are applied. After stripping the putty, several layers of paint are applied. If necessary, apply clear varnish.
The result of replacing the threshold.
Step-by-step procedure for replacing the generator. Option one is not complete
2.1. Pull out the split steel bushing installed in it from bracket 21214 and install a silent instead (with the metal side inward).
2.3. Remove the contact extension 61 (excitation winding) from it under the protection cover - however, you can do it yourself :).
2.4. Unscrew the old bracket from below (head with 17, 2 or 3 bolts).
2.5. Unscrew the old strip from above (17 head, one nut).
2.6. Hang a new bar - but do not fix it completely, let it dangle.
2.7. Secure the new bracket with the silent insert inserted into it (metal ring inside).
2.8. Hang the generator 214, having first placed the excitation winding contact extension on it (so as not to do it by touch). Insert the bolt, put on the shaped washer (with the ribs inward, of course) and tighten with the nut (not too much).
2.9. Putting on the belt - by the way, is noticeably easier than on 213, insert the bolt into the bar and the upper ear of the generator, tighten it (not all the way, again).
2.10. Finally tighten the fastening of the bar to the engine.
2.11. Pull the belt, fix the ear fastening to the bar, fix the lower fastening.
2.13. After drinking beer first, start up and enjoy life.
Why and when do you need to change the thresholds on a VAZ 2110
It's simple: over time they rust and collapse. The bottom and sills of the VAZ 2110 are susceptible to corrosion. Even if the car is new, after 8-10 years the sills on it will be corroded by rust. The reasons are obvious: it is this part of the car that is most exposed to moisture and other aggressive environmental factors, such as reagents that are used to sprinkle roads during icy conditions. Mechanical damage cannot be ruled out: impacts and scratches first lead to dents and chips of paint on the thresholds, and then rust occurs. In these cases, the need to change them becomes obvious.
Car generator connection diagram
Although the car runs on gasoline, it contains many devices powered by electricity. The main source of electrical energy in a car is a car generator.
Essentially, it is an internal power plant that converts the rotation of the crankshaft of an internal combustion engine into electricity.
This electricity powers all the electrical appliances of the car, including the recharge of the battery, which is also a source of electricity when the engine is not running.
The connection diagram for a car generator is shown in the following figure.
G – generator; Ph1…Ph3 – three-phase stator windings; VD+ – power rectifier, positive diodes; VD1- – power rectifier, negative diodes; C – capacitor, equalizing high-frequency voltage surges; B+ – positive power output of the generator set; VD1d+ – winding elements excitation;Ex – exciting winding;VR – volt-voltage regulator;Accu – battery;+ – positive battery output;IgnSw – ignition switch;H – charge indicator;D+ – output “D+” gene control unit; DF – exciter control output winding;
We recommend: How to check a generator
R – consuming devices.
The connection diagram for a car generator and the principle of its operation are similar for any car. The differences are related only to the quality of production, power and layout of the components in the motor.
All modern cars are equipped with alternating current generator sets, which include the generator itself and a voltage regulator.
The regulator normalizes the current strength in the field winding, due to this the power of the generator set varies while the voltage at the power output terminals remains unchanged.
Modern cars are additionally equipped with an electronic unit on the voltage regulator, with the help of which the on-board computer controls the amount of load on the generator set.
The circuit of a car generator is based on the principle of electromagnetic induction.
If a coil of copper wire is rotated in a magnetic field created by permanent magnets or an excitation winding powered by a battery, then an electric current is formed (induced) in the copper wire.
Found a mistake? Select the text with the mouse and press Ctrl+EnterWhat is the main purpose of a car generator? Of course, the transformation of energy is from mechanical to electrical to power the car. The design of a car generator and the principles of its operation No car can do without How to test the generator First, let us note that a breakdown of the gene Wind energy is the cheapest, and you can even get it at home .It is known that even the most “cleaned” of electronics car will not start without electricity. Tachometers for carburetor VAZ cars. Connection diagram for the tachometer VAZ-2103, 2106, 2107: 1 - tachometer; Main functions of the generator The generator is an important device in the car. Show more
Features of repair and replacement of thresholds at service stations
VAZ-2110 owners most often repair the sills of their cars with their own hands. Based on the cost of the car, repairing thresholds at a service station is impractical.
For those owners who are thinking about repairs at the station, we can give approximate prices for these services:
- Removing the threshold – from 500 rubles.
- Installation of a new threshold – from 6,000 rubles.
- Painting the threshold - from 1,000 rubles.
- Materials – depending on quality, from 900 rubles.
- Threshold repair, which consists of welding holes - from 1,000 rubles.
Replacing thresholds at a service station is quite an expensive procedure.
In total, it turns out that repairing or replacing the threshold will cost from 6 to 9,000 rubles. This amount will most likely have to be multiplied by two, since thresholds are usually changed on both sides. The total is 12–18,000 rubles. Given the price of a VAZ car in the amount of 60–90,000 rubles, carrying out this procedure at a service station is very expensive.
Step-by-step procedure for replacing the generator. Option two is not complete
3.1. Remove the old generator, mounting bracket (pictured) and generator tension bar.
3.2. Pull out the split steel bushing installed in it from bracket 21214.
3.3. Install bracket 21214 in place of the old bracket.
3.4. Install a new tension bar.
3.5. Remove the silent ring with two rings from this bolt.
3.6. Install it in a bracket that is already attached to the block.
3.7. Then everything is simple. As usual, we install the generator, tighten the bolt on the bracket from the bottom, put on the belt, tighten it, tighten the generator with a tension bar using an M8x25 bolt with a nut and a groover.
3.8. Now connection. On the driver's side, under the hood, a voltage regulator is attached to the fender; 2 wires are connected to it; we disconnect them from the regulator and isolate them.
3.9. On the new generator there are only two places for connection, a bolt and a terminal. We place a terminal on the bolt, just like on the old generator; tighten it with a nut and put the rubber casing on the bolt. As for the remaining two wires going to the generator, we place the yellow wire on the remaining terminal of the generator, and the gray one (it was attached to the brushes of the old generator) is also insulated and left dangling.
3.10. And one last thing. There is a RS-702 relay under the hood on the passenger side; it needs to be replaced with the purchased RS-527. We connect in the same way as the old one was connected, i.e. contact 85 to 85, 86 to 86, etc.
3.11. It’s probably worth replacing the battery))) and running to start the engine! Everything works for me, it’s one of the few things that works after my hands.
Thanks Tretyakov Oleg “STALKER”, VAZ-2106 Auto Club
More information about connection diagrams The issue of connection is discussed on the forums. Opinions and advice vary: from replacing relay 702 with 527 and connecting PP 380 wires to soldering in diodes, etc. Therefore, share your experience which path is correct. And if possible, describe the connection step by step, because in diodes, field windings, etc. I’m not cutting much yet. Changing one relay is the simplest solution. In the instrument panel, you can solder not “-” to the light bulb (as it is there by default), but “+ from the ignition” with a parallel resistor - and then you will connect this wire (which goes from the relay to the light bulb) directly to the generator. This is how you need to connect. In principle, you can not use resistors, but then if the light bulb burns out, charging will disappear. 9 - resistors 2W (mlt-2, omlt-2) 100 Ohm
We take the “+” wire from the ignition switch “15” (a “+” appears when the ignition is turned on) and connect it to one of the contacts of the light bulb. From the other contact of the light bulb we pull a wire to the generator and connect it to terminal 61. EVERYTHING! It will work until the light bulb burns out.
You can connect 2 100 Ohm resistors with a power of 2 W or 1 50 Ohm resistor with a power of 2 W in parallel to the light bulb (actually you need 4 W). Then, when the light bulb burns out, charging will not be lost.
By simple combinations you can use the original wiring and the original light bulb on the dash
The operating principle of the 2110 generator is identical to Niv's. The resistor there is also 50 ohms. Any diode can be used for a direct current of 5A.
Electrical systems of VAZ 2106
The electrical circuit of the VAZ sixth model includes a number of systems that ensure the operation of consumers in different parts of the car. This:
- ignition system;
- control and lighting system;
- cigarette lighter operation system;
- engine starting system;
- carburetor solenoid valve control system;
- windshield wiper and washer system;
- heating system;
- sound signal system;
- component of the engine cooling system;
- system of indicators and status sensors.
The ignition system includes an alternating current generator, a rectifier unit, a current distribution system, spark plugs, fuses and a number of supporting elements. The system removes low voltage current from the generator brushes, converts it into high voltage current in transformers and, in accordance with the firing order of the engine cylinders, supplies it to the spark plug. The converted current must have enough energy to create electricity inside the engine cylinder and ignite the working mixture.
Control and lighting devices include all lighting devices, such as front and fog lights, interior lighting lamps, trunk lighting lamps, as well as additional lighting elements installed. This also includes turn signals, brake lights, side lights and others.
In general, these devices are an important part of ensuring compliance with traffic rules, and therefore are constantly powered either through the battery or through the generator and are turned off last. The same applies to the sound signal system, which provides clearer information to other road users about changes in the situation on the road. The engine starting system includes a battery and a number of elements that supply high current to start all consumers and rotate the engine shaft to starting speed
When the crankshaft reaches this frequency, the alternating current generator comes into operation - now it powers all consumers and charges the battery
The engine starting system includes a battery and a number of elements that supply high current to start all consumers and rotate the engine shaft to starting speed. When the crankshaft reaches this frequency, the alternating current generator comes into operation - now it powers all consumers and charges the battery.
For satisfactory operation of the fuel supply system at high speeds, the VAZ 2106 carburetor is equipped with a solenoid valve. It regulates the operation of the internal combustion engine at idle and operating speed. To control it and synchronize its operation with the operation of the engine, the electrical circuit has its own separate system. It is recommended to download the VAZ 2106 electrical diagram and familiarize yourself with its operation.
The engine cooling system fan control system ensures consistently normal thermal operating conditions for the internal combustion engine and increases the service life of the most expensive part of the vehicle. Indicators of the vehicle's operating status are connected to sensors installed in critical places on the VAZ 2106. The indicators take readings by converting physical quantities into an analog or digital signal, which is processed and sent to the indicators. From the latter, in turn, the necessary information can be read.
The VAZ 2106 has several electrical equipment systems designed to make life easier for the driver and increase driving comfort. These include windshield wipers, heater, defroster, cigarette lighter and others. Some of them are useful, others were created on the principle of “so it was.” Which one to use is up to the owner to decide, but the very fact that there is a choice is pleasing.
The electrical circuit of the VAZ 2106 car is very ramified and it is not possible to describe it all in one article. If there is a desire or there is a need to deepen and expand knowledge about the most popular car of the Union, it is strongly recommended that you familiarize yourself with special specialized literature or, at least, with a photo of the electrical circuit diagram.