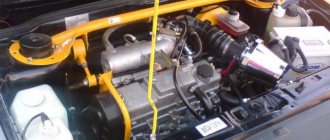
On VAZ-2109 cars, only one engine mount is used, the other two are installed on the gearbox. With the help of these simple devices, made of metal and rubber, vibration is eliminated and their level is significantly reduced. These vibrations come from the engine and are transmitted to the body.
Any motorist can make the replacement with his own hands. No difficulties arise during the work. Replacing airbags can significantly increase the service life of both the car itself and its individual components. And the most important thing is that you will get rid of various kinds of noise and vibrations that arise during engine operation.
Features of pillows
On Lada-2109 cars, airbags are used, the functioning of which has the following features:
- There are many designs of supports, they are able to reduce the level of vibrations, therefore, during production, all values of the loads that act on them are taken into account.
- These components are constantly under the influence of load, and their direction and magnitude changes many times.
- The only constant load is the mass of the engine itself. But during the start of movement, several other forces arise, acting in different directions.
- When reversing, the same forces act on the airbags as when starting, but they are directed in the opposite direction.
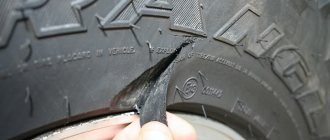
During sudden acceleration, braking, or driving over uneven surfaces, a lot of forces are necessarily exerted on the engine mounts. In the manufacture of cushions for Lada-2109 cars, only natural rubber is used, as well as high-grade rubber. In addition to rubber elements, the supports consist of steel frames and heavy-duty adhesive. They operate at temperatures of -40…+70 degrees.
Ways to increase the rigidity of engine fixation on the body of a VAZ 2109
To prevent the VAZ 2109 cushion from being replaced frequently, and to increase the rigidity of the power unit, instead of the standard support, a more advanced part is installed, which has a rigid body and a rubber part inside.
Minimize the movement of the motor when braking, hitting bumps on the roads, or abruptly starting the car. With its help, you can avoid self-switching off the transmission. Increase the resource in the exhaust system and drive the drive wheels. Improve the design of the engine compartment. You can increase the rigidity of the motor by installing an additional fourth support . Its purpose is to connect the clutch housing to the cross member of the front suspension of the VAZ 2109. When installing the device, it is necessary to install a new bracket and find a place for the ignition module. The work procedure includes: Dismantling the VP for spark plugs. Disconnecting the wire connectors from the ignition module of the car. Disconnecting the clutch housing of this module from the cylinder block. The remaining three nuts securing the module are unscrewed, which is then removed. The ignition module takes a different place and new fasteners are installed. A bracket for mounting the fourth support is attached to the cross member of the front suspension. A bolt is installed in the hole on the terminal clamp, the nut is placed and screwed initially by two turns. The lower head of the rod is inserted into the support fixing eye. The bolt is installed in the eye and support, the nut is tightened. The size of the rod is adjusted until the holes in the clutch housing and on the upper head coincide. Another bolt is installed.
Factors affecting the resource
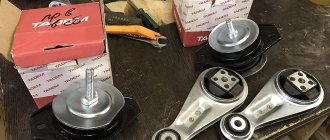
The price of VAZ-2109 engine mounts is about 500 rubles. Most experts recommend choosing only products that are recommended by the car manufacturer. But there are several factors that affect the resource of these elements:
- Natural production. All elements, including pillows, have a maximum service life. And hardly anyone can surpass him. They are not able to develop a full resource for reasons that will be discussed below.
- VAZ-2109 cars experience very high mechanical loads when driving on uneven roads, colliding with curbs, etc. And this significantly reduces the service life of the engine mounts.
Stretching the front struts (installation, advantages and disadvantages)
A car's front strut brace is a piece of iron that is now installed not only on sports cars, but also on everyday cars. It won’t be difficult to install the strut spacer yourself, but will it be beneficial, and won’t it get worse than it was?
Installation of front strut extensions on a VAZ of the tenth family
It all starts with the question, which strut spacer is better to choose? And indeed, there is quite a wide selection of yellow iron on the market, with stickers from different manufacturers or handicraft assembly (by the way, if you wish, you can even make it yourself). I won’t go deep into this topic, but I will say that the TechnoMaster front strut struts stand out from the general plan not only in price, but also in the quality of the product. Technomaster front strut extensions on the VAZ 2110 come in several types:
- For carburetor engines (technomaster CODE 2904.0500.04, price 900 rubles);
- For injection engines VAZ 21102 limited edition (technomaster CODE 2904.0600.05, price 750 rubles). According to the manufacturer, the only difference between the limited edition strut strut and a regular injection strut strut is the price. This is the same spacer, only from the previous batch, there are no design differences;
- For injection engines with 16-valve VAZ-2112 engine. The kit includes an additional engine mount rod.
For injection engines (technomaster CODE 2904.0600.04, price 825 rubles);
Adjustable strut brace, what does that mean? Over time, the cups of the struts come closer together and it is difficult to install the non-adjustable strut spacer (the holes do not match by 3-8mm). To install, you have to jack up both wheels and use a pry bar. Thus, adjustment on the spacer is needed only to make it easier to install it on a vehicle that is not new; it cannot be stretched or tightened. Installation process: Unscrew the nuts from each support and install the spacer. Unscrew the nuts (key 13) without fear that the racks will fall through, they won’t go anywhere. If the stretcher is adjustable, adjust the distance between the support plates with the clutch before installation and fixation, otherwise the camber angles of the wheels will change. You can buy the TechnoMaster front strut strut in online stores (section “tuning”).
What to look for when purchasing
Before purchasing, be sure to look at the quality of the product - there should be no damage to the metal parts - dents, cracks, paint damage. Rubber components should also not be damaged - no cuts or cracks on them are allowed.
If you plan to tune the engine, then you need to buy reinforced cushions - only they can withstand increased loads on the suspension. It is also recommended to supplement the design with at least one more support - this will significantly improve the operation of the car.
Installation of VAZ 21083 engine
Photo. Box boot VAZ 21083
You can immediately lubricate the release bearing with oil, preferably transmission oil or mixed with lithol; it can be pressed with a syringe through the slot shown in the photo below.
Photo. Release bearing of VAZ 21083 engine.
We install the engine as we removed it through the bottom without the head; this can be easily done at home with two people. To do this, pass a belt or rope under the engine, place a thick rag on the front of the car and using a pipe or crowbar you can effortlessly pull the engine onto the box, as shown in the photo below. Bolt the box, lift the engine, screw on the mount, the engine is installed, all that remains is to install the head.
Photo. Installing the VAZ 21083 engine through the bottom.
When to replace
Before carrying out repairs, you need to completely inspect all motor mounts and identify those that need replacement. They cannot be repaired - these are elements that cannot be restored. And if they are broken, then only installing new ones will help. Replacement of VAZ-2109 engine mounts is carried out in the following cases:
- In the presence of strong body vibrations. If you feel vibration, you need to diagnose the supports. This behavior of the car can be caused by various reasons. But the failure of the pillows is the main one.
- In the case when the timing belt is being replaced and it is not possible to remove the cover that protects the compartment, it is necessary to completely dismantle the cushion in order to slightly lift and move the engine to the side.
- If the mass of the motor has a strong effect on the CV joints, and their geometry changes significantly, this leads to the fact that the life of the cushions is reduced.
- Sometimes an almost imperceptible knock appears near the scenes. This is the first sign that the engine has sunk. In other words, the engine mounts are not working correctly.
If the pillows are not replaced, this will result in more serious consequences and expensive repairs. Therefore, it is necessary to replace the pillows as soon as the first signs of their breakdown are discovered. It is impossible to delay repairs, as this will lead to destruction of body elements, damage to the engine and deterioration in the comfort of the driver and all passengers.
Malfunctions
Tire wear. Most often, over time, the rubber “gets tired”, and therefore cracks or even breaks. The external environment can damage this part of the car, since bad roads cause unnecessary shocks and surges in the engine. You can find out whether there is a breakdown of this type without much difficulty. Engine vibrations and extraneous, non-characteristic noises will be clearly audible inside the car. Like any malfunction, failed airbags must be replaced. For this procedure, it is not necessary to contact specialists at car services, since this procedure is not so complicated, and, as we know, there is no such thing as extra money. No extra complex units or mechanisms are required. It assumes that there is only a bracket for hanging the car. Do not forget about safety precautions, since any manipulations with such a complex mechanism can lead to force majeure and unforeseen consequences. The entire replacement procedure, which will be discussed below, can be carried out independently by one person. But safety precautions require the presence of one more person, as they say, just in case.
Below is a video of what happens to the engine when starting under tension with failed engine mounts.
Replacement procedure
Some may wonder how many engine mounts there are on a VAZ-2109. In fact, there is only one, but the total number of engine and gearbox mounts is three. To replace the rear cushion, perform the following steps:
- Place the car on a viewing hole or overpass.
- Secure the car using special wheel chocks, and be sure to set the handbrake.
- It is advisable to disconnect the negative terminal from the battery.
- Using a spanner, you need to unscrew the nut that secures the airbag to the body.
- Unscrew the nuts securing the support bracket to the gearbox housing. There are only three nuts located there.
- Remove the old cushion, first remove all the bolts.
- Install the new cushion and tighten all threaded connections.
Replacing the left side airbag is done in approximately the same way, but you will have to remove the left mudguard on the engine. If there is protection, it must also be removed.
How to change engine mounts yourself
If the vibrations of the engine, even a new, serviceable one, were transmitted into the car interior, the driver would probably be very unpleasant. Fortunately, special rubber linings at the junction of the piston unit with the car body save you from this.
But not only do they protect the people in the car from vibrations; the underlay structures save the piston unit itself from the effects of uneven road surfaces. These elements themselves consist of rubber stands, metal parts and threaded fasteners. They break due to natural factors, such as:
- high humidity, oil traces, keeping the power unit in dirt;
- natural wear and tear that occurs after approximately 80 - 100 thousand kilometers;
- faulty “triple” piston unit with increased vibrations.
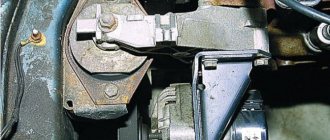
- Remove the generator belt.
- Having loosened the threaded connections, move the generator away.
- Having installed the jack under the crankcase pan, and at the same time laying a plank between the jack and the pan, we slightly raise the power plant to relieve the load on the silent blocks supporting the engine.
- We inspect the appearance of the engine support structures and feel them for final diagnosis. Are there any delaminations in the rubber? Is the rubber hard? Is it easy to separate from the backing? Is the play of the entire element noticeable? If everything is normal, only play is observed, just tighten the nuts, and you may be able to do without reinstalling the part. If we can’t do without reinstalling, we move on.
- Unscrew the nut of the threaded connection of the defective element.
- We unscrew the two bolts securing it to the metal holder.
- We take out the entire structure complete with the metal part, and reinstall the rubber part. Then we attach the unit back to its normal place. We carry out complete assembly on the way back.
This is how the right engine mount is replaced. Let's look at updating the underlay structure at the back of the engine using another VAZ brand as an example.
Replacing pillows on a VAZ 2114 resembles the process on a “ten”. In any case, the tools used are similar:
This is how it is done.
- A jack with a plank is installed under the gearbox.
- Slightly lift this part of the piston unit.
- Unscrew the nut of the defective part.
- After unscrewing the nuts connecting to the bracket, the unit is taken out, then the rubber part is reinstalled in the metal holder. In this case, the latter can be clamped in a vice if you have a vice at hand.
It turns out that, in general terms, work is carried out in a similar way on all motor stands. Replacing the rear engine mount on a VAZ 2109 occurs in exactly the same way. The change at Priora is accompanied by the removal of the standard engine mudguard. Otherwise, the operation is the same as replacing engine mounts on a VAZ 2110.
What to do with foreign car engines
Now let’s determine how to replace a defective airbag in a Ford Focus 2. In this car, the entire support assembly is non-separable. To work you will need:
When reinstalling the right part, the steps are as follows.
- We remove and move the expansion tank to the side without pulling off the hoses.
- We lift the power unit, being, for example, in a garage with a winch.
- Unscrew the two nuts securing it to the bracket.
- We unscrew the two threaded connections attaching to the body side member.
- We are reinstalling the node.
- Let's put everything back together.