The power unit of a passenger car, and in particular the Lada Priora, has a mandatory support, one of the elements of which is a pillow. It is precisely this that is necessary for attaching the heavy “engine” to the body. The engine mount itself is, although a simple but necessary special structure, made of rubber and metal, and to be more specific, it consists of a body, respectively, steel and a fairly thick cushion made of rubber.
The so-called 16-valve or 8-valve engine mount functions as a kind of vibration damper emitted by the power plant.
On the popular Lada Priora, 8-valve power units are always attached to the body by one rear and 2 side supports, and 16-valve power units by 2 side and 2 front supports, with one located on top and the other below.
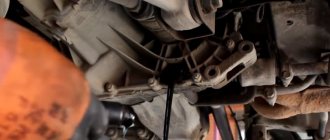
Removing the right support
Remove the generator drive belt (see “Replacing the generator drive belt”). We install an adjustable stop under the engine oil pan.
We put a “17” socket on the nut securing the right support to the engine bracket, and then...
...insert the extension into the head... ...and unscrew the nut.
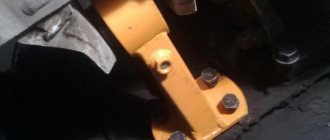
Using a 15mm socket, unscrew the three bolts securing the support bracket to the body side member. Having lowered the bracket with the support down, we remove the threaded part of the support bolt from the hole in the engine bracket and, moving the assembly forward...
...take out the right support with the bracket. Use a Torx E-10 head to unscrew...
...two screws securing the support to the bracket... ...and remove the support from the bracket. To disassemble the support...
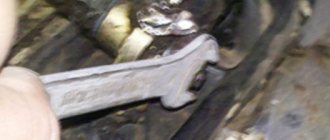
... use a 15mm wrench to unscrew the cushion coupling nut, holding the bolt head with a wrench of the same size.
Right support parts
:1 - nut;2 - upper limiter;3 - cushion;4 - lower limiter;5 - bolt. The cushions of the left and right supports are interchangeable. When assembling the right support, the flanging rings (see the left support) should be facing upward, and the flats of the upper and lower stops, as well as the cushion coupling nut, should be parallel to the axis of the support mounting holes. We assemble the support with the bracket by tightening two screws. We install the right support with the bracket in the reverse order, while...
...the coupling nut 2 of the cushion must be placed in the rectangular socket 1 of the engine bracket.
Replacing the left support is done in two ways
The first involves removing the part assembled with limiters. To complete it you need:
- Tighten the nut from the bottom of the car, which secures the part to the gearbox bracket;
- Unscrew the bolts securing the rod to the body and remove it.
To implement the second option, in which the consumable is disassembled, you will need:
- Unscrew the pillow nut from above;
- Remove the upper limiter;
- Unscrew the bolts securing it to the body;
- Remove the part, then the lower stop;
- Assembly is performed in both cases in reverse order.
Do-it-yourself replacement of engine mount cushions on a Priora
On an 8-valve engine:
- The car must be prepared for repair work; for this purpose it is placed on a flat surface; it is imperative to place stops under the rear wheels and remove the protection of the power unit.
- Cl. 13” remove the bolt holding the generator belt tensioner. We remove the belt.
- We install a jack under the “engine” of the LADA Priora, not forgetting to place a thick board under it, or a regular beam will do. The power unit must be raised so that there is no load on the supports.
- Cl. 15” unscrew the nut of the so-called central fastening directly to the pillow on the right.
- We remove the cl. 13” bolts securing the pillow on the bracket.
- Unscrew the plug. 17” 3 bolts that secure the bracket to the car side member. You can find these bolts on the side of the right arch directly below.
- At this stage, we remove the bracket and replace the old pillow with a new one.
- In the reverse order, we put everything back in its place in exactly the same order.
- Next we jack up the gearbox.
- Cl. 15” unscrew the nut of the so-called central fastening on the left cushion.
- Cl. 13” unscrew the 2 existing bolts securing the supports we are considering.
- We replace the pillow with a new one and assemble everything, observing the sequence in reverse order.
- Cl. at 17”, unscrew the 2nd nuts, they are the ones that secure the support cushion to the body, then the 2nd nuts on the side where the cushion is attached to the gearbox.
- It's time to remove the rear support.
- Cl. 19” unscrew the only nut securing the support pad to the bracket. We replace the pillow with a new one, then collect it in the reverse order.
Replacement work on a 16 valve engine:
The 16 valves located on the side of the engine mount on the LADA Priora are removed and replaced in the same way as on 8-valve engines. In order to replace the pillow from below, you need to work from underneath.
- Cl. 15” remove the only bolt that secures the so-called lower support bar, which is located in front, to the suspension cross member, also located in front.
- Using a pair of 15” wrenches at once, unscrew the nut securing the metal. support to the motor bracket. We remove the bolt with ease.
- We remove the old support, change the pillow, or, if desired/necessary, the entire structure.
- And, don’t forget to collect everything in the reverse order of the given one.
- Under the hood, you need to unscrew the bolt connecting the upper front support and part of the body. We use cl. by 17”, and it is recommended to hold the nut by hand.
- We take out the nut and bolt.
- Cl. 15” unscrew the existing bolt connecting the upper front support and the power device bracket. We remove the nut and, accordingly, do not forget about the bolt.
- We then carry out the now familiar replacement and assemble everything, following the reverse instructions.
When the entire 16-valve engine mount has been replaced, or even if the engine has 8 valves, you need to start the engine and check if vibration is present. If the engine mount is installed correctly and properly secured, then vibration should be completely absent or minimal; detailed instructions can be found here.
What problems do pillows have?
How can the owner of a Lada Priora understand that the engine mount, and its main element - the cushion, have already completely become unusable? When the engine operates in its usual mode, the body begins to rattle quite noticeably, plus vibration, which cannot be ignored, is transmitted to the steering rack, as well as the dashboard, and even to the pedal block. If you notice this, then know for sure that it is the pillows that have worn out and will certainly need replacement.
As a rule, a slight vibration is present when the engine starts, and it is felt when it is completely turned off. When the pillows are completely worn out, a knocking sound often begins to be heard, and it appears due to the contact of the motor with the support.
In order to be completely sure that this is where the problem lies, you need to open the engine compartment and inspect the supports and, without exception, all the pillows. You can feel the force of vibration if you place your palm on the “engine”.
What could be the reasons why the support cushions we are considering fail:
- Due to fairly rapid temperature changes and the natural aging of rubber, cushions lose their elasticity.
- Trace factors influence: temperature/mechanical stress or it happens that deformation is inevitable due to the spent resource
- All kinds of chemical liquids also act, and cracking and even delamination occurs.
When and why do you need to replace pillows with Priora?
There are no specific recommendations on whether it is advisable to replace the support cushions on the most popular Lada Priora at the moment. However, if you are sure that the faulty airbag is obvious, then you should not delay replacing it. Strong vibration significantly reduces driving comfort in a Priora and inevitably leads to negative consequences in the power unit or gearbox.
When deciding to make repairs, you need to decide whether the pillows will be replaced or the supports will be replaced. By and large, if the support, we remind you, which is always made of metal, is not damaged, then there is no need to replace it; it will be enough to purchase and install a worn-out support pad.
On a domestic Lada Priora, a set of support cushions costs around 1.3 thousand rubles. rub. If you purchase assembled supports, it will cost you approximately 2.5 thousand rubles. rub. Plus, you need to calculate the work of a specialist who will carry out the replacement; as a rule, services charge 300 rubles for 1 pillow. However, you can also carry out the replacement yourself. Below we provide detailed step-by-step instructions on how you can do this.
How to check engine mounts
Considering that engine mounts (aka cushions) last an average of 80-100 thousand kilometers, it is not surprising that many car owners are not familiar with the malfunction of these parts. But if the car is no longer new, and increased vibrations have appeared in the engine compartment, then you should think about how to check the engine mounts.
Here we will analyze all the main points regarding fault diagnosis and testing methods. Briefly, information on how pillows are checked is collected in the table, and below we will consider in detail each of their methods. If you are first interested in “what it looks like”, “where it is located” and “why it is needed”, then read the article about engine mounts.
| How can I check | Rubber-metal cushions | Hydraulic supports with mechanical control | Hydraulic supports with electronic vacuum control |
| External inspection of the engine compartment | ✔ | ✔ | ✔ |
| External inspection from below the car | ✔ | ✔ | ✔ |
| Method for checking vibration of a car with automatic transmission | ✔ | ||
| Vacuum hose inspection method | ✔ |
Priora: features of the sedan body
Note that the Priora hasn’t changed much in appearance after the facelift. The difference between it and its pre-restyling version can only be determined by a professional who will immediately notice other body kits and optics.
But much more innovations appeared in the cabin. The dashboard has been changed, a new steering wheel and an ergonomic armrest have been installed. As for the seats, the driver’s seat received comfortable lateral support and an increased range of adjustments by 20 mm. The passenger seats also received the same innovations, where additional airbags were also installed.
VAZ car body structure
A pre-heater from Eberspäscher was introduced into the new Lada Priora. Note that all heater elements are now located behind the bumper, directly under the left front headlight. On the one hand, this is convenient, but on the other hand, in the event of a head-on collision, it will be almost impossible to avoid damage to the element.
The galvanization of the sedan body remained at the same level as before. True, the manufacturer now officially recommends the use of an anticorrosive composition that increases resistance to external influences. This is especially true on city roads, where deicing compounds are used in winter.
Improved paintwork. Paint is now supplied to AvtoVAZ from the number 1 company in the world - PRG, whose products can hardly be suspected of poor quality. On the other hand, many contradictory reviews are posted in forums, where for the most part owners of new Priors complain specifically about the paintwork. The paint is weak, and after driving, even for a short time, small chips appear on the body, which subsequently rust very quickly.
As for the suspension, an independent MacPherson strut is installed at the front and a beam at the rear. At the production stage, elastic elements of shock absorber struts were used in the suspension assembly. They have increased rigidity at the end of the compression stroke.
The main drawback, as always, is the level of ShVI. The roar of the engine can be heard in the cabin even at idle, and when driving the noise almost completely drowns out the music at medium volume. In addition, rear row passengers also hear the wind whistling outside the window. Without additional testing, it is better not to get into the new Priora, just like the old one.
VAZ car body diagrams
Another weak point is the plastic lining of the cabin, which makes extraneous sounds even in the initial stages of operation. The door trim and gear knob rattle the most, the eyeglass case and rear parcel shelf rattle less.
As for the price for revision and modernization, it varies. So, to install an additional shvi, you will only have to spend about 20 thousand rubles to eliminate rattling. Although, if you manage to carry out proper sound insulation with your own hands, the procedure will cost several times less.
The cost of painting a Priora body part will cost 10.5 thousand rubles. But to paint the entire body, you will need to part with 55 thousand rubles.
Today, when purchasing a Priora at dealerships, the client is provided with a wide range of additional equipment, including not only anti-corrosion treatment of the underbody and hidden areas of the body, but also treatment of the fender liner.
Body of lada 2170 priora
The trunk of the new Priora is just as roomy. Up to 430 liters of cargo can be placed here. The ground clearance is 16.5 cm, which allows the body to travel off-road in the countryside without any danger to the body. The Priora is easy to drive on snow, although this largely depends on the condition of the tires.
Types of supports
The Lada Priora has 4 airbags installed on the left and right of the engine, as well as in the front and rear. It should be noted that only engines with 16 valves have 4 supports, while in an 8-valve engine there are only 3 supports.
Right
The right (upper) support is located near the gas distribution mechanism (GRM). Designed to connect the engine to the car body via rubber, to cushion it and dampen vibrations. This support also limits the longitudinal movement of the engine in the engine compartment.
Left
The left support (lower) is installed between the gearbox and the car body. It serves in the same way as the right one to dampen engine vibrations during its operation, as well as to limit its longitudinal movements during movement or work.
Do-it-yourself replacement of engine mount cushions on a Priora
On an 8-valve engine:
- The car must be prepared for repair work; for this purpose it is placed on a flat surface; it is imperative to place stops under the rear wheels and remove the protection of the power unit.
- Cl. 13” remove the bolt holding the generator belt tensioner. We remove the belt.
- We install a jack under the “engine” of the LADA Priora, not forgetting to place a thick board under it, or a regular beam will do. The power unit must be raised so that there is no load on the supports.
- Cl. 15” unscrew the nut of the so-called central fastening directly to the pillow on the right.
- We remove the cl. 13” bolts securing the pillow on the bracket.
- Unscrew the plug. 17” 3 bolts that secure the bracket to the car side member. You can find these bolts on the side of the right arch directly below.
- At this stage, we remove the bracket and replace the old pillow with a new one.
- In the reverse order, we put everything back in its place in exactly the same order.
- Next we jack up the gearbox.
- Cl. 15” unscrew the nut of the so-called central fastening on the left cushion.
- Cl. 13” unscrew the 2 existing bolts securing the supports we are considering.
- We replace the pillow with a new one and assemble everything, observing the sequence in reverse order.
- Cl. at 17”, unscrew the 2nd nuts, they are the ones that secure the support cushion to the body, then the 2nd nuts on the side where the cushion is attached to the gearbox.
- It's time to remove the rear support.
- Cl. 19” unscrew the only nut securing the support pad to the bracket. We replace the pillow with a new one, then collect it in the reverse order.
Replacement work on a 16 valve engine:
The 16 valves located on the side of the engine mount on the LADA Priora are removed and replaced in the same way as on 8-valve engines. In order to replace the pillow from below, you need to work from underneath.
- Cl. 15” remove the only bolt that secures the so-called lower support bar, which is located in front, to the suspension cross member, also located in front.
- Using a pair of 15” wrenches at once, unscrew the nut securing the metal. support to the motor bracket. We remove the bolt with ease.
- We remove the old support, change the pillow, or, if desired/necessary, the entire structure.
- And, don’t forget to collect everything in the reverse order of the given one.
- Under the hood, you need to unscrew the bolt connecting the upper front support and part of the body. We use cl. by 17”, and it is recommended to hold the nut by hand.
- We take out the nut and bolt.
- Cl. 15” unscrew the existing bolt connecting the upper front support and the power device bracket. We remove the nut and, accordingly, do not forget about the bolt.
- We then carry out the now familiar replacement and assemble everything, following the reverse instructions.
When the entire 16-valve engine mount has been replaced, or even if the engine has 8 valves, you need to start the engine and check if vibration is present. If the engine mount is installed correctly and properly secured, then vibration should be completely absent or minimal; detailed instructions can be found here.
Replacing the optional top cushion:
This cushion is also not difficult to remove, it is attached in the same way to one bolt with a cage nut (This nut is indicated by a green arrow in the small photo and most importantly, when you unscrew the bolt, do not lose this nut, be sure to hold it) and to another bolt , but only at the end of which a regular nut is screwed in (the approximate location of this nut is indicated by a blue arrow, and its bolt is shown in red), when these two bolts are removed, you can remove the upper support and put a new one in its place.
Additional video clip: If you suddenly want to understand what kind of airbags are generally installed on 16 valve cars of the tenth family and the Priora family, and also if you suddenly wonder how they can be distinguished from each other, then in this case, watch the video clip just below :
Note! Always remember one thing, we do not recommend removing several cushions that secure the engine at once (Only if you do not remove it), otherwise, when all the cushions are removed, the engine simply will not be attached to the body with anything other than Moreover, if one pillow has been removed and you decide to also remove the second one so that you can install both of them later, we don’t recommend doing this either, because it will be difficult to combine the pillows with the bolt holes, it’s best to change one at a time and after replacing, move on to the others immediately , if true and they must be replaced!
Source
Operational and technical characteristics
The VAZ 2171 Priora station wagon is a budget car and its technical parameters do not stand out in any way from the general background of AvtoVAZ products.
Power unit
The Priora 2171 station wagon was equipped with two VAZ-made engines with technical characteristics:
| Power unit type | VAZ 21116 | VAZ 21126 |
| Options | Meaning | |
| Volume, cubic cm. | ||
| Power, l. With. (6000 rpm) | ||
| Torque, Nm | 140 (at 3800 rpm) | 145 (at 4000 rpm) |
| Number of valves per cylinder | ||
| Supply system | controlled multipoint fuel injection | |
| Gasoline AI-95 | ||
| Fuel consumption, l/100 km. (city/highway/mixed) | ||
| Motor resource, thousand km |
When assembling the engines, American-made parts and components were used:
- 39% lighter connecting rod and piston group - manufactured by Federal Mogul;
- The timing belt and tensioner pulley are from Gates Rubber Company.
The engines are powered by a standard VAZ 5-speed manual transmission with a reinforced clutch. The gearbox drive is made on closed type bearings.
Chassis
The chassis is structurally a long-proven, but somewhat modernized, “figure-of-eight”. The independent front suspension of the VAZ 2171 - McPherson with barrel springs - is made according to a scheme with straight forged arms and diagonal reaction rods. At the rear there is a torsion beam with new shock absorbers and springs that are stiffer than those of the sedan. Anti-roll bars are installed at the front and rear. According to experts, the chassis of the VAZ 2171 Priora station wagon is ideally suited to the domestic road surface. Its stability is not affected by changes in the profile of suburban highways, and you can drive along a road covered with potholes without slowing down.
Important! During vigorous maneuvering at high speed, the body begins to sway strongly, but this driving style is not the standard mode of a family station wagon.
Operating parameters of the VAZ 2171 Priora
| Parameters of VAZ 2171 Priora | Unit | Meaning |
Overall dimensions of VAZ 2171 Priora:
| ||
| Wheelbase of VAZ 2171 Priora | ||
| ||
| ||
| Fuel tank capacity | ||
| Maximum speed | ||
| Acceleration up to 100 km/h | ||
| Tire size: | 185/65 R14 86(H) 175/65 R14 82 (H) 185/60 R14 82 (H) |
Approximate prices
A support bearing without support on a Priora will cost 500-800 rubles . When assembled with a support, the car part will cost approximately three times more. Typically, bearings are purchased together with the support. The estimated cost of such spare parts, depending on the manufacturer, is given below:
- AvtoVAZ - from 1700 rubles.
- SEVI - about 1200 rubles.
- SS20 – from 1500 to 3400 rubles.
- BRT – 1600 rubles.
- AMT – from 1500 rubles.
BRT A used car part can be purchased for 200-900 rubles , depending on the type and condition.
Car body stiffness table
| car model | Hardness, Nm/deg |
| Alfa Romeo 147 3d | 18800 |
| Alfa Romeo 147 5d | 16250 |
| Alfa Romeo 156 | 18800 |
| Alfa Romeo 159 | 31400 |
| Alfa Romeo 166 | 24400 |
| Alfa Romeo MiTo | 17650 |
| Aston Martin DB9 Convertible | 15500 |
| Aston Martin DB9 Coupe | 27000 |
| Aston Martin Vanquish | 28500 |
| Audi A2 | 11900 |
| Audi A8 D2 | 25000 |
| Audi A8 D3 | 36000 |
| Audi A8 D4 | 45000 |
| Audi R8 | 40000 |
| Audi TT Coupe mk1 | 19000 |
| Audi TT Roadster mk1 | 10000 |
| Audi TT Roadster mk2 | 22000 |
| Bentley Azure | 18000 |
| Bentley Continental Supersports | 24000 |
| Bentley Flying Spur mk2 | 36500 |
| BMW 7 series E65 | 31200 |
| BMW 7 series F01 | 37500 |
| BMW E34 | 17200 |
| BMW E36 Touring | 10900 |
| BMW E39 | 24000 |
| BMW E46 Convertible | 10500 |
| BMW E46 Coupe | 12500 |
| BMW E46 Sedan | 13000 |
| BMW E46 Wagon | 14000 |
| BMW E60 | 24000 |
| BMW E90 | 22500 |
| BMW F10 | 37500 |
| BMW F30 | 25000 |
| BMW X5 E53 | 23100 |
| BMW X5 E70 | 28000 |
| BMW Z3 mk1 | 5600 |
| BMW Z4 Coupe mk1 | 32000 |
| BMW Z4 Roadster mk1 | 14500 |
| BMW Z8 | 40000 |
| Bugatti EB110 | 19000 |
| Bugatti Veyron | 50000 |
| Chevrolet Corvette C5 | 9100 |
| Chrysler Crossfire | 20140 |
| Citroen Picasso mk1 | 17000 |
| Daewoo Lanos 3d 1997 | 10500 |
| Daewoo Nubira 1997 | 14500 |
| Dodge Durango mk1 | 6800 |
| Dodge Viper Coupe mk2 | 7600 |
| Ferrari 360 Spider | 8500 |
| Ferrari 575M Maranello | 14700 |
| Ferrari F50 | 34600 |
| Fiat Brava | 9100 |
| Fiat Bravo | 10600 |
| Fiat Punto 3d | 19700 |
| Fiat Tempra | 6700 |
| Ford Fiesta 3d 1995 | 6500 |
| Ford Focus 3d mk1 | 19600 |
| Ford Focus 5d mk1 | 17900 |
| Ford GT | 27100 |
| Ford GT40 MkI | 17000 |
| Ford Maverick 5d 1995 | 4400 |
| Ford Mustang 2003 | 16000 |
| Ford Mustang 2005 | 21000 |
| Ford Mustang Convertible (2003) | 4800 |
| Ford Mustang Convertible (2005) | 9500 |
| Jaguar XK mk2 | 16000 |
| Jaguar X-Type Estate | 16300 |
| Jaguar X-Type Sedan | 22000 |
| Koenigsegg Agera | 58000 |
| Koenigsegg Agera R | 65000 |
| Koenigsegg CC-8 | 28100 |
| Lamborghini Aventador | 35000 |
| Lamborghini Gallardo | 23000 |
| Lamborghini Murcielago | 20000 |
| Lancia Kappa Coupe | 27350 |
| Land Rover Freelander 2 | 28000 |
| Lexus LFA | 39130 |
| Lotus Elan | 7900 |
| Lotus Elise S2/Exige (2004) | 10500 |
| Lotus Esprit SE Turbo | 5850 |
| Maserati Quattroporte 2008 | 18000 |
| Mazda CX-5 | 27000 |
| Mazda CX-7 | 23700 |
| Mazda Rx-7 FD | 15000 |
| Mazda Rx-8 | 30000 |
| McLaren F1 | 13500 |
| Mercedes SL R230 | 16400 |
| Mercedes SL R231 | 19400 |
| Mercedes SLS Roadster | 18000 |
| Mercedes E-Class W212 | 29920 |
| Mercedes S-Class W221 | 27500 |
| Mercedes S-Class W222 | 40500 |
| Mini (2003) | 24500 |
| Nissan Micra 1995 | 4000 |
| Nissan Prairie 4×4 5d 1995 | 7500 |
| Nissan Sunny 3d 1995 | 8200 |
| Opel Astra 3d 1998 | 10500 |
| Opel Astra 4d 1998 | 11900 |
| Opel Astra 5d 1998 | 11700 |
| Opel Combo 1999 | 18500 |
| Opel Corsa 3d 1995 | 6500 |
| Opel Corsa 3d 1999 | 8000 |
| Opel Omega 1999 | 13000 |
| Opel Vectra 4d 1999 | 8800 |
| Pagani Zonda C12 S | 26300 |
| Pagani Zonda F | 27000 |
| Pagani Zonda Roadster | 18000 |
| Peugeot 206 CC | 8000 |
| Peugeot 407 | 22700 |
| Porsche 911 Carrera S 991 | 30400 |
| Porsche 911 Turbo 993 | 13500 |
| Porsche 911 Turbo 996 | 27000 |
| Porsche 911 Turbo 996 Convertible | 11600 |
| Porsche 911 Turbo 997 | 34000 |
| Porsche 959 | 12900 |
| Porsche Carrera GT | 26000 |
| Porsche Cayman 981 | 42000 |
| Porsche Panamera | 25000 |
| Range Rover mk3 | 32500 |
| Renault Sport Spider | 10000 |
| Renault Twingo 1995 | 14200 |
| Rolls-Royce Phantom | 40500 |
| Saab 9-3 Cabriolet mk2 | 11500 |
| Saab 9-3 Sedan mk2 | 22000 |
| Saab 9-3 Sportcombi mk2 | 21000 |
| Seat Leon 2005 | 23800 |
| Toyota Corolla 3d 1995 | 10500 |
| Toyota Prius 2001 | 22700 |
| Toyota Starlet 5d 1995 | 7600 |
| Volkswagen Fox 2007 | 17900 |
| Volvo S60 mk1 | 20000 |
| Volvo S80 mk1 | 18600 |
| VW Golf V GTI | 25000 |
| VW Passat B6 | 32400 |
| VW Phaeton | 37000 |
| VAZ-1111E Oka | 7000 |
| VAZ-21043 | 6300 |
| VAZ-2105 | 7300 |
| VAZ-2106 | 6500 |
| VAZ-2107 | 7200 |
| VAZ-21083 | 8200 |
| VAZ-21093 | 6800 |
| VAZ-21099 | 5500 |
| VAZ-2110 | 8000 |
| VAZ-21102 | 8400 |
| VAZ-21106 | 12200 |
| VAZ-21106 (racing) | 51800 |
| VAZ-21108 Premier | 10500 |
| VAZ-21109 Consul | 14300 |
| VAZ-2111 | 7400 |
| VAZ-2112 | 8100 |
| VAZ-2115 | 5500 |
| VAZ-2120 Nadezhda | 10000 |
| VAZ-21213 Niva | 8900 |
| VAZ-2123 Chevy Niva | 12000 |
| VAZ-2131 Niva | 7400 |
| GAZ-M20 Pobeda | 4600 |
| MZMA-400 Moskvich | 2500 |
Of course, torsional rigidity of the body is one of the most important indicators of a modern car. Let's hope that over time, our engineers will come up with more efficient designs and improve the design so that domestic cars occupy the top positions in the ranking of the best cars in the world for this indicator.
Types of auto parts
According to the load distribution, the support bearing on the Priora can be of the following types:
- Thrust-radial (accepts mostly axial and small radial loads).
- Thrust (accepts only axial load).
- Radial thrust (accepts combined radial and axial load).
Structurally, the following types of spare parts are distinguished:
- With outer detachable ring.
- With outer or inner built-in ring.
- Single split type.
- With internal detachable ring.
Based on their ability to compensate for shaft misalignments, parts are divided into the following types:
Based on the number of rows of rolling elements, an auto part can be:
According to the shape of the rolling body, the part can be:
You can take a support bearing for the front or rear strut.
According to the manufacturer, spare parts for Priora are:
- Original (from the AvtoVAZ plant).
- Non-original (any other company).
You can buy a car part of the following brand:
Support bearings are sold without support and with support. Depending on the condition, the spare part can be taken:
You can purchase the required part for Priora at the following points of sale:
- Automotive market.
- Special shop.
- Auto disassembly point.
- Advertisements from private individuals.
- An online store specializing in the sale of auto parts.
SS20
Station wagon body 2111
The department of the main design bureau of AvtoVAZ came up with the newest model of the body, which immediately received the trust of designers and became a kind of base for all body modifications of the 10th family. It was on the station wagon that a new type of glazing was first implemented.
VAZ 2111 body
Unlike the previous station wagon, a different steering wheel was installed in the new one. This one was much softer and safer. As for the interior, its equipment was made in accordance with European standards and safety requirements.
As for the luggage compartment of the new station wagon:
It made it possible to transport a considerable load, and if the rear sofa and the front passenger seat were folded, the car turned into a real truck, where you could put pipes up to 170 cm long and calmly close the back door.
VAZ 2111
The huge advantages of the station wagon over other models could not but affect its cost. From the moment the car was released, the price was high: in the range from 212 to 240 thousand rubles. As for competition with foreign cars, the 2111 station wagon was significantly cheaper than foreign models similar to it in class and body style.
The “conveyor” career of the 2111 station wagon ended at the Togliatti plant at the beginning of 2009, when it was decided to produce another station wagon - the Lada Priora.
The license to produce the station wagon is being purchased by the Ukrainian Bogdan. Only the Ukrainian version of the station wagon differed from the Russian one: the door panel trim was different, as was the dashboard.
Watch an interesting video about the body of the VAZ 2111
https://youtube.com/watch?v=KoVgxS0pbKs
VAZ bodies continue to be modernized today. Time does not stand still. Every year new technologies are introduced, equipment is changed, staff are retrained and retrained. Videos and photos will help you learn more about VAZ bodies. As for repairing damaged parts with your own hands, step-by-step instructions are provided for this, posted on our website.
Replacing the Priora strut supports
It must be said right away that, contrary to the stories circulating on the Internet, these chassis elements are replaced only with the rack completely removed. Dismantling the rack itself is not such an epoch-making undertaking and has been described many times. Well, replacing the supports themselves only requires the presence of a special device - a spring tensioner. A special device mounted in such a way that when the central rod rotates, the threaded “legs” attached to it move or move apart, fixing the spring in one position. This is necessary because the upper cup of the spring rests against the lower part of the support. When this device is installed and the spring is fixed in one position, all that remains is to unscrew the rod nut with a 22mm wrench. That's all. The element is easily removed and can be easily replaced with a new one.
Now you can assemble everything in reverse order, observing safety precautions. Upon completion of all work, take the car to a service center that will adjust the wheel alignment. This is a must!
The video shows the replacement of the rear strut and strut support of the Priora:
Manufacturers and prices of analogues
Powertrain cushions for Lada Priora are produced by many manufacturers. The most common brands are:
- BRT - parts from the famous Balakovo Rubber Products Plant;
- Lada Detal – original Lada spare parts from conveyor suppliers, in particular AvtoVAZ subsidiary VIS;
- Riginal is a fairly young brand of PKF Niagara.
Technologies of the future - rods of a new type are produced under this brand.
The cost of spare parts from these manufacturers is approximately the same, the difference in price depends mainly on the specific store. Some companies supply kits for replacing all suspension elements of the power unit at once. Such a purchase is usually more profitable than purchasing spare parts separately.
Prices and articles
Below is a table of prices and article numbers for Lada Priora engine mounts depending on the model, type and manufacturer.
| Support type | Manufacturer | vendor code | Price, (rubles) |
| Left | BRT | 2110-1001242/55 | 540 |
| Right | BRT | 2110-1001242/14 | 495 |
| Rod (S.O.) | VIS | 2112-1001300 | 705 |
| Rod (N.O.) | Drive | 2112-1001300 | 660 |
| Gearbox support 8kl. | SEVI EXPERT | 5104 | 660 |
Replacement
The process of replacing Lada Priora engine mounts is described below, as well as the tools that will be needed to carry out this work. By following these step-by-step instructions, work on replacing the Priora engine mounts can be carried out without much effort in the shortest possible time.
Required tool:
- Ratchet with 13, 15, 17mm heads. Head Torx E10;
- Open-end or socket wrenches 13, 15, 17 mm;
- Jack;
- Part of a wooden board;
Replacing the right support
If the car has a crankcase protection installed, it must be removed.
We jack the engine into the crankcase, placing the support through a wooden board.
Unscrew the central nut securing the support to the engine bracket.
Unscrew the fastenings of the support to the body.
Lower the engine slightly with a jack. This is necessary for easier dismantling of the unscrewed support.
Install the new support in reverse order
Replacing the left support
Replacing the left support is done in the same way as the right one, only the jack must be installed under the gearbox. The emphasis must be made through a wooden lining.
Replacing guitars
Replacing guitars is quite simple and effortless.
Using a 15 mm wrench, unscrew the bolt securing the guitar to the car body and remove it.
Using a 15 mm wrench, unscrew the bolt securing the guitar to the engine bracket and remove it, and then the support itself.
Install the new support in reverse order.
Replacing the lower guitar follows similar instructions.
Tightening guitars must be done with the engine running.
Replacing the lower support on 8-valve internal combustion engines
Work on replacing the lower support on 8-valve engines must be carried out from the inspection hole.
We unscrew the 2 nuts securing the rubber part of the cushion, which is attached to the car body.
Unscrew the two bolts securing the cushion to the gearbox housing and remove the cushion.
Installation is carried out in reverse order.
Source
Installing an additional gearbox cushion
The Priora already has the holes necessary to install this pillow, so in addition to the spare part itself with article number 2110-1001280, you will only need fasteners:
- 2 bolts M12x75.
- 2 self-locking nuts M12.
- 4 washers for M12 bolts.
- 2 bolts M10x30 with a thread pitch of 1.25 (for some cars a thread pitch of 1.5 is suitable).
- 2 engravers for M10 bolts. 8 wide washers for M10 (can be replaced with a smaller number when using thick washers, for example, from the cylinder head).
The replacement technology itself
- The part is attached to the gearbox bracket using M12 bolts with self-locking nuts.
- The washers are placed under the bolt head and under the nut.
- M10 bolts are screwed into the body. Between it and the rod body, you need to place washers so that the rubber rod does not touch the body.
To replace this rod, which will also be required over time, just unscrew the fasteners and replace the old one with a new one.
The good condition of the Priora engine mounts is the key to comfortable movement. At the same time, if you have a suitable tool, replacing components will not be difficult.
Salon
The interior design, even for 2007, was already outdated. Almost every car enthusiast has said this. The front fascia design is reminiscent of early 2000s Fords. The steering wheel is four-spoke, without buttons. The instrument panel is pointer, with a digital odometer. On the center console there is an analog clock (similar to the “tenth” family) and a heater control unit. The radio was not present - only audio preparation (and regardless of the configuration of the Lada Priora station wagon). The seats are fairly flat, but there is a small center armrest. There are two airbags. Expensive versions have air conditioning and an alarm system. The latter caused many problems for the owners. So, sometimes the central locking did not work. After pressing the button, some of the doors did not close or open.
Another problem of the Lada Priora (including the station wagon) is poor sound insulation. This disease has been plaguing VAZ cars for more than one year (fortunately, this chain ended at Vesta). The plastic rattles loudly inside, the door trim, the drawstring and the rear parcel shelf vibrate. Almost every owner of the Lada Priora station wagon tried to overcome this problem on their own. But in order to “make noise” around the car, you need to spend at least ten thousand rubles on materials. In this case, you will have to completely disassemble the interior. And at a service station the price of such a service will be about 20 thousand rubles.
Another problem is the stove. The Priora uses a motor with micromotor gearboxes that switch the dampers. These gearboxes often fail, causing the stove to blow in only one direction. Sometimes the dampers themselves jam. As a result, air is pumped by the motor, but cannot enter the cabin (or it does, but poorly).
How to check the engine mount
There are several basic methods for checking engine mounts. Two are universal and are used both for diagnosing traditional rubber-metal ICE mounts and hydraulic mounts. If you have a Toyota, Ford or another foreign car that has hydraulic mounts installed, then checking the functionality of the engine mounts can be done using other methods, including even using a smartphone. Let's look at them all in detail.
Checking rubber-metal engine mounts
The first method , which will help determine the malfunction, is the simplest, but the least informative. Open the hood, ask the assistant to start the engine, and then slowly move away, driving literally 10 centimeters, then turn on the reverse gear and move back. If the engine changes its position as a result of changing vehicle driving modes, or it vibrates too much, most likely the problem is in the airbags. This method is best suited for checking the right, or upper, engine mount - it is clearly visible under the hood. However, several airbags or a problem with the lower support may fail at once, so it’s worth moving on to the next option.
The second method will help make sure that the integrity has been damaged and check the condition of all the pillows . It will require a pit or overpass, a jack, a support or prop, a pry bar or a strong lever. Then follow the algorithm.
Checking the hydraulic cushion with the engine running
Visual inspection of the rubber-metal support
What can you see when examining them? Traces of destruction or damage to the structure, ruptures, cracks, delamination of the rubber layer, detachment of rubber from the metal part. During the inspection, special attention should be paid to the junction of rubber and metal.
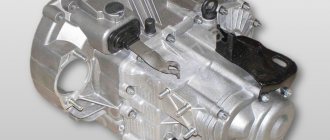
Lada Priora (2013+). Removal and installation of the VAZ-21126, -21127 engine
We carry out work when it is necessary to repair the engine or replace it.
Relieve the pressure in the engine power supply system (see “Replacing the fuel filter”) and disconnect the fitting of the fuel supply tube to the ramp from the tip of the fuel hose (see “Removing the cylinder head”).
Disconnect the wire terminal from the negative terminal of the battery. We drain the engine oil (see “Changing the engine oil and oil filter”) and coolant (see “Replacing the coolant”).
We disconnect the engine control system wiring harness block from the canister purge solenoid valve, remove the valve from the plastic engine cover (see “Removing the canister purge solenoid valve”) and move the valve to the side without disconnecting the hoses from it.
We remove the air filter along with the mass air flow sensor (see “Removing the air filter”) and the air supply hose to the throttle assembly.
Disconnect the end of the throttle drive cable from the drive sector (see “Replacing the throttle drive cable”).
Remove the vacuum brake booster hose from the intake manifold (see “Removing the intake manifold”). Remove the fuel vapor supply hose from the throttle assembly fitting (see “Removing the throttle assembly”).
We disconnect the wiring harness blocks of the engine control system from the idle speed regulator and sensors: oxygen concentration, detonation, low oil pressure indicator, coolant temperature, coolant temperature indicator, phases, crankshaft position, throttle position, rough road (see the corresponding chapters : “Engine”, “Power system”, “Engine control system”).
Remove the rough road sensor together with the bracket from the right mudguard cup (see “Removing the rough road sensor”).
We remove the generator (see “Removing the generator”). Remove the crankcase ventilation idle circuit hose from the cylinder head cover fitting and disconnect the engine management system wiring harness brackets from the cylinder head cover (see “Removing camshafts and replacing valve lifters”).
Unfasten or cut two layers of mass clamps securing the wiring harness of the engine management system to the rear timing cover (see “Removing the coolant pump”).
Disconnect the end of the ground wire of the engine management system wiring harness from the cylinder head and remove the end of the ground wire coming from the battery from the thermostat housing mounting stud (see “Removing the cylinder head”). We move the wiring harnesses away from the engine to the side.
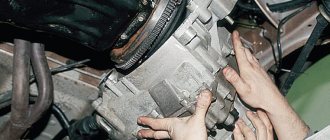
We disconnect the pipe of the additional muffler from the catenary collector (see “Replacing the gasket in the connection between the catalytic collector and the additional muffler”). We remove the gearbox (see “Removing the gearbox”), the “basket” and the driven clutch disk (see “Removing clutch parts”).
Use a Phillips screwdriver to loosen the clamp securing the radiator supply hose...
...and remove the hose from the thermostat housing pipe. Similarly, remove the radiator outlet hose from the thermostat cover.
Use a Phillips screwdriver to loosen the clamp securing the inlet hose of the expansion tank...
...and remove hose 1 from the thermostat housing pipe. Similarly, remove the heater inlet hose 2 from the thermostat housing pipe, and the heater outlet hose 3 from the coolant pump inlet pipe.
Having removed the hood stop from the socket in the fender, and placing a rag between the hood and the windshield, set the hood to a vertical position.
To attach the lifting chain...
Having tightened the chains, we remove the adjustable stop from under the engine, which supported it when removing the gearbox.
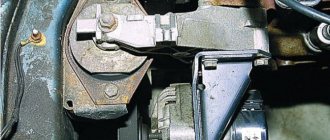
Disconnect the front and rear supports from the engine brackets.
We unscrew the three bolts securing the right support bracket to the body side member without disconnecting the support from the engine bracket (see.
“Removing the power unit supports”).
Before removing the engine, you need to check that all hoses, tubes, and wires are disconnected from the engine and laid aside.
Using a lifting device, remove the engine from the engine compartment. We install the engine on the car in reverse order.
Replacing the right (upper) engine mount of a Priora car is carried out in a similar way:
- The central nut securing the support to the engine bracket is unscrewed.
- The two bolts securing the part to the body are unscrewed. As a rule, they have heads - Torx E10, but on some Priors there are ordinary hexagonal 13 keys;
- The front upper rod can be removed together with the bracket by unscrewing the three bolts located on the inside of the wheel arch.
- It will be more convenient to get the consumable with the bracket if you remove the generator belt;
- For replacing the upper and lower rods. It is enough to unscrew two bolts: one from the side of the power unit, the other from the body.
When replacing the top cushion, the nut of the bolt securing the rod to the body can cause difficulty: it is hidden from view and sometimes turns. To unscrew the bolt without any problems, you need to fix the nut with a flat screwdriver.
To achieve the effect, it is better to simultaneously replace all elastic suspension elements of the power unit.
What we see after replacing engine mounts
Having installed new original power plant mounts, we naturally feel a significantly lower level of vibration. And not only! After the repair, the gears engage more clearly, the comfort of movement on a dirt road increases noticeably, and the engine becomes 1-3 cm higher. But the vibrations of the manual gearbox lever do not always go away.
Sources
- https://KrutiMotor.ru/proverka-podushek-dvigatelya/
- https://www.kolesa.ru/article/gidroopora-dvigatelya-kak-ustroena-kak-ee-diagnostirovat-i-mozhno-li-remontirovat
- https://tuning-mg.ru/ustrojstvo/iznos-podushek-dvigatelya.html
- https://avtika.ru/kak-proverit-podushki-pod-dvigatel/
- https://bibika.pro/kak-proverit-podushki-dvigatelya-vse-ob-avto/
- https://autobann.su/diagnostika-podushek-dvigatelya.html
Reviews after installing the rear gearbox support
The purpose of the rear mount of the power unit with the engine is to reduce the load on the front and rear engine mounts and reduce the rolling of the gearbox. In other words, after installing the additional gearbox support:
- The engine jerks less when starting to move, when changing gears or when you sharply press/release the gas pedal;
- The rattling of the gearshift knob has decreased;
- Shifting into gears has become clearer, especially 2nd.
Many Lada Priora car owners notice that after installing an additional airbag, vibration appears at idle, the reasons may be the following:
- the engine mount is made of low-quality rubber, it is better to choose another manufacturer, for example, BRT;
- The gearbox cushion is not installed correctly (in tension), as a result of which it does not dampen vibration from the power unit;
- other engine mounts are worn.
Have you installed an additional gearbox cushion on your Priora? Share your feelings after revision. Let us remind you that body reinforcements/struts are also very popular among car enthusiasts?
Source
Signs and causes of engine mounting problems
The main symptoms of faulty engine mountings are as follows:
- strong vibration on the steering wheel when the engine is running;
- knocking in the gearbox installation area when driving over uneven surfaces;
- jerks in the transmission while driving and changing gears at high speed;
- knocking under the hood when overcoming a rough road, as well as at idle and when the load changes while the engine is running;
When these signs appear, it is worth diagnosing the pillows. You can do this yourself.
Typical faults
If, while driving a car, a characteristic knocking noise has become clearly audible from under the hood, more precisely, from under the lower part of the engine or in the transmission area, if noise and vibration increase during the switching from 2nd to 4th gear, then this may be associated with malfunctions in the suspension or engine operation. Depending on the condition of the road surface, these sounds may become louder.
If the car is operated for a long time under conditions of severe loads or temperature changes, then all this does not have the best effect on the condition of the engine mounts. Over time, rubber loses its elasticity. In addition, the pillow may delaminate or crack, or even collapse.
But it is worth considering that the service life of these parts is quite long - more than 100,000 km. The supports are subjected to high loads when the vehicle starts and during braking. If the car owner likes to drive fast enough, with sharp jerks at the start, then the supports will not last their intended period.
Also among the typical faults is the breakdown of a metal aluminum bracket. This often happens when hitting a different obstacle. If there are oil leaks in the engine, it will definitely get onto the rubber part of the support. This lubricant can corrode the silent block and the support will fail.
Coolant also does not have the best effect on the rubber part of the cushion. Breakdowns in the system must be eliminated immediately. Do not overheat the engine. In addition to the cracked cylinder head, antifreeze from the expansion tank will also get onto the rubber parts. This will not have the best effect on their resource.
Torn engine mount: signs
Like any other part, the power plant support also has a limited service life and eventually fails. On average, airbags on modern cars are designed to last at least 100-120 thousand km, although in practice these elements may need to be replaced both earlier and much later than this period.
Usually the cause of problems is the rubber insert, which simply cracks and breaks under load. Less often, cracks appear in the metal part of the support, the installation sites of fasteners are broken, etc.
One way or another, the following symptoms usually indicate a malfunction of the engine mounts:
- The engine itself runs smoothly, but the driver feels a clear increase in vibrations in the body, on the steering wheel, on the gearshift knob, etc.;
- When you start moving from a standstill, as well as during braking, you can hear clicking or muffled knocking in the engine compartment;
- When driving on an uneven road, impacts are heard from the front of the car; in many cases such impacts are felt on the gearshift lever; shifting gears with a manual transmission at this moment can be difficult;
To check the engine mounts, it is not necessary to immediately go to a service station and drive the car to a stand. Usually, a fault can be identified and localized on your own, even if you do not have much experience in car repair and maintenance.
The simplest method of initial diagnosis is to rock the engine with your hands in the engine compartment, after which you can localize a torn or cracked support by knocking.
To carry out a more detailed check, you first need to find out in advance where exactly the supports are located on a particular model. Then the elements available for review will need to be pre-inspected. Cracks, breaks and other damage are usually visible and easily visible.
For a full visual assessment of the lower airbags, you need to be prepared for the fact that the car will need to be parked in a garage with an inspection hole, driven onto an overpass, or using a lift.
If a superficial diagnosis shows nothing, then the assistant should be used again. One person uses a pry bar to move the support, while the other watches for tears in the rubber insert at the very moment the support moves. It happens that some cracks are not immediately visible without rocking.
As for the replacement itself, replacing the top cushion is quite simple. The car needs to be jacked up, the old cushion removed and a new one installed. If you have to change the lower supports, it is also important to consider that the engine goes down after removing this cushion. This means that you will need an additional support that supports the internal combustion engine, allowing you to direct the cushion and properly secure this element.
Signs of wear on engine mounts
- Engine vibration at idle.
- Extraneous knocks while driving, felt in the engine compartment or under the gearbox.
- Jerks during dynamic acceleration of the car.
- Knocks in the engine compartment when starting or stopping the engine.
- Difficulty shifting gears.
On cars with hydraulic supports, in addition, acceleration dynamics may deteriorate. Visually, faulty airbags can be identified by delamination and ruptures of rubber dampers or breakage of aluminum brackets. An experienced specialist can also visually identify a sagging pillow by how severely its damper is deformed.