Lada 2110 PhiX › Logbook › Removing jet thrust from a VAZ 2110 gearbox
Hi all!
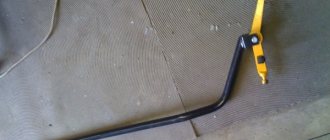
In continuing the struggle with vibrations and rattling of the gearbox lever, I decided to get rid of the gearbox torque rod. I decided to return to this problem after the gearbox lever, in which I had once filed a bushing, began to rattle again. www.drive2.ru/l/2052503/ I thought for a long time about how to calm the jet thrust without removing it, and some time ago I converted the jet thrust hinge into some kind of silent block. www.drive2.ru/l/3350393/ I was very pleased with the result of this modification, the creaking of the old joint disappeared and the gears began to fit noticeably better. But over time, I noticed an increase in vibrations on the gearshift lever and transmission noises appeared, the 3rd gear became especially audible, the sound resembled the work of worn gears or bearings. I tried to loosen the tightening on that same silent block, but nothing changed.
Having studied the unit in detail, I realized that no matter how you look at it, jet thrust will always be a source of noise and vibration.
It is attached directly to the engine and here you have the choice of either play of the standard joint and soft gear shifting, or a clamped connection with clear gear shifting and an abundance of vibrations.
After weighing all the pros and cons, I decided to completely get rid of jet propulsion.
You can’t just take jet thrust and throw it away. In this case, the gearbox ball joint cushion will remain loose, and the lever will dangle like a float in an ice hole, and sooner or later the ball joint itself will break.
The easiest way to secure the ball joint would be to cut off the part that holds it against jet thrust and weld it to the retaining bar.
But I wanted to keep the jet thrust intact and I decided to try to cut off the platform from the old collapsed gearbox ball joint and weld it to the retaining bar.
conclusions
At the end of the work done, it is necessary to make a test drive and check the functionality of the rocker and gear shifting. If necessary, the procedure must be repeated in a similar manner.
The rocker - it is responsible for changing gears in the car, it stands under the bottom of the car and goes into the interior, at the end of the rocker (on its rod) a cover is put on, which is popularly called the gearshift knob cover, you also grab this cover when changing gears in the car .
Replacement
If it was not possible to improve the performance of the gearbox, then the whole problem is in the linkage, which has failed. It will need to be replaced or repaired.
In addition to the symptom described above, when the gears do not shift normally, vibration of the shift lever can be a problematic symptom of a damaged linkage.
Note. If vibration of the shift lever is observed, this means that there is increased play in the lever hinges, which need to be repaired.
We arm ourselves with the necessary tools:
keys 10, 12, 14; side cutter; screwdriver
Started:
open the hood of the car;
we find the nut of the bolt responsible for the terminal connection of the tip of the lever and the gear shift rod;
remove the turnbuckle from it, as well as the protective cover;
we return to the car interior;
remove the frame of the lever cover that controls the gearbox (you need to remove the cover, despite the force of the latches holding it);
the lever cover must be turned inside out;
We take a knife or side cutter with which we cut the clamp securing the cover;
remove the cover from the lever.
Note. The clamp securing the gear lever boot is a disposable option. Therefore, it is not a pity to cut it, but during installation you should install a new one.
remove the lining of the floor tunnel in the cabin (front part);
Unfasten the axle lock from the lever;
remove the lever axis, removing it from the holes of the rocker and lever;
Now the gear shift lever will come out easily if you pull it up;
it’s time to push the guide sleeve inside the lever body with a screwdriver (you should move it along the shaft);
now we find four bolts securing the lever housing to the body;
turn them inside out;
remove the body;
remove the shaft;
the guide sleeve is removed from the shaft.
Note. We carefully inspect all removed parts. If, for example, the hole in the guide bushing is worn out or its rubber mass is deformed, the entire bushing is replaced as an assembly. Also, if there is play in the hinges or the hole for the lever axis is badly worn, the entire linkage is replaced.
we install the parts back;
We adjust the gear shift drive.
The corresponding video will help you learn more about replacing the scenes with your own hands. It is also recommended to study photo materials.
The step-by-step instructions presented above are a chance to save a lot on repairs, the price of which at service stations is growing every day.
How to check a wheel bearing follow the link.
Adjustment
Before repairing a car with your own hands, it is necessary to eliminate all risk factors regarding the problematic shifting of the rear and fifth speeds of your vehicle.
Remember that setting the scenes can be done using numerous methods, which are in some way interconnected with each other, but are performed in completely different ways. And so we will try to give all the options for the process of regulating the scenes on a domestic car.
Firstly, we carry out the process of regulating the scenes using reverse speed. We switch the box to move it back, first you need to loosen the clamp and the lever switch to where it should be located when reverse gear is engaged. After this, you must carefully tighten the clamp. After all the procedures, the problem regarding the adjustment of the backstage is completed, which means it is completely resolved. Secondly, you can use the second method. This method is used when it is not possible to easily switch to reverse speed in automobile mode. Here it is necessary to do all the work that is associated with regulating the first gear. Switch the box to first gear, loosen the rocker clamp, remember that it is located at the bottom of your vehicle. Next, turn the rocker drive counterclockwise until the gearshift lever rests against the plastic stopper for the reverse gear. Now you need to tighten the clamp and complete the process of adjusting the rocker of your vehicle.
Perhaps now we can try to answer the question of how to set the neutral state of the gearbox shift knob? Probably, you should start with an accurate and detailed calculation of the depth of landing of your vehicle's rocker on the cardan.
It is worth remembering that after such changes, the gearbox lever may begin to make a nasty rattling sound. Please also remember that in this case you can drive your vehicle under such circumstances. There is only one drawback: the driver worries about the technical condition and begins to be distracted from the road. No more nasty sounds can harm you or your vehicle. In any case, it is necessary to foresee in advance all kinds of breakdowns and technical deficiencies that could cause severe damage.
How to change
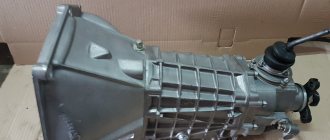
If you don’t bother with alterations and find where the short-throw VAZ 2112 gearbox assembly is sold.
Then let's do the replacement:
To gain access to the bolts securing the gearbox lever, we need to remove the protective decorative cover from it along with the knob
The knob itself is not screwed to the lever, so it will be enough to pull it hard to remove it
Now you need to disconnect the gearbox lever rod from the cardan; to do this, you first need to loosen the clamp using a key at “13”
Pulling the shaft off the cardan
Let's go to the salon
And remove the locking ring, then remove the lever with the ball and spring from the plastic case
Then we pull the lever with the rod into the cabin, to make it more convenient, you can disconnect the rod from it, although it can be pulled out without disconnecting, it’s already been checked
We go down the car to disconnect the traction drive
First of all, we pull off the rubber boot from it, then, using the “10” key, unscrew the bolt that is attached to the left side of the cardan shaft
The VAZ 21124 short-stroke gearbox requires replacing the Priorovsky cardan with a Kalinovsky one
As you can see, the cardan rods differ greatly in length
This problem can be solved by simply shortening the Kalinovsky rod
This must be done, taking into account the type of short-stroke link
There are situations when the rod may not fully enter
As a result, the gearbox lever moves towards the parking brake.
This can be corrected by shortening, if necessary, know that you need to cut off no more than 1-2 centimeters
We install the “Kalinovsky” cardan, first lubricate it from the inside with “Litol” lubricant
The fastening bolt screws in easily because it has a cone-shaped shape; you should not tighten it, however.
Installing traction through the cabin
It is more convenient to perform the installation with an assistant: so that one holds it in the cabin by the elastic band, and the second carefully stretches the rod
Now assembly
And so we have in our hands the short-throw shift link of the VAZ 2112 gearbox, the removal of the old one is completed, all that remains is to screw on the new link:
We put a rod on the cardan shaft
Then we assemble the mechanism that blocks accidental engagement of reverse gear, lubricate the spring ball
Adjusting the gearbox lever
Then we clamp the clamp on the rod with the “13” key
Note: If you assemble the mechanism that blocks accidental engagement of reverse gear first, then due to the long rod it may not be possible to put the cardan rod on the rod. Shortening the driveshaft may solve the problem. And don’t forget to put the boot on the driveshaft.
Now let’s adjust the mechanism that blocks accidental engagement of reverse gear, since after adjusting the rocker it may not fall on the blocking plate to which it usually clings
A similar problem is solved as follows: remove the plate and adjust the hook
In the bracket itself that secures the plate, there is a cutout for which the engagement occurs
Our task is to adjust or modernize this plastic hook using sandpaper or a file
I once found out while driving why the rear one was switched on instead of the first one. The solution was proposed to be simple and effective: replacing the lining with a stop (which blocks the reverse gear from being engaged without pressing the lever). Yes, the old lining and axle were ground off and definitely needed replacement. But it did not help. The lever rested against the pad and the rear one still turned on. Adjusting the backstage helped. It can be done by two people if there is a hole in 5-10 minutes.
It was necessary to loosen the screw that holds together part of the rod coming out of the passenger compartment into the box. Move the lever slightly to the left 1-2 centimeters. Tighten again. And that’s it, the gears engage as they should, from stop to first and second. From pressing and then to the left - back.
We also pumped up the tires and replaced the left rear nipple (it was leaking). Included in the amount.
The gearbox on the VAZ-2110 sometimes starts to act up. If you neglect the care and maintenance of this part of the car, you can get many problems with the operation of the gearbox. As a rule, these are inaccuracies in gear shifting, characteristic “knocking out” of the gear, crunching and clanging when manipulating the gearbox lever. Some car owners believe that all these symptoms indicate a gearbox failure.
CPT diseases
VAZ 2110 owners often complain that the first gear is difficult to engage or crashes.
Another complaint is that second gear is difficult to engage and often gets knocked out.
Here you can suspect the main culprits:
Sometimes (albeit rarely) when the second one does not turn on well enough and falls out, replacing the retaining spring helps. If the speeds often drop out, some of them are difficult to turn on, which means that half-measures will no longer help - the box needs to be overhauled.
Whether you do it yourself, or go to a service center where they will repair it for you and also adjust the gear shift mechanism, decide for yourself, based on your own experience and skills.
Source
Preparing to adjust the rocker
On an old car, it is better to lubricate the linkage mounting assembly with a penetrating compound in advance.
Before starting adjustment work, you need to prepare the place and carry out the following preparatory measures:
- The car needs to be parked in a pit.
- The handbrake must be tightened all the way.
- It is mandatory to install wheel chocks.
For a faster and better adjustment process, it is better to perform all work with an assistant. The process itself can occur in several ways.
First adjustment method
To adjust, you need to loosen the clamp connecting the rocker drive to the cardan.
This method is the simplest. In this case, the gearbox linkage is adjusted according to the rear speed. First of all, you need to loosen the clamp, after which the reverse gear is engaged. Then you need to position the lever in the position you need. After this, the clamp is tightened and the operation of the entire mechanism is checked.
If you don't succeed the first time, you need to listen for knocks and crackles when switching. They must either decrease or increase. In accordance with this, you need to position the lever in the desired direction. If all manipulations do not lead to the desired effect, you need to resort to another adjustment method.
Second adjustment method
The gear shift lever should rest against the locking plate (in the photo it is made of light plastic).
This method is used if the first one did not lead to the desired results. When using it, you can more clearly position the gearshift lever. This method is as follows:
- The gearshift lever switches to first speed.
- The backstage clamp is completely loosened.
- Next, you need to turn the drive of the rocker itself counterclockwise until the lever rests against the reverse speed stop.
- The backstage clamp is tightened.
Tighten the clamp fastening nut, eliminating the shift of the rod during operation.
It happens that some VAZ-2110 cars do not have a plastic limiter retainer, so the adjustment in this case is carried out not in first gear, but in neutral.
Third adjustment method
This method is quite complicated, as it involves calculating the depth of the gearbox linkage to the cardan. Due to this, the position of the lever in the neutral position can be accurately calculated and adjusted. It happens that if the calculation is not accurate enough, all manipulations only lead to the appearance of rattling when changing gears.
If adjustment by any of the above methods does not lead to the desired results, several options are possible to solve the problem:
- Carry out diagnostics at a service station to make sure that the problem is in the gearbox linkage.
- You can replace the gearbox linkage.
- You can contact specialists who will adjust the slide themselves.