01/26/2022 11,324 VAZ 2110
Author: Ivan Baranov
The gearbox of any vehicle, like any other unit, requires periodic repairs. If a unit breaks down, not every motorist is ready to go to a service station and pay money for its repair. Therefore, now we will tell you how to disassemble the VAZ 2110 gearbox, what nuances should be taken into account when dismantling the box. You can also watch a repair video.
[Hide]
Removal and installation of gearbox 2108,2110,2112,2118, Kalina
Removing and installing the gearbox, replacing the VAZ clutch.
GENERAL INFORMATION Recommendation Remove the gearbox with an assistant.
EXECUTION ORDER
Remove the battery, drain the gearbox oil and remove the starter
Disconnect the block with wires from the speed sensor by squeezing the spring clips.
Remove bolt 1 securing the ignition module bracket to the gearbox and two bolts of the upper gearbox mounting to the engine. Bolt 2 (front of the car) is short, bolt 3 is long.
At the bottom of the car, disconnect the block with wires from the reverse light switch.
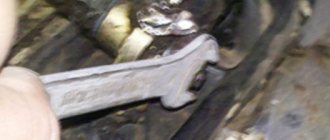
Remove the two bolts securing the torque rod bracket to the gearbox.
Loosen the bolt of the gear shift rod clamp and disconnect the rod from the gear selector rod hinge by sliding it back.
Remove the wheel drives. Tie the plug inserted in place of one of the drives with a rope or wire so that it does not fall out when removing the box. The right drive does not need to be completely removed. It is enough to disconnect it from the gearbox and, moving it to the side, hang it from the body.
To make it easier to remove the box, unscrew the two mounting bolts and disconnect the left ball joint from the steering knuckle
Unscrew the nut of the lower right mounting of gearbox 1 to the engine (engine side)
Please note that on models with a fuel injection system, an intake pipe support bracket 2 is installed under this nut, which must be removed from the stud. If necessary, loosen the upper nut securing this bracket.
If necessary, loosen the top nut securing this bracket.
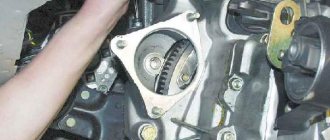
Unscrew the three fastening bolts and remove the lower cover 1 of the clutch housing 2.
Remove the bolt from the lower left mounting of the gearbox to the engine. Suspend the engine using a hoist or board.
From the bottom of the car, unscrew the nut securing the left power unit support.
Unscrew the two nuts securing the rear power unit mount to the body.
Unscrew the two bolts securing the rear support of the power unit to the gearbox, holding the nuts from turning with a second wrench, and remove the support.
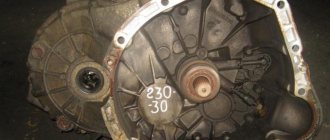
By inserting a screwdriver between the clutch housing and the cylinder block, slide the gearbox off the guide bushings. Be sure to hold it while doing this.
Gearbox synchronizer, possible problems
- If you hear a strange noise or crunching noise, it is quite possible that the locking ring has become deformed or the conical surface has worn out.
- If it is difficult to change gears, the synchronizer itself wears out.
- If the gears disengage spontaneously, the release clutch is faulty or the gear is worn out.
Pro tips, driver actions after gearbox repair
The gearbox must be installed in the reverse order. After installation, you need to adjust the clutch drive (How to adjust the clutch drive?) and the gearbox lever, and fill in the transmission oil. Having prepared everything you need, you can begin work.
The removal sequence is as follows:
- We place the car in the pit and immobilize it with wheel chocks installed under the wheels. We put the gearbox in the neutral position, do not tighten the handbrake;
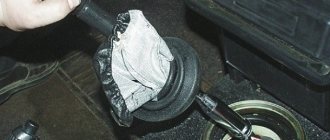
- First we will do all the work in the salon. At this point it is necessary to remove the lever from the box rod. To do this, pull the lever boot up, which will provide access to the fixing sleeve. You need to carefully pry it up with a thin screwdriver so that it pops out, after which you can pull the lever off the rod;
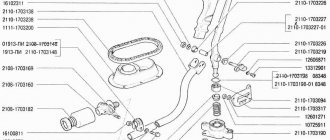
- Remove the upper plastic bushing from the rod by loosening the petals with a screwdriver, then the rubber boot and the lower bushing. As a result, there should be nothing left on the rod;
- Remove the plastic trim located under the floor covering. To do this, you need to remove the seats, their guides, etc. from the car. It is much easier to make a cut towards the rear seats, this will allow you to not disassemble the interior. Having provided access to the cover, unscrew the 4 screws securing it and remove it. We turn on 1st gear at the gearbox;
- Let's go under the car. For ease of work, the exhaust system should be completely dismantled. To do this, unscrew the muffler from the exhaust pipe. To make it easier to unscrew bolts and nuts, you should treat them with WD-40 in advance;
- Having removed the muffler, we go into the engine compartment and unscrew the nuts securing the exhaust pipe to the exhaust manifold. Then we remove this pipe from the car;
- All subsequent work is carried out under the car. Unscrew the driveshaft from the gearbox flange. Next, unscrew the two safety crossbars to lower the cardan down;
Repair process
Next, you should carefully unscrew all the fastening bolts, sequentially releasing the parts.
Each gear is disassembled separately, and it is important to carefully check not only the gaskets, but also the seals. Correction and diagnosis of breakdowns include replacing gaskets, this is a prerequisite; oil seals are usually changed if they are very worn
To replace parts, you can buy a ready-made gearbox repair kit, designed taking into account the most frequently occurring faults in five-speed gearboxes. Also, before disassembling the transmission, prepare the necessary tools: an impact driver, a three-jaw puller, wrenches of different diameters and a torque wrench. Also for maintenance you will need fixing glue, a set of gaskets and seals, preferably a repair kit.
After all the parts have been checked and replaced, you can begin assembling the gearbox, carrying out all the steps in the reverse order. If the parts have undergone too much wear and replacement of individual components no longer helps, a complete replacement of the gearbox on a VAZ 2107 may be necessary.
Thus, it is quite possible to carry out maintenance and repair of the VAZ 2107 gearbox yourself, the main thing is to follow all the requirements of the dismantling instructions and follow the drawings during assembly.
A major overhaul of the gearbox can be done literally “on your knees”, thanks to its simple and archaic design - this is one of the main advantages of the Zhiguli Seven gearbox.
Disassembled transmission box of a VAZ 2107 car.
Examination
VAZ 2110 replacing box bearings
A possible malfunction can be considered a low oil level. At such moments, not only do the bearings stop functioning correctly, but every part of the gearbox begins to adhere poorly. If you do not fill in the required amount of oil or transmission fluid in time, the parts will quickly wear out. The car is installed above the inspection hole. A thorough inspection is carried out at the time of checking for oil leaks.
So:
With the clutch depressed (see Repairing the VAZ 2110 clutch - we do it ourselves), you need to gradually shift all gears. Their accuracy of operation is checked at the time of switching on and off. If necessary, the gear shift mechanism is adjusted.
Replacing bearings in the box of a VAZ 2110 input shaft
- When the transmission lever is in neutral, the engine must be started. When you press the clutch pedal, you must try to hear the operation of the gearbox bearings. The characteristic sound of a breakdown appears the moment the pedal is released. As soon as you press, the sound disappears again. If the sound is loud, the bearings should be replaced.
- The operation of the gearbox is also checked while the vehicle is moving. It is necessary to accelerate the car, then slow braking. Gears shift up and then down. Here you should check the operation of the synchronizers and the clarity of the gear shift. There should be no extraneous sounds when the gearbox is operating. If the load increases, you must ensure that gears are not changed randomly.
Malfunctions and solutions
We remove the gearbox on a 16-valve VAZ-2112 with our own hands.
Some defects can be eliminated with your own hands, but to do this you need to learn to determine which defect is interfering with the normal operation of the gearbox. The main faults are listed below:
- The lever is loose. The cause may be worn-out gearbox and motor cushions. Also, other parts may be the “culprits”. Below are instructions for replacing the cushions and lever.
- Noise in the VAZ 2110 gearbox when switching. There may be several reasons: parts are worn out, poor lubricant is used or its level has dropped below the minimum, or water may have gotten into the working fluid. In the case of worn parts, only replacement will help. As for the lubricant, its quality and the presence of water in it can be checked with a dipstick.
- The gears are switched off randomly.
This defect appears when parts wear out - an inspection is necessary to determine the cause of the spontaneous shutdown. The malfunction also appears due to incorrect operation of the drives that need to be adjusted. Replacing faulty gears - The transmission does not engage (or starts with difficulty, accompanied by knocking and noise). Loose forks, deformation of parts, incorrect adjustment of drives. In the case of damaged parts, only replacing them with new ones will help.
- Loud noise when changing gears. Malfunctions of this kind can be caused by incomplete disengagement of the VAZ 2110 clutch, wear of the gearbox synchronizer, or damaged bearings. It is also worth checking the oil, as noise may occur due to low fluid levels.
- Lubricant leak. The gearbox system is leaking, you need to check all the pipelines and find a crack through which the gearbox oil is leaking.
Disassembling and assembling the synchronizer
Synchronizers of 1st–2nd, 3rd–4th and 5th gears are disassembled and assembled in the same way. We show the disassembly and assembly of a synchronizer using the example of a 5th gear synchronizer. Before disassembling, we mark the blocking rings and their position relative to the synchronizer clutch. Remove the blocking rings. We mark the position of the hub relative to the coupling and the position of the crackers relative to the grooves of the hub, so that during subsequent assembly they will be installed in their original places.
To disassemble the synchronizer...
...carefully slide the coupling along the hub, holding the balls with your hand to prevent them from “shooting out”.
5th gear synchronizer parts
:
1 - coupling;
2 - ball;
3 - cracker;
4 - spring;
5 — hub Before assembly, inspect the synchronizer parts. Nicks and chips on the splines of the hub and coupling, the gear rims of the locking rings and the coupling are unacceptable. We replace defective parts with new ones. If there is significant wear on the working conical surface of the blocking ring (the minimum permissible axial clearance between the ends of the gear rims of the gear and the blocking ring is 0.6 mm), it must be replaced.
For ease of assembly of the synchronizer, generously lubricate the springs, crackers and balls with grease.
Putting the hub on the workbench...
...we insert springs into the hub sockets, and crackers into the grooves (in accordance with the previously applied marks). We insert the assembled hub into the coupling, orienting it so that when the ball is subsequently installed...
... it was located exactly in the middle part of the coupling groove - in its deepest place.
Place balls in the holes of the crackers...
...and, pressing each ball in turn with a screwdriver... ...we push the hub along the splines of the coupling.
When installing a synchronizing shaft on the synchronizing shaft, the grooves on the coupling and hub must face:
— for the synchronizer of 1st–2nd gears — to the 1st gear gear;
— for the 3rd–4th gear synchronizer — to the 3rd gear gear;
- for the 5th gear synchronizer - to the thrust plate of the shaft bearings.
Grooves on the clutch and synchronizer hub
Repair work
If the adjustment does not give the desired result, you will have to work more carefully with the box. A common problem is knocking out the gears responsible for speeds 1 and 2.
When dismantling, make sure that each individual fastener is in good working order. The latches are springs, of which there are a total of three. The first one is the longest, it is responsible for speeds 1 and 2. The second is medium in size, and its prerogative is 3 and 4 speeds. The third detent is the smallest, and its “guardian” is fifth gear.
How to repair a gearbox on a VAZ 2110
Adjustment does not always achieve the desired effect. Therefore, the motorist will need to carry out repair work. Practice shows that repairing a VAZ 2110 gearbox involves dismantling and reassembling the gearbox. Now I will tell you in detail how to do this.
How to remove/dismantle a VAZ 2110 box
How to remove the box? Before disassembling the gearbox, it must be cleaned
It is important that water does not get inside the box.
Main stages:
- Power from the battery is turned off.
- The block is disconnected from the speed sensor.
- Transmission fluid is drained.
- The bolts securing the jet thrust are removed.
- It is necessary to remove the constant velocity joints from their standard location.
- The existing ball joint bolts are loosened.
- Using a tool, unscrew the nuts holding the clutch cover to the gearbox housing.
- The bolts securing the gearbox to the engine are disconnected.
- The power plant must be lifted (use a jack).
- The engine mounts must be removed.
- To pick up the gearbox, you can use a screwdriver.
- The speed box slides off the guides. The input shaft should disengage from the clutch.
How to properly disassemble a VAZ 2110 gearbox
- We remove dirt and wash the outside of the gearbox (do not allow water to enter the crankcase).
- Using a 17mm wrench, unscrew the bolt securing the power unit suspension bracket.
- Using a 13mm socket, unscrew the six nuts securing the rear crankcase cover.
- Remove the bracket.
- Tapping with a copper hammer (or an ordinary one through a soft metal mandrel) on the tides of the lid, and remove it along with the sealing gasket from the studs.
- Having pressed the gear selection rod all the way, we turn on the third gear, or, by retracting the rod all the way, we turn on the fourth.
- Using a 10mm spanner, unscrew the bolt securing the fifth gear fork.
- Using a soft metal drift, we strike the fork downwards, including the fifth gear of the VAZ 2110
- Use a beard to straighten dents in the nuts of the primary and secondary shafts
- Using a 32" socket with a powerful wrench, unscrew the shaft nuts.
- Using a screwdriver, pry off the fifth gear fork and remove the fifth gear assembly. Remove the fifth gear shift fork.
- Remove the synchronizer sliding clutch from the hub. Remove the synchronizer blocking ring. We take out the thrust plate.
- We move the hub inside the sliding clutch of the Synchronizer and remove the hub, springs, clamps and crackers of the fifth gear synchronizer.
- Using a copper hammer we strike the end of the input shaft. Insert two screwdrivers into the resulting gap between the thrust plate and the fifth gear drive gear. Prying up the gear with screwdrivers, we press it
- Using the “13” socket, unscrew the three plugs of the gearshift rod clamps. Remove the springs and retaining balls from their sockets.
- Using a Phillips impact screwdriver, unscrew the four screws securing the thrust plate. The screws have special lock washers.
- Remove the thrust plate. Use two screwdrivers to pry off the thrust washer of the fifth gear driven gear bushing. We insert the puller arms into the resulting gap between the end of the rear bearing and the thrust washer and compress the gear sleeve and the thrust washer.
- Use two screwdrivers to separate the retaining ring on the input shaft and remove it. In the same way, remove the retaining ring from the secondary shaft.
- We insert a screwdriver into the socket of the latch and, applying a magnet to it, remove the ball.
- Using a “13” socket, unscrew thirteen nuts and one bolt securing the gearbox housing to the clutch housing.
- By inserting a screwdriver into the groove at the junction of the crankcase mating planes, carefully lift the box crankcase and remove it.
- Using a 10mm spanner, unscrew the bolt securing the 1st-2nd gear shift fork to the rod. We lift the rod up and disengage the fork. Using a 10mm spanner, unscrew the bolt securing the 3rd-4th gear shift fork to the rod. Use a screwdriver to remove the rod from the gear selection mechanism.
- Raise the rod up and remove the fork from the groove of the synchronizer sliding clutch.
- By turning the 5th gear engagement rod, we remove it from the gear selection mechanism. We take out the axis of the reverse intermediate gear.
- Remove the reverse intermediate gear. We simultaneously remove the primary and secondary shafts from the roller bearings of the clutch housing.
- We take out the differential assembly. The process of repairing a VAZ 2110 gearbox
- Using a 10mm socket, unscrew the three bolts securing the gear selection mechanism and remove it.
- Using a 10mm socket, unscrew the installation bolt of the gear selector lever. Remove the gear selector lever from the rod.
- Using a screwdriver, remove the protective cover of the rod from the bushing. We take out the gear selection rod.
Assembly procedure for the VAZ 2110 gearbox
How to remove a transmission on a Chevrolet Niva
Something bad happened and a VAZ 2110 gearbox needed to be repaired. Unit repair is required when:
- It is difficult to switch gears off and on.
- automatic switching off of gears.
- noise occurs when shifting gears.
- transmission oil leak.
The reasons for the breakdown may be different, perhaps the oil was not changed in a timely manner or the mechanism has simply exhausted its resource.
How is a VAZ 2110 gearbox repaired? Do-it-yourself VAZ 2110 gearbox repair, video.
Gearbox device
There are situations when removing the gearbox is not at all necessary; adjusting it is enough. The VAZ 2110 very often has problems with gear shifting, they get knocked out. To eliminate this problem, it is not at all necessary to remove the box; it is enough to adjust the gear selection drive mechanism. It is enough to make do with adjustment in the following cases:
- not so long ago, the input shaft bearing was replaced or any other repair was carried out where the gearbox was removed.
- Only one speed comes out.
- When the car is moving, the speed shifts poorly or completely jumps out.
To adjust the gearbox you need:
- Loosen the nut and bolt, which is located under the machine, tightening the clamp securing the box rod.
- Using a screwdriver, move the clamp and grooves of the rod apart. Set the rod to the neutral position.
- Remove the cover from the gearbox.
- In order to block reverse gear, you need to place a lever in the window of the bracket lining.
- Adjust the axial play in the rear direction and by turning to the left.
- Place the clamp in place and tighten it with a bolt.
Disassembling the gearbox
In the situations described above, a simple gearbox adjustment will be sufficient. This is much better than repairing the VAZ 2110 gearbox, disassembling and assembling the gearbox.
Procedure for disassembling the gearbox:
- Remove the oil indicator from the gearbox. Unscrew the bolts that hold the clutch cable.
- Unscrew the bolts that hold the back cover. The lid is hermetically sealed, so when removing it, you can use a hammer.
- To prevent the shafts from turning while disassembling the gearbox, turn on the third or fourth speed. Then unscrew the bolt that secures the fifth gear.
- Remove the fifth gear and fork together.
- Afterwards, remove the gear from the secondary shaft and the fork. Then remove the plate that protects the bearings.
Below you can see a DIY video repairing a VAZ 2110 gearbox.
Dismantling the VAZ 2110 gearbox housing
Having started repairing the VAZ 2110 gearbox, after all the steps described above, it is necessary to disassemble the crankcase and the operating mechanism. Let's get started:
- We unscrew the spring plugs that hold the gear rods. Once the plugs are unscrewed, the end balls will fall out of the holes. We do the same with the plug that holds the reverse gear. If the balls have not fallen out of the holes, you can get them out using a magnetic screwdriver.
- Next, we unscrew the bolts that secure the gearbox housing to the clutch housing. After the bolts are unscrewed, you can use a screwdriver to disconnect the crankcases.
- Next step. Unscrew the rod from the first and second gear fork.
- We do the same with gears third, fourth and fifth, respectively. To remove the rod, it must be removed together with the gear shift parts.
- You need to remove the axle from the reverse gear and, of course, the gear.
- Next, take out the differential and two shafts with gears. Unscrew the three bolts that secure the gear mechanism and remove it from the crankcase.
- Unscrew the rear lever bolt and remove the rod.
- If necessary, remove the bearings of the primary and secondary shafts with a separator.
Dismantling of the VAZ 2110 gearbox has been completed.
Common gearbox problems
Owners of the VAZ 2110 car note several characteristic faults in gearboxes for this model. Some people do not engage reverse gear, others complain about overshoot, and so on.
Let's look at the most popular problems that the domestic "ten" box can boast of.
- First speed problem. It may fly out or be difficult to turn on in the car. There are several reasons: The synchronizer has failed;
- The latch spring has a defect, it has burst;
- The lever has become loose, causing the gears to switch spontaneously;
- The rod is out of order or the fork is faulty; they must be replaced.
- The gear teeth do not cling well to the gear shift clutch;
Having experience, relevant knowledge and skills makes it possible to deal with checkpoint problems with your own hands. If all this is missing, we strongly recommend that you contact a trusted service center, where they will carry out diagnostics, determine the true causes of the problem and return your gearbox to its previous condition. Yes, it will cost some money, but you can’t do without it. Nothing is eternal. Moreover, the “tens” gearbox.
Finding a new synchronizer
Since the synchronizer is assembled for a specific gearbox, there is no reason to think that the mechanism from one car can be installed on the gearbox of another car. Of course, the operating principle of these two mechanisms will be the same, but, for example, their geometry may be different. It would be best to select a spare part according to:
- Vehicle VIN code;
- Code of an already installed synchronizer;
- Parameters of the vehicle and its gearbox.
- Onnuri (South Korea);
- Transporterparts (France);
- KAP (South Korea);
- Omix-ADA (USA).
Also, synchronizer components can be found in the catalogs of major European packers. The quality of these spare parts, as noted by car enthusiasts, is not always high. But spare parts from South Korean companies, on the contrary, please with both price and workmanship. As for assembled synchronizers, they can only be found under the names of automakers, i.e. originals . If you wish, you can save on buying a mechanism by choosing an option at a dismantling shop. If you are interested in purchasing a spare part with the longest service life, it is better to buy a new original.
Welcome to the website https://lada110atricom.ru
Many people have their own cars, of various brands, configurations, tuned and simply “gray” cars for everyday driving. Some make various gadgets for cars with their own hands, some send them to special services, and others simply admire how people do it. Actually, this is what I would like to talk about - tuning!
I didn’t have a car before and somehow didn’t need one, but in my heart I always wanted to sit, steer and enjoy the speed. The first step to buying a car was getting a driver's license, which I also went to study for spontaneously. In general, I studied for 3 months in DOSAAF and on February 29, 2008 I received my driver’s license. From time to time there was a desire to buy a car, but there was no money to buy it, and I began to think about it – where should I go?
Time passed, years flew by, rumors circulated about a crisis. By that time, we had managed to save up a little cash, which we finally decided to invest in some kind of automobile before it disappeared. One wonderful morning, we got ready and went to the car market in Saratov to choose a car for me. I had to borrow a considerable additional amount of cash from friends, otherwise my savings were not enough.
We set off on the road, drove and drove, and finally arrived. Let's go to the market.
There were a lot of cars in Saratov, some not for our money, others too dead, in general, we wandered and wandered and saw a red VAZ2110 (my favorite color). After some time, after a lot of walking, it was finally decided to buy the first car I liked and finally go home.
The path to home was not close, about 200 km. At first, I thought that my friend would drive and drive my car to my native Kamyshin, but I still drove it back myself. This is my very first time when I drove for so long, because the last time I held it in my hands was back in February and that was for about 10 minutes. For the first 10-20 minutes I couldn’t come to my senses that I was sitting behind my own car, My hands were shaking a little and I still couldn’t believe that I was going. Literally, after driving 50 kilometers, I already began to feel much more confident, fell back on the seat and began to enjoy the trip.
Everything would be fine, but in Krasnoarmeysk at the traffic police checkpoint we were stopped to check our documents. And I stupidly took only my license with me, and the rest of the documents remained with my mother, who drove ahead in another car with a driver. Luckily they stopped about 300 meters from us. The inspector had to wait for some time, to which he made a menacing expression on his face. They brought the documents, checked everything, but still got to the bottom of the fact that there was no first aid kit, fire extinguisher and sign. And the fact that the car even had transit license plates and had just been purchased did not bother him; he had to pay some fine to the Inspector’s fund. We got into the car, refueled and hit the road.
We got home quickly, we drove for about 3 hours in total, although it could have been longer, but I was still a beginner at that time, and the car was not tested, you never know what would break down, so I kept the speed around 100-110 km/h . But still there was a desire to experience the drive and therefore I accelerated once to 155 km/h, the car behaved amazingly on the road, I remained satisfied throughout the journey.
Here is a short story about the steps to buying my first car, which is with me to this day and makes me happy. From time to time I do something for the soul in it, a little tuning, etc. what I will tell you about in my Logbook
.
Express your opinions about my work, and just like that, we can discuss something, further work, plans.
selection of differential bearing adjusting ring
Differential bearings must be mounted with a preload of 0.25 mm (for control 0.15-0.35 mm). The tension is ensured by selecting the thickness of the adjusting ring 13 (see Fig. 3-7), installed in the gearbox housing socket under the outer ring of the differential bearing.
Note. Select the thickness of the adjusting ring when replacing one of the following parts: differential box, differential bearing and clutch or gearbox housings.
Determine the thickness of the adjusting ring using tool 67.7824.9517 in the following sequence: press the outer ring of the tapered roller bearing 3 together with the adjusting ring 4 (Fig. 3-24) into the gearbox housing;
Note. The installation ring 4 has a constant thickness of 1.25 mm.
Press the outer race of the other differential bearing into the clutch housing. At the same time, be careful not to mix up the outer rings of the differential bearings; install the differential into the gearbox housing and, covering it with the clutch housing, tighten at least three nuts, equidistant from each other, securing the gearbox housing to the clutch housing (tightening torque 24.5 Nm (2.5 kgcm)). Then turn the differential to self-install the bearings 2-3 turns; install support mandrel 2 on the differential box and secure indicator 1 with extension using a universal holder. Install the indicator leg on the support mandrel with a preload of 1 mm, and in this position fix the indicator and set its arrow to zero; move the differential from below and watch the indicator;
WARNING When measuring the axial movement of the differential, do not rotate it so as not to distort the measurement results.
Using the formula S = A + B + C, calculate the thickness of the adjusting ring of the differential bearings, where: S is the thickness of the adjusting ring;
A is the amount of axial movement of the differential; B - the amount of preload of the differential bearings; C is the thickness of the installation ring (constant value). Example.
The indicator reading when moving the differential is 1.00 mm. The preload of the differential bearings is 0.25 mm, the thickness of the mounting ring is 1.25 mm. S = 1.00+ 0.25+ 1.25 = 2.50 mm. After determining the thickness of the adjusting ring, disconnect the clutch housing and gearbox, remove the differential, press out the outer bearing ring from the gearbox housing using a puller 67.7801.9526 and install the selected adjusting ring instead of the adjusting ring 4. Press in the outer ring of the differential bearing using the mandrel 67.7853.9575 and install the differential into the gearbox housing and, covering it with the clutch housing, tighten the nuts securing the gearbox to the clutch housing. Check the moment of resistance to rotation of the differential with a dynamometer 02.7812.9501. To do this, pass the tip of the dynamometer through the hole in the differential box (for the wheel drive shaft) until it wraps around the pinion axis. Turn the dynamometer handle several turns clockwise and use the scale to determine the moment of resistance to turning. It should be: for new bearings 147-343 Ncm (15-35 kgf.cm), for run-in bearings at least 30 Ncm (3 kgf.cm).
Rice. 3-24. Scheme for selecting the thickness of the differential bearing adjusting ring: 1 - indicator; 2 - support mandrel; 3 — differential bearing; 4 — installation ring; 5 - mandrel
Something bad happened and a VAZ 2110 gearbox needed to be repaired. Unit repair is required when:
- It is difficult to switch gears off and on.
- automatic switching off of gears.
- noise occurs when shifting gears.
- transmission oil leak.
The reasons for the breakdown may be different, perhaps the oil was not changed in a timely manner or the mechanism has simply exhausted its resource.
How is a VAZ 2110 gearbox repaired? Do-it-yourself VAZ 2110 gearbox repair, video.
Instructions for removing the gearbox
The procedure for removing the gearbox is labor-intensive and time-consuming. It’s easier to replace it with a VAZ 2110 by visiting a car service center, but you can do it yourself.
Tools
To carry out the procedure, you will need tools consisting of:
- a set of wrenches, socket or open-end wrenches;
- set of heads with extensions;
- flat screwdriver;
- mounts;
- pliers;
- jack;
- clean rags.
In addition, you should prepare a container to drain the used oil. You can use a plastic 5 liter bottle.
Tools should be prepared in advance so that they are nearby while working.
Sequencing
To remove the gearbox, you need access to the underbody of the car, so it needs to be lifted. This can be done using a lift, or driving the car onto an overpass or inspection groove.
The following video demonstrates replacing the clutch, the first step of which is removing the gearbox.
Removing the gearbox from a VAZ 2110 car consists of a sequence of steps:
- First, you should remove the engine mudguard (protection). To do this, use a socket wrench to unscrew the mudguard mounting bolts and remove the protection.
- Next, we dismantle the engine compartment shield on the right.
- The next step is to drain the oil from the gearbox.
To ensure high-quality drainage of oil, it is recommended to warm up the engine before draining, allowing it to run for several minutes. Next, place a prepared bottle or other container under the drain hole and unscrew the drain plug. Draining oil from the box - When the oil has completely drained, clean the plug and hole from dirt. Then screw the plug back.
- After draining the oil, you need to turn off the power to the car by disconnecting the negative terminal from the battery.
- Next, you need to dismantle the air filter: disconnect the hoses of the crankcase ventilation system, air supply and air flow sensor. The air filter housing is removed along with the throttle valve, sensor and hose.
- Then you need to remove the starter from the car. First you need to unscrew the nut that secures the tip of the clutch wire connecting the starter to the positive terminal of the battery. Next, you need to remove the tip from the contact bolt. Now you need to disconnect the traction relay control wire, unscrew the fastening nuts and remove the starter.
- At the next stage, we disconnect the clutch drive cable from the gearbox bracket and the gear shift fork. To do this, you need to pull the clutch cable out of the fork lever in the engine compartment. Then you should loosen the fastening nut of the cable sheath to the bracket on the gearbox. While holding the sheath, you can pull the cable end out of the bracket.
- Now you need to disconnect the wire connector from the speed sensor, as well as from the reverse sensor.
Disconnecting the reverse sensor connector - Next, disconnect the jet rod. It is attached to the buffer using two nuts. After unscrewing the nuts, remove the bracket. Now the rod can be dismantled.
- Now we disconnect the gear shift rod from the hinge.
- Then we tighten the fastening bolts on the clutch housing cover and remove the cover.
- Now we remove the wheel drives.
A wooden plug should be installed on one drive to avoid any problems during installation. The moment of inserting the plug into the hole. Then we remove the right drive, but you can simply move it to the side and not remove it. - To simplify the removal procedure, you need to loosen the ball joint bolts.
- After unscrewing the mounting bolts, you need to remove the lower crankcase cover.
- Then you need to unscrew the lower bolt securing the gearbox to the engine.
- Next, we hang the power unit using the prepared support. You can use a board as a support. After unscrewing the fastening nut, remove the left engine mount.
- Having unscrewed the nuts that secure the rear engine support to the body, and the bolts securing it to the gearbox, holding the nuts from turning, we dismantle the rear support.
- To move the box from the guide bushings, you need to insert a screwdriver between the cylinder block and the clutch housing. When moving the box, it should be held so that it does not rest on the crankshaft diaphragm spring. Due to significant load, the spring may become deformed, which will lead to malfunction of the unit.
- While rocking the gearbox, we move it as far back as possible and dismantle it.
Removing the gearbox from a car
After dismantling the gearbox on the VAZ 2110, you can begin further repair work. Installing the box is done in reverse order.
Loading …
How to remove and install a manual transmission
The procedure for removing the gearbox must be carried out by driving the car onto an overpass or into a garage with an inspection hole. The wider and more spacious the pit, the easier it will be to do the work. Provide good lighting for the underside of the car, because all work will take place in semi-darkness.
The gearbox in the “ten” weighs about 30 kg, provided that the oil is drained. The weight does not seem very large, but keep in mind that you will need to hold the gearbox and unscrew the nuts. There are two options: work with an assistant or build a device into which you can rest the box when removing it and then grab it with both hands to remove it.
List of tools required for dismantling:
- Set of wrenches;
- Set of socket heads with extension;
- Flat and figured screwdrivers;
- Pliers;
- Mount;
- Jack;
- Clean dry cloth for wiping.
Further work is carried out in the following order:
- Remove the plastic engine protection by unscrewing the bolts with a socket wrench. We also remove the shield covering the engine compartment.
First you need to remove the crankcase protection
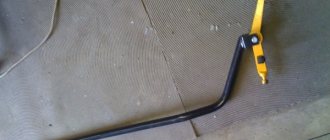
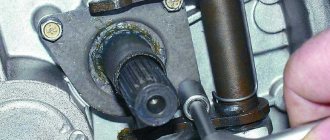
You need to insert a homemade chopper into the hole located under the inner CV joint.
Unscrew the gearbox mounting bolt
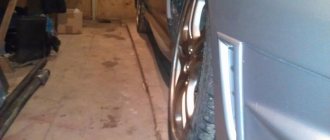
In order to remove the rear power support of the assembly you will need two keys
A thick screwdriver can be used as a crowbar to remove the gearbox from the guides.
After removing the box, it should be disassembled to carry out a visual inspection of the shafts and gears. If necessary, replace worn parts with new ones. When assembling the box, pay special attention to sealing the crankcase and replacing the seals.
Reinstallation of the box is carried out in the reverse order. If this is your first time carrying out a similar procedure, take photographs of each step, the location of parts and fasteners. This will help restore the sequence of actions.
Video: dismantling the gearbox on Lada 2110
After repairing the gearbox, you need to run in the new gears for some time, especially if you changed them block by block, in groups. During the break-in period, refrain from aggressive driving style. When switching to a higher speed, pause for one or two seconds, and when downshifting, on the contrary, engage a new one immediately. Always monitor the oil level - if it drops, take the time to crawl under the car and inspect for leaks at the junction of the cover and crankcase. Handle your vehicle carefully and the service life of the gearbox will increase.
Gearbox device
There are situations when removing the gearbox is not at all necessary; adjusting it is enough. The VAZ 2110 very often has problems with gear shifting, they get knocked out. To eliminate this problem, it is not at all necessary to remove the box; it is enough to adjust the gear selection drive mechanism. It is enough to make do with adjustment in the following cases:
- not so long ago, the input shaft bearing was replaced or any other repair was carried out where the gearbox was removed.
- Only one speed comes out.
- When the car is moving, the speed shifts poorly or completely jumps out.
To adjust the gearbox you need:
- Loosen the nut and bolt, which is located under the machine, tightening the clamp securing the box rod.
- Using a screwdriver, move the clamp and grooves of the rod apart. Set the rod to the neutral position.
- Remove the cover from the gearbox.
- In order to block reverse gear, you need to place a lever in the window of the bracket lining.
- Adjust the axial play in the rear direction and by turning to the left.
- Place the clamp in place and tighten it with a bolt.
Repairing the box
In the event that this kind of adjustment work did not bring much results, you will have to remove and disassemble the gearbox of your VAZ 2110
The main attention should be paid to the gears, as they are most often knocked out. This is especially true for first and second speeds.
It will also be important to check the latch. There are three latches in total in the gearbox.
The very first of them is very long and is responsible for 1st and 2nd gears. Next comes the clamp for third and fourth gears, and the shortest of the clamps is intended for 5th gear
There are three latches in total in the gearbox. The very first of them is very long and is responsible for 1st and 2nd gears. Next comes the clamp for third and fourth gears, and the shortest of the clamps is intended for 5th gear.
complete gearbox assembly
Often, VAZ 2110 owners voice a problem regarding the switching or departure of first gear. Most likely, the reasons lie in the following:
- synchronizer problems;
- damage to the retainer spring when the lever dangles and the gears are switched on randomly;
- damaged rod and fork.
A common problem is when the second gear is reluctantly engaged, or it is simply knocked out. The most likely causes of the problem:
- poor engagement of the gear and clutch that engages the gears;
- wear of gear teeth and coupling;
- problems with the clutch.
Installing an automatic transmission instead of a manual transmission on a VAZ 2110
Since KB VAZ does not have its own automatic transmission model, the German ZF continuously variable variator is used as an automatic transmission. The principle of operation of such a unit is based on the operation of a V-belt type transmission with the difference that both pulleys are of a split type. When converging or diverging, the segments change the depth of the stream, and the drive belt rotates at different radii. By changing the radii of rotation, the gear ratio also changes.
There is nothing complicated about installing this foreign equipment. All that was required was the manufacture of a special insert between the engine and the clutch housing, and the VAZ 2110 engine mount, which is attached to a manual gearbox, was also transferred. In the cabin, the gearshift lever was replaced with an automatic transmission selector.
With this modification of the transmission, the choice has become smaller; in addition to parking, neutral, reverse and the actual forward movement of the car, the braking mode of the power plant has been preserved, which distinguishes the CVT from other automatic transmissions and operates quite effectively.
In this position of the automatic transmission selector, the variator selects an extremely high gear ratio, operating in the “low” gear mode and continues to hold it when the accelerator is released. To prevent blocking of wheel travel, stage switching is done softly and smoothly, with some delay. When passing dynamic tests and during operation, the unit showed a sufficient degree of reliability.
Oil change intervals
The official manual for the car indicates how often the transmission oil in the box needs to be changed - 60 thousand kilometers. To prevent unit malfunctions, experts recommend adhering to certain rules:
- change the oil in the box in a timely manner;
- pour the required amount of oil into the VAZ 2114 gearbox and monitor its level;
- Use only high-quality lubricant.
The oil volume in the VAZ 2114 gearbox is also indicated in the manual for the car. According to the instructions, the box holds approximately 3.3 liters of lubricant.
When choosing oil for a manual transmission, you need to decide on the packaging of the fluid. It is usually sold in canisters of 1, 3 and 5 liters, but there are also non-standard containers. Also, anyone can buy oil from a barrel for bottling in specialized stores
Therefore, you can get the required amount of oil on favorable terms, but it is important to carefully check the quality of the products. Otherwise, imaginary savings may subsequently lead to serious costs for repair work.