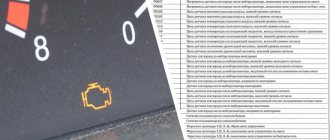
When strange numbers or symbols appear on the Chevrolet Cruze instrument panel, this means an error due to a car malfunction, which is important to be able to decipher, reset and correct the condition of your vehicle. With each new version of the Chevrolet Cruze it becomes more and more difficult to read the codes, because... their number increases significantly. But let's look at how to behave in a situation where an error appears on the panel, how to clear the code yourself, when computer diagnostics of a car at a service station cannot be avoided, what PC programs will help you with self-diagnosis and a complete list of codes for the 2014 Chevrolet Cruze.
What to do when the main error messages come on
| Meaning | Translation | What to do |
| Change Engine Oil Soon | The time to change the engine oil is approaching (less than 5% service life) | Fill the oil and reset the readings of this resource |
| Low Engine Oil Level | Low engine oil level | If after filling the oil the message does not disappear, then let the power unit operate in the thermodynamic cycle, because instrument cluster is ok |
| Oil Pressure Low – Stop Engine | Low engine oil pressure - stop the engine | Bringing the indicator into line |
| Program Cluster | Program the instrument cluster | Performed after replacing devices or when information appears on the display. the center of such a message. We recommend carrying it out using the SPS system |
| Service Vehicle Soon | The next vehicle maintenance is approaching | The error is displayed when a problem is detected by the ECM engine control unit |
| Vehicle Overspeed | Speeding car | Reduce speed |
How to decipher the VIN code?
Deciphering the Chevrolet Cruze VIN code is a fairly simple procedure if you know what its designations mean. Therefore, let's take a closer look at the structure of which it consists. The code consists of seventeen numbers and letters of the Latin alphabet. These signs are combined into three groups, each of which carries its own information: the place where the car was manufactured, its factory designation, transmission and engine type, body type, compliance with environmental standards, year of manufacture and body number. XUFJF356JC3111111 as an example : The first three characters indicate the international code of the plant that manufactured the car. In the situation with the Chevrolet Cruze, these designations can be two: XUF (plant in St. Petersburg, Russia) and KL1 (made in Korea). The fourth to ninth characters provide information directly about the car: J is the factory designation of the car model. For Cruz, this is the letter J. F is the type of transmission and drive. In this case, F stands for manual transmission and front-wheel drive. There may also be the designation A - this means front-wheel drive and automatic transmission. 35 - type of body design, in this case station wagon. There are also two more designations - 19 (four-door sedan with six windows) and 68 (four-door hatchback with six windows). 6 —engine model. 1.6 liter DOHC engines are designated as 6, 1.8 liter DOHC engines are designated as B. J - compliance with environmental emission standards. The letter J corresponds to the Euro-4 emission standard, and the number 1 corresponds to the Euro-3 emission standard. C - This symbol corresponds to the vehicle year code. In this case, it is 2012, but cars produced in 1982 may have the same code. 3 —manufacturer code. 111111 - these six characters are the chassis number.
Now that you know how the Chevrolet Cruze VIN code is deciphered, you yourself can find out the most complete information about your car.
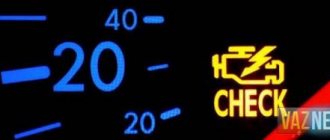
Troubleshooting Check Engine
In order to reset the check engine, Chevrolet Cruze car owners recommend removing the negative terminal from the battery for 10 minutes. If a false error occurs, the ECU independently eliminates the “Check engine” icon according to one of three established algorithms:
Fault with low risk of false alarm:
Malfunction with an average risk of false lightning of the check
High risk problem “Check engine”
If the “Check Engine” icon lights up or blinks again after a reset, then you need to find the reasons for its appearance. Otherwise, the extinction of the check will only be temporary. In addition, the components of the power unit will be subject to increased wear. Failure to report problems may result in costly major repairs.
Diagnostic instructions and procedures
If a malfunction is detected in the engine, the ECU sends a signal to the car’s dashboard, where the “check engine” indicator lights up. System errors are recorded in the memory log in the form of codes.
If the error is not critical, then to correct it it is enough to reboot the controller unit or reset the ECU settings.
If a sensor, component or unit breaks down, the indicator will remain on until the problem is resolved.
In pre-restyling versions of the 2011 Chevrolet Cruze, to reset ECU errors, you must perform several step-by-step actions:
The indicator light should stop lighting - the ECU errors have been reset.
For computer diagnostics, error codes are read through the ODB 2 connector and the cause of the failure is determined. If the car does not start and the error code is P0016, then its interpretation means the crankshaft and camshaft are incorrectly positioned relative to each other.
The sensors determine which cylinder is misfiring, the ECM sends a signal to stop the fuel supply, and the engine does not start. Diagnostic information is analyzed, and troubleshooting actions begin with testing the electrical circuit. Possible minor irregularities may be the source of the problem: faulty or removed contact terminals, loose connections, worn wiring or damaged insulation.
If no damage is found in the electrical circuit, then check according to the diagnostic table. For example: when the camshaft position sensor is disconnected, the scanner should count error P0340, and when the power is turned off (removing the terminal from the battery), the scanner counter stops.
This operation allows you to determine the reason for the engine failure to start: the error values are increasing - there are serious problems with the motor or the ECM is not working correctly. A complete list of ECU error codes can be found in the Chevrolet Cruze data sheet.
During complex diagnostics, all vehicle systems are scanned - the information obtained allows you to determine the general condition of all components and assemblies, the sensors themselves and the controller units.
Any technical malfunction is recorded as an error code, remaining in the memory log. Thus, you can estimate the cost of the machine by tracking all the malfunctions and failures over the past period of operation, as well as identify possible future problems.
Chip tuning and firmware for Chevrolet Cruze:
| A | WEIGHT |
| B | Diagnostic terminal (connect pin B to pin A with a jumper, turn on the ignition, the “MIL” lamp will emit a series of flashes: a long flash (tens) short flashes (units) between the error code there is a long pause. Code 12 will be shown first (flash, short pause and two fast flashes), this means the start of diagnostics, and then error codes. Each error is shown 3 times in a row, and then the next error comes, and so on in a circle while the jumper is in place. |
| C | |
| D | |
| E | |
| F | |
| G | Fuel pump |
| M | K-line diagnostics |
| H | +12V (not available on some models) |
Self-diagnosis codes Chevrolet 1992-1994
Code 15 - The additional brake light, which is installed either on the rear spoiler or rear window, has failed and needs repair. Code 16 - Check the integrity of the main brake lights. Code 17 - Chevrolet Cruze, how to check for faulty electric or hydraulic headlight adjustment errors.
Code 18 - You have a problem with the low beam of the front optics. Code 19 - The rear fog lights need to be checked and possibly repaired.
Code 20 - Check the right light bulb to see if the low beam is on, there may be a problem. Code 21 - Check the left headlight to see if the side light is on. Code 22 - Check the right headlight to see if the side light is on. Code 23 - Malfunction of the reverse light. Code 24 - Not Chevrolet Cruze how to see rear license plate illumination errors. Code 25 - The front left turn signal does not light up.
Code 26 - The rear left turn signal does not light up. Code 27 - The front right turn signal does not light up.
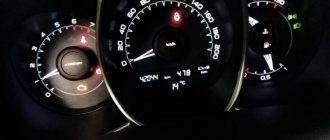
Decoding error code 89 in a Chevrolet Cruze
Hello! I have a 2013 Chevrolet Cruze. It gives an error: code 89. Help me figure out what this means! (Michael).
Mikhail, hello, we have analyzed your question and are ready to answer it.
What does code 89 mean?
This error code can be called a disease for Chevrolet Cruze cars. Over the past few years, hundreds of motorists have encountered this problem. We have turned to an official source for help with your question. Here's what we learned: combination 89 means the need for vehicle maintenance. Regardless of the mileage on your car, unfavorable conditions for operating a Chevrolet Cruze may periodically arise. It is these conditions that cause the need for maintenance.
Red Chevrolet Cruze
Unfortunately, the manufacturer does not provide more specific information to solve this problem, and it is clear why. Who wants to lose extra money? Diagnostics from an official dealer costs about 600-800 rubles, and this is only the test itself, without solving the problem. Plus, you must come to the “official” with a burning “check” of the error. But in practice, code 89 tends to appear and disappear on the screen. Therefore, if you decide to be serviced by a dealer, then you need to go to him when the code is always on, without disappearing. Of course, this option is not the most acceptable, but, unfortunately, the Chevrolet concern has determined such a car diagnostic policy.
Everyone knows that service at the dealer in most cases costs a pretty penny. We can recommend another option: diagnose your vehicle yourself. To do this, you will need a laptop with the necessary software for this and a special adapter for testing. The laptop is connected via an adapter to the diagnostic connector (its location is indicated in the service manual), and the diagnostic procedure is launched on the computer. The program reads all fault codes and displays them on the screen. In this case, the codes will not be two-digit and can be deciphered using technical documentation. And based on the information received, it will be possible to draw some conclusions.
But keep in mind that in this case you can save money only if you do the diagnostics yourself. If you contact specialists at any service station, the cost of the inspection will cost approximately the same amount that you will need to pay to the dealer. Therefore, how to act in such a situation is up to you to decide.
Symptoms of malfunction
The main driver symptom of P2723 is the MIL (Malfunction Indicator Light) illumination. It is also called Check engine or simply “check light”.
They can also appear as:
- The “Check engine” warning light on the control panel will light up (the code will be stored in the ECM memory as a malfunction).
- The car goes into emergency mode.
- The gearbox slips when changing gears.
- The transmission is stuck in gear.
- Hard gear shifting.
- Transmission overheating.
- Increased fuel consumption.
- Symptoms similar to misfires may occur.
The severity of the P2723 code is usually moderate, but can quickly progress to a more severe level if not corrected promptly.
Replacing front and rear pads of Chevrolet Cruze
Disc brakes are a design feature of the Chevrolet Cruze. The activity of changing pads is not too difficult to do independently. Therefore, there is no need to spend money on an expensive service station. Follow the algorithm of actions and achieve your goals
When to change Chevrolet Cruze pads
An indicator of the need to change Chevrolet Cruze brake pads is the size of their thickening. The composition applied to them must be at least 2 millimeters. If the wear of the pads is uneven, then you need to check the caliper. There are clearly problems with it. The engineers provided for the presence of a special plate. If abrasion has reached critical levels, then the pads will whistle while moving. This factor encourages urgent action.
Do not neglect obvious signs. Do not endanger yourself and those around you. It’s good if you only have to reimburse the financial component. Problems arising as a result of inaction: leakage of brake fluid and non-working brake, lengthening of the braking distance, wheel locking and skidding of the car.
Set of tools for repair:
Algorithm for changing rear brake pads of Chevrolet Cruze
We change the brake pads on the rear of the car. Work progress:
You can get to the rear pads by dividing the caliper into parts. There will be two of them. Using the “No. 13” wrench, unscrew the fastening joints. At the same time, hold the guides with the “No.18” key. Do not allow it to rotate - this will lead to boot defects.
After completely removing the fasteners, remove the part of the caliper from above. Remove used pads. Use a screwdriver if necessary. Remove the plate fixing spacers. Over time, they weaken and do not hold the pads securely.
The Chevrolet Cruze has an interesting brake cylinder. Pressing it in is quite problematic. Use an additional tool to accomplish your plan (pliers or wrench). Rotate it to the right with noticeable force. Its surface should be flush with the boot. Otherwise, it is impossible to connect the caliper again. The new pads are much thicker than the old ones.
The upper part of the block is equipped with a specialized protrusion in the center. When carrying out installation work, make sure that this mark coincides with the hole in the brake cylinder. Carry out a thorough cleaning of the location of the elements of the new plates. Install new fasteners. Often they are included in the package of linings.
Carrying out lubrication work with ceramic grease is not a prerequisite, but is recommended by experienced car enthusiasts and specialists. It is necessary to prevent brake pads from sticking and eliminate unnecessary noise.
Lubricate the surfaces of the brake cylinders and the locations of the brake pads themselves. You can apply lubricant to the caliper guides. Don't expect a lightning-fast effect. The paste will be able to settle and partially harden only after some time. It is heat-resistant and does not lose its quality at all. But the noise from the pads will stop completely. Other types of seals will no longer be needed.
After installing the pads, secure the upper part of the caliper with mounting screws. You have completed a complete change of brake pads. The process itself is easy to implement and practically does not require specialized knowledge and skills.
Replacing Chevrolet Cruze front brake pads
Changing the pads on the front is much easier. It is enough to unscrew one fixing screw. It is located at the bottom of the caliper. Apply key "No13". Turning the wheel outward until it stops will greatly facilitate access to the repair site.
You can press in the brake cylinder in advance. Before removing the used pads. Point the screwdriver inward (use the support lever method) and push the cylinder in. Didn't work out right away? Open the caliper and take the larger lever.
Opening the upper part of the caliper freed up passage to the pads. Use the already known algorithm for changing pads. Pull out the used linings and fixing elements. Use a metal brush to clean surfaces before future installation.
Install new fixing plates and brake linings after applying ceramic lubricant (also optional). To reliably treat all surfaces with lubricant, unscrew the second mounting screw.
Close the caliper and tighten the mounting screws. Remember to maintain the guide.
Advice from the experts
Disc brakes are reliable and easy to maintain. Listen to the advice of the master and feel free to carry out repairs yourself.
Carefully study the algorithm for performing repair work. It is useful to watch video material on the topic. Having carefully prepared, you can begin to do the work yourself. Carefully, slowly, diligently carry out all the points of the proposed work algorithms. Pay special attention to the suggestion of treating surfaces with ceramic lubricant. With minimal material and labor costs, you can achieve the desired result.
Do-it-yourself code 95 Chevrolet Cruze error reset
So how can you reset errors on a Chevrolet Cruze yourself? The article is the final one in a series of my experiments on reading and resetting Chevrolet Cruze airbag errors.
I no longer believed in the possibility of self-resetting with Chinese devices when I received a parcel at the post office with another car scanner. The seller promised that this scanner would clear errors on my car (just like the previous one).
I'll tell you a little about the parcel itself. It reached me in about two weeks, delivery was fast, as promised by the seller. The packaging is not wrinkled, which was surprising; nothing inside was damaged. The disc downloaded to the computer quickly, without problems, there was an activator on the disc, video instructions in the application, everything was great. Everything was perfect, it really alarmed me, well, the Chinese don’t have jokes.
Having connected the scanner to the car, it lit up with light blue lights as expected, the drivers installed without problems (available on the disk), after installing the drivers, the lights changed to dark blue. After starting the program, the scanner was normally detected by the computer, I was informed that the scanner software was out of date, by clicking on the button in the program I updated it.
ATTENTION! The software update in the scanner occurs only when the cable is connected to the computer; it is not done over the air, because the Bluetooth module is turned off during the firmware update. During the firmware installation, the scanner lights up and flashes red lights; you should not remove the voltage from it unless you want to get a “brick” instead of an expensive device. After the firmware it glows either blue or dark blue.
The program menu contains a Chevrolet Cruze, I chose 2012, the blocks were diagnosed. And most importantly, the scanner found the SRS unit, read the airbag errors, found a crash record (this is a record that appeared during a collision in the SRS controller, which does not allow a pregnant man to disappear). With a trembling hand, I pressed the error erase button, the scanner began to click the switches, at that moment I expected anything from an error message to the shooting of the surviving airbags (in the seats and doors). And then it happened! The scanner erased the errors and the pregnant man on the instrument panel went OFF!
After gawking a little at the dashboard and the disappearing “Code 95” error message, I decided to turn off the car and turn off the ignition. After turning on the ignition and turning on the car engine, the error did not appear. At this moment I thought that it couldn’t be that I guessed correctly with the resistances of the decoys and the most important thing is that all these resistances have normal contact (I didn’t solder) and the shock sensor was not damaged, because I installed the original sensor in place , into the standard connector. I turned off the ignition again and started the car again, but again nothing, everything works fine.
To experiment with the ignition off, I removed the trick from the belt pretensioner, turned on the ignition, error 95 immediately appeared on the panel, after connecting the trick with the ignition off and turning on the car, the error no longer appeared.
After reading the airbag unit with a scanner, I found an error about the missing connection between the belt pretensioner and the controller. Everything works, I'm amazed!
I described the connection of decoys in the article “Installing decoys”
I recommend! The scanner comes with a 4 GB memory card.