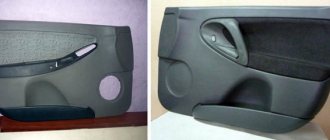
This post is a consequence of the previous one. So, after changing the low beam bulb, the headlight began to shine “a little in the wrong direction”!
Theory! Procedure: 1. Place the car perpendicular to a smooth wall (for example, in a garage) at a distance of 3 meters. 2. Place a 75 kg weight on the driver's seat or have an assistant sit on the seat. 3. Place the screen on the wall as shown in the picture. Line 0 should run along the longitudinal plane of symmetry of the car. Lines 1 and 2 should run through the centers of the low beam lamps. 4. Measure the distance from the center of the headlights to the floor. This will be the distance h on the screen. 5. Set the electric corrector regulator in the car interior to the position with the load of one driver. 6. Cover one headlight with thick material. 7. Turn on the low beam headlights and check the location of the light spots. If the location of the light spots does not correspond to the diagram, adjust the low beam by rotating the adjusting screws on the headlight unit through a special hole in the upper cross member of the radiator frame. Drawings to help!
I adjusted it, but the light became diffused and went far away. “I scratched my turnip,” looked into the headlight, the light bulb seemed to be in place. I decided to postpone this matter until later...
On Saturday, being in the city on business, I stopped by the service station to check what kind of “beard with light” was there.
Adjusting headlights Kalina 1 manually
How to independently adjust the headlights on a Lada Kalina
The car enthusiast will need to make a minimum of effort; for convenience, below is a complete list of necessary components
.
- An additional pair of hands in the person of an assistant.
- Five meter tape measure.
- The nearest flat vertical surface, be it the wall of a house or a fence.
- Cardboard sheet. It is necessary to cover the adjustable headlight.
Scheme for adjusting the head light Armed with everything you need and waiting until it gets dark, you can begin the adjustment process.
It is worth remembering that the car must have the correct tire pressure, without excess load, and the corrector must be set to the zero position. On the selected surface it is necessary to draw a screen according to the diagram shown.
Having measured five meters from a vertical obstacle, you need to install the car perpendicular to it and alternately cover the headlights with a cardboard sheet and adjust them with a six-millimeter hex key.
In this case, it is necessary to compare the light from each headlight with the circuit used. For both headlights, set the upper limit of the low beam to line 2, and bring the bends of the beam boundaries to points A (for the left) and B (for the right).
Lada Kalina Cross 2016, petrol engine 1.6 l., 106 l. p., front drive, manual transmission — service visit
Participate in the discussion can only registered users.
Tools:
- Hex key 5 mm
- Pressure gauge
- Roulette
- Pencil
Successful result of the work performed
Having carried out all the procedures, in the end we get the correct adjustment of Kalina’s headlights, the light of which will not cause discomfort to other road users, and also correctly illuminate the road surface.
It’s doubly nice to realize that, firstly, the setup process was completed independently, and the principle “if you want to do it well, do it yourself” is still relevant, and, secondly, a small, but far from unnecessary amount of money was saved.
What is needed to adjust the headlights on Kalina 1
The set of tools for servicing Kalina needs a simple one, but it should be prepared in advance so that nothing distracts you later. As a rule, a standard suitcase that is always kept in the trunk is sufficient. Just in case, it is advisable to immediately prepare a jack and an emergency stop sign.
Working with headlights is not difficult, the main thing is to act carefully
Adjusting headlights Kalina 1 manually
During the operation of the car, an effect occurs when the headlights lower slightly. This happens due to the fact that on uneven roads vibration occurs in the body, which is transmitted to all fasteners. This is a simple law of physics. So, on the Lada Kalina, adjusting the headlights is quite easy.
will tell you how to adjust the headlights on a Lada Kalina. Basic recommendations for the adjustment process are given.
Parts and consumables:
- Spare wheel
- Additional weight of 75 kg
- Opaque material
- Large sheet of cardboard/plywood
Preparing to adjust the headlights on Kalina 1
Adjusting headlights on Kalina 2 and 1 begins with preparation. A beginner should study the manual or watch a video - this way it will be clear in what sequence to act, even if there is no knowledge, skills, or experience.
General scheme of actions:
- Align the body level, test the current tire pressure - the parameter must strictly meet the optimal criteria.
- Remove all dirt from the optics - oil, dust, and other substances. Typically, plain water is used; if this is not enough, you can use an organic-based solvent.
- Lubricate the adjustment screws with a penetrating liquid, treat the fasteners, and check the reliability of the optics in the niches specially designed for this.
The final stage is another tire pressure test. If there is a need to make adjustments, the car is parked on a level surface (a strict requirement), then vertical markings are made on the wall nearby and the pressure inside the tires is tested.
Visual diagrams for calculating the radius of illumination and the necessary markings help you do the work yourself
Main design options and criteria affecting quality
The following types of products can be found in the retail chain:
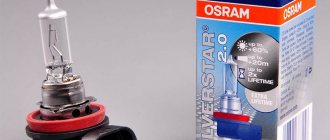
- Products under the Bosch brand are always sold as a set (2 pieces) and are distinguished by fairly durable glass and good quality luminous flux. We can say that this is the most reliable option, but its price is noticeably higher than all other analogues.
- Production PTFs are in many ways similar to those described above, but in fact their quality is noticeably inferior to the first option. The only advantage is lower cost.
- Kirzhach fog lights on Kalina have lens-shaped convex glass, which allows you to concentrate the light flux and direct it exactly where it is required. Quite a good and reliable solution.
- Products under the ProSport brand and other similar brands are produced by Chinese factories. It is difficult to judge their reliability and quality, since one option can be excellent, while the second one will fail in a very short time.
Bosch products also play leading roles here.
The question of which fog lights are best for Kalina raises a number of disputes, so the decision is yours. As practice shows, the most popular options are Bosch and Kirzhach.
Important! All of the above options are excellent for installation, and you do not have to make any alterations to the design.
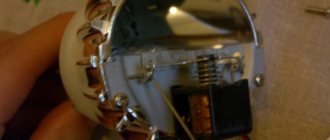
Step-by-step replacement instructions
Each H7 standard bulb has an iron base, which is pressed to the headlamp with a wire clamp. To bend this bracket, just get close to the plane of the headlight from behind. Let's open the hood and see what exactly will bother us.
The procedure for dismantling the lights
You should know that the Lada Kalina 1118 flashlight system consists of:
- housings;
- glass (polycarbonate);
- lamps;
- reflector;
- wiring;
- lamp plugs;
- decorative inserts (masks).
As for the ease of removal and subsequent replacement of the lamp on the 1118 model, the process usually involves removing the front bumper. After this, the screws on the top and bottom of the lighting fasteners become accessible. After dismantling them, you can immediately remove the headlight unit, not forgetting to first remove the blocks with wires.
Removing the front optics
However, not all car enthusiasts have a lot of time to replace the lighting system or experience in removing the bumper. For this reason, a more popular method is to change the Kalina headlight without removing the bumper.
To do this you will need to use:
- key for 8 and 10;
- a set of screwdrivers (flat and Phillips);
- new lighting system component.
A set of tools
in order to adjust the block lighting on the Lada. You will need to complete the following steps:
- Remove the air filter housing, as well as the coolant unit.
- Remove the PTF plug using a screwdriver.
- Unscrew the bolt on the lower fastener of the lighting component using a 10mm wrench. Insert your hand into the PTF hole.
- Remove the bolts located on the upper fastener of the light block component. They are located closer to the radiator. Use the key at 8.
- Unscrew the screw securing the product to the car fender using a large Phillips screwdriver.
- Expand the Lada Kalina headlamp so as to move the part closest to the radiator closer to the car engine. This measure will allow you to remove the lower fasteners from the seat.
- Remove the lower iron fasteners of the headlight. To do this, you will need to remove a couple of bolts with a short head.
How to adjust headlights on a Lada Granta correctly
The headlight corrector equipped on the Lada Granta can only compensate for the different power of the car, however, leveling the horizontal surface is the task of the car owner. The main reason for adjusting the headlights is insufficient lighting while driving. Here it is time to pay attention to the following factors:
- Mostly the new Granta, which comes off the assembly line, is adjusted to the weight of the average driver (75-80 kg). But if your body weight differs significantly from that specified in the settings, then it is worth adjusting the headlights after purchasing the vehicle.
- Damage to the hydraulic corrector. This is expressed in curved headlight illumination and difficulty in setting.
- After driving on uneven, bumpy roads, off-road.
- After purchasing a used car, since the headlights were adjusted by the previous owner of the Lada Granta to suit his needs and body weight.
It’s worth dwelling in a little more detail on hydraulic correctors. These devices are equipped on vehicles by the manufacturer and are designed to adjust the headlights lower or higher depending on the degree of load of the vehicle. Since they do not have automatic adjustment, each headlight requires independent adjustment. The corrector controls are located next to the light switch handle. The zero position corresponds to a car with a driver, that is, when there is one person in the cabin.
Operating principle of the device in Grant
- The corrector cylinder must be controlled using the handle.
- The cylinder is responsible for regulating the pressure in the hoses extending to the pusher.
- The pushrods are located in the headlights. The higher the pressure rises in the tube, the more dynamically the liquid presses on the rod (located in the internal compartment of the pusher).
- The main position for adjusting the headlights is the position in which the rod itself is located.
When the corrector on the Grant is damaged (one headlight does not respond to it), the pusher should be put in order. It is the malfunction of the latter that mainly provokes the breakdown of the entire device. There are 2 ways to repair a pusher. With the first, no further adjustment is provided. To implement this technique you need to do the following:
- remove the damaged pusher from the headlight;
- warm up the pusher hose (which gives greater flexibility), and then remove the pusher from it;
- tighten the self-tapping screw from the side of the hose (you need to tighten it at an angle, since the level of protrusion of the rod directly depends on the depth of tightening of the screw);
- adjust the length of the screw to obtain the desired result.
To work on adjusting the headlights, you need to prepare the tool in advance:
- 6 mm hexagon or Phillips screwdriver;
- a sheet of chipboard 3x3 m or a vertical flat panel made of another material;
- tape measure or long ruler;
- a couple of crayons;
- several newspapers.
Adjusting Lada Granta headlights: instructions with video
First of all, prepare your car for adjustment procedures. To do this, you need to check the pressure in the wheels, set the corrector to the zero position, and then turn on the parking brake.
In the driver's seat in the cabin there is a cargo weighing 70-75 kg, in the form of an imitation of a driver. A screen is made from chipboard, after which it is placed in front of the car at a distance of 3-5 m. Next, you need to fill the tank full and put on the spare wheel - this will all help reproduce standard conditions when driving a Lada Granta. Be sure to remove any dirt and dust from the headlights, and also check the body for deformations. If there are identified nuances, adjusting the headlights is quite problematic.
It is worth remembering that adjustment work should be carried out exclusively in a room with leveled walls (at least one). The procedure for self-adjusting headlights is carried out in the following order:
- Place the Lada Granta car on a flat surface parallel to a flat wall. The distance to the wall should be 3-5 m.
- Next, measure the height from the floor to the low beam bulbs, then mark them with chalk on the wall opposite each headlight. This will indicate the top point of movement of the light beam.
- Now you need to step back down about 35 mm, making another mark.
- Cover one headlight with a sheet of newspaper so that the light does not overlap the light beam of the other headlight. Then you need to turn on the low beam.
- Using the adjusting device, you should adjust the height of the light so that the edge at the top matches the lines left on the wall.
- Next, you need to close the 2nd headlight and adjust it in an identical way.
- If necessary, adjust the light using special valves (located on the headlights) to the right and left.
- All that remains is to test your Grant for accuracy and serviceability of lighting.
Settings
On the Lada Granta, adjusting the headlights is quite simple and is done using two screws of the mechanical hydraulic corrector:
- horizontally - using a white plastic wing-head screw;
- vertically - using white plastic. Its adjustment can be done with a Phillips screwdriver inserted at an angle into a special hole in the car body.
By rotating them one by one, you need to ensure that the beams of rays exactly coincide with the markings on the wall. If this cannot be done, the hydraulic corrector must be replaced. The cylinders may be jammed or the seal may be compromised due to damage to the tubes or seals. In this case, the corrector will need to be replaced, since its repair is ineffective.
How to turn on the dimensions, low and high beam headlights of Lada Kalina
Hello dear reader of the auto blog Avtokak.ru. Today we will try to look at how to turn on the low and high beam headlights, as well as the dimensions on a Lada Kalina car. Of course, if you are an experienced driver, it will not be difficult for you to turn the lighting on and off, but for a beginner and someone who is just getting acquainted with this car, I think it will be useful.
First, let's figure out where the headlight control unit is located on Kalina, and it is located on the left under the air duct.
In order to turn on the dimensions on the viburnum, you need to move the lever to the middle position and yes, the dimensions do not depend on the ignition switch, that is, the dimensions will light up in any case and it does not depend on whether you have the ignition on or not.
The low beam headlights are turned on by moving the switch to the rightmost position. It will only work when the ignition is on. But, if you turn off the ignition, only the dimensions will remain on.
We figured out the low and high beams on Kalina, now we just need to figure out how to turn on the high beam headlights. To do this, press the left steering column switch away from you. High beam works provided that you have low beam headlights on.
Many people are interested in the question, how to blink the high beams, this is done very simply, you need to pull the lever on the left under the steering wheel towards you and the high beams will be on exactly as long as you hold the lever. Works even when the ignition is off.
Well, that’s all we looked at, how to turn on and off the high and low beam headlights.
Turning on the dimensions, low and high beam headlights on the Lada Kalina (video)
High beam headlights do not work on Kalina
Now let's look at the main reasons why the long-range signal on a Lada Kalina car does not work.
The first reason is a burnt out light bulb, if necessary, replace it with a new one.
The second reason is the high beam fuse F14 (10 A) (right), (10 A) F15 (left). If necessary, replace with a new fuse, observing the amperage.
The third reason is relay K 7 can be solved by replacement.
The fourth reason is wiring.
The fifth reason is the high beam switch or its connector.
Reasons for low beam headlights on Kalina
The low beam bulb is burnt out and can be resolved by replacing it.
Fuse F 12 (right) F13 (left) has blown
Light control unit
Selection of fog lights
Bright and stylish headlights
At the factory, fog lights are installed only on Kalina luxury equipment. Owners of other car models install similar optics themselves. To begin with, auto mechanics recommend finding out what types of foglights there are. PTFs are distinguished according to the following criteria:
- manufacturer;
- quality of workmanship;
- configurations
Taking into account these factors, the appropriate PTF connection diagram is used. Fog lights from Bosch are equipped with high quality flat glass. produces similar optics with convex glass. Luch products are considered an analogue of Bosch (only without a misting valve). If you want to save money, you can install Chinese-made fog lights on your Lada.
If we talk about domestic goods, it should be noted that PTF with flat glass is produced in Ryazan. In this case, the same connection diagram for fog lights is used as for products. Please note that, in addition to optics, you will need to buy a connection kit consisting of a relay, wire and button.
For those who are confident in their abilities
To independently install and configure fog lights, car enthusiasts will still need certain skills. Initially, you need to make sure that the car has the necessary space for this lighting element. Experienced motorists know that the distance from the end of the bumper to the headlights should be the same, and the fog lights should be located above the center of the main optics.
No matter how trivial it sounds, but first you need to buy fog lights. If you install them in specially designated areas of the car, then choose a suitable shape; if there are no such places, then any will be acceptable.
What equipment will you need:
- the headlights themselves;
- for connecting wires (they may be included in the equipment);
- a tool for inserting optics into the bumper and for installing lighting equipment;
- other means and tools that should always be at hand.
It is worth paying attention to the relay; the possibility of installing it will be indicated by specially prepared places for such illuminators. The button for turning on the fog lights in the cabin will also greatly simplify installation.
Indispensable attribute
Fog lights are designed for bad weather conditions when it is difficult to drive due to reduced visibility. They increase the safety of both the passengers of the vehicle and other road users.
In bad weather, conventional headlights are of little use, since the light beam is reflected from water droplets, and creates the feeling that the car is in a spot of light, which prevents the driver from seeing where he is pointing the car. Anti-fog models - scatter light directly in front of the car, which spreads along the roadway. This happens because the beam comes out dense, wide and flat.
Typically, these headlights emit white or yellow light and are installed both at the front and rear of the car. Adjusting the fog lights depending on environmental conditions does not require special skills and can be done independently.
What is a proofreader for?
Probably every driver has found himself in a situation where an oncoming car is blinding and it is impossible to see anything. Vision is restored only after some time. To prevent this from happening, headlight spotters are installed on cars. The device maintains the position of the optical axis during changes in the position of the vehicle body. The light generated by the optics should be adjusted when the machine is not yet loaded. After loading, the light flux changes direction, moving relative to the optical axis. To correct the situation, a correction system is needed.
If the trunk of the car is heavily loaded, the front part of the body necessarily rises a little. The light from the headlights goes up and can blind the driver of an oncoming car. The auto-corrector adjusts the tilt of the light - the beam remains at the same level when the trunk of the car is overloaded or for some reason its front part is raised.
Do it yourself or contact a specialist
Sometimes the cost of installing fog lights can significantly exceed a driver's financial limit. And inside every person there is a little accountant who tries to save every penny.
Let's say right away that installing and adjusting fog lights with your own hands is quite doable. To do this, you do not need to be a particularly talented craftsman, since this work takes little time and does not require serious experience. There is even an opinion among car enthusiasts that one installation will be enough to then teach your friend this business.