17 June 2016 25,383
Disassembling the Priora headlight may be required in case of modification or tuning (paint masks, install lenses, etc.), or for repairs (use new glass, or glue the old one well so that the headlight does not sweat). Let's look at the process of removing glass from a headlight in detail.
The process of disassembling a Priora headlight can vary greatly, and it depends on the manufacturer of the optics. Removing glass from a Bosch headlight is much easier than from a Kirzhach headlight.
General procedure for disassembling the headlight:
- Remove the light bulbs from the headlight;
- Heat the sealant until it goes from hard to soft, like chewing gum;
- Separate the headlight housing and glass using a utility knife.
In the case of Bosch, a household hair dryer will be enough for heating. It will be very difficult to melt the sealant on Kirzhach headlights, so here are some tips:
1. To bring the sealant to the desired state, use an industrial hair dryer (set the temperature to about 200..250 degrees). The melting temperature of the sealant is very close to the melting temperature of plastic, be careful not to damage the headlight housing!
2. To heat the glue evenly, the headlight unit can be wrapped in cloth and placed in the oven for 15 minutes at a temperature of about 170 degrees. More details about this in the video:
3. Instead of an oven, you can use a box with a hole into which you insert a technical hair dryer.
4. The junction of the glass and the body is covered along the entire perimeter by a plastic side. It will have to be carefully bent (by heating), or, in extreme cases, cut off.
5. If all else fails, you can cut off the headlight glass using a Dremel. Glue it back together using quick-drying epoxy glue, such as Contact. It is worth considering that after cutting out the glass it will become 1-2 millimeters smaller.
Attention!
You can remove the headlight sealant using a special product, sold on AliExpress (see selection of products from Ali). Instructions using Vesta headlights as an example.
Have you dismantled the Priora headlights yourself? What recommendations can you leave for future auto tuning enthusiasts? Let us remind you that some modifications can be made without disassembling the optics, for example, installing eyelashes or buying already tuning headlights for the Priora.
Where can I buy
: in our online store (Priora Headlights category).
Photo: 7ski in-flight magazine
Key words: Lada Priora headlights
Share on social networks:
Found an error? Select it and press Ctrl+Enter..
Comments
Guests cannot leave comments on the site, please log in.
Products for LADA at the best price
A selection of accessories for LADA from AliExpress
Published: March 23, 2016
I welcome you to the website dedicated to automotive optics and lighting devices - FaraInfo.
Today in the “Repair” section I will tell you how to disassemble the headlight on a Lada Priora at home. Disassembling a headlight is an activity that does not require special skills or special equipment. tool. However, without knowing the various subtleties and not following a certain sequence, you can fumble for a long time or break something.
Why do you need to disassemble the headlight?
Disassembling the headlight may be necessary when you want to do headlight tuning, for example, you decide to tint the headlights or give angel eyes to your car.
Before you disassemble the headlight on a Priora, you need to understand something. The fact is that the headlights on the Lada Priora come in two types - produced by Kirzhach and BOSCH. Visually they are not different, the difference between them is only during disassembly. It is not difficult to disassemble Kirzhach headlights, which cannot be said about BOSCH headlights. German quality and the powerful sealant used in the manufacture of these headlights make them an “impregnable fortress”. The headlight glass is glued with a hard sealant and holds so tightly that during disassembly, due to the need to heat the sealant very much, the body of the headlight itself melts. There is, however, a way out to simplify the process; you need to cut off the top plastic strip that runs around the entire headlight and along with it some of this sealant with a utility knife.
As I already said, the headlamp consists of a plastic body and curved glass, which are securely glued together using sealant. Disassembling the Lada Priora headlight will require you to have a household hair dryer (we will use it to heat the joint), a stationery knife (with its help you can cut off the plastic strip that was discussed at the beginning), as well as several screwdrivers (with which you can separate the two parts block headlights).
How to understand that the headlight is faulty
The headlights of the Lada Priora often fail, resulting in poor road illumination. Replacing Priora front headlights may be required if the following defects are present:
- the headlight mounting elements are broken;
- headlights constantly fog up;
- reflector malfunction;
- faulty electrical connectors.
The Lada Priora headlights have a non-separable design. Therefore, for tuning, replacement or repair, you will have to remove the headlight completely.
Instructions for replacing fog lamp glass
Replacing PTF glass can be done by a person who does not have special knowledge, skills and tools.
- To replace the fog lamp glass, you need to find out how the PTF is attached to the bumper or to the car body? As a rule, the headlight is attached to the bumper with screws or nuts. The most convenient way is to partially or completely remove the bumper from the car. There is nothing complicated about this; to make the process easier, use the instructions for repairing your car.
- Then disconnect the PTF terminals from the on-board network.
- Inspect the removed fog lamp, determine the integrity of the reflective surface of the headlight.
- Apply a sufficient amount of adhesive-sealant to the dry, grease-free rim of the headlight so that the layer of sealant fills the entire space between the glass and the headlight housing; you can use any water-heat-resistant adhesive-sealant that meets the operating conditions of the PTF: temperature from -45°C to +150 °C
- Press the glass firmly against the headlight body (you can use a clamp for a better result) until the sealant is completely dry. That's the whole procedure for replacing PTF glass.
- Now install the light bulb, attach the PTF to the bumper, connect the terminals and put the bumper back in the reverse order.
Do-it-yourself headlight adjustment
It is recommended to adjust the vehicle's front lighting devices annually; the headlights should also be adjusted if:
- new front optics are installed on the car;
- wheels of a different radius are installed;
- there was a minor accident;
- The front suspension has been repaired.
There are several options for adjusting the front optics; the work can be done:
- in a car service center at a special stand;
- independently, using a flat area and a building wall with a smooth, level surface.
You can adjust the headlights yourself either at the stand or without using special equipment. Let’s consider the second option, it is constantly used by car enthusiasts.
For example, let's take the adjustment of the headlights on a Ford Fusion car. It is convenient to carry out work on the street in the dark; first of all, we choose a flat area as possible and find a place where there is a white, flat wall nearby:
- drive close to the wall, mark the center of the car with colored chalk, mark the center of each headlight;
- we drive away from the wall at a distance of 5 meters;
- Next we need a laser level, we install it next to the rear wheel - we direct its beam so that it passes along the front wheel, at its very bottom;
- further it passes better onto the wall, a laser dot is visible on it;
- the point from the laser on the wall will be the level for one headlight (in this case, on the right side), we also set the level for the left headlight in the same way;
- installation of points is necessary for correct leveling - the platform and the wall may be uneven;
- take a measuring tool (tape measure), measure the distance from the ground to the center of the headlight (the place where the lamp is located). For Ford Fusion, the height is approximately 0.7 m;
- in the area of the points obtained by the laser, we measure on the wall the distance from the ground upward by 0.7 m on each side;
- draw three lines - two vertical (at the laser points) and one horizontal (at a height of 70 cm), then another horizontal strip 5 cm lower.
Why is the second horizontal line needed? On a Ford Fusion, the angle of incidence of the low beam headlights is one percent. If the car moves 1 meter from the wall, then the headlights tilt down by 1 cm, respectively, at a distance of 5 m - by 5 cm.
Let’s say if the car was 7 m from the wall, then the headlights should be lowered 7 cm from the horizontal level.
Each car model has its own low beam angle; there is always a sticker or designation in the front of the car under the hood.
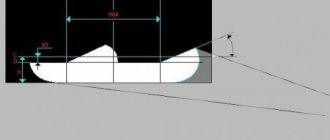
With adjusted optics, the light from the headlights follows the bottom line; the refraction of light at an upward angle on each headlight should be at the point of intersection of the bottom horizontal line with the vertical line.
A correctly adjusted headlight should shine as shown in the figure below; here the refraction of light begins precisely at the intersection point, but in this case the light can be raised a little higher.
To adjust the headlights on a Ford Fusion, we use a screwdriver or wrench with a 13 mm head. The light is adjusted by two nuts located on top of the optics:
- one of them is closer to the front wing;
- the other nut is almost in the center of the headlight.
The nut located in the center of the optics adjusts the height of the illumination; using the lateral adjustment (closer to the wing), the light is shifted to the right or left.
Before you begin adjusting the headlights, you must:
- set the same tire pressure;
- rock the front of the car up and down several times until the suspension returns to its normal position;
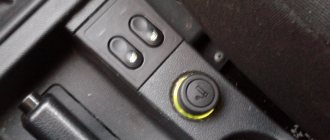
- switch the electric corrector to position “0” (right lever in the figure below).
Various videos are posted on the channel; they discuss in detail the issues of adjusting headlights with visual examples.
Source
Examples of PTF glass installation
More examples of installing glass on headlights in our VK group Our VKontakte Group
Photo reports on replacing the fog lamp glass:
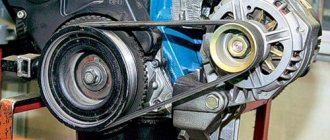
One of the significant disadvantages of the Lada Priora is the ill-conceived design of the headlights; they are not dismountable, so in order to replace the glass in the headlight or the light bulb, you either have to buy a new headlight, or get out and disassemble the old one. “It’s not the first time for our brother to get out,” as they say, there have been more difficult cases. However, despite this question , is a big problem. The fact is that this requires a lot of time and effort, as well as some experience. The Priora is equipped with two and “BOSCH” headlights. The first ones are much more difficult to disassemble, but still possible. Today, I will tell you how to do it correctly so that you don’t have to buy new headlights.
The headlight block consists of two parts, which are fastened together with very strong sealant or glue. In order to disassemble the Priora headlight, you need a household hairdryer; it heats up the glued joint, after which the sealant melts and becomes liquid, which allows you to separate the two parts of the headlight block.
How to remove a headlight on a Priora? 2 proven methods, instructions and tips
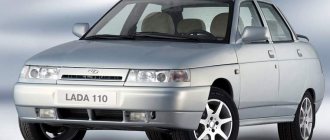
Sooner or later, every owner of a LADA Priora car faces the need to change headlights.
There can be many reasons for this:
- damage to optics in an accident;
- the need to replace internal parts: reflector or corrector;
- to eliminate a phenomenon such as fogging (in this case, sizing is required).
What tools will you need?
Headlights play an important role in the design of LADA Priora. Therefore, when removing a headlight for its subsequent replacement, it is necessary to know well the sequence of disassembly and assembly of the structure. To remove the headlight block on a Priora, many go to a service station. However, this procedure is so simple that if you have certain tools, you can handle this task yourself.
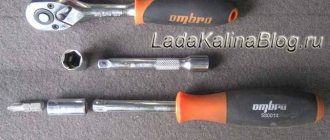
In this case, the following tools will be required for work:
- wrench 8 or 10 mm;
- ratchet;
- a screwdriver with a cross-shaped blade;
- extension.
How to disassemble the headlight of a Lada Priora - step-by-step manual
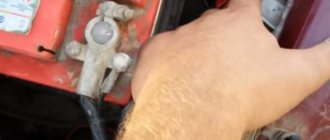
2. Take a hairdryer, heat it to a temperature of 250° and heat the joint as in the photo. We heat the sealant evenly around the entire circumference of the headlight until it begins to melt.
Note: When disassembling a Priora headlight, some “craftsmen” recommend cutting off the plastic side that runs along the entire edge of the headlight. This certainly simplifies the process, but as practice shows, this is not absolutely necessary; it can only be bent a little. If the joint is well heated, then you can “open” the headlight without damaging the body of the headlight unit.
3. When the joint of the headlight unit is warmed up, carefully separate the front part, while continuing to warm up. On BOSCH headlights you also need to get four fixing brackets.
Adjusting Priora headlights using a corrector
- cracks and breaks in the body;
- breakdown in the electrical connectors of the headlight;
- damage to reflectors;
- defects in fasteners;
- clouding of the optics (the headlight sweats or becomes dirty).
Replacing a headlight is one of the activities after which it is impossible to do without adjusting the lighting fixtures, since the light must be properly dispersed. Headlight leveling plays a decisive role in improving driving safety. Therefore, knowing how to replace front or rear lights is only half of the whole replacement process, where an important role is also played by how to adjust new headlights correctly.
With the right approach, the process of replacing headlights is not difficult.
It is important to follow the exact sequence of actions when disassembling and assembling the flashlight
At the level of the middle of the headlights, draw a horizontal line on the wall (L. 1), approximately 65-75mm. Below we draw a line (l. 2). Two vertical lines in the middle of each headlight (l. A) (l. B), another vertical line strictly in the middle between them. There should be 1 person in the car, the tire pressure should be within normal limits and be the same everywhere.
- Phillips screwdriver;
- round screwdriver;
- screwdriver;
- ruler;
- pencil.
To adjust the headlights, you need to park the car close to the wall and turn on the low beam mode. After this, you should alternately mark the centers of the traces of the two headlights and the centers of their symmetry. Connect the dots to form a straight horizontal line. The second line should be drawn parallel to the first, but with an interval of 5-12 cm, and the third - at a distance of 22 cm from the first. In addition to horizontal lines, it is necessary to draw a strictly vertical line through the center points of the headlights and the car.
Removing the front headlight units on a Lada Priora car is carried out to repair or replace them if restoration is impossible, as well as when carrying out other work in which the presence of headlights will interfere with the progress of their implementation. To carry out repair work, prepare a standard set of tools and perform the following sequence of actions:
- De-energize the vehicle by disconnecting the negative terminal from the battery.
- Dismantle the front bumper, as it will interfere with further work.
- We press out the plastic clips and disconnect the block with power wires from the headlight unit.
- Next, use a spanner wrench to unscrew the front lower and side bolts securing the headlight to the car body.
Now you need to remove the decorative headlight cover. To do this, use a Phillips screwdriver to unscrew the four screws that secure it.
- We unscrew the remaining upper mounting bolts and remove the headlight unit from the car.
- Make any necessary repairs or replacements, then perform installation in reverse order.
At this point, the repair work to remove the front headlight unit on the Lada Priora car has been completed.
Painting headlights
Tuning the front and rear lights on a Priora is not limited to increasing the aperture ratio. They can be tinted. But this does not mean that you need to paint the glass - the light will simply become cloudy. The tinting effect is obtained due to a change in the color of the substrate. This is done using high temperature paint.
This is done in the following order:
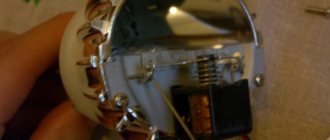
- The entire block is removed and the backing is removed;
- Wipe off the chrome from the substrate (zero polish will help). Cover the substrate with two or three layers of primer and wait about an hour;
- Apply 4-5 layers of paint over the primer, wait for each layer to dry;
- Assemble the block lights, close all the cracks to prevent fogging;
- After painting, all that remains is to adjust them. The main thing is that the light is not too dim and does not cause inconvenience when driving.
Adjustment after any modification of the optics is performed as follows:
- Place the car at a distance of 5 m from a flat wall (for example, opposite the garage);
- Set the adjusting screws under the hood to “0”. Put a person of similar height behind the wheel;
- The headlights are adjusted one by one; while one is being adjusted, the second one is closed;
- The clear edge of the light should be 10 mm below the top edge of the headlight.