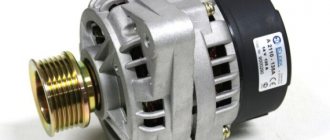
The electrical equipment of a modern car is a complex set of instruments and devices. The on-board power supply is supplied from the battery, and after starting the engine - from the generator. This device, in good condition, provides a voltage within 14 - 14.2 V. Checking the VAZ 2107 generator will not only help identify its malfunctions, but also avoid battery failure.
If the voltage is insufficient, its charge becomes incomplete, which causes a drop in the density of the electrolyte. At low temperatures, this phenomenon can cause the liquid to freeze. The formation of ice crystals leads to the gradual destruction of the battery plates. To establish the output voltage parameters of the generator, you can ring it with a conventional multimeter.
Purpose of a car electric generator
This device converts torque into electricity. This element feeds:
- car ignition system;
- automotive lighting;
- electronic equipment of the car (for example, on-board PC).
The power of the electric generator may not be enough when all consumers are turned on. This will cause the batteries to drain quickly. When the full load is turned on, the voltage of the generator of the VAZ 2110 car and other models of the manufacturer drops below the permissible value, which leads to battery discharge. .
A little information about them
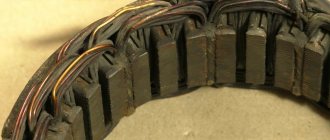
The brushes, which will be discussed below, are made from graphite; they look black, so you can hear them sometimes called carbon. They find their application in automobile and other generators, electric motors and other similar devices.
Graphite does not have good abrasion resistance, so during production they are impregnated with special compounds to increase their service life.
Such devices are always equipped with two brushes, which ensure its functionality. One brush is supplied with voltage from a relay that regulates the amount of voltage generated by the generator, and the second connects the armature to the vehicle’s ground. During the operation of the generator, their inevitable wear occurs, so periodic replacement of these parts is required.
Where is the generating unit installed on VAZ vehicles?
To find the generator in AvtoVAZ cars, just lift the hood and inspect the front left corner. The device is located behind the radiator in a rather inaccessible place.
Appearance of the VAZ 2108-2115 generator
To remove the generating unit, specialists often use lifts or dismantle it from the pit. Due to the difficulty of carrying out such operations, it is important to know that you can check the charging of the generator with a multimeter on a VAZ 2110 car and other modifications of the manufacturer without removing the device.
Replacing the VAZ 2101 – 2106 generator
The need to replace the generator on a VAZ car may occur when its windings burn out, an interturn short circuit occurs, the case breaks, and other reasons. But today, I would like to talk about replacing the VAZ generator in the case when its power is no longer sufficient...
Imagine the situation - you are the owner of a VAZ 2101 - 2106, you bought and installed a powerful amplifier, installed fog lights of 50 W each. A standard generator that produces a maximum current of 42A cannot cope with such a load.
And if all additional equipment is turned on, then there will be nothing left to charge the battery.
It’s these types of cases of replacing a VAZ generator that I want to talk about. Let's consider which generators can replace our long-suffering G-221.
Generators that replace G - 221
What models of generators are suitable for replacement in a VAZ 2101 - 2106 car?
- The first option is a generator from a VAZ 2105; it produces a maximum current of 55A. Not much, but if you don’t use a lot of additional equipment, then this is an ideal option. This generator replaces the G-221 generator without any modifications to the mounting. There are only minor changes in the connection to the electrical wiring; they are due to the fact that in the connection diagram of the G-221 generator the relay-regulator is placed separately, while in the five-wheel generator the relay regulator is combined with the design of the brushes.
- The next option for installing a chisel generator on a VAZ 2101 - 2106. It produces 55A, which is quite acceptable for a small amount of additional equipment.
- The third option for replacing a standard VAZ generator is a generator from a VAZ 21074, its marking is 372.3701-03. It is capable of delivering about 73A of current, which will be sufficient for the average motorist. The installation is practically no different from the previous one.
- The fourth option is to install a generator from an injection Niva. It produces about 80A, which will satisfy the requirements even if a large number of additional light bulbs and amplifiers are installed. It will not let the light go out at idle. But the installation does not require very big changes.
- The fifth and final option is to replace the standard G - 221 with a generator from a VAZ 2110, which produces 105 - 110A (depending on the specific model).
- There are other options (foreign cars, Chinese, our semi-underground companies), but you can consider them here endlessly.
We have listed the most realistic and easiest ways to replace a generator in a VAZ 2106 car. Next we will look at how to practically implement the installation of a generator from a VAZ 21074.
Installation of a generator from a VAZ 21074i to a VAZ 2106 (2101)
Information found on the six forum. First, it’s worth noting (as far as I understand), there are different models that fit these parameters, they recommend taking 2107-3701010.
If you chose 2107-3701010, then now I will quote the installation on the VAZ 2106. It is also much easier to find spare parts for the first generator.
Photo from the back:
A little about the relay regulator. I have already read more than one negative review about the K1216EN1 relay regulator. In particular, thermal compensation is poorly implemented in it, that is, the charge voltage does not change depending on the ambient temperature.
So the author almost immediately replaced the standard RR with a 67.3702-01 regulator.
Installing a new generator instead of an old one is not difficult; everything fits into a standard mount. Now let's look at the connection.
The very first thing you need to do is disconnect and insulate the wires from the relay regulator. As for the connection on the generator itself, everything is almost the same as in the old one. Wires with a terminal in the form of a ring - in the old place, a bolt that was also on the old generator. The gray wire is isolated and not connected anywhere, the yellow wire is connected to the terminal.
In the form of a control lamp, a lamp from a repeater with a power of 3 W is used. To connect it, two wires are used - double orange and yellow.
The author is delighted with the new generator. Charging is maintained reliably even at 1500 rpm. And all those shortcomings that were there are gone...
Operating principle of an electric generator
The operating algorithm of the generating unit on VAZ cars is as follows:
- when the ignition is activated, the current begins to move to the excitation wires;
- the armature creates an e/m field passing through the stator winding;
- voltage appears at the terminals;
- after the armature reaches a significant rotation speed, the system switches to self-excitation mode;
- The produced alternating current is converted into direct current through a rectifier unit.
- when the crankshaft rotation speed jumps, the voltage regulator is activated (the time interval for activating the excitation wire is adjusted).
Those who want to know how to check the generator on VAZ 2109 cars and newer models of the manufacturer should take into account that the general connection diagram may include a built-in voltmeter and a charge lamp. The latter is located on the dashboard.
Monitoring the performance of components
To perform this operation, it is necessary to remove the device from the vehicle and clean it of dirt. The verification procedure is as follows:
- We switch the multimeter to resistance measurement mode. We install the positive probe on terminal “30”, and the negative probe on ground. Readings close to zero indicate that the bridge or generator stator has failed.
- Positive diodes are checked by installing a positive probe on the terminal of one of the rectifier unit mounting bolts, and a negative probe on ground. Zero or close to zero instrument readings indicate that the diode bridge is faulty.
- To check the rotor, it is necessary to measure the resistance between the slip rings. In working condition it should be within a few ohms. If the resistance is near zero, then a short circuit has occurred in the winding.
Device for mounting AvtoVAZ electric generators
Sometimes, to check the functionality of such devices, it is necessary to completely dismantle them. Before checking a generator removed from a VAZ 2110 and other cars from the same manufacturer with a multimeter, you should understand the structure of the generating unit.
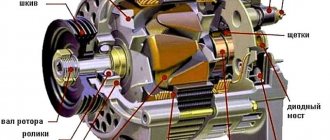
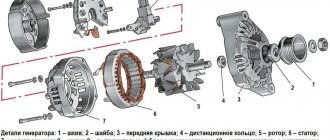
The design may differ slightly depending on the modification of the device. But the main components of electric generators include the stator, rotor, aluminum covers, pulley, brushes, and bearings.
Rotor design features
The part is made in the form of a shaft with a corrugated surface, pressed steel bushings, and beak-shaped poles. Together these elements form an electromagnetic core.
Between the poles on the bushing there is an exciting winding protected by a plastic housing. A cooling impeller and a generator pulley are attached to the front of the shaft. The rotor is installed on bearings. The rear ball bearing is pressed onto the shaft. The front one is fixed with special washers on the cover.
Generator stator structure
This device is made of thin plates (up to 1 mm thick) made of electrical steel. The inner surface of the stator has grooves for laying three-phase windings. Each winding includes 6 coils.
Mounting the VAZ electric generator
When servicing such devices, it is often necessary to remove them. The generating units are fixed using special brackets secured with bolts. It is more convenient to unscrew this mount while under the car.
Drawing of the VAZ 2108-2115 generator
The electric generators are also attached to the drive belt tensioner plate. Fixation is carried out using a nut. Different AvtoVAZ vehicles are equipped with different types of drive belts. For example, model 2108 (and its modifications) has V-belts, and VAZ 2111 has poly-V-belts.
This difference is due to the different configuration of the internal combustion engines of VAZ cars. Newer models (for example, 2114b 2115) are equipped with powerful air conditioning systems and electric power steering. Therefore, they require better adhesion of the belt to the pulleys, as well as a current output of 80 A or more.
Useful tips
If, before replacing the brushes, you begin to notice noise when the generator is running, then this malfunction may indicate wear on the generator bearings.
Increased play may indicate premature bearing wear. In this case, you need to replace it.
Often, an overtightened alternator belt leads to bearing failure.
To prevent breakdowns of vehicle systems, it is advisable to regularly check components according to the manufacturer’s recommendations. Try to create a habit of periodically inspecting the engine compartment for noise. This will avoid serious damage and solve existing problems with minimal financial costs. It’s better to do everything right than to do it “as always.” Good luck on your journey!
It is forbidden to start a car generator with a disconnected battery. This will lead to a short-term increase in voltage at terminal “30”, as a result of which the parts of the rectifier and the vehicle’s electrical network will become unusable.
To replace the brushes you will need the following tools:
- ring wrenches for “8”, “13”;
- ratchet;
- a set of nozzles “for 13”, “for 10”, “for 17”; "at 19";
- flat and Phillips screwdriver;
- penetrating fluid WD 40;
- vice (if needed);
- new brushes for the VAZ 2107 generator.
The price is valid for Moscow and the region for the summer of 2022.
A problem in the power supply system is indicated by the battery charging arrow. This indicates that when the engine is running, the battery is not charging well.
The voltmeter showed a voltage of 11.2 volts. Ultimately, suspicion falls on the generator.
Let's start the renovation. First, remove the terminals and remove the battery.
Using a 17mm wrench, unscrew the nut and remove the adjusting bar.
Disconnect the wire block from terminal “61” of the generator.
Using the socket “19” we unscrew the nut of the lower mounting of the generator.
Remove the drive belt from the generator pulley.
We knock out the bolt and remove the bushing. Please note that in this case the generator will be supported on a bracket.
We remove the generator from the car by lowering it down between the bracket and the front axle beam.
And here is the culprit of the “long journey”: a screw with torn edges.
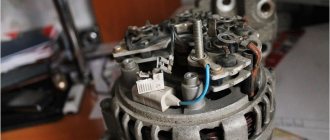
We install the generator in a vice and use a screwdriver to unscrew the two brush holder bolts.
We install a new brush holder and assemble everything in the reverse order.
Which electric generator should I buy (articles, manufacturers)?
When checking a generator, it sometimes turns out that the device needs to be replaced. To choose the appropriate version of the generating unit for a VAZ, you need to take into account the type of engine (with a carburetor or injector) and the configuration of the internal combustion engine.
It is better to install models of generating units manufactured by VAZ partners. Among the latter, electric generators KZATE 9402.3701 and 372.3701 are distinguished. The first option produces a current of 80 A and is installed on the engines of AvtoVAZ 2111 cars. Devices 372.3701 are less powerful, delivering 55 A.
The most popular brands of generators for VAZ internal combustion engines
If you cannot find one of the above parts, you can give preference to compatible generating units. Among the most famous manufacturers of electric generators at VAZ are:
- LKD - the brand is distinguished by the production of devices that are not of the highest standard, but still suitable for use.
- Fenox - the manufacturer stands out for its high-quality assembly of products.
- “Pramo” - generating units of this brand have a different design than models from previous manufacturers, which makes it possible to obtain power up to 100 A;
- “StartVOLT” - devices from this manufacturer are equipped with digital voltage regulators and a pair of additional diodes. The latter help to increase the productivity of the electric generator (up to 120 A).
If you want to save money, you should choose Chinese brands of generators. Domestic manufacturers produce electric generators with an optimal ratio of quality and cost.
Generator 2107-3701010
For lovers of various additional equipment, an even stronger “gene” is required. They can recommend installing a device from a VAZ 2107i. This unit produces 80 amps, which is sufficient to operate any electrical systems added by the owner. When purchasing such a generator, keep in mind that there are several varieties. For installation on a VAZ 2106, only model 2107-3701010 is suitable; any generators of this series can be installed on carburetor “sevens”.
It is advisable to modify the device for installation on the “six”. To do this, the relay regulator is replaced with a similar one from G222. The connection is completely similar to working with a figure-of-eight generator.
Conclusion
. Initially, rather weak generators were installed on the “sixes” and “sevens”. But, in the process of technology development, their power was no longer enough to provide adequate power to the car. So the question arose, which generator is better to install on the VAZ 2106 and 2107. Fortunately, there is plenty to choose from. The next generations of devices are perfect for old Zhiguli cars after a little modification.
If the generator is seriously damaged, it does not have to be repaired, but completely replaced. Parts necessary for repair may be missing, or the breakdown may not be repairable at all. Meanwhile, the on-board voltage and the quality of battery charging depend on the good operation of the power unit. It's a shame when, despite a good motor, electrical equipment does not work properly.
And if we are talking about VAZ cars, then sometimes a replacement is in demand due to the lack of power of standard devices. Modern automakers offer many additional devices that increase the level of comfort when traveling, but they also consume a large amount of electricity, and old devices cannot cope, so they have to be replaced with more powerful ones.
Many people are interested: which generator to buy if they have a VAZ? Here you need to consider them separately by model, so before you go shopping, read the recommendations of specialists and compare them with your wishes and capabilities.
Main malfunctions of VAZ generating units
Before you check, without removing, the generator on a VAZ 2115 or another manufacturer's model, you should know that malfunctions of such devices can be electrical and mechanical.
Electrical problems include:
- breakdown of the diode bridge;
- voltage regulator malfunction;
- brush wear, rotor shaft runout;
- winding breakage, puncture (interturn or to the housing).
Features of the VAZ 2108-2115 generator
Mechanical failures include destruction of bearings, damage to the housing, and the drive belt.
Wear, ball bearing wedge
This problem can be recognized by the specific sound of the bearings when the shaft rotates, and the presence of vibration during operation of the electric generator. You can check the performance of the bearings by checking the smoothness of the shaft. If noise is heard during rotation, the ball bearings must be replaced.
Damage to the windings of the generating unit
This fault often occurs at the junction of the ends of the winding with the slip rings. Also, sometimes the winding short-circuits (when the conductor branches off, gaps form). If such damage occurs, the battery stops charging. To diagnose a breakdown you need:
- disconnect the end of the winding from the brush;
- connect the battery wiring to the disconnected end and the terminal of the generating unit through a voltmeter or lamp;
- if the light does not light up and the meter needle remains in place, we can confidently say that there is a break.
In this way, you can check the operation of the generator on a VAZ 2110 without removing it. This method is also suitable for most other VAZ models. To fix the problem, acid-free soldering and soft solder are used. If damage occurs inside the coil, the rotor or starter is replaced.
Signs of wear on generator brushes
Diagnosis of this breakdown is possible without dismantling the generating unit. If you use an electric generator with worn brushes, this will lead to complete failure of the device. Signs of problems with brushes include:
- frequent blinking, dim headlights;
- slow battery charging;
- random switching off of the radio.
Such a breakdown is dangerous because during car maintenance small parts are often not given due attention. Therefore, the problem of worn brushes often takes motorists by surprise. The malfunction is eliminated by replacing the unit.
Rectifier unit malfunction
A problem may be indicated by rapid battery drain. In this case, you can check the generator on the car for functionality (for VAZ 2110 and other cars of the same brand).
Most often, problems begin after the element overheats, power surges, or mechanical damage. As a rule, failure is associated with breakdown of diodes. This causes a short circuit of the contacts of the stator winding, which leads to the generator becoming unusable.
Problems with the voltage regulator
A malfunction often occurs on VAZ 2114 vehicles. With such a malfunction, problems with the battery begin. The breakdown can also be diagnosed using a multimeter.
Repair of generator VAZ 2108-2115
The generator on a VAZ 2114 car should produce a voltage of about 13...14 V (with the internal combustion engine running). If the device begins to produce a lower or higher value, this will lead to a decrease in battery life. At high voltage (more than 14.5 V), the relay should turn off. If the regulator does not turn off, this indicates a breakdown. This problem can be caused by:
- short circuit in the circuit;
- incorrect connection to the battery;
- penetration of moisture into the housing.
The voltage regulator can also become unusable if the car's electric generator is not regularly maintained.
Generating Device Replacement Procedure
Before starting work, check the serviceability of the regulator relay. It is advisable to choose a model with the highest possible temperature compensation. This characteristic allows models 2106-2107 to operate at high speeds without failure. This indicator should be studied especially carefully if the VAZ 2106 or later modifications are used in areas with a hot climate.
Difficulties arise at the stage when you need to connect a new VAZ generator. To begin with, the wires coming from the relay regulator are disconnected and subsequently insulated. Further connection of the VAZ 2108 generator is carried out as follows.
The wires, formed in the form of a ring terminal, are connected to the old place in the VAZ 2108. It is imperative to insulate the gray wire, which is not connected anywhere. Completes the installation procedure by connecting the yellow wire to the terminal. If the car owner was unable to find a device with the required power, then a model from a VAZ 2108 to a VAZ 2106 can be installed, provided that the total power of consumers is taken into account.
Careful attitude and regular preventive inspections will ensure long-term reliable operation of the machine. Even with a slight drop in speed or problems when starting the engine, there is a reason to look under the hood. The faster this is done, the less likely it is that the problem will spread further.
The VAZ-2107 is a luxury version of the simpler VAZ-2105 car, but everything also belongs to the general family of “classics” of the Volzhsky Automobile Plant. This brand of car was produced in Russia until 2012, so on the roads you can see both new examples of cars and honorary old men of thirty years of age.
This model differs from other classic VAZ cars in a large number of modifications associated with different engine sizes. The “sevens” were equipped with engines with a volume of 1.3 liters, 1.5 liters, 1.6 liters, 1.7 liters. On special models produced for the Ministry of Internal Affairs and the KGB, which were later decommissioned and fell into private hands, even rotary piston engines with a volume of 1.3 liters and a power of 140 hp were installed.
Such a variety of engine systems has led to the fact that the VAZ-2107 model has a fairly large range of spare parts, which are constantly in demand during repairs and periodic maintenance of these vehicles. Also, recently, a trend has developed towards deep tuning of this model, which consists in installing a more powerful engine and reinforced suspension, for the participation of modified cars in unrecognized, but quite popular street racing among young people.
VAZ 2107 is one of the legends of the domestic automobile industry. The car was created as a luxury version of the VAZ 2105 model. At the same time, the differences affected not only the interior, but also other key components. In total, there are about 15 modifications that differ from the basic version. Unfortunately, the company's management decided to close production in 2012.
During their service, many cars have undergone repairs of varying complexity more than once. Let's look at the generator and its associated faults.
Related problems of the generating node
This group of breakdowns is often associated with malfunctions of other components or elements of the internal combustion engine. The owner of the car learns about such problems from the incorrect operation of the electric generator.
Loss of drive belt tension
The most obvious sign of a problem is a drop in power when the engine speed increases. This occurs due to the fact that during a sharp increase in rotational speed, the weakened belt begins to slip significantly.
The problem is detected when the engine starts - an uncertain start will be observed. Also, insufficient belt tension is diagnosed during engine operation. Such a breakdown is fraught with the appearance of failures in traction and strong engine vibrations.
Loss of excitation signal
This problem is usually associated with poor contact or broken wires of the generating units. With such a malfunction, the generator goes into an asynchronous operating mode, but can produce the required power.
This problem causes the device to overheat. This can lead to breakdown of the generating unit. When the drive signal is lost, power supply instability is common.
Dirty device contacts
Dirt gets onto the terminals when frequently driving on dirt roads or washing the car engine. When oil leaks, dust accumulates on oily contacts. Dirty terminals can lead to corrosion of other elements of the generating unit.
Sometimes terminals covered with a layer of dirt begin to oxidize. Such a breakdown can be checked without removing the generator on a VAZ 2115 or another AvtoVAZ car. A suitable device for testing is a multimeter. If, when connected to an electric generator while the engine is running, the indicator arrow does not twitch, it is time to remove dirt from the contacts.
Generator brushes - why are they needed?
Quite often (especially in older models) there are cases when, with a sharp increase in driving speed, various seemingly inexplicable things happen: the light of the dashboard or headlights dims, the cigarette lighter and (or) radio work intermittently. Drivers who have not been hardened by many years of experience in the cold lake may mistakenly think about burnt fuses, wiring, or shorted devices. It can take a whole day or more to work through all these versions. But what will be the driver’s surprise when the true cause of the malfunction becomes clear, that the whole essence of the problem is due to some small pieces of black metal called generator brushes.
Generator device
Based on 9th or 8th grade physics lessons, everyone knows that any generator must include two main parts, one of which is movable (rotor), and the second, correspondingly, stationary (stator). Each part has a copper (in most cases) winding. Under the influence of magnetic force, the rotor begins to rotate, powered by electricity through the armature and two other metal parts. And they are called generator brushes. Due to the constant impact of friction, all parts gradually wear out due to the constant rotation of the rotor. This happens in any case, regardless of the quality of the material of the parts (and it is really strong).
Methods for checking the health of the generator
The choice of testing method for the generating unit depends on whether the car owner has the appropriate tools, his own garage with an inspection pit or a lifting device, as well as the appropriate skills.
Checking the electric generator without removing it
Due to difficulties with dismantling generating units, they are often tested without removing them from the car. To do this, you will need a multimeter and basic skills in using this device. First you need to check the voltage at the battery terminals with the engine off. An indicator of 12.5...12.7 V indicates the good condition of the battery.
Then you should start the engine and repeat the measurement at idle with the headlights, radio and other consumers turned off. The value of 13.8...14.5 V indicates the correct operation of the electric generator. At 1.5...2 thousand rpm. and enabled consumer value should be the same.
Testing the generating unit after dismantling
You can also check a generator removed from a VAZ 2110 or other cars of this brand with a multimeter. This requires actual dismantling. After this the check is performed:
- Diode bridge - conductivity of the diodes should be observed only in 1 direction.
- Voltage regulator - checked with a light bulb. At 13.5 V it should light up, and at a higher voltage it should go out. This test will require a power supply with a voltage regulation option.
- Generator stator - the resistance between the terminals is measured, as well as between the neutral wire and the winding. The value should be 0.2 Ohm and 1 mOhm respectively.
Generator repair
Additionally, the dimensions of brushes and slip rings are measured. The obtained values are compared with the regulated values.
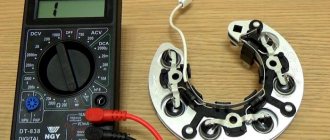
Checking the brushes
How to change the radiator of a VAZ-2110 stove with your own hands
To check for brush malfunctions, you will need a 12 V light bulb.
We put a plus on the terminal, and a minus on the ground terminal. The light comes on, let's check further. We add voltage to 16 V, if the light continues to light, this is the main sign of a malfunction of the brushes.
Checking the serviceability of the brushes
In this case, before installing new brushes, you should also check the protrusion of the graphite contacts. A normal protrusion is considered to be a protrusion of at least 0.5 centimeters, after which new brushes are installed, and everything is installed back, based on the above steps.
It happens that repairing a generator does not end with just replacing the brushes. If brush wear is not detected in time, then the remaining parts of the generator also wear out, since all elements of the generator are interconnected. That is why, after replacing the brushes alone, the malfunction in the generator will not completely disappear, but the signs of breakdown will disappear for a while.
When replacing brushes, it is best to remove the generator and examine it, trying to identify what other faults may be in it.
For instructions on replacing brushes without removing the generator, see below:
Dismantling and installation of an electric generator
The procedures for removing and installing the generating unit will be considered using the example of VAZ 2108, 2109. Algorithm for the dismantling procedure:
- Disabling the car battery.
- Disconnecting the generator terminals (located on the right).
- Loosening the drive belt tension adjustment nut (located on top).
- Removing the strap from the pulley.
- Removing the adjusting bar (the same bar where the nut was loosened).
- Unscrewing the bracket mounting bolts.
After this, the generating unit can be removed. You can remove the generator, for example, on a VAZ 2114 with a 16-valve internal combustion engine from Super Auto according to the same sequence. The device must be installed in reverse order.
Repair of generator on VAZ 2107
The generator can be repaired without outside help. The device can be easily disassembled into spare parts, so you can replace old parts even without relevant work experience. However, it is worth keeping in mind that a generator is primarily an electrical device, so in no case should you make a mistake during assembly.
The standard procedure for repairing a generator on a VAZ 2107 fits into the following diagram.
- Removing the device from the car.
- Disassembling the generator (troubleshooting is also carried out at the same time).
- Replacement of worn parts.
- Assembly of the structure.
- Vehicle installation.
Removing the generator from the car
Dismantling work takes about 20 minutes and requires a minimum set of tools:
- open-end wrench 10;
- open-end wrench 17;
- open-end wrench 19;
- mounting blade or pry bar.
It is best to remove the generator from the car when the engine is cool, as the device gets very hot during operation. In addition, you will need to jack up the car in advance and remove the front right wheel so that it is convenient to work with the generator housing and mounts.
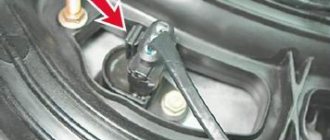
- Remove the wheel and make sure the car is securely on the jack.
- Find the generator housing and its mounting bracket.
- Use a wrench to loosen the lower fixing nut, but do not unscrew it completely.
- Unscrew the nut on the bar, also leaving it on the stud.
- Move the generator housing slightly towards the motor.
- At this time, the alternator belt will loosen, allowing it to be removed from the pulleys.
- Disconnect all wiring from the generator.
- Unscrew the loose nuts.
- Pull the generator housing towards you and remove it from the studs.
Video: dismantling the generator
Disassembling the device
To repair the generator, you need to disassemble it. During work you will need:
- open-end wrench 19;
- socket wrench 19;
- ratchet (you can add an extension);
- head at 8;
- head at 10;
- small hammer.
With this approach, you will always be sure that each part corresponds exactly to its place.
Disassembly of the G-221A generator is carried out in accordance with the following algorithm.
- Unscrew the four nuts from the rear cover of the generator and remove the cover.
- Remove the pulley by unscrewing the fixing nut.
- After dismantling the pulley, the housing is divided into two parts: one part comes out of the other. The rotor should remain in one hand, the stator in the other.
- Remove the pulley from the rotor shaft. If the pulley is tight, you can gently tap it with a hammer.
- Remove the shaft with bearings from the rotor housing.
- Press out the bearings.
- Disassemble the stator into parts, being careful not to touch the winding.
During the disassembly process, you can immediately identify the main faults of certain components. Accordingly, all those parts that:
- covered with heavy soot;
- worn out;
- have nicks, cracks and deformations on the surface.
Video: disassembling the generator
DIY repair
The generator repair procedure involves replacing those parts that have not been tested. Changing bearings, diodes, windings and other components is simple: the old part is removed and a new one is installed in its place.
Before starting repairs, you need to calculate approximately how much the purchase of components will require. It is quite possible that repairing an old generator will not be practical, since the parts will actually cost the cost of a new generator.
VAZ electric generator repair
If a generating unit breaks down, you do not always need to buy a new device. Some problems can be fixed:
- Replacing failed parts with new ones. This applies to worn brushes, damaged diode bridge, worn bearings.
- Tensioning or replacing the belt. To avoid problems in models with a 16-valve engine from Super Auto and other vehicles, you should regularly check the belt tension.
- Cleaning the terminals. If the contacts become oxidized, you will have to remove the electric generator and carefully remove dirt from adjacent surfaces as well.
Troubleshooting VAZ 2108-2115
When rectifiers or voltage regulators fail, the help of specialists is usually required. It is better to contact a car service.
Replacement Tablet Generator VAZ 2107
Replacing a brush make yourself a VAZ 2107 generator
Replacement nozzles VAZ and tips 2107
Welcome friends to the car repair site. Despite the huge number of foreign cars, cars of the VAZ family are still needed and are found among motorists who are knowledgeable about technology and appreciate the advantages of the Russian automobile industry.
Of course, operation and repair are indivisible concepts, and in the event of a failure of a particular unit, fault identification and troubleshooting can be carried out completely independently. Let's look at a simple example of repairing a VAZ 2107 car generator.
Malfunctions and principle of operation of generator brushes
The electrical system of your steel stallion shows defects, when the VAZ 2107 generator does not work, a reddish warning light with a battery symbol lights up on the dashboard.
Quite often, wearing or freezing brushes is a must. Those who are familiar with the mechanism of operation of the generator understand that an excitation voltage is supplied to the armature through the brush, which not only drives the electronic machine (generator), but also regulates its output power.
In particular, the regulation itself is determined by a special device, a relay controller, which can be implemented specifically on the brush holders or installed separately (on earlier models).
READ How to Disassemble the Passat B3 Gas Pump
As a rule, this malfunction manifests itself gradually, initially accompanied by minor interruptions in the operation of the generator, which leads to its uniform failure, but other options are also possible, such as an unexpected malfunction.
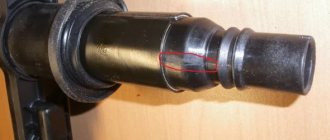
How to remove the brushes and check the VAZ 2107 generator
VAZ 2106.
VAZ 2107
, No downtime. parking while shifting gears.
Replace the VAZ 2107 generator brushes yourself
The brush repair itself usually comes down to replacing them, but first you need to remove the brush assembly from the generator body and assess the degree of wear, check for chips and cracks.
replacing generator brushes The VAZ 2107 procedure is simple and usually takes a few minutes, you do not need to remove the generator to replace the brushes, just disconnect the power cable, unscrew the two screws that secure the brush holder housing and carefully remove this assembly, make sure to disconnect the negative terminal in advance .
Warning! The battery(s) must be disconnected when performing any electrical work on the vehicle!
READ Replacing Car Interior Trim With Your Hands
Check the disassembled assembly for freezing, jamming of the brushes and their protruding part, which should be at least 12 millimeters. In case of non-compliance, the part must be replaced. Brushes for the VAZ 2107 generator can be bought at almost any auto parts store.
After fixing the problem or purchasing a new one (it's better to buy small parts with a sample of the old ones so you don't have to change them), install them in reverse order.
Prank tips
If you noticed noise from your car's generator brush before repairs, this may mean that the bearings of the VAZ 2107 generator may be worn out, in which case it is necessary to remove and disassemble the VAZ 2107 generator. A worn bearing has an increased clearance of the rolling elements and is susceptible to it. This is the case replacement with a new one
Keep in mind that premature bearing failure is not only due to lack of lubrication.
A worn bearing has an increased clearance of the rolling elements and is susceptible to it; this is the case when replacing it with a new one. Keep in mind that premature bearing failure is not only due to lack of lubrication.
This is often caused by excessive tension on the alternator drive belt; in addition, a tight belt can damage the cooling system pump bearing.
Therefore, check this device regularly in accordance with the manufacturer's recommendations. It is better to habitually and regularly inspect the engine compartment while the engine is running; this will allow you to identify and eliminate previously encountered problems at minimal cost.
READ Ford Focus 3 Transmission Error
Correct diagnosis will help you avoid unnecessary work and unexpected breakdowns.
What other electric generators are suitable for VAZ?
When choosing an analogue to the original generating unit, car owners often want to save money. Chinese-made models (for example, ATE-1) are suitable for such purposes. But at a low cost, you should not expect sky-high quality. Other manufacturers of suitable generators:
- Eldix - products of this brand combine high-quality assembly and reasonable prices. But it is difficult to find spare parts for devices of this brand.
- Bosch - devices from this manufacturer are reliable and durable.
- Motorhertz – stands out for its wear-resistant bearings.
VAZ car owners also highlight Krauf electric generators. Products of this brand are distinguished by their affordable price and good quality.
Multimeter - what is it
A multimeter is a measuring device used to measure resistance, current or voltage. Also, using such a device you can check the wiring for breaks. Each of these measurements involves the use of separate measuring instruments, such as a voltmeter, ammeter or ohmmeter. Therefore, a multimeter is considered a universal tool (mulmeter = voltmeter + ammeter + ohmmeter). In practice, analog and digital multimeters are used.
What is a multimeter
Analog
This multimeter is equipped with a special hand, like on a watch, by the movement of which the measurements are read. The analog multimeter is also equipped with a measuring scale with resistance, current and voltage values. The device is inexpensive, so it is very popular. The disadvantages of an analog multimeter include measurement errors (this mainly applies to products made in China).
Analog multimeter
Digital
Unlike an analog multimeter, a digital multimeter has an LCD or LED screen that displays data. These devices are easier to use and also have high accuracy, which cannot be said about cheaper analogues.
Digital multimeter
Note! Some types of digital multimeters can work in conjunction with a computer, transferring data obtained as a result of measurements to it.
Video - How to use a multimeter
Types of relay-regulator
To exaggerate, there are only two types, but each works on the same principle, namely, “cuts” or increases the voltage to the desired level.
Combined with brush assembly. Usually it is mounted on the generator itself, in the housing where the brushes are located, there is also a relay regulator.
Separate. Usually it is mounted on the car body, the wires go from the generator to it, and only then to the battery.
The housings are non-separable and tight and of a different type (often filled with sealants or special adhesives), that is, they cannot be repaired. To be honest, they are quite cheap, especially for our VAZs, so it’s easier to buy a new one than to tinker with an old one.
These are the most common types, of course, previously there were so-called ones combined with terminals, but they didn’t catch on because the device is not very convenient, so I won’t talk about them.
If your relay is “broken” and is constantly recharging, then it’s worth changing it, but first you need to make sure that this is the problem. Now there are only two ways to check: - without removing it on the car itself, and checking an already removed relay. Let's look at both options.
Types and location of voltage regulators
As you know, the VAZ 2107 car began to be produced a very long time ago. And over the years, not only different motors were installed on it, but also different voltage regulators. On the earliest models, the relay regulators were external. On later “sevens” the regulators were internal three-level. Let's take a closer look at these devices.
External voltage regulator VAZ 2107
It is the external voltage regulator that many motorists in the old fashioned way call a “relay-regulator”. Today, external voltage regulators can only be seen on very old “Sevens” produced before 1995. These cars were equipped with an old generator model 37.3701, which was equipped with external relays.
External relay regulators were installed on the very first VAZ 2107 models
The external regulator was located under the hood of the car; it was mounted on the left front wheel arch of the car. As a rule, external relays were made on the basis of a single semiconductor, although after 1998 on some VAZ 2107 there were external regulators made on a common printed circuit board.
The external regulator was not built into the generator, but was located under the hood of the car
External relays had certain advantages:
- Replacing the external regulator was fairly easy. It was held on by only two bolts, which were not difficult to reach. The only mistake that a beginner could make when replacing this device is to mix up terminals 15 and 67 (they are located next to each other on the regulator);
- the cost of the external regulator was quite affordable, and they were sold in almost all car stores.
Of course, the device also had disadvantages:
- bulky design. Compared to later electronic regulators, the external relay seems very large and takes up too much engine compartment space;
- low reliability. External VAZ regulators have never been of high quality. It is difficult to say what is causing this: the low quality of individual components or the poor build quality of the device itself. But the fact remains a fact.
Internal three-level voltage regulator
Internal three-level voltage regulators began to be installed on the VAZ 2107 starting in 1999.
The internal regulator began to be installed on the VAZ 2107 after 1999
These compact electronic devices were built directly into car generators.
The internal regulator is mounted directly into the VAZ 2107 generator
This technical solution had its advantages:
- compact sizes. Semiconductors were replaced by electronics, so now the voltage regulator fits in the palm of your hand;
- reliability. It’s simple: there’s nothing special about electronic devices that breaks. The only reason why a three-level regulator could burn out is a short circuit in the on-board network.
There are also disadvantages:
- difficulty of replacement. If there were no particular problems with external regulators, then to replace the internal relay the car owner first needs to get to the generator. To do this, he will have to remove the air filter and a couple of air ducts, which requires patience and time;
- difficulty of acquisition. As you know, the VAZ 2107 has long been out of production. So getting new components for the “seven” is becoming more and more difficult every year. Of course, this rule does not apply to all details. But internal three-level voltage regulators for the VAZ 2107 are among the parts that are not so easy to find today.
This is interesting: Checking diesel engine injectors, malfunctions and cleaning
Common faults
What are the malfunctions of the VAZ 2106 generator and how to fix them?
The first type of crash is the toolbar always or occasionally when moving, the reasons are as follows:
- Strap slides - adjust the strap tension.
- Open the circuit between the center of the hub and the No. 85 plug of the direction indicator relay.
- Damaged control control relay.
- Damage to the voltage regulator.
- Open the circuit in the box winding.
- Used generator brushes and slip rings oxidize. Cleaning the rings as well as replacing the alternator brush may solve the problem.
- The engine valves were shorted or open.
- There is a short circuit in the winding wiring or open stator circuit.
If the warning lamp does not light up after turning on the ignition, the reasons may be as follows:
- The filament is blown - the light bulb can simply be replaced.
- Damage to the lamp relay.
- Break in wiring or short circuit of valves.
- The stator winding is short to ground. The problem can be solved at the stator exchange.
- The generator cannot charge the battery.
If the generator is not working normally but the battery is not charging normally, the problem may be caused by
- The strap is not tight enough or may slip when driving at high speed. This problem can be corrected by adjusting the oxidation battery terminals, the wires have been damaged or the wiring harness tips are loose.
- The battery terminals are oxidized, the wiring is damaged, or the cable lugs on the mechanism are loose.
- If the battery is damaged, it must be replaced.
- Problems with the voltage regulator can be cleared by cleaning the contacts and adjusting or replacing the element.
Resetting the battery is most often caused by poor contact of the regulator housing with ground. It is much less common due to failure of the controller itself, as well as battery failure.
If, on the other hand, the generator assembly is very noisy, this is due to:
- When loosening the pulley nut, it should be tightened.
- Curve fans - just adjust them.
- Load-bearing elements are ineffective.
- Short circuit or wire break in the mechanism.
- The appearance of noise can be caused by the brush of the knot - they simply wipe it (video author - Sergey Bakaev).