01/26/2022 4,997 VAZ 2115
Author: Ivan Baranov
The purpose of the generator unit is to convert mechanical energy into electric current, which is used to power the electrical equipment of the machine. If the VAZ 2115 generator for some reason refuses to function or does not work correctly, this will affect the performance of the car as a whole. We will tell you more about malfunctions and repairs of the unit below.
[Hide]
Purpose of a car electric generator
This device converts torque into electricity. This element feeds:
- car ignition system;
- automotive lighting;
- electronic equipment of the car (for example, on-board PC).
The power of the electric generator may not be enough when all consumers are turned on. This will cause the batteries to drain quickly. When the full load is turned on, the voltage of the generator of the VAZ 2110 car and other models of the manufacturer drops below the permissible value, which leads to battery discharge. .
Where is the generating unit installed on VAZ vehicles?
To find the generator in AvtoVAZ cars, just lift the hood and inspect the front left corner. The device is located behind the radiator in a rather inaccessible place.
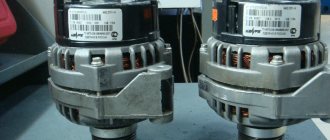
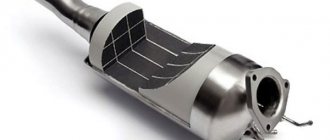
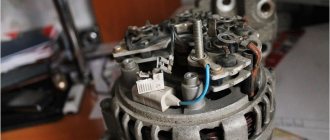
Appearance of the VAZ 2108-2115 generator
To remove the generating unit, specialists often use lifts or dismantle it from the pit. Due to the difficulty of carrying out such operations, it is important to know that you can check the charging of the generator with a multimeter on a VAZ 2110 car and other modifications of the manufacturer without removing the device.
Operating principle of an electric generator
The operating algorithm of the generating unit on VAZ cars is as follows:
- when the ignition is activated, the current begins to move to the excitation wires;
- the armature creates an e/m field passing through the stator winding;
- voltage appears at the terminals;
- after the armature reaches a significant rotation speed, the system switches to self-excitation mode;
- The produced alternating current is converted into direct current through a rectifier unit.
- when the crankshaft rotation speed jumps, the voltage regulator is activated (the time interval for activating the excitation wire is adjusted).
Those who want to know how to check the generator on VAZ 2109 cars and newer models of the manufacturer should take into account that the general connection diagram may include a built-in voltmeter and a charge lamp. The latter is located on the dashboard.
Generator repair for VAZ 2113-VAZ 2115
Disassembly
1) First you need to remove the generator; the article will help you understand the procedure: “Replacing the generator on a car.” Then remove the voltage regulator from the generator and the rectifier unit, the publication will help you with this: “Replacing the generator rectifier unit on a VAZ.”
Note! The roller can be removed using an 8mm hex key. If you don't have one, try finding a flat-head screwdriver of the appropriate size. Be careful not to strip the thread when unscrewing the nut. The removal mechanism is as follows: a hex wrench stops the shaft with the installed roller from turning, and the roller fastening nut is unscrewed with a spanner (photo 1). Remove the unscrewed nut and its spring washer. By the way, this washer is of an unusual shape; examine it carefully: on one side it has a convex shape, and on the other it is flat. The convex part must be installed to the nut (photo 2).
2) We proceed directly to the repair. Use a marker or chalk to mark the two generator covers, noting their location relative to each other - you need to install them exactly as they were. Proceed to unscrewing the four bolts located around the circumference of the generator (photo 1). Next, use a flat-head screwdriver to separate both covers from each other (photo 2). Disconnect the cover located on the side of the slip rings (photo 3, rings are indicated by arrows). Now remove one of the important elements of the generator - the stator, by pulling it and removing it (photo 4).
Note! Be sure to check the removed stator for integrity; the condition should be acceptable, the inner surface (indicated by the arrow) without scratches - signs of touching the armature. The presence of marks and damage is a sign of faulty bearings or deformation of the generator cover.
3) Separate the cover from the rotor, and remove the rotor itself - simply grab the rotor with your hand and pull out the shaft (photo 1, the rotor shaft is indicated by a red arrow) from the bearing (indicated by a blue arrow). If the shaft does not pull out, screw the nut that previously secured the roller onto it. There is no need to install the roller, just screw on the nut. Then, having started to knock out the shaft, the rotor will not fly out of the bearing and will not hit the asphalt. Do not tighten the nut all the way, just screw it a little onto the thread. Using a hammer and a wooden spacer, knock the shaft with the rotor out of the bearing, controlling the effort. After removing the rotor, inspect the cover (photo 2)
Pay special attention to the bearing; rotate it by hand: rotate the inner part in the direction where the rotor shaft was inserted. If you notice jamming, play, or rolling, replace the bearing
Take a screwdriver and remove the four screws securing the metal washer (photo 3), remove them from both sides of the cover. The bearing is knocked out using a hammer and a socket or mandrel of suitable diameter (photo 4).
Note! Check the cover for defects and if there is significant damage (large cracks, dents, etc.), replace the cover with a new one.
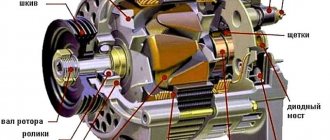
Device for mounting AvtoVAZ electric generators
Sometimes, to check the functionality of such devices, it is necessary to completely dismantle them. Before checking a generator removed from a VAZ 2110 and other cars from the same manufacturer with a multimeter, you should understand the structure of the generating unit.
The design may differ slightly depending on the modification of the device. But the main components of electric generators include the stator, rotor, aluminum covers, pulley, brushes, and bearings.
Rotor design features
The part is made in the form of a shaft with a corrugated surface, pressed steel bushings, and beak-shaped poles. Together these elements form an electromagnetic core.
Between the poles on the bushing there is an exciting winding protected by a plastic housing. A cooling impeller and a generator pulley are attached to the front of the shaft. The rotor is installed on bearings. The rear ball bearing is pressed onto the shaft. The front one is fixed with special washers on the cover.
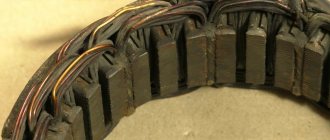
Generator stator structure
This device is made of thin plates (up to 1 mm thick) made of electrical steel. The inner surface of the stator has grooves for laying three-phase windings. Each winding includes 6 coils.
Mounting the VAZ electric generator
When servicing such devices, it is often necessary to remove them. The generating units are fixed using special brackets secured with bolts. It is more convenient to unscrew this mount while under the car.
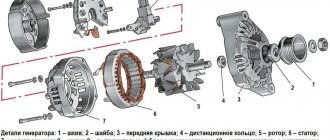
Drawing of the VAZ 2108-2115 generator
The electric generators are also attached to the drive belt tensioner plate. Fixation is carried out using a nut. Different AvtoVAZ vehicles are equipped with different types of drive belts. For example, model 2108 (and its modifications) has V-belts, and VAZ 2111 has poly-V-belts.
This difference is due to the different configuration of the internal combustion engines of VAZ cars. Newer models (for example, 2114b 2115) are equipped with powerful air conditioning systems and electric power steering. Therefore, they require better adhesion of the belt to the pulleys, as well as a current output of 80 A or more.
Which electric generator should I buy (articles, manufacturers)?
When checking a generator, it sometimes turns out that the device needs to be replaced. To choose the appropriate version of the generating unit for a VAZ, you need to take into account the type of engine (with a carburetor or injector) and the configuration of the internal combustion engine.
It is better to install models of generating units manufactured by VAZ partners. Among the latter, electric generators KZATE 9402.3701 and 372.3701 are distinguished. The first option produces a current of 80 A and is installed on the engines of AvtoVAZ 2111 cars. Devices 372.3701 are less powerful, delivering 55 A.
The most popular brands of generators for VAZ internal combustion engines
If you cannot find one of the above parts, you can give preference to compatible generating units. Among the most famous manufacturers of electric generators at VAZ are:
- LKD - the brand is distinguished by the production of devices that are not of the highest standard, but still suitable for use.
- Fenox - the manufacturer stands out for its high-quality assembly of products.
- “Pramo” - generating units of this brand have a different design than models from previous manufacturers, which makes it possible to obtain power up to 100 A;
- “StartVOLT” - devices from this manufacturer are equipped with digital voltage regulators and a pair of additional diodes. The latter help to increase the productivity of the electric generator (up to 120 A).
If you want to save money, you should choose Chinese brands of generators. Domestic manufacturers produce electric generators with an optimal ratio of quality and cost.
Battery overcharge
But often there is no “lowering” and “overcharging”. The electrolyte in the battery boils, and the battery also fails; there is nothing good about that.
The first sign will be a white coating on the top of the battery, which means the electrolyte is boiling and evaporating. This means the battery is charged, but the alternator still screws up charging it. Here, most likely, the voltage regulator has failed.
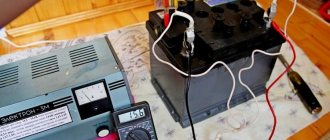
The check here is also elementary - you need to connect a multimeter or tester (whatever you call it) to a running machine and look at the load. If it is much higher than 14.5-14.8V and 15-15.2V, it means overcharging. Urgent replacement of the voltage regulator, otherwise you will constantly boil the battery, NOTHING good. Banal plates can fall apart.
Main malfunctions of VAZ generating units
Before you check, without removing, the generator on a VAZ 2115 or another manufacturer's model, you should know that malfunctions of such devices can be electrical and mechanical.
Electrical problems include:
- breakdown of the diode bridge;
- voltage regulator malfunction;
- brush wear, rotor shaft runout;
- winding breakage, puncture (interturn or to the housing).
Features of the VAZ 2108-2115 generator
Mechanical failures include destruction of bearings, damage to the housing, and the drive belt.
Wear, ball bearing wedge
This problem can be recognized by the specific sound of the bearings when the shaft rotates, and the presence of vibration during operation of the electric generator. You can check the performance of the bearings by checking the smoothness of the shaft. If noise is heard during rotation, the ball bearings must be replaced.
Damage to the windings of the generating unit
This fault often occurs at the junction of the ends of the winding with the slip rings. Also, sometimes the winding short-circuits (when the conductor branches off, gaps form). If such damage occurs, the battery stops charging. To diagnose a breakdown you need:
- disconnect the end of the winding from the brush;
- connect the battery wiring to the disconnected end and the terminal of the generating unit through a voltmeter or lamp;
- if the light does not light up and the meter needle remains in place, we can confidently say that there is a break.
In this way, you can check the operation of the generator on a VAZ 2110 without removing it. This method is also suitable for most other VAZ models. To fix the problem, acid-free soldering and soft solder are used. If damage occurs inside the coil, the rotor or starter is replaced.
Signs of wear on generator brushes
Diagnosis of this breakdown is possible without dismantling the generating unit. If you use an electric generator with worn brushes, this will lead to complete failure of the device. Signs of problems with brushes include:
- frequent blinking, dim headlights;
- slow battery charging;
- random switching off of the radio.
Such a breakdown is dangerous because during car maintenance small parts are often not given due attention. Therefore, the problem of worn brushes often takes motorists by surprise. The malfunction is eliminated by replacing the unit.
Rectifier unit malfunction
A problem may be indicated by rapid battery drain. In this case, you can check the generator on the car for functionality (for VAZ 2110 and other cars of the same brand).
Most often, problems begin after the element overheats, power surges, or mechanical damage. As a rule, failure is associated with breakdown of diodes. This causes a short circuit of the contacts of the stator winding, which leads to the generator becoming unusable.
Problems with the voltage regulator
A malfunction often occurs on VAZ 2114 vehicles. With such a malfunction, problems with the battery begin. The breakdown can also be diagnosed using a multimeter.
Repair of generator VAZ 2108-2115
The generator on a VAZ 2114 car should produce a voltage of about 13...14 V (with the internal combustion engine running). If the device begins to produce a lower or higher value, this will lead to a decrease in battery life. At high voltage (more than 14.5 V), the relay should turn off. If the regulator does not turn off, this indicates a breakdown. This problem can be caused by:
- short circuit in the circuit;
- incorrect connection to the battery;
- penetration of moisture into the housing.
The voltage regulator can also become unusable if the car's electric generator is not regularly maintained.
Why does the generator fail?
In fact, the generator has a simple design, if you want, it is an ordinary electric motor (only designed for high-generation current), try to turn the ordinary electric motor and attach a light bulb or LED, it will start to light up - that’s the elementary current of the alternator.
Someday I will have an article where I will tell you what a generator is. Today it is simple and redrawn - the rotor (the moving part), the stator (the static part), the brush assembly, the voltage regulator and, of course, the housing in which it is located.
And now the actual cracks.
- Seized bearings. This is a fairly common problem in already worn-out generators; the rotor in the housing includes bearings; over time and moisture (dirt), the banal wedge or lower clamping ring also wears out. If there is jamming, then one thing is that the rod stops rotating. But if there is wedging, it is hard to see - the rod may or may not rotate. In any case, with these symptoms, the belt that rotates the generator along with the engine is more likely to break. THIS IS THE FIRST WARNING SIGNAL.
- The stator or rotor winding has burned out. It is there in any case, and most likely it will be on the stator, which means that moisture (salt on the roads) can also eat up this banal short circuit or simply burn it, since copper wires are used. Accordingly, the current generation will stop.
- Damage to the hand node. This is also very common, the brushes are graphite (often square) rods that run along the stator tracks. Therefore, from time to time they wear out a lot and need to be replaced.
- The regulator relay is damaged. This relay prevents the alternator from overcharging the battery by ensuring the voltage and current are in the correct range. It also often fails and charging does not reach the battery at all! You should look at this.
Basically, these are the 4 main reasons why an alternator can fail, so you should definitely have it checked before purchasing a new battery. You may have problems with this.
Related problems of the generating node
This group of breakdowns is often associated with malfunctions of other components or elements of the internal combustion engine. The owner of the car learns about such problems from the incorrect operation of the electric generator.
Loss of drive belt tension
The most obvious sign of a problem is a drop in power when the engine speed increases. This occurs due to the fact that during a sharp increase in rotational speed, the weakened belt begins to slip significantly.
The problem is detected when the engine starts - an uncertain start will be observed. Also, insufficient belt tension is diagnosed during engine operation. Such a breakdown is fraught with the appearance of failures in traction and strong engine vibrations.
Loss of excitation signal
This problem is usually associated with poor contact or broken wires of the generating units. With such a malfunction, the generator goes into an asynchronous operating mode, but can produce the required power.
This problem causes the device to overheat. This can lead to breakdown of the generating unit. When the drive signal is lost, power supply instability is common.
Dirty device contacts
Dirt gets onto the terminals when frequently driving on dirt roads or washing the car engine. When oil leaks, dust accumulates on oily contacts. Dirty terminals can lead to corrosion of other elements of the generating unit.
Sometimes terminals covered with a layer of dirt begin to oxidize. Such a breakdown can be checked without removing the generator on a VAZ 2115 or another AvtoVAZ car. A suitable device for testing is a multimeter. If, when connected to an electric generator while the engine is running, the indicator arrow does not twitch, it is time to remove dirt from the contacts.
Diagnostics of a removed generator
To check the generator removed from the VAZ 21, you should use a multimeter in ohmmeter mode. The probes are pressed against terminal 30 and the body of the unit. If there are contaminants and strong oxides on the case, they should be removed first, as they can affect the readings of the device.
You need to measure the resistance of each generator unit in turn. Parts that do not have the required resistance have become unusable. Most of them can be replaced at home using a minimal set of tools. To replace, you need to buy the same parts as those originally installed in the generator.
If you find an error, please select a piece of text and press Ctrl+Enter.
Source
Methods for checking the health of the generator
The choice of testing method for the generating unit depends on whether the car owner has the appropriate tools, his own garage with an inspection pit or a lifting device, as well as the appropriate skills.
Checking the electric generator without removing it
Due to difficulties with dismantling generating units, they are often tested without removing them from the car. To do this, you will need a multimeter and basic skills in using this device. First you need to check the voltage at the battery terminals with the engine off. An indicator of 12.5...12.7 V indicates the good condition of the battery.
Then you should start the engine and repeat the measurement at idle with the headlights, radio and other consumers turned off. The value of 13.8...14.5 V indicates the correct operation of the electric generator. At 1.5...2 thousand rpm. and enabled consumer value should be the same.
Testing the generating unit after dismantling
You can also check a generator removed from a VAZ 2110 or other cars of this brand with a multimeter. This requires actual dismantling. After this the check is performed:
- Diode bridge - conductivity of the diodes should be observed only in 1 direction.
- Voltage regulator - checked with a light bulb. At 13.5 V it should light up, and at a higher voltage it should go out. This test will require a power supply with a voltage regulation option.
- Generator stator - the resistance between the terminals is measured, as well as between the neutral wire and the winding. The value should be 0.2 Ohm and 1 mOhm respectively.
Generator repair
Additionally, the dimensions of brushes and slip rings are measured. The obtained values are compared with the regulated values.
How to test a generator with a multimeter
The diode bridge of the generator can be checked with a multimeter, but you can also use the stand that was used to check the regulator.
But before that, first of all, without removing the rectifier bridge from the generator, connect the red wire of the tester to terminal 30 of the generator, and the black wire to the housing. Set the tester operating mode to dial (diode icon). If it is not there, then set it to 1-2 kOhm. The multimeter should show infinity. If the readings are different, the diode bridge is faulty.
Then check the current rectifiers for breakdown. Leave the positive (red) probe on terminal 30, touch the negative one to the bridge mounting bolts one by one. The multimeter display should show infinity in all cases; any others mean a breakdown.
Next, connect the positive probe to the axle mounting bolts, and the negative probe to the generator housing. In this case, the tester should also output infinity.
But in practice, such verification is most often not enough. In most cases, it is necessary to ring the generator in more detail.
Careful testing
Attach one of the tester probes to the diode plate, connect the second to the central terminal of each diode fixed to this plate. Then swap the probes. In one case, the multimeter should show infinity, in the other - a nominal resistance of approximately 570-590 Ohms. Rectifiers are considered faulty if:
- In the first and second measurements (when the polarity was changed), the multimeter readings are the same;
- Diode resistance is greater or less than nominal values.
Perform the same actions with the second plate of the diode bridge. If a fault is detected in one or more diodes, it will be easier to replace the entire rectifier unit. True, there are craftsmen who replace failed diodes individually, but such work requires a certain skill and dexterity.
Checking the armature and stator windings
The armature winding should not clearly smell like burning. The color of the winding must be uniform and free of damage and breaks. To check the armature winding for a break, you will need a multimeter. Set the operating mode to continuity testing or resistance measurement and connect the probes to the brush rings. The winding resistance should be within 3-5 Ohms. Then leave one probe on the ring, connect the other to the body. The multimeter display should show infinity.
The generator stator is diagnosed after removal from the housing. First of all, carry out a visual inspection. There should be no visible damage to the wire or its insulation. Then connect the tester wire to the stator housing. With the second wire, touch the terminals one by one. There are only three of them. The tester must be in dialing mode. If the display shows infinity, this indicates that the stator is working properly.
Further testing consists of diagnosing the windings. The resistance of all three windings must be the same.
Before assembling the generator, you need to check and, if necessary, replace the bearings. When turning, they should not jam or make a creaking sound. This means that they are very worn out and will soon fail. Therefore, it is better to replace them immediately.
Source
Dismantling and installation of an electric generator
The procedures for removing and installing the generating unit will be considered using the example of VAZ 2108, 2109. Algorithm for the dismantling procedure:
- Disabling the car battery.
- Disconnecting the generator terminals (located on the right).
- Loosening the drive belt tension adjustment nut (located on top).
- Removing the strap from the pulley.
- Removing the adjusting bar (the same bar where the nut was loosened).
- Unscrewing the bracket mounting bolts.
After this, the generating unit can be removed. You can remove the generator, for example, on a VAZ 2114 with a 16-valve internal combustion engine from Super Auto according to the same sequence. The device must be installed in reverse order.
Check without removing from the car
There are two 100% ways that I personally recommend to you.
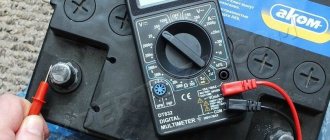
1) Check with a multimeter . Of course, not everyone has it, but in fairness it’s worth noting that this is a fairly common device and let’s say your father, neighbor, friend will have it “anyway.” To begin with, we measure with the engine not running, at the battery terminals, the normal voltage should be about 12.5 - 12.7 V, ideally.
We start the car, do not accelerate, and do not turn on any electrical appliances - with the engine running, we measure the voltage, it should be within 13.8 - 14.5 Volts.
However, on modern cars, where a lot of electronics are crammed, manufacturers assure that 14.8 Volts IS ALSO NORMAL. More on this below. Next, we connect the load - headlights, heater, heated rear window, foglights, radio, after that the voltage should drop a little - but not lower than 13.7 - 14.0V. If it is lower, say 12.8 - 13V, then the generator is not working, you need to check it.
Let's summarize a little:
Normal battery voltage is 12.5 - 12.7V
After starting the car - 13.8 - 14.5V, on some modern cars - 14.8V
After turning on the maximum load, it should be - 13.7 - 13.8 V
If the voltage is below 13V, urgently CHECK THE GENERATOR
2) The old grandfather's method . You can check this on almost all machines, and this method works 100%. But everything needs to be done very carefully. So - we start the engine, turn on a small load (for example, headlights or heated rear window). And on a working engine, we need to remove the negative terminal from the battery, everything is unscrewed with a key to “10”. We remove it and put it to the side, you can simply lift it above the terminal.
If the car continues to work confidently, the headlights have not dimmed, then your generator is 100% working. If the car stalls immediately, it means that the generator is 100% not working and it urgently needs to be looked at. So I tested it on a VAZ 2101 and now it works on my AVEO.
VAZ electric generator repair
If a generating unit breaks down, you do not always need to buy a new device. Some problems can be fixed:
- Replacing failed parts with new ones. This applies to worn brushes, damaged diode bridge, worn bearings.
- Tensioning or replacing the belt. To avoid problems in models with a 16-valve engine from Super Auto and other vehicles, you should regularly check the belt tension.
- Cleaning the terminals. If the contacts become oxidized, you will have to remove the electric generator and carefully remove dirt from adjacent surfaces as well.
Troubleshooting VAZ 2108-2115
When rectifiers or voltage regulators fail, the help of specialists is usually required. It is better to contact a car service.
The principle of operation of a generator in a car
The peculiarity of the generator is that it produces alternating current. Whatever one may say, when operating this electric machine, you can only get alternating current, and only then convert it to direct current. General generator design:
- Back and front covers with pressed bearings.
- Rotor with excitation winding.
- The stator with power windings is where the voltage is removed.
- Diode bridge - three-phase rectifier.
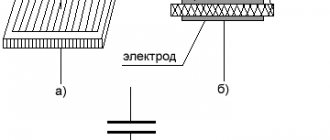
- Electrolytic capacitor - to get rid of the alternating component of current.
- Voltage regulator - necessary for accurately setting the supply voltage of the rotor winding.
- Carbon-graphite brushes are necessary for transmitting voltage from the relay regulator to the rotor winding.
- And the remaining components - brackets, nuts, bolts, belt.
For normal operation of the generator, two components are required:
- Rotation.
- Magnetic field (constant).
It is enough to remember the school physics course - an electric current will appear in the winding only if it is affected by a moving magnetic field. Moreover, the output voltage will depend directly on the magnitude of this magnetic field. This means that the rotor winding is a source of a constant magnetic field, and it is powered through a voltage regulator, therefore, the output will always have the same voltage.
The alternating voltage is removed from the stator winding. Moreover, there are three windings, they are connected in a “star”. Consequently, we get three phases at the output. This is necessary primarily in order to reduce current ripple in the on-board network. With the help of a diode bridge, which contains six semiconductors, the current is rectified. And the capacitor cuts off the entire variable component. According to Kirchhoff's law, an electrolytic capacitor is replaced by a gap when operating in a DC circuit and by a conductor in an AC circuit.
What other electric generators are suitable for VAZ?
When choosing an analogue to the original generating unit, car owners often want to save money. Chinese-made models (for example, ATE-1) are suitable for such purposes. But at a low cost, you should not expect sky-high quality. Other manufacturers of suitable generators:
- Eldix - products of this brand combine high-quality assembly and reasonable prices. But it is difficult to find spare parts for devices of this brand.
- Bosch - devices from this manufacturer are reliable and durable.
- Motorhertz – stands out for its wear-resistant bearings.
VAZ car owners also highlight Krauf electric generators. Products of this brand are distinguished by their affordable price and good quality.