How to check the generator voltage regulator with a multimeter
In order to ensure the normal operation of light bulbs, power windows, windshield wipers and other electrical equipment, as well as charging the battery, you need to maintain a DC value of 13.5-14.5 volts. If this figure is less, the battery will not charge, and if it exceeds this level, the on-board electrical appliances will fail. High voltage also causes some damage to the battery, shortening its service life due to overcharging.
Therefore, to convert the current generated by the generator, there is a special device - a relay-voltage regulator. With its help, the on-board network is provided with a current that maintains the required parameters, regardless of the crankshaft speed. Situations often arise when it becomes necessary to check the generator voltage with a multimeter.
Modern relays are electronic, and their design is non-separable. If they fail, they cannot be adjusted or repaired, but require complete replacement. This is considered the only drawback of these devices, since otherwise the relays have a lot of advantages: compactness, durability, high accuracy of current parameters.
When can the voltage regulator be considered faulty?
- The headlights change brightness depending on engine speed.
- There is an insufficient charge of the battery or, conversely, its overcharging, accompanied by boiling off of the electrolyte.
- There may be a burning smell inside the car. Failure of the regulator can occur due to moisture, various mechanical damage, short circuit and other non-standard short-term electrical influences.
- Sometimes the regulator is initially of poor quality if it is a dubious product from unknown manufacturers.
Selecting a starting capacitor for an electric motor
Read also: How to make money on Instagram: ways
A modern approach to this issue involves the use of special calculators on the Internet that perform quick and accurate calculations.
To carry out the calculation, you should know and enter the following indicators:
- Motor winding connection type : delta or star. The capacitance also depends on the type of connection.
- Engine power is one of the determining factors. This indicator is measured in Watts.
- Mains voltage is taken into account in calculations. As a rule, it can be 220 or 380 Volts.
- Power factor is a constant value that is often 0.9. However, it is possible to change this indicator during calculation.
- The efficiency of the electric motor also affects the calculations performed. This information, as well as others, can be found by studying the information printed by the manufacturer. If it is not there, you should enter the engine model on the Internet to search for information about what the efficiency is. You can also enter an approximate value, which is typical for such models. It is worth remembering that efficiency may vary depending on the condition of the electric motor.
Such information is entered into the appropriate fields and an automatic calculation is carried out. At the same time, we obtain the capacity of the working condensate, and the starting condensate should have an indicator 2.5 times greater.
You can carry out such a calculation yourself.
To do this, you can use the following formulas:
- For the star winding connection type, the capacitance is determined using the following formula: Cр=2800*I/U. In the case of a triangle connection of the windings, the formula Cр=4800*I/U is used. As you can see from the information above, the type of connection is the determining factor.
- The above formulas determine the need to calculate the amount of current that passes through the system. For this, the formula is used: I=P/1.73U?cos?. For the calculation you will need engine performance indicators.
- After calculating the current, you can find the capacitance indicator of the working capacitor.
- The starting one , as previously noted, should be 2 or 3 times higher in capacity than the working one.
When choosing, you should also consider the following nuances:
- range .
- Possible deviation from the calculated capacity.
- Insulation resistance.
- Loss tangent.
Usually, the above parameters are not paid much attention. However, they can be taken into account to create an ideal electric motor power system.
Overall dimensions can also be a determining factor. In this case, the following dependence can be distinguished:
- Increasing the capacitance leads to an increase in the diametrical size and outlet distance.
- The most common maximum diameter is 50 millimeters with a capacitance of 400 µF. At the same time, the height is 100 millimeters.
In addition, it is worth considering that on the market you can find models from foreign and domestic manufacturers. As a rule, foreign ones are more expensive, but also more reliable. Russian versions are also often used when creating an electric motor connection network.
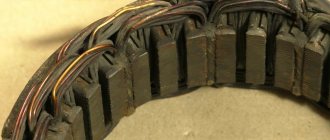
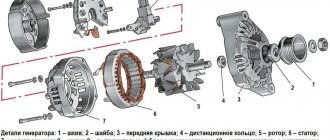
How to check a generator rotor with a multimeter
A faulty car alternator rotor primarily causes the charging current to disappear and the battery to discharge. This is indicated by the low battery light located on the instrument panel. The position of the voltmeter needle is near the red zone or in the zone itself. In this regard, it becomes necessary to check the generator armature with a multimeter.
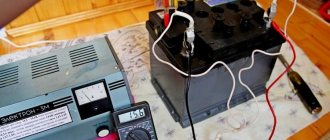
When checking the voltage with a multimeter while the engine is running, its readings at the battery terminals will be less than the required 13.6 volts. In order to obtain more accurate results, it is recommended to check the battery charging from the generator in advance with a multimeter.
The main rotor malfunctions are considered to be a short circuit of the windings and a break in the leads between the field winding and the slip rings. To check, it is not necessary to remove the generator from the engine and remove the rotor from it. It is enough to remove the voltage regulator relay and perform all the necessary actions through the resulting window.
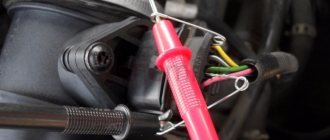
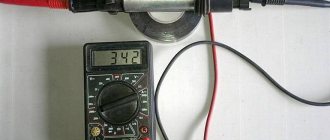
In order to check for a short to ground in the rotor field windings, you need to set the multimeter to ohmmeter mode and press the positive probe one by one against the slip rings. The negative probe is pressed against the mass - the generator housing. If the resistance indicator tends to infinity, then the rotor is working properly and there is no short circuit to ground. After this, you should check the generator winding with a multimeter for an open circuit. The multimeter is also set to ohmmeter mode, the positive probe is applied to one contact ring, and the negative probe to the other. A resistance value of 5 to 10 ohms indicates the serviceability of the excitation winding. In most cases, a faulty rotor must be replaced.
Operating principle of a capacitor
According to the principle of operation, it is similar to a battery only at first glance, but still it is very different from it in terms of the principle and charge-discharge rate, maximum capacity.
At the moment of connection to the power source, there is the most space on the electrodes, therefore the charging current will be maximum, but as the charge accumulates, the current will decrease and disappear completely after a full charge. When charging, negatively charged particles - electrons - will be collected on one plate, and ions, positively charged particles, will be collected on the other. The dielectric acts as an obstacle to their jumping to the opposite side of the capacitor. When charging, the voltage also increases from zero before charging and reaches a maximum at the very end equal to the voltage of the power source.
If, after charging is completed, you turn off the power source and connect the load R, then it itself will turn into a current source. When a load is connected, a circuit is formed between the plates. Negatively charged electrons will move through the load to positively charged ions on the other plate according to the law of attraction between unlike charges. The initial current according to Ohm's law will be equal to the voltage across the electrodes (equal to the voltage of the power source at the end of charging the capacitor), divided by the load resistance. After the current flows, the capacitor begins to gradually lose charge or discharge. At the same time, the voltage will begin to decrease, accordingly, according to Ohm’s law, and the current. At the same time, the higher the discharge level of the plates, the lower the rate of voltage and current drop will be. The process will end after the voltage on the capacitor electrodes becomes zero.
Replacement
Removing the capacitor of the VAZ 2110 generator and checking it is carried out in the following order:
- Disconnect the battery (just disconnect the negative terminal);
- Disconnect the excitation wire (wire block at terminal “D”);
- Using the “10” key, unscrew the “B+” output wire;
- Remove the generator belt;
- Unscrew the fixing nut, the adjusting bolt and remove the belt tensioner bar;
- We take out the lower fastening bolt, first use a key “13” and unscrew its nut;
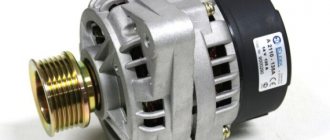
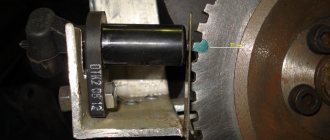
- Carefully pull out the generator itself (see photo).
Generator removal process
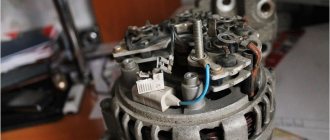
Next, we begin to get directly to the “culprit” of the repair:
- We remove the plastic protective casing by pressing the three latches on its body:
- We unscrew the two screws securing the brush holder and carefully, trying not to damage the brushes, pull out the assembly itself, simultaneously disconnecting the wire block from it;
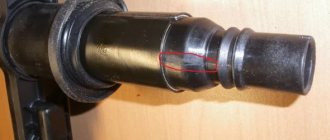
- Unscrew the nut securing the bolt and remove the tip of the condenser contact wire along with the spring and spacer washer;
Capacitor Contact Wire
Capacitor in car audio
Capacitors for car audio are often used in both exclusive cars and classic models that are equipped with an amplifier. Such devices can improve the parameters and sound quality of the subwoofer.
The thing is that modern car audio consumes a large amount of energy, especially at the peaks. Sometimes even the most powerful battery is not able to provide it instantly. As a result of resistance and voltage drop, even with high-quality wires that power the amplifier, sound dips occur.
In the summer, such failures are exacerbated by the operation of the air conditioner, which takes up to thirty percent of the total energy.
Sound distortion in a car occurs primarily due to the inability of the battery to provide the entire system with the required amount of voltage.
To eliminate this phenomenon and smooth out all kinds of dips, capacitors are used for the subwoofer. It is connected in parallel to the amplifier's power supply circuit. A good capacitor is an excellent suppressor of high-frequency interference, all kinds of ripples and voltage surges during the operation of various additional devices, such as a fan, air conditioner and others. This is why many drivers install a capacitor in their vehicle's sound system.
Checking the car battery and generator
One of the most common causes of electronic equipment failure is capacitor failure. Any electronics, household appliances and digital processors all have capacitors in their equipment, and one minor malfunction of the capacitor is enough for the entire mechanism to stop performing its functions.
How to test a capacitor with a multimeter
I am glad to see you all again on the pages of the “Electrician in the House” website. Today we will get acquainted and study one of the most used parts in electronics - a capacitor. The history of the creation of the first capacitor takes us back to 1745 (“Leyden jar”).
Nowadays, in the age of technology, we are surrounded on all sides by electrical machines and equipment. You are, of course, very familiar with the capacitor, and if you haven’t encountered it technically, you’ve definitely heard about it.
Basic parameters of capacitors
Capacity
This indicator characterizes the capacitor's ability to accumulate electrical charge. The larger the area of the conductor plates and the smaller the thickness of the dielectric layer, the larger the capacitance. This characteristic also depends on the dielectric material. The device indicates the nominal capacity. The actual capacity, depending on operating conditions, may differ from the nominal capacity within significant limits. Standard options for nominal capacity range from units of picofarads to several thousand microfarads. Some models may have a capacity of several tens of farads.
Classic capacitors have a positive capacitance, that is, the greater the applied voltage, the greater the accumulated charge. But today, devices with unique properties, which scientists call “anti-capacitors,” are under development. They have negative capacitance, that is, as the voltage increases, their charge decreases, and vice versa. The introduction of such anti-capacitors into the electronics industry will speed up the operation of computers and reduce the risk of overheating.
What happens if you install a drive with a larger/smaller capacity than required? If we are talking about smoothing out voltage ripples in power supplies, then installing a capacitor with a capacitance exceeding the required value (within reasonable limits - up to 90% of the nominal value) in most cases improves the situation. Installing a capacitor with a smaller capacitance may degrade the performance of the circuit. In other cases, the possibility of installing a part with parameters different from the specified ones is determined specifically for each case.
Specific capacitance
The ratio of the nominal capacitance to the volume (or mass) of the dielectric. The thinner the dielectric layer, the higher the specific capacitance, but the lower its breakdown voltage.
Energy Density
This concept refers to electrolytic capacitors. The maximum density is typical for large capacitors, in which the mass of the housing is significantly lower than the mass of the plates and electrolyte.
Rated voltage
Its value is reflected on the housing and characterizes the voltage at which the capacitor operates during its service life with parameters fluctuating within specified limits. The operating voltage must not exceed the rated value. For many capacitors, the rated voltage decreases as the temperature increases.
Polarity
Polar capacitors are electrolytic capacitors that have positive and negative charges. On domestically produced devices, a “+” sign was usually placed at the positive electrode. On imported devices, a negative electrode is indicated, next to which there is a “-” sign. Such capacitors can perform their functions only if the voltage polarity is connected correctly. This fact is explained by the chemical features of the reaction of the electrolyte with the dielectric.
What happens if you reverse the polarity of a capacitor? Usually in this case the devices fail. This occurs due to the chemical destruction of the dielectric, which causes an increase in current strength, boiling of the electrolyte and, as a result, swelling of the housing and a possible explosion.
Most charge storage devices belong to the group of non-polar capacitors. These parts ensure correct operation no matter how the pins are connected to the circuit.
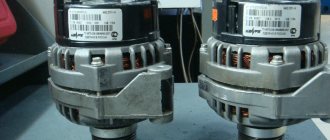
Model overview
There are several popular models that can be found on sale.
It is worth noting that these models differ not in capacity, but in type of design:
- Metallized polypropylene versions of the SVV-60 brand. The cost of this version is about 300 rubles.
- NTS film brands are somewhat cheaper. With the same capacity, the cost is about 200 rubles.
- E92 – products of domestic manufacturers. Their cost is small - about 120-150 rubles for the same capacity.
There are other models, often differing in the type of dielectric used and the type of insulating material.
Do-it-yourself VAZ 2110 generator repair
So let's look at the common malfunctions of the VAZ 2110 generator and how to repair them:
How to check the generator capacitor of a VAZ 2110
The capacitor of the VAZ 2110 generator is one of the elements of the car’s electrical circuit and is a capacitance consisting of a pair of electrodes isolated from each other by a dielectric.
Since the main task of a capacitor is the accumulation of electrical energy, its capacitance can be considered the main indicator (the larger the capacitance, the greater the accumulated charge). So, in the capacitor body, a positive charge accumulates on one of the plates, while a negative charge of equal magnitude accumulates on the other (connected to ground)
Replacing a capacitor in a VAZ 2110 generator begins with its diagnosis. The main parameter by which one can judge its damage is increased radio interference while the engine is running.
Advice! Make sure that the capacitor does not have loose contact with ground (which also contributes to noise).
Checking the bearings of the VAZ 2110 generator
Quite often the generator bearing fails, and the car owner will hear an obsessive hum when driving. But you don’t have to immediately go to a car service center; first, you can independently determine whether the problem is with the bearing.
How to understand a bearing failure?
- Visual inspection. If the design of the car allows, you can carry out an external inspection of the part for cracks in the area of the clips, metal damage, and wear of the seats.
- If there is a hum from the generator when driving, try tightening the fastening nut that secures the fan pulley. The cessation of extraneous noise after such manipulations means that replacement of the generator bearing is not required.
- Sometimes the hum stops after disassembling the generator and checking the starter with the rectifier unit. This also confirms that the generator bearing has nothing to do with it, but completely other parts are faulty.
- If the hum remains, the contact rings with brushes should be cleaned. This is best done with a regular rag soaked in gasoline. If the noise remains after this, then replacing the bearings is inevitable.
- As for the rear bearing of the generator, its failure is much easier to determine. To do this, shake the outer ring of the part and rotate it. If the ring rotates freely and there is no play or noise, then everything is in order. Otherwise, the spare part must be replaced.
- front bearing of the generator is checked in the same way as the previous one. You need to rock and rotate the front cover while supporting the pulley. Seizing, play, noise - all this indicates bearing wear.
Signs of an unusable generator bearing:
- Noise, hum, whistling sounds when the rotor rotates;
- Rapid and excessive heating;
- Rotating the pulley;
- Unstable charging.
Tags
The capacitor in the car capacitor needs a capacitor in the car capacitor Capacitor in the Capacitor in the Capacitor for in the generator purpose in the car generator that your generator in the car generator in the generator is installed the work of the generator. on the car generator the electric current and the electric current of the electric current in the electric current in the consumed current in the electric current. and the current will be the source of the current. the initial current by
variable read ignition current diodes
Common malfunctions (signs) of the VAZ 2110 generator
So, it is very easy to determine that it is the generator that is acting up; just know a few basic signs of this - here they are:
- The device does not perform its main function, that is, it does not produce current. In this case, the car is driven only by the battery. Moreover, in this case you will not be able to travel far.
- The drive belt is spinning.
- The generator brushes are faulty.
- The rotor clings and touches the stator.
- There is no wire contact with the battery.
- The device begins to make a lot of noise.
- The battery does not charge while driving.
All these signs are very specific and only an experienced driver can identify them. However, if you have even slight doubts about the performance of the generator of VAZ 21099, 2109, 2110 cars.
Connection diagrams
wiring diagram for an electric motor with a starting capacitor
The circuit that has a starting capacitor in the network has become more widespread.
This scheme has certain nuances:
- The starting winding and capacitor are turned on when the engine starts.
- The additional winding operates for a short time.
- The thermal relay is included in the circuit to protect the additional winding from overheating.
If it is necessary to provide high torque during startup, a starting capacitor is included in the circuit, which is connected together with the working capacitor. It is worth noting that quite often its capacity is determined empirically to achieve the highest starting torque. Moreover, according to the measurements taken, the value of its capacity should be 2-3 times greater.
The main points of creating an electric motor power circuit include the following:
- From the current source , 1 branch goes to the working capacitor. It works all the time, which is why it got its name.
- In front of it there is a branch that goes to the switch. In addition to the switch, another element can be used that starts the engine.
- after the switch . It operates for a few seconds until the rotor picks up speed.
- Both capacitors go to the motor.
In a similar way, you can connect a single-phase electric motor.
It is worth noting that the working capacitor is present in the circuit almost constantly. Therefore, it is worth remembering that they must be connected in parallel.