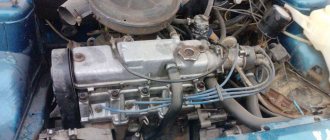
Engine repair VAZ 21213
In our time of universal automation, many car enthusiasts forget about such a necessary operation as checking the oil level in the engine and hope for the warning light on the instrument panel to go off. However, it is not a fact that if the oil pressure indicator does not panic, then everything is in order in the lubrication system, because it may turn out that it simply burned out or the sensor itself failed, and without oil, as we know, the engine is guaranteed a short and difficult life.
Causes of oil waste
Well, in general, this is the second question. First you need to find out where the oil goes from the engine if the leak is not visible from the outside? The debate about the natural waste of oil has been going on for many years. There is only one conclusion - if you don’t want the engine to “eat up” the oil, don’t fill it at all! The point is this. The service life of the engine is ensured by good lubrication, and even more so by the lubrication of the piston rings and, as a consequence, the surface of the cylinders in the form of an oil film. So much for natural insanity.
CPG lubrication
When designing a modern engine, oil loss due to waste is initially 0.1-0.3% of the volume of fuel used . In addition, with different types of operation (river transport, cars, generators), oil burn readings vary significantly! Well, since the engine of the VAZ 21213 is frankly “weak” and, due to the specifics of the vehicle’s operation, operates under increased loads, the passport parameter for oil waste does not last long, after which oil consumption begins to increase significantly. Why? In addition to the mentioned natural burnout, there are several other reasons:
- Oil release through the internal combustion engine ventilation system. The wear of the CPG (cylinder-piston group) directly depends on the pressure of the crankcase gases, whose speeds increase, which contributes to a greater extraction of oil into the atmosphere (in modern cars for “afterburning”);
- A trivial leak in places where engine components do not fit tightly.
Attention: In general, if you see all of the above defects in your car. If you are convinced that the CPG is worn out (by measuring the compression - at least 8 kgf), then replacing the piston rings of the VAZ 21213 is the most economical option for you. In case of such wear of the internal combustion engine, a good owner will, among other things, check the wear of the cylinders, connecting rod liners and, if necessary, replace not only them, but also the entire piston group with valve stem seals. Everything here is limited only by the price of the repair issue.
Niva engine characteristics
Years of manufacture – (1994 – present day) Cylinder block material – cast iron Power system – carburetor (21213) / injector (21214) Type – in-line Number of cylinders – 4 Valves per cylinder – 2 Piston stroke – 80mm Cylinder diameter – 82mm Compression ratio – 9 .4 Niva engine capacity 21213 – 1690 cm3. Engine power Niva 21213 – 81 hp. /5200 rpm Torque - 125 Nm / 3000 rpm Fuel - AI93 Fuel consumption - city 11.5l. | track 8.3 l. | mixed 10.5 l/100 km Oil consumption - 700 g per 1000 km Niva engine weight - 117 kg Overall dimensions of the Niva 21213 engine (LxWxH), mm - Oil in the Niva 21213 engine: 5W-30 5W-40 10W-40 15W-40 How much oil in the Niva 21213/21214 engine: 3.75 l. When replacing, fill in about 3.5 liters.
Repair of central piston group
To replace the piston VAZ 21213 we need a pit or overpass and a standard set of tools.
Dismantling the cylinder head
So:
- The very first action at the beginning of each repair is to de-energize the vehicle's power supply system - remove the battery terminal;
- Drain all fluids from the lubrication system and cooling system;
- We remove all the “attached” equipment from the cylinder head: carburetor, ignition distributor with high-voltage wires, exhaust pipe, starter;
Attention! When disconnecting the exhaust manifold and the exhaust pipe, do not lose the metal sealing ring.
- Disconnect the wires from the oil and coolant temperature sensors;
- Remove the cylinder head cover;
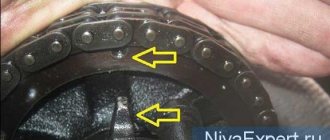
- We unscrew the bolt securing the sprocket on the camshaft and remove it along with the chain;
Camshaft sprocket with chain
- We take out the shaft along with the valve tappets and bearing housing;
Removing the camshaft
- We remove all hoses that will get in the way when dismantling the cylinder head;
- Using an extension and a socket, unscrew the block head and remove it.
Removing the block head
Removing the pallet
Begin:
- Remove the engine splash guard and the sump protection plate;
- On the side engine mounts, unscrew the nuts securing them to the cross beam brackets;
Unscrewing the gearbox bracket
- We disconnect the front axle gearbox and the engine bracket in order to raise the power unit;
- Raise the engine with a jack and insert wooden blocks between the supports and brackets of the transverse beam;
- Remove the jack from under the car;
- Using a ten-point socket, unscrew the twelve bolts securing the pan to the crankcase.
Attention! We remove the pan carefully, trying not to tear the gasket.
- Remove the oil pump intake filter.
- Next, unscrew the nuts of the lower connecting rod caps and remove them along with the liners.
Replacing the piston group and rings
We take out the connecting rods
Advice! Mark their location and order for later installation of each cover and liner in its place.
- Carefully, using a wooden block (usually a hammer handle), after raising the piston to top dead center, push the connecting rod up;
Dismantling the connecting rod
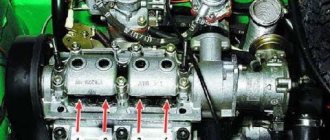
Attention! When installing and dismantling, you should pay attention to the markings of connecting rods and pistons, where:
- arrow indicating the position of the piston in the cylinder;
- repair number size;
- class of the piston itself;
- piston pin hole class;
- class of connecting rod, or rather its holes for the piston pin;
- number of the cylinder for which the connecting rod is intended.
Marking
Checking the condition of the pistons
We clean the piston from traces of carbon deposits and remove all deposits from the lubrication channels of the connecting rod and the piston itself. During inspection, we pay attention to characteristic cracks on the piston, its rings, pins, connecting rods and on the covers, which are a sign of maximum wear. Deep grooves on the working surface of the liners also indicate that they should be replaced with new ones.
Selection of pistons for cylinders
The gap calculated for this pair, provided that they are new, is 0.025-0.045 mm. It is determined by measuring the elements of the piston group (cylinders and pistons) of the same class. For wear, the maximum tolerance is 0.15 mm. If the clearances are exceeded, it is necessary to select new pistons for the cylinders to achieve optimal values. Pistons of various classes (sizes) are supplied to the automotive spare parts market - A, C, E, which are quite enough to select pistons for any size of cylinders, since they, in turn, are also divided into classes that have a margin according to the limiting values of their dimensions. That is, a piston with class C is quite suitable for class B or D cylinders.
Disassembly
So:
- We remove the rings that lock the piston pin from the pistons, take it out and separate the connecting rod from the piston;
- Remove the piston rings.
Attention! Bolts are pressed into the connecting rod with a high tension. As a result, when repairing the connecting rod and piston group, pressing them out is not recommended in order to avoid damaging the seat.
Advice! Some parts may be slightly worn and not damaged, so during disassembly they must be marked in order to assemble the dismantled elements into their own group and into their own cylinder during reassembly.
Order and cost of fingers
The cost of manufacturing fingers for special equipment depends on:
- The purpose of the finger - this affects the choice of material and additional processing;
- Availability of a drawing, sample or sketch;
- Number of parts in a batch.
Separately, we note that if you apply again, the price may be lower, since we will already have all the project documentation.
carries out a full cycle of manufacturing parts: from drawing development and prototype production to applying protective coatings and films. We can guarantee the precision of product processing at every stage.
To clarify the details of cooperation, please contact the managers of FERROPOLIS. This can be done by phone or send a request through the form on the website. In both cases, you will receive qualified advice and a preliminary calculation of the cost of your order.
Weaknesses of the VAZ 21213 power unit
- Water pump;
- Engine, manual transmission and transfer case oil seals;
- Generator;
- Starter;
- manual transmission;
- Valve cover gasket;
- Cooling system pipe connections;
- Radiator;
- Thermostat;
- Expansion tank;
- Vacuum brake booster.
The water pump (pump) is characterized by frequent failures on new cars after 2,000 km.
Due to poor quality, oil seals require more frequent replacement than required according to the operating manual.
The generator has a high probability of failure. As a rule, it burns out even on new cars that have not reached 4,000-10,000 km.
The starter has a low service life without repair.
On a gearbox, one of the common defects is fifth gear offset. In addition, the gears are not fully engaged.
The valve cover gasket loses its properties over time and allows oil to leak out.
The connections of the cooling system pipes in the places where the clamps are installed are not reliable and lose their tightness very early, which is fraught with loss of antifreeze.
The radiator is leaking. The problem occurs due to the appearance of cracks in the radiator pipe package, accompanied by loss of coolant. This defect has become widespread.
The thermostat does not provide thermal conditions for the coolant in the engine cooling system. The manifestation of this problem is no exception. The cause of the defect is a failure of the valve mechanism inside the thermostat. To check that the thermostat is working properly, after starting the engine, simply place your palm on the lower (outlet) hose, through which hot antifreeze circulates into the radiator for cooling. If the thermostat is working properly, after some time the hose should become hot; if the hose remains cold, the thermostat must be replaced.
The expansion tank cracks and antifreeze leaks out. The appearance of cracks occurs due to the failure of the steam-air valve in the tank plug due to increased pressure.
Vacuum brake booster (VUT). Manifested by a stiff brake pedal. The speed may fluctuate when the brake pedal is pressed, as well as hissing. The problem is solved by replacing failed rubber products and replacing clamps in connections.
Lada 4×4 3D Gan-Gan › Logbook › Motor capital 21213
Hi all. 3 years ago I bought a Niva, an old Niva. for rides, fishing and fishing. its price was a purely symbolic 27 thousand, in fact the price of a bicycle, or a boat propeller for my boat with an outboard motor))). at the same time, the car could move itself. electrically, a lot of things didn’t work, the appearance was 3-, the condition of the chassis was 3, the engine was 3-. tires are shit! but the price! I had a laugh with a friend and I took her. It’s one o’clock in the morning, we are looking for an ATM in the village, writing a written statement and shaking hands. home on your own. further debriefing and so on. repair\modernization, i.e. NIVORY. In half a year we have repaired the gearbox and front axle. another year later the engine gave up its life, so what do you want from a car for 27 sput? ))) that's right - documents! the rest is all done. We removed the engine and installed the contract. the choice was difficult. the contract did not fail. I won’t say that I got shit, but it’s not great (the price is 12 thousand. Well, that’s also funny). skated for 2 years, upgraded to an injector. and he didn’t give any special problems. never let me down given his condition. in principle, it was possible to skate him and skate him until the total. but I need it! ))) I want a new one! But I don’t want to leave the store due to personal convictions and experience I’ve read. and my native number entered in the STS would somehow warm me up))) in general, I decided to buy capital. native dead engine, or rather only the bottom, because I had no intention of putting the injection head from 2123 anywhere. just change the bottom. Easy to say, difficult to do! CAPITAL bottom 21213, to begin with, we disassemble everything and repair defects. Let me remind you that the engine simply stopped starting for a reason unknown to me at the time. the analysis gave the following. 1. “tar”. he was everywhere. camshaft, cylinder head, crankshaft. The knee was left for repair. it was barely washed and purged. the knee channels were soaked for 2 days in the solution. and sulked until clean gasoline came out.
the head is not killed. let's move on. how to make a cylinder head capital, see the manual. it doesn't take long and isn't that expensive. but it must be done. in my case, the head was done in the fall, when I installed the injector, and in the winter in February again, when the key on the camshaft was torn off, followed by the bending of bugs (we went to a competition and our crew simply did not get there under its own power. sad and funny). so I did another capital rebuild of the cylinder head with the replacement of the camshaft (I didn’t like it right away, but a broken key is a one in a thousand case!). 2 in a row is too much. I decided not to make the third one. 2. piston. This is where the “waiter” came out. This is a crumbled piston of the 1st cylinder. (I can’t find a photo)
How to flush the Chevrolet Niva engine correctly?
Step-by-step instructions for performing the said process are given below:
- Remove the dipstick by treating the element with Dimexide. To do this, you will need to unscrew the E12 clamp bolt and pull the dipstick up. This may cause a small amount of oil to spill.
- Then turn the probe over without removing the cable, pour the specified composition into the container, and then heat the tube with an industrial hair dryer. The paint will begin to peel off in layers in just a matter of minutes.
- The dipstick is turned over again, the paint is removed from it in the usual way, and the element is washed with water. It is imperative to check that there are no paint residues left inside the measure, after which it is placed in its seat.
- The engine of the Chevrolet Niva (VAZ-2123) is warmed up and driven to a hill.