The Logan maintenance regulations stipulate that valves should be adjusted every 60,000 km. And if the car is driven on gas , then checking and tuning should be done after 30 thousand km .
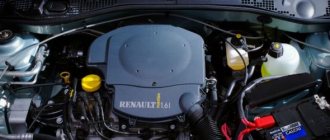
Renault Logan I 1.4 l produced in 2007 arrived with a problem that has been tormenting the car enthusiast for several months. As long as the engine is cold the car moves without any problems. But as soon as the engine warms up to operating temperature, driving becomes impossible. Engine thrust disappears completely. As it turned out, the owner of the car, with a mileage of 140,000 km, had never adjusted the valves.
When checking the thermal clearances of the valves, it was found that almost all the valves were clamped (the clearances were too small). Having set the correct gaps, the car began to drive like new.
When is valve adjustment done in Renault Logan?
According to the regulations established by the manufacturer, valve adjustment on the K7M engine is performed once every 100 thousand kilometers. It is recommended to perform this procedure more often - once every 60 thousand kilometers.
It is necessary to adjust the gap in the gas distribution mechanism to compensate for the distance between the cam and the valve, so that when heated, it completely disappears. Violation of this parameter leads to knocking in the timing belt. This type of engine operation is not desirable.
Incorrect clearance in the K7M valve mechanism can lead to a leak in the combustion chamber. This affects engine power and fuel consumption.
A small gap will lead to the fact that when closing, the valve will not close completely, and with a large gap the valve will be open for less time than it should be.
Frequency of regulatory activities
According to the manufacturer's recommendations, the gaps between the levers and valve stems should be adjusted every 80 thousand mileage of the car. As practice shows, you have to do engine maintenance much earlier - as soon as the numbers on the speedometer pass the 60 thousand km mark. If you operate Renault Logan with gas-cylinder equipment, then the frequency of adjustment is halved. Every 30 thousand km you will have to call in for service and waste time and money. Or do it yourself - the adjustment procedure is simple and even novice car enthusiasts can do it.
What tool will you need?
To adjust the valves on Renault Logan, you must have the following components:
- valve cover gasket K7M, article number: 7701471719;
- probes 0.15 mm and 0.25 mm;
- a standard set of tools for car repair (it is advisable to have Torex bits);
- jack;
It is advisable to carry out all work in a warm box. The air temperature when adjusting the valves on a Renault Logan with a 1.6 engine (8 valves) should be at least 20 degrees Celsius. The motor must be “cold”.
About the history of development and design features of the units
The 1.6 and 16-valve engine differs from the newest modifications; they are the absence of a mechanism for regulating valve timing; this engine design has significantly reduced the dynamic capabilities of the car. But the advantages remain excellent maintainability and durability, that is, increased engine life, thanks to simple design solutions from the manufacturer.
- the cylinder volume increased (1.6 liter engine), which made it possible to increase power in tandem with torque and improve the dynamic characteristics of the model;
- The output of the unit increased by 11% (up to 82 “horses” for the 8-valve version), this engine design led to an increase in torque to 132 Nm;
- the cooling system has undergone adjustments (the need for this modification is caused by an increase in engine power);
- the cooling circuit did not receive any fundamental design changes, and its elements were modified in order to achieve greater performance, for which some new components were integrated, which led to an increase in the service life and efficiency of the system, especially in critical operating modes;
- power increase up to 102 hp. With. achieved thanks to the use of new components in the cylinder-piston group units and valve mechanism:
- the number of valves has doubled (from 8 to 16), which ensured better filling of the combustion chambers with the mixture and led to an increase in power and dynamic capabilities;
- The service life of the motor has increased significantly due to the use of parts made of new, more durable alloys;
- After applying the previously mentioned design solutions in the updated engines, Renault Logan developers managed to achieve significant fuel efficiency:
- 1.5 liters at a distance of 100 km for a 1.6 engine with 16 valves;
- 1.0 liter in the case of 8-valve engine versions.
All these innovations made it possible to essentially make the 1.6 liter engine. more modern (especially the 16-valve version), the engine life has become longer. Although the developers did not apply progressive and innovative design solutions, this modernization of engines for Renault Logan still made it possible to attract a large army of new potential customers to the updated model. In addition to design innovations, these units began to meet the requirements of Euro-5 environmental standards. In the future, the manufacturer of Renault Logan models planned to bring the engine design to the level of compliance with Euro 6/7 standards.
The update of the 1.6-liter unit was not limited to the use of a 16-valve cylinder head mechanism. The increase in traction and power characteristics was achieved thanks to significant transformations, including:
- increasing the performance level of the intake and exhaust systems, which was a necessary measure to bring engines to the advanced level of environmental standards;
- the use of new elements in the cooling circuit, which significantly improved the efficiency of its operation;
- replacement of the generator with a version of increased performance for the Renault Logan model, which made it possible to cope with increased loads on this unit (now the power varies depending on the model’s configuration)
Valve cover removal instructions
Follow the following sequence of actions:
Raise the right wheel and put the gearbox in 5th gear. Remove the air filter housing, armored wires, coil and anything that interferes with the removal of the engine valve cover.
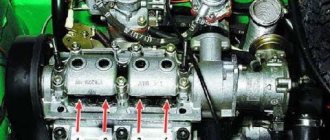
Unscrew the 8 bolts securing the valve cover using a 8 socket. The sequence for unscrewing the bolts is indicated below:
Remove the valve cover.
Useful tips
To make the process of adjusting Renault Logan valves simpler and more efficient, you should follow simple recommendations:
- After the cover is removed, you need to find a special mark made with enamel paint. This will help determine if the cylinder is in the proper position. If the mark is pointing up, the cylinder is at top dead center. You can move the mark to the desired position by rotating the hanging wheel.
- Every half revolution of the right wheel moves a certain cylinder to the desired position. When turning the wheel in the direction of travel of the car, the first, fourth, second and third cylinders are sequentially adjusted. The calculation starts from the flywheel side.
- You can make sure that the piston is in the right position by unscrewing the spark plug and testing it with an aluminum wire.
Instructions for setting Renault Logan valves
Rotate the raised wheel by hand until the mark on the camshaft sprocket matches:
Check the clearances between the cams and valves on the first cylinder. Cylinder counting on Renault engines is carried out from the gearbox. Checking the gap is performed as follows (shown in the example of cylinder 4 - next to the timing belt):
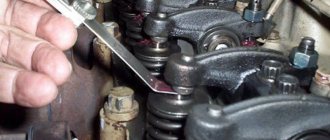
The intake valve clearance on the K7M and K7J engine should be 0.15 mm and the exhaust valve clearance should be 0.25 mm. The probe should enter with slight pinching.
To adjust, loosen the lock nut by 10 and turn the adjusting bolt in the desired direction until the gap is normal.
Attention! Cars with LPG must have clearances of 0.20 mm for the intake valves, and 0.30 mm for the exhaust valves!
After tightening the locknut, the valve is slightly tightened, so the gap needs to be set a little more.
Then check the gap again. If necessary, repeat the adjustment procedure.
Next, turn the crankshaft 180 degrees, the camshaft should turn 90 degrees. Adjust the valves of cylinder 3. Then rotate the crankshaft another 180 degrees and adjust the valves on cylinder 4. In the same way, turn the HF another 180 degrees. and adjust the valves of cylinder 2. After this, you need to set a mark and check the gaps all around to make sure the adjustment is correct.
To simplify the procedure, we recommend using a hint called “the procedure for adjusting valves on Renault Logan”:
| Crank angle | Camshaft angle | Cylinder number |
| 0 | 0 | 1 |
| 180 | 90 | 3 |
| 360 | 180 | 4 |
| 540 | 270 | 2 |
After checking the clearances, install the valve cover. Before this, you need to clean the mating surfaces and install a new gasket. The procedure for tightening the valve cover on a Renault Logan is as follows:
Reassemble the attachment in reverse order. This is how valves are adjusted on Renault Logan 1.6 (8 valves).
And now the easiest way
We set the camshaft mark simply up. We specially adjusted the old mark on the timing belt for clarity. The mark on the belt may not match due to the fact that the belt arms between the marks are different and with each revolution it will shift by two teeth. If it suffers, then after a certain number of revolutions all the marks will fall into place, but we don’t need this.
The circled icon will be needed if we are going the long way; more about it at the end of the article.
If the old mark on the belt and camshaft match, then the second one on the belt and crankshaft too.
If you have a newer Logan, the camshaft sprocket will look like this.
We mark the marks on the belt with a marker; if they are not preserved, we remember which camshaft. Loosen the tension roller nut and remove the belt along with the roller.
New timing kit.
The new timing belt has marks and direction of movement.
We apply the old belt to the new one and are amazed at how clearly all the marks match.
We put the new timing belt in place, aligning the marks on the belt with the marks on the camshaft and crankshaft. We tighten it with a roller using the usual VAZ device. We check the tension of the belt, turn the long branch with two fingers and if it can be turned more than ninety degrees, then tighten it again. That's all. You can put back everything that was removed earlier.
TDC of the first cylinder
It is necessary to adjust the camshaft so that the piston of the first cylinder is at TDC. The camshaft cams must be positioned accordingly so that both valves are closed. This will be the moment of compression. That is, the cams should be positioned with their protrusions down; the rocker arms will be free and will not put pressure on the valves.
You can check the correct position by looking at the camshaft pulley. Mark F will be located approximately as in the photo.
More precisely, the piston is adjusted to TDC by touch using a screwdriver or a thin metal rod. If you insert a rod into the spark plug hole and turn the engine from back to front. The maximum output of the rod will be the required position of the piston at TDC. In this position, the valves of the first cylinder are adjusted.
Engine
Lada Priora has undergone changes several times, both externally and technically. The appearance, power plant and transmission changed.
Below is an example of engines that were installed on the VAZ 2170-72.
Engine 21116 (8 valves)
This engine was installed on the VAZ 2114 and Lada Kalina, and was later inherited by the Priora. The power of this internal combustion engine is 80 hp. with a volume of 1.6 liters, which is very small. Such an engine does not have good dynamics, and it is difficult for it to “drag” the body of the Priora.
Pros:
- Does not bend valves;
- Easy to maintain;
- Cheaper spare parts;
Minuses:
- Low power;
- Noisiness;
The installation of such an engine continued until 2022.
Engine 21126 (16 valves)
16 valve engine with more power and torque compared to 116. It is a modified model of the 124 engine. Its power is 98 hp. with a volume of 1.6 liters.
Pros:
- Great power;
- No noisy operation;
Minuses:
- Bend valves when the belt breaks;
- Expensive spare parts;
Engine 21127 (16 valves)
The modified 126 engine received the index 21127; the intake in this engine was changed, thereby increasing the power to 106 hp. with the same volume of 1.6 liters. They began to install a new cable gearbox for this engine.
Pros:
- High power;
- No noisy operation;
Minuses:
- Bend valves;
- Expensive spare parts;
Engine 21128 (16 valves)
This engine was specially designed for more powerful Lada cars with the “Super Auto” nameplate. The power of this engine has increased, as has its volume. The number of horsepower in the super car engine increased to 123, and the volume to 1.8 liters, which radically affected the dynamics of the car.
Pros:
Good dynamics and high power;
Minuses:
- Bend valves;
- More expensive spare parts;