Causes of wear
Replacing the input shaft bearing of a VAZ 2110
You can find out about wear and when it is necessary to replace the bearings of the primary shafts of gearboxes based on such signs.
- in neutral gear, with the engine running, extraneous noise may be heard;
- When the car is moving in any gear, you can hear a knock in the gearbox;
- transmissions may switch off spontaneously;
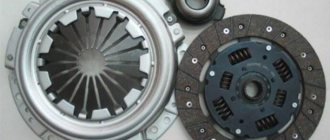
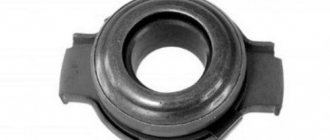
- the clutch may not disengage (this often occurs due to jamming of the bearing);
- If the bearing is misaligned, the clutch disc may be destroyed.
Note! If you do not pay attention to the above listed signs of malfunction of this part, in the future you will not be able to do without serious repairs to the clutch or gearbox. By changing the gearbox shaft bearings in a timely manner, you can avoid unwanted problems and additional cash costs for repairs.
Causes of breakdowns
Many different factors can influence an element to wear out and break down. Often the culprit is poor quality parts. When purchasing a product, you should not give preference to the cheapest options, but rather purchase a quality product. It is necessary to carefully inspect the unit and make sure that it is reliable and made of strong materials. Also one of the possible reasons is the way you drive the car. If the driver uses an overly aggressive style, literally pulling out the shift lever, then this does not add service life to the bearing, but seriously reduces its service life.
The conditions in which the car is operated are also important. If the car is constantly stored in a garage, if there are no overloads, then all this will have the best effect on the resource of each unit. And finally, the most popular reason why the VAZ input shaft bearing fails is ignoring the maintenance of the vehicle’s mechanisms and components. Owners of inexpensive cars who use them for work, as well as novice drivers who are just learning, can ignore maintenance.
When do you need to change the gearbox input shaft bearing?
Replacing the input shaft bearing on a VAZ 2110
Surely, many car enthusiasts are asking the question “when do you need to change bearings?” In fact, there is no definite answer, since the resource of this mechanism directly depends on:
- bearing quality;
- vehicle operating conditions;
- driving style;
- regularity of technical inspection.
Typically, problems that occur due to a worn bearing are detected during the next technical inspection. Diagnostics of the gearbox can be carried out in specialized technical centers, and it becomes possible to evaluate the resource of the components of the unit that remains. The same applies to PV bearings. In certain situations, you can get by with simply lubricating the bearing. Such measures will help normalize operation and eliminate noise in the gearbox. When undergoing vehicle maintenance, experts strongly recommend doing a clutch diagnostic (see: Repairing the VAZ 2110 clutch - we do it ourselves).
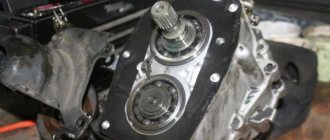
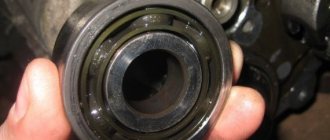
Where is the bearing located, how to dismantle it?
On domestically produced cars, the input shaft bearing is located on the secondary shaft, directly behind the oil seal. When the gearbox is completely removed from the car, take out the bell, as well as the retaining rings. There is no need to disassemble the assembly further.
In order to replace the part, you need to use a screwdriver to hook the bearing into its annular groove. Next, the input shaft is pushed forward using the bearing as a support. Then slowly pull the bearing off the shaft by tapping it with a hammer. There's no need to rush. Replacing the VAZ input shaft bearing can take from several minutes to one hour.
Replacement process
Often, replacing the VAZ 2110 input shaft bearings will in any case involve removing the gearbox from the car. Let's consider this situation using the example of a VAZ 2110 car.
Note! To change the bearings on the input shaft, you will need an inspection pit or a lift.
Removing the gearbox to change bearings on the input shafts
- The machine is installed on the inspection pit.
- The oil is drained from the gearbox.
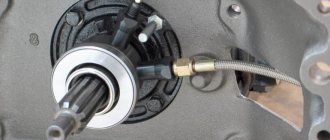
- The cardan moves away.
- The functioning clutch cylinder is dismantled.
- To make removing the gearbox to change the front shaft bearing convenient, it is recommended to remove the “pants” from the exhaust system.
- The starter, the cable from the speedometer, and also the wires for the reverse gear are moved away.
- The shift rocker is removed from the interior.
- All fastening bolts of the box are unscrewed.
- Now it can be easily removed to change the bearings on the input shafts. It must be removed by moving it away from the engine; the rocker arm must pass freely into the body cutout.
- Before disassembling the gearbox, it must be cleaned and washed to remove dirt.
Replacing bearings on the input shaft begins with dismantling the gearbox clutch housing. Before these steps, you need to remove the clutch release fork and release bearing. These parts are checked for suitability for subsequent use.
Note! There should be no cracks on the release plug. The bosses intended for mounting on the release bearing must not be very worn, the spring bracket for the “soldier” (there is a stand in the casing for fixing the fork) must be absolutely intact. The “soldier” is not allowed to have signs of wear on the ball part.
Procedure for disassembling the gearbox
- The clutch cover is unfastened and moved out of place. If easy actions are not possible, you can easily hit it with a wooden mallet or a small hammer through a wooden spacer.
- The clutch cover is removed together with the gearbox input shaft.
- Now we begin to analyze the shaft defects.
Lubrication
If the bearing is dry, but there is no damage on it, then you can completely get by with lubricating it and install it back. It’s only better to do this if you don’t have a new spare part on hand. There are two ways to lubricate the bearing. The first is to boil it in lithol, preferably in a water bath. A safer method of lubrication is by injection. Using a syringe, lithol is driven into the bearing; this method takes quite a lot of time.
Read more in the article “How to lubricate a release bearing without removing the box.”
Replacing bearings for gearbox VAZ 2110
Disassemble Transmission VAZ 2110 Do it yourself
box any vehicle, like another unit, requires repair. If the device fails, not every motorist is ready to raise 100 and pay for its repair. replacing trapezoidal wiper blades on a VAZ 2110. YouTube. So at the moment we will tell you how to disassemble a VAZ 2110 , what aspects need to be taken into account when removing the box. Replacing the steering rack of a VAZ 2110. Video instructions. You can also watch the repair video.
Features of the VAZ 2110 gearbox
As you can imagine, when a device fails, there are only two options - either drive the machine at 100, or do it yourself. To repair a VAZ 2110 without outside help, you will need to disassemble and disassemble the device in order to replace faulty elements with new ones. Replacing the VAZ 2110 timing belt. vaz-remont.ru. Accordingly, you will need to assemble in reverse order.
VAZ car 2110
setting
One of the features VAZ 2110 Gearbox
common symptoms of defects.
In practice, many VAZ owners encounter such breakdowns. 2110:
- Switching speeds to “neutral”, third-party sounds. As a rule, this indicates low quality oil or its deficiency. If you realize this and change the transmission fluid, but the sounds remain, then it may be a faulty Shaft Bearings .
- The gear lever shifts with great difficulty. The issue here may be a failure of the speed selection mechanism, a broken universal joint, or improper disengagement of the clutch. This is also hard work Gearboxes
This is often caused by loosening screw connections. - The shutdown speed is random. Such a defect at the intersection point of the VAZ 2110
may be the result of breakage or mechanical damage to the gear teeth.
This may also indicate weakening. output shaft , broken connecting rods, damaged forks and excessive engine vibration while the vehicle is moving. Knowledge of how to replace the gas pump on a VAZ 2110, VAZ 2110, fuel pump, injector.
How to disassemble a checkpoint
Replacing bearings in a VAZ 2110 gearbox
To perform work on disassembling the gearbox, you must use:
- Impact screwdriver.
- Beard.
- Expanding pliers for removing retaining rings.
- Magnet.
- Mounting blades - it is better to have two copies of the tool.
- Two-jaw and three-jaw pullers.
- With a chisel.
- With a drift.
- Micrometer and dial indicator.
Note: This tool will be needed to replace the differential bearing adjusting ring.
- Locksmith's ruler.
- Glue-fixer.
- Sealant.
First of all, you need to remove the device from the car. The mechanism is cleaned from dirt, dust, and possible liquid residues. Each part is washed with detergent (outer part of the mechanism), diesel fuel or kerosene.
Dismantling the box
Replacing bearings in a VAZ 2110 gearbox
Before opening access to the gearbox bearings, this mechanism must be removed from the vehicle. To do this work you need:
Note: The weight of the gearbox is more than 30 kilograms. The work must be done with an assistant or using special equipment.
- First of all, you need to disconnect the engine splash guard.
- The gearbox oil is drained.
- The battery is removed.
- The air filter is removed.
- The battery shelf is removed.
- The starter is removed.
- The clutch cable must be removed.
- The wiring harness block is disconnected from the rear light switches and the speed sensor.
- The gearbox has a bracket, a wire harness clamp and a nut that needs to be unscrewed. Together with the bracket and the harness box, it should be removed from the car.
- The jet thrust is disconnected.
VAZ 2110 box bearing dimensions
- A similar situation is required for the gear shift drive rod.
- The front wheel drives are removed.
- The left side of the power unit is removed. To perform this work, the engine must be raised.
- The nut securing the mounting eye is unscrewed and removed from the vehicle.
- The lower clutch housing cover has three bolts. They need to be unscrewed.
- The bottom cover is removed.
Note: assistance from an assistant or a lift is required.
- Using a socket wrench with a 19 mm extension, the fastening bolts are unscrewed.
- The transmission nut follows the same procedure.
Note: There is a bolt on the top of the transmission on the right side that will be smaller than the others. When removing the gearbox, never rest its input shaft on the clutch spring. This delicate mechanism can be damaged at any moment.
- Removal of the gearbox must be carried out by rocking or smooth, not sudden movements, removing it from its location.
- After removing the input shaft, it remains easy to remove the gearbox itself.
Repair of VAZ 2110 gearbox
Something bad happened and a VAZ 2110 gearbox needed to be repaired. Unit repair is required when:
- It is difficult to switch gears off and on.
- automatic switching off of gears.
- noise occurs when shifting gears.
- transmission oil leak.
The reasons for the breakdown may be different, perhaps the oil was not changed in a timely manner or the mechanism has simply exhausted its resource.
How is a VAZ 2110 gearbox repaired? Do-it-yourself VAZ 2110 gearbox repair, video.
Main manual transmission malfunctions and their causes
The transmission is designed to change and transmit torque from the engine to the wheels, that is, it is one of the main systems of the car, determining its dynamic and speed characteristics. The key role in the transmission is played by the gearbox (gearbox, or simply gearbox, gearbox), when it fails the car loses its driving characteristics or cannot move at all.
As you know, today there are two main types of transmissions in the world - manual (mechanical) and automatic. These transmissions have different designs and operating principles, so they are characterized by different malfunctions. Here we will only talk about malfunctions of a manual transmission; read about problems with an automatic transmission in a separate article.
The following malfunctions are typical for a manual gearbox:
• Noise during operation and when changing gears; • Inability to engage any gear or all gears; • Difficulty shifting gears; • Spontaneous gear disengagement; • Oil leakage from the gearbox.
Gearbox device
There are situations when removing the gearbox is not at all necessary; adjusting it is enough. The VAZ 2110 very often has problems with gear shifting, they get knocked out. To eliminate this problem, it is not at all necessary to remove the box; it is enough to adjust the gear selection drive mechanism. It is enough to make do with adjustment in the following cases:
- not so long ago, the input shaft bearing was replaced or any other repair was carried out where the gearbox was removed.
- Only one speed comes out.
- When the car is moving, the speed shifts poorly or completely jumps out.
To adjust the gearbox you need:
- Loosen the nut and bolt, which is located under the machine, tightening the clamp securing the box rod.
- Using a screwdriver, move the clamp and grooves of the rod apart. Set the rod to the neutral position.
- Remove the cover from the gearbox.
- In order to block reverse gear, you need to place a lever in the window of the bracket lining.
- Adjust the axial play in the rear direction and by turning to the left.
- Place the clamp in place and tighten it with a bolt.
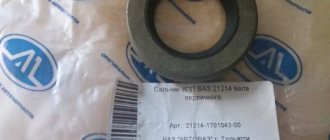
Shaft bearing: features of part selection
The type and brand of bearing you will need for repairs can be found by consulting your vehicle manufacturer's information. In the future, you should inform the seller of its catalog number. The consultant will select the required part for you. When reinstalling, it is not necessary to use the brand recommended by the factory.
A wide range of products allows you to choose an analogue that is not inferior or superior in its performance qualities
. If you do not know the information about the catalog number of the unit installed on your car, you can search by make and year of manufacture of the car.
When purchasing, pay special attention to the date of manufacture of the sample. The shelf life of products should not exceed three years. In this case, the lubricant located inside the product retains its performance qualities. If this time is exceeded, the sealant thickens and does not work as effectively. It is permissible to use parts in a car after re-preservation - the date of the operation should be marked accordingly on the box. But at the same time, the product should not have signs of warping and rusting on its metal surfaces. It is undesirable to buy goods whose packaging has lost its integrity.
Disassembling the gearbox
In the situations described above, a simple gearbox adjustment will be sufficient. This is much better than repairing the VAZ 2110 gearbox, disassembling and assembling the gearbox.
Procedure for disassembling the gearbox:
- Remove the oil indicator from the gearbox. Unscrew the bolts that hold the clutch cable.
- Unscrew the bolts that hold the back cover. The lid is hermetically sealed, so when removing it, you can use a hammer.
- To prevent the shafts from turning while disassembling the gearbox, turn on the third or fourth speed. Then unscrew the bolt that secures the fifth gear.
- Remove the fifth gear and fork together.
- Afterwards, remove the gear from the secondary shaft and the fork. Then remove the plate that protects the bearings.
Below you can see a DIY video repairing a VAZ 2110 gearbox.
Dismantling the VAZ 2110 gearbox housing
Having started repairing the VAZ 2110 gearbox, after all the steps described above, it is necessary to disassemble the crankcase and the operating mechanism. Let's get started:
- We unscrew the spring plugs that hold the gear rods. Once the plugs are unscrewed, the end balls will fall out of the holes. We do the same with the plug that holds the reverse gear. If the balls have not fallen out of the holes, you can get them out using a magnetic screwdriver.
- Next, we unscrew the bolts that secure the gearbox housing to the clutch housing. After the bolts are unscrewed, you can use a screwdriver to disconnect the crankcases.
- Next step. Unscrew the rod from the first and second gear fork.
- We do the same with gears third, fourth and fifth, respectively. To remove the rod, it must be removed together with the gear shift parts.
- You need to remove the axle from the reverse gear and, of course, the gear.
- Next, take out the differential and two shafts with gears. Unscrew the three bolts that secure the gear mechanism and remove it from the crankcase.
- Unscrew the rear lever bolt and remove the rod.
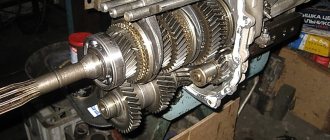
- If necessary, remove the bearings of the primary and secondary shafts with a separator.
Dismantling of the VAZ 2110 gearbox has been completed.
Gearbox disassembly and repair
ATTENTION !
If during the repair of the gearbox at least one of the following parts was replaced: clutch or gearbox housings, differential housing or differential bearings, then it is necessary to select a differential bearing adjusting ring.
| 4. Unscrew the remaining four nuts securing the rear cover. | ||
| 5. Use a screwdriver to hook the boss on the cover and remove the back cover. | 6. Unscrew the bolt securing the 5th gear fork (a spring washer is installed under the bolt head). | 2. Secure the gearbox shafts from turning. To do this, engage 5th gear by moving the synchronizer clutch down along with the fork so that the coupling splines engage with the gear, then engage 3rd or 4th gear by moving the gear selection rod. |
| 2. Unlock and unscrew the nut securing the input shaft. To do this, you need to apply a lot of force, since the nut is tightened with a large torque. | 9. Having previously unlocked it, unscrew the nut securing the secondary shaft. To do this, you need to apply force, since the nut is tightened with a large torque. | 10. Using screwdrivers, lift the 5th gear driven gear (thereby pressing the synchronizer hub from the shaft), remove it together with the synchronizer and fork from the secondary shaft. At the same time, make sure that the synchronizer clutch does not come off the hub: the spring-loaded synchronizer retaining balls may fall apart. |
| 11. Remove the thrust plate from the synchronizer. Then remove the fork from the groove of the synchronizer clutch. | 12. Remove the 5th gear from the synchronizer with blocking ring 1. Mark blocking ring 1 relative to clutch 2 and remove it. During operation, the teeth of the ring are worn in to the teeth of the coupling, so during assembly the ring must be installed in the same position. If you do not intend to disassemble the synchronizer, tie it with wire or rope to prevent it from falling apart. | 13. Remove the bushing from the secondary shaft. |
| 14. Remove the 5th gear drive gear from the input shaft. Pay attention to how it is installed. | 15. Using an impact screwdriver, remove the four screws (there are spring washers underneath) securing the bearing plate and remove bearing plate 1. Then remove thrust washer 2 from the secondary shaft. | 16. Remove the retaining rings from the bearings of both shafts while lifting the shafts by hand. |
| 17. Unscrew the three clamp plugs and carefully remove the clamp balls with springs. | 18. After unscrewing the reverse lock plug, remove the O-ring, and then remove the lock spring. | 19. Tilt the box and remove the locking ball. |
| 20. Unscrew the twelve nuts and bolt securing the gearbox housings. Pay attention to which nuts holder 1 and eye 2 are installed under. Spring washers are installed under the nuts and bolt. Remove the process plug | 21. By inserting a screwdriver into the grooves (three special grooves along the perimeter of the crankcases), separate the gearbox housing from the clutch housing. | 22. Lift the gearbox housing slightly, turn it counterclockwise so that boss 1 of the housing comes out from under the gear, and remove the gearbox housing from the clutch housing. |
| 2Unscrew the bolts securing the 1st–2nd and 3rd–4th gear shift forks. | 24. Slightly lift the 1st–2nd gear shift rod so that it comes out of support 3, and turn it counterclockwise so that its head 1 disengages from the locking bracket 2. Remove the rod fork 4 from the groove of the synchronizer clutch and remove the rod with a fork. It is not recommended to remove the forks from the rods unless necessary, so as not to mix them up during assembly. | 25. By turning the 3rd–4th gear shift rod, disengage its head from the gear selection lever. Then lift the rod slightly so that it comes out of the support, and, moving the rod fork out of the groove of the synchronizer clutch, remove the rod with the fork. |
| 26. By turning the 5th gear shift rod, disengage its head from the locking bracket. Remove the rod by moving it out of the support. | 27. Remove the reverse idler gear shaft. | 28. Slide the reverse idler gear all the way into the gear selection mechanism, turn it 30–40° and remove the idler gear from under the shaft gears. |
| 29. Using a slight rocking motion, remove the input and output shafts at the same time. | 30. Remove the differential from the clutch housing. | 31. Unscrew the three bolts securing the gear selection mechanism (spring washers are installed under the heads of the bolts). Remove the gear selector mechanism. |
| 32. Remove the magnet from the clutch housing. | 3After unscrewing the fastening nut, remove the housing with the speedometer drive gear. Replace a torn or loose housing O-ring. | 34. Unscrew the reverse light switch from the gearbox housing. There is a metal O-ring installed underneath it. |
| 35. There is a special puller for pressing out the front bearing of the secondary shaft. If it is missing, press out the bearing using a screwdriver. | 36. Remove the oil pan located under the bearing. | 37. There is also a special puller for pressing out the front input shaft bearing. If it is missing, bend the device into the shape of a hook made of stiff wire. Insert the tool into one of the two grooves in the crankcase and place the hook under the bearing. Then, using a screwdriver (placing a wooden block), press the bearing out of the crankcase, applying force to the opposite end of the screwdriver with hammer blows and alternately moving the hook in the grooves. |
| 38. Press the new front shaft bearings all the way into the clutch housing using a suitable mandrel. | ||
| 39. Using a screwdriver, use a screwdriver to hook the edge of the protective boot on the gear selector rod and slide it off the rod support sleeve. | 40. Remove the gear selector lever mounting bolt. Slide the rod and remove the gear selector lever. Then remove the gear selector rod from the clutch housing. | 41. If it is necessary to replace the rod hinge, slide the protective cover off it and unscrew the hinge mounting bolt. The bolt is fixed with special glue TB-1324. Before tightening the bolt, clean it of old glue and apply new one. Replace the torn or lost elasticity protective cover of the rod hinge. |
| 42. To replace the clutch housing, remove the bearing and clutch release fork from it (see here), press out the seals. | ||
| 4 Inspect the clutch and gearbox housings, as well as the rear cover. There should be no cracks or chips on them. There should be no nicks, scratches, dents, etc. on the mating surfaces. Remove minor damage with sandpaper. In case of severe damage, replace the defective parts. | ||
| 44. Check the bearing seats in the clutch housing and in the gearbox housing. These surfaces must show no signs of wear or damage. Otherwise, replace the crankcases. | ||
| 45. Check the condition of the roller bearings. If the raceways, cage or rollers are damaged and if play is detected in the bearing, replace it by installing it on the shaft (the radial play in the bearing should not exceed 0.07 mm). | ||
| 46. Check the condition of the gear shift rods. Replace bent rods, with burrs, burrs or worn out holes for clamps. Replace the forks if they are bent or their tabs are worn. | ||
| 47. Check the axle seals. The seals must not be warped or have tears. The working edge must be smooth, without holes, dents or rubber sagging. The oil seal spring must not be broken or stretched. Replace defective seals. | ||
| 48. Also check and, if necessary, replace the input shaft seal and the selector rod seal. | ||
| 49. Clean the magnet from particles of wear parts. If the magnet is cracked or its magnetic properties are weakened, replace the magnet. | ||
| 50. Thoroughly clean the mating surfaces of the clutch and gearbox housings and the rear cover from old sealant. Reassemble the gearbox in the reverse order of disassembly, taking into account the following. | ||
| 51. Before installing the shafts, engage the teeth of their gears and, in this position, install them in the clutch housing. | ||
| 52. Pay attention to how the forks are installed on the gear shift rods: 1 – rod with the 1st and 2nd gear shift fork, 2 – rod with the 3rd and 4th gear shift fork. | ||
| 5 Liberally lubricate all rubbing parts with transmission oil. | ||
| 54. Don't forget to reinstall the magnet. | ||
| 55. Before installing the gearbox housing on the clutch housing and the rear cover on the gearbox housing, sealant is applied to their mating surfaces along the entire perimeter. | ||
Common gearbox problems
Let's look at the problems that most often arise:
The problem concerns the first gear speed. It turns on very hard, there is an extraneous sound when changing gears, the speed drops while driving.
The reasons may be the following:
- The synchronizer may have failed.
- The retainer spring has burst or has a defect.
- Speeds may change independently due to the weakening of the lever.
- The problem is in the stem or fork. They need to be replaced.
The next problem concerns second gear. Most often, car enthusiasts are faced with the fact that the second speed jumps out or difficulties arise when turning it on.
The following reasons may lie behind this:
- The gear teeth are worn out, as a result of which they do not cling well to the gear shift clutch. In this case, it is necessary to repair the VAZ 2110 gearbox. In the future, this may cause the transmission to crash.
- If the transmission slips out exclusively when driving over bumps, then we can say with confidence that the reason for this is a problem with the clutch.
Very often, in order to fix a problem with the second speed, you just need to change the retaining spring. If, after replacing the spring, the speed continues to drop, then you need to remove the gearbox and do a major overhaul.
The occurrence of extraneous noise in the gearbox may be due to bearings that have failed. In order to find out, you need to check the play of the roller bearings that are installed in the clutch housing, and the rolling bearings located on the primary and secondary shafts.
You need to check the forks and gear rods very carefully. These parts tend to deteriorate very quickly. If there are any obvious signs of wear on these mechanisms, then they need to be replaced immediately with new ones. You can buy these parts at auto stores.
If a car enthusiast has a little experience in repairing a VAZ 2110 gearbox, then he can safely carry out repair work on the gearbox on his own. From this article it is clear that this is not so difficult to do. Even a car owner, without sufficient experience and skills, can cope with this problem. But if a person is still far from this, and has no idea what or how to do, in this case turning to a specialist for help would be the right decision. Of course, turning to specialists for help will cost the car owner some money. But it’s better to pay money and get a quick and high-quality gearbox repair.
Simple repair of the input shaft support
You can purchase the parts required for this repair at the representative office. Here you will find bearings for all brands of cars. The products presented are original products produced by domestic and foreign manufacturers.
If this unit fails on your car, consider purchasing the materials that will be needed for this type of restoration work, namely:
Even though new bearings are supplied with factory grease, they must be further treated. This needs to be done for several reasons:
1. Over time, any lubricant loses some of its performance qualities;
2. The latest generation of sealants can significantly improve the performance of the unit, increase its working life, and protect the part from the influence of aggressive factors.
This type of bearing is not insulated with an oil seal. But, to remove it, the technician needs to partially dismantle the parts that make up the gearbox. The optimal solution would be to replace all rubber elements removed during repairs. This will allow you to postpone the period of preventive maintenance to prevent oil leaks from the gearbox.
Repair of VAZ 2110 gearbox
Something bad happened and a VAZ 2110 gearbox needed to be repaired. Unit repair is required when:
- It is difficult to switch gears off and on.
- automatic switching off of gears.
- noise occurs when shifting gears.
- transmission oil leak.
The reasons for the breakdown may be different, perhaps the oil was not changed in a timely manner or the mechanism has simply exhausted its resource.
How is a VAZ 2110 gearbox repaired? Do-it-yourself VAZ 2110 gearbox repair, video.
Manual transmission malfunctions and their elimination
All gearbox malfunctions are characterized by certain external signs - it is from these manifestations that one can judge the nature of the breakdown. However, many malfunctions manifest themselves in the same way, so in the table presented here all manual transmission breakdowns are grouped according to their external signs.
This table does not indicate troubleshooting methods, since they, for the most part, require high qualifications and car repair skills. Only some operations can be carried out even by an unprepared car owner - this is replacing and filling oil, as well as replacing gear drive parts. If other manual transmission malfunctions are detected, it makes sense to contact a car service center.
Gearbox device
There are situations when removing the gearbox is not at all necessary; adjusting it is enough. The VAZ 2110 very often has problems with gear shifting, they get knocked out. To eliminate this problem, it is not at all necessary to remove the box; it is enough to adjust the gear selection drive mechanism. It is enough to make do with adjustment in the following cases:
- not so long ago, the input shaft bearing was replaced or any other repair was carried out where the gearbox was removed.
- Only one speed comes out.
- When the car is moving, the speed shifts poorly or completely jumps out.
To adjust the gearbox you need:
- Loosen the nut and bolt, which is located under the machine, tightening the clamp securing the box rod.
- Using a screwdriver, move the clamp and grooves of the rod apart. Set the rod to the neutral position.
- Remove the cover from the gearbox.
- In order to block reverse gear, you need to place a lever in the window of the bracket lining.
- Adjust the axial play in the rear direction and by turning to the left.
- Place the clamp in place and tighten it with a bolt.
Disassembling the gearbox
In the situations described above, a simple gearbox adjustment will be sufficient. This is much better than repairing the VAZ 2110 gearbox, disassembling and assembling the gearbox.
Procedure for disassembling the gearbox:
- Remove the oil indicator from the gearbox. Unscrew the bolts that hold the clutch cable.
- Unscrew the bolts that hold the back cover. The lid is hermetically sealed, so when removing it, you can use a hammer.
- To prevent the shafts from turning while disassembling the gearbox, turn on the third or fourth speed. Then unscrew the bolt that secures the fifth gear.
- Remove the fifth gear and fork together.
- Afterwards, remove the gear from the secondary shaft and the fork. Then remove the plate that protects the bearings.
Below you can see a DIY video repairing a VAZ 2110 gearbox.
Dismantling the VAZ 2110 gearbox housing
Having started repairing the VAZ 2110 gearbox, after all the steps described above, it is necessary to disassemble the crankcase and the operating mechanism. Let's get started:
- We unscrew the spring plugs that hold the gear rods. Once the plugs are unscrewed, the end balls will fall out of the holes. We do the same with the plug that holds the reverse gear. If the balls have not fallen out of the holes, you can get them out using a magnetic screwdriver.
- Next, we unscrew the bolts that secure the gearbox housing to the clutch housing. After the bolts are unscrewed, you can use a screwdriver to disconnect the crankcases.
- Next step. Unscrew the rod from the first and second gear fork.
- We do the same with gears third, fourth and fifth, respectively. To remove the rod, it must be removed together with the gear shift parts.
- You need to remove the axle from the reverse gear and, of course, the gear.
- Next, take out the differential and two shafts with gears. Unscrew the three bolts that secure the gear mechanism and remove it from the crankcase.
- Unscrew the rear lever bolt and remove the rod.
- If necessary, remove the bearings of the primary and secondary shafts with a separator.
Dismantling of the VAZ 2110 gearbox has been completed.
Removing the bearing
To get to the bearing, you must be careful and careful.
For repair you will need:
- Before dismantling the shaft, it must be securely fastened using a vice, make sure that it is stable;
- remove the ball bearing from the input shaft using mounting blades;
- you have removed the bearing. See if lubrication is needed here, and if it is possible to get by with preliminary repairs. If all this does not help, we will change the bearing.
The VAZ 2110 has another bearing on the secondary shaft. It will also have to be disassembled to gain access to the worn part.
Using paddles will help you remove the ring from the inside of the roller bearing. Insert the puller grips into the resulting socket. This will remove the bearing ring.
Next, open the locking ring and remove it from the shaft. Also open the coupling ring and remove it. Such rings are used to engage 1st and 2nd gears.
You also remove the hub and clutch for shifting 1st - 2nd gears using mounting blades. You must do the same steps to remove the ring that blocks the 2nd gear synchronizer and gears.
Disconnect the roller bearing on the reverse side of the shaft.
Congratulations, now the bearing is free, there is normal access to it, then the secondary shaft does not require disassembly. If your plans include a major overhaul, continue to disassemble the secondary shaft further.
The differential has its own bearing. As before, all these devices will be disassembled.
What you need to do for this process:
- The bearing at the top of the device must be removed.
- When the bearing replacement is completed, select the adjustment ring again. Diameter required 1.25 mm;
- Mount the differential to the clutch housing. Tighten three nuts;
- Turn the base in the differential a couple of times or more. Turn as many times as necessary until the bearing is secured in the required position;
- use an indicator to measure the size of the differential in the axle;
The formula for calculating the size of the adjusting ring is: T=O+H+K.
- T is the thickness of the next adjusting ring;
- O is the exchange of movement of the axis in the mechanism;
- H is a number that determines the bearing tension;
- K is the width of the installation ring.
Common gearbox problems
Let's look at the problems that most often arise:
The problem concerns the first gear speed. It turns on very hard, there is an extraneous sound when changing gears, the speed drops while driving.
The reasons may be the following:
- The synchronizer may have failed.
- The retainer spring has burst or has a defect.
- Speeds may change independently due to the weakening of the lever.
- The problem is in the stem or fork. They need to be replaced.
The next problem concerns second gear. Most often, car enthusiasts are faced with the fact that the second speed jumps out or difficulties arise when turning it on.
The following reasons may lie behind this:
- The gear teeth are worn out, as a result of which they do not cling well to the gear shift clutch. In this case, it is necessary to repair the VAZ 2110 gearbox. In the future, this may cause the transmission to crash.
- If the transmission slips out exclusively when driving over bumps, then we can say with confidence that the reason for this is a problem with the clutch.
Very often, in order to fix a problem with the second speed, you just need to change the retaining spring. If, after replacing the spring, the speed continues to drop, then you need to remove the gearbox and do a major overhaul.
The occurrence of extraneous noise in the gearbox may be due to bearings that have failed. In order to find out, you need to check the play of the roller bearings that are installed in the clutch housing, and the rolling bearings located on the primary and secondary shafts.
You need to check the forks and gear rods very carefully. These parts tend to deteriorate very quickly. If there are any obvious signs of wear on these mechanisms, then they need to be replaced immediately with new ones. You can buy these parts at auto stores.
If a car enthusiast has a little experience in repairing a VAZ 2110 gearbox, then he can safely carry out repair work on the gearbox on his own. From this article it is clear that this is not so difficult to do. Even a car owner, without sufficient experience and skills, can cope with this problem. But if a person is still far from this, and has no idea what or how to do, in this case turning to a specialist for help would be the right decision. Of course, turning to specialists for help will cost the car owner some money. But it’s better to pay money and get a quick and high-quality gearbox repair.
Checking the serviceability of bearings
If the oil level is low enough, all parts work poorly and the clutch is low enough. All bearings are no exception.
I'll tell you what to do to check:
1. Place the car on the inspection hole. We carefully check for oil leaks. Pay attention to the contact of the crankcase, wheel drive seals, and the rod mechanism. This is where the leak may be.
2. Depress the clutch, while shifting each gear in order. Check that they turn on and off clearly. If necessary, adjust the gear shift mechanism.
3.Start the engine with the transmission lever in neutral. When you depress the clutch pedal, listen to how all the bearings operate. An unusual loud sound occurs when the pedal is released. Press again and the sound disappears. Such signs indicate that the roller bearing has failed.
4. You can check bearing wear while the car is moving. Accelerate first, then brake gradually. By changing gear, you check the operation of the synchronizer and the accuracy of the transition to another gear. No unnecessary sounds appear when the gearbox is running.
The load has increased, make sure that the gears are not switched on without permission. If it is necessary to replace only one part of the mechanism, do not disassemble the device completely. It will be enough to get the part that needs to be replaced.
Location
Since we are talking about the VAZ 2114, the first thing we will do is determine the location of the element.
On the fourteenth, the primary bearing is located on the shaft behind the oil seal.
It is noteworthy that on some gearboxes this bearing additionally plays the role of an oil seal, taking on the load together with the release bearing.
To get to the damaged transmission component, you will have to remove the transmission. When choosing a new element, be sure to check the recommendations from the instruction manual for your VAZ 2114 regarding the overall dimensions of the component.
VESKO-TRANS.RU
Replacing the input shaft bearing on a VAZ 2114
Many people replace the input shaft bearing without outside help, without the help of professionals with 100. Algorithm for replacing a VAZ 2115 radiator. Replacing a VAZ 2110 clutch without removing the box, etc. To do this, you need to know the location of the required element and signs of its malfunction. Plus we will tell you carefully how you can understand it.
Location
Since we are talking about a VAZ 2114, we will first determine the location of the element.
In the fourteenth, the primary bearing is located on the shaft behind the seal.
Catch this on some gearboxes, this bearing additionally plays the role of an oil seal, bearing the load along with the output bearing.
To get to the deformed transmission component, you need to remove the transmission. When choosing a new product, be sure to read the operating instructions for the VAZ 2114 car to find out its overall dimensions.
Signs of failure
All bearings in a car show approximately the same signs of failure. Replacement of VAZ 2110 Transmission shaft bearing. But, as you understand, the location of the bearing Input shaft , discovering that the difficulties that arise specifically with it will not be so difficult.
There are several relevant signs of failure.
Characteristics
It howls when the clutch is released in a parking lot.
The item is defective and needs to be replaced. Howling is usually caused by the formation of chips, cracks, or the destruction of 1-2 rollers
The bearing is partially broken or lacks grease. A problem in the absence of lubrication can only be detected by disassembly and visual inspection. Sometimes it's easy to lubricate the item and put it back in place to solve the problem
Signs of failure
All bearings, of which there are quite a few in a car, have approximately the same signs of failure. But since you know the location of the input shaft bearing, it will not be so difficult to determine that the problem arose with it.
There are several characteristic signs of its breakdown.
Sign
Peculiarities
Howling when the clutch is released in a parking lot
The element has failed and needs to be replaced. The howling is usually caused by the formation of chips, cracks, or the destruction of 1-2 rollers
Whistle when driving
The bearing is partially damaged or there is no lubrication. The problem in the absence of lubrication can only be determined by dismantling and visual inspection. To solve the problem, sometimes it is enough to simply lubricate the element and return it to its place
Clutch won't engage or disengage
Most likely the bearing is stuck. If the damage is serious, the input shaft may need to be replaced.
Knock in the area where the element is located
The bearing knocks only when the part is completely destroyed. If you do not replace it in time, the bearing will be welded to the shaft, so you will also have to replace the shaft itself
If you notice the first signs of a malfunction of the input shaft bearing on your gearbox, you should immediately check the condition of the element and, if necessary, replace it.
Symptoms of malfunctions
Signs of failure of this element are strongly related to the installation location. The gearbox input shaft bearing is installed on the input shaft, and behind it there is an oil seal. In various transmission models, the bearing itself can act as an oil seal. So, paired with a release valve, this part experiences almost the entire load from the car engine. To find the problem bearing, you need to dismantle the transmission. Symptoms of failure of this element are similar to how any other bearings become unusable. In case of serious breakdowns, characteristic sounds resembling a howl are heard from the gearbox. This sound can be heard when the clutch is released and the car is stationary. But the input shaft bearing can also whistle while driving. It is very rare to hear characteristic knocking sounds - they indicate complete destruction of the unit.
There are also problems with engaging or not disengaging the clutch. The reasons for this type of gearbox operation lie in this bearing. A malfunction often occurs if a part is jammed. In difficult situations, it may be necessary to replace the input shaft. Often, whistling and humming are heard when there is no lubricant in the bearing. This issue can be resolved by lubricating the part. But first you need to remove it from the gearbox. The transmission will make a howling noise if the bearings are chipped or cracked, or if one or two rollers are destroyed. If characteristic knocking noises are heard, this indicates complete failure of the part. The knock will be made in any gear. If you do not replace a worn or damaged part in time, then the element may become seriously “welded” to the shaft. As a result, you will have to change the input shaft bearing and the shaft itself.
Replacement
Many people turn to a service station to replace this bearing. It is noteworthy that car services often refuse to perform such work. It’s understandable, because the procedure is painstaking, and you can’t get a lot of money for it.
Dismantling works
To do the job yourself, follow the instructions.
- You can often find advice about the need to completely disassemble the gearbox to replace the bearing. But this is optional. You can do without such complex manipulations.
- In any case, you will have to remove the box, so familiarize yourself with this procedure.
- Before removing the gearbox, remove the negative terminal from the car battery.
- All the chips are removed from the box, the wire from the speedometer is unscrewed.
- Next, the trousers of the vehicle exhaust system are dismantled.
- After this, you can completely remove the gearbox.
- At the next stage, the bell is dismantled. You can try to do without it, but then it will definitely constantly interfere with your work.
- Thoroughly clean the box from accumulated dirt.
- The bearing is secured using retaining rings. To remove them you will need a flathead screwdriver.
- The rings are pryed off and loosened a little, after which there will be no more problems with removal.
- To make it more convenient, arm yourself with tweezers that can be used to remove the ring.
- Using a flat-head screwdriver, pry the bearing by the ring groove, and at the same time move the input shaft slightly forward.
- Insert a pry bar between the gearbox and the bearing. It is unlikely that you will be able to do this without an assistant.
- You will operate the tools, while your friend will hold the pry bar.
- Your main task is to press out the bearing. To do this, precise, strong, but most accurate blows are applied to the input shaft.
- In the process of striking, the shaft must rotate.
- This work will take you about 20 minutes. But if you have a special puller at your disposal, you can speed up the work. Although it is really convenient to work with a puller only if you decide to disassemble the gearbox.
- Before installing a new input shaft bearing, be sure to lubricate the element with regular engine oil.
- Carefully press the component into place using gentle, light blows with a hammer. It is better to use a pipe of diameter or a stand.
- When pressing, apply blows to the inner race, in a circle, as evenly as possible.
- Once the bearing is pressed in, make sure it is seated properly. Scrolling should be calm, without obstacles.
- Reassemble the box in reverse order and install it on the car.
Location at checkpoint
Recommendations for manual transmission operation and maintenance
The durability and quality of the transmission largely depends on how the gearbox and clutch are operated. Extending the service life of the gearbox, and therefore increasing the comfort, controllability and safety of the car, is not difficult; all you need to do is follow a few simple recommendations.
The main thing in operating a manual transmission is smooth gear shifting with the clutch pedal fully depressed. Under no circumstances should gear shifting be allowed with the clutch not fully disengaged, as this leads to accelerated wear of the gears and increases the likelihood of their failure. It is also very important to move in the gear that best matches the current speed, and, if possible, switch to direct (usually fourth) gear - in this case, the torque transmission uses a minimum number of gears and two shafts (bypassing the intermediate one), therefore, wear of parts is reduced Checkpoint.
When switching to a lower gear, you should reduce the speed of the car, which is also necessary to reduce the load on the parts of the gearbox and the engine itself. Under no circumstances should you engage reverse gear even when the car is moving forward at a low speed - this will certainly lead to damage to the gearbox. And finally, if the first gear does not engage immediately, then you need to first depress the clutch (you can do it twice), and only then engage first gear again. Next, gear shifting must be done smoothly and with a mandatory pause between shifts.
A manual transmission also has operating features that many people are not even aware of. For example, in the winter season, especially at significant subzero temperatures, it is not recommended to park the car with the gear engaged - in this case, there is a high risk of the synchronizer ring freezing, and the next time you start the engine, even after the gear is turned off, the car may start moving. This is also fraught with some malfunctions.
Maintenance is also of great importance for the reliable operation of the gearbox. Firstly, periodically after long and active trips you need to inspect the gearbox for oil leaks. Typically, drips can appear in the area of the filler and drain plugs, along the perimeter of the junction of the box to the engine, between the crankcase and the gearbox cover, and also (in the case of a two-wheel drive vehicle) on the flange of the driveshaft coming out of the box.