DS555555555
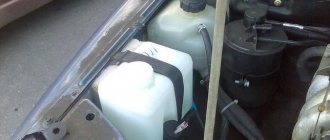
If the engine is hot, you need to let it cool and then relieve excess pressure in the cooling system by unscrewing the expansion tank cap.
To access the drain holes from below, you must remove the middle mudguard of the engine compartment. How to perform this operation can be found in the article “Changing the oil and oil filter of Lada Kalina”.
We place a wide container with a volume of at least 6 liters under the drain hole made in the lower part of the right radiator tank. To reduce the intensity of liquid drainage at the initial moment, the cap of the expansion tank should be tightly screwed on.
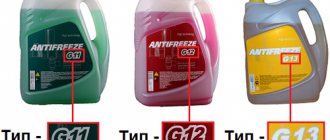
Which antifreeze to choose and what volume is needed
To completely replace the coolant in a 2nd generation Lada Kalina/Kalina car, you need 7.8 liters of antifreeze or antifreeze, depending on what you choose. Felix red antifreeze is poured from the factory.
To completely replace the coolant (coolant), we will need to purchase either one 10 liter canister or two 5 liter canisters.
Choosing antifreeze to replace
If red antifreeze was added from the factory, then we recommend replacing it with red one.
- AGA 003Z (-40*) red 10l price from 1000 rub.
- Professional Premium G-12 red 10 l price from 700 rub.
- SINTEC LUX G-12 red 10l price from 1000 rub.
- FELIX Carbox-40 (10 l) red price from 950 rub.
- NIAGARA G12 (10 l) red price from 800 rub.
- Arctic Circle G12 (10 l) red price from 700 rub.
All of the above manufacturers have proven themselves, so antifreeze from these manufacturers can be used as a replacement.
What is needed for replacement
- Container for draining old antifreeze for 6-8 liters
- 16mm head
- 13mm socket wrench for removing the starter on the 16 valve version of Kalina
It is better to replace it with a cold engine. Before starting the replacement, you should release the pressure in the system by unscrewing the cap of the expansion tank. In order to freely access the drain plug, it is necessary to remove the middle mud flap.
1449657996_2279_4_9b_03_kopirovat
The connection is sealed with a rubber ring.
To increase the intensity of liquid drainage, unscrew the cap of the expansion tank.
Next, you need to drain the fluid from the cylinder block.
To drain the coolant from the cooling jacket of an 8-valve engine equipped with a traction drive gearbox, place a container under the drain hole located on the front side of the cylinder block below the ignition coil.
The process of draining antifreeze step by step
Below is a list of tools needed to drain antifreeze from the Lada Kalina tank:
- Socket wrench or open-end wrench 13
- Socket head 13
- Driver or ratchet handle
- crosshead screwdriver
- 17mm socket or wrench for unscrewing the ignition module housing
In addition to tools, you will need containers for waste fluid (more than 5 liters in volume) and clean rags.
Before draining antifreeze, place the vehicle on a level surface. If it is slightly inclined, then the front wheels of the car should be higher.
To prevent burns, cool the engine. Remove the plastic boot by unscrewing the six screws.
The set of actions for replacing the refrigerant will depend on the version of LADA Kalina.
Lada Kalina with 8-valve engine
Before starting the antifreeze draining procedure, it is recommended to relieve the pressure level in the circuit. To do this, remove the crankcase protection and open the cap on the neck of the expansion tank.
Place a prepared container under the drain hole on the radiator. Adjust the pressure of the drained liquid stream by tightening or removing the plug on the tank. Wait until the antifreeze has completely drained and move on to the engine block.
Unscrew the drain plug located under the ignition coil using a 13 key. Place a container and collect the remaining liquid in it.
Lada Kalina with 16-valve engine
To complete the draining procedure in full, you will need to dismantle the starter assembly. If this is not done, antifreeze may enter the coil through the open drain hole and cause damage to the starter.
To remove the ignition module, turn off the power to the starter by disconnecting the block with cables from the solenoid relay on the assembly housing.
Remove the protective cap on the positive terminal of the unit, then use a 13mm wrench to unscrew the fixing nut, remove the terminal with the wire and move it to the side.
Remove the starter mounting bolts. There are only three of them. The first is located closer to the gearbox. It is inconvenient to unscrew it, so it is better to use a ratchet wrench.
The second bolt is located in the center, it can be easily removed using a 13mm wrench. You will find the third at the very bottom on the left. You can loosen it slightly, but do not unscrew it completely.
After unscrewing the bolts, carefully lift the module along with the housing and set it aside. Using a spanner wrench, remove the drain plug on the cylinder block, after placing a container under it.
After all the “working off” has drained, unscrew the cap in the radiator (it is located in the lower right corner in the direction of travel of the car). Also place a container under the drain.
Once all the antifreeze has been removed from the cooling system, wipe off any traces of it on the engine and crankcase guard, and then reinstall all plugs. Before doing this, check the condition of their O-rings and replace if necessary.
Be careful when tightening the radiator cap - it is plastic and may burst if too much force is applied.
1449660640_2279_4_9a_02
On a vehicle with a 16-valve engine equipped with a cable-driven gearbox, access to the drain hole in the cylinder block is prevented by the starter. In addition, the leaking liquid will inevitably get inside the starter.
Therefore, the starter needs to be removed. Disconnect the wire terminal from the negative terminal of the battery. By pressing the latch of the wire block, disconnect the block from the traction relay connector. Remove the protective cap from the nut securing the tip of the wire connected to the positive cable of the battery.
How to drain
To get started, you will need to acquire some tools:
- antifreeze or 10 liters of antifreeze;
- screwdriver;
- delivery key for 13.
Now with all this baggage you can begin the first part of the work. Let the engine cool down first.
- Place the machine on level ground.
- Open the hood and remove the engine splash guard.
- Remove the negative terminal from the battery.
- We take out the plug from the tank.
Unscrew the cap from the tank
- Place the drain container and unscrew the drain plug.
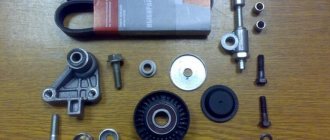
- Remove the ignition module and bracket.
- Remove the plug from the radiator. And now you need to drain all the antifreeze.
1449660639_2279_4_9a_01zh
We remove the starter.
We unscrew the plug and drain the coolant from the cylinder block.
We tighten the drain plugs of the radiator and cylinder block. The connection between the plug and the cylinder block uses a conical thread that does not require additional sealing. Tighten the drain plug of the cylinder block to a torque of 25–30 Nm. We pour the fluid recommended by the manufacturer into the engine cooling system through the expansion tank until it is full. Let's start the engine. With the engine running, vigorously compress all the hoses of the cooling system several times in turn - this will help the fluid fill the system and displace air from it. As the coolant level in the expansion tank drops, bring it to normal and screw on the tank cap. When the engine warms up, the outlet (lower) radiator hose should be cold for some time, and then quickly heat up, which will indicate the beginning of fluid circulation in a large circle. After waiting for the cooling system fan to turn on, stop the engine. After the engine has cooled, check the coolant level again and, if necessary, replenish the system.
Lada Kalina: instructions for replacing coolant
Types of coolant for Lada Kalina
In Lada Kalina, the coolant must be replaced on a regular basis every 50 thousand kilometers. It is worth remembering that when operating a car in difficult urban or extreme conditions, the coolant should be replaced more often, because the engine operates under increased loads and the antifreeze reaches its potential faster.
In order to choose a high-quality coolant for the Lada Kalina, you must give preference to the original manufacturer, for example, the Cool Stream brand. The car owner should remember that before updating the refrigerant, the used coolant must be drained and the system flushed with a special compound or distilled water. This is, first of all, necessary to remove suspended matter, metal shavings from the bottom of the system and the remains of old liquid.
We recommend: Replacing the front engine mount of a VAZ 2114
How to fill
- After successfully completing the first part, you can move on to the second.
- We screw the drain plugs back, as well as the plug from the radiator.
- Disconnect the hose from the tank by loosening the clamps.
- Fill in the required amount of antifreeze.
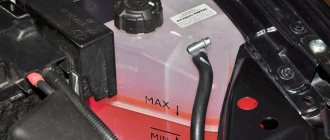
- Reconnect the hose and continue pouring until the liquid reaches the 3 cm mark below the “max”.
- We tighten the cap of the expansion tank.
- Reconnect the terminal.
- Turn on the engine and warm up until the fan turns on. Check the level.
We remove or restore the hoses in place
Done, the replacement in the Kalina car has been successfully completed.
Replacing the thermostat on Kalina
The thermostat is one of the most important elements of the cooling system of an internal combustion engine. It is designed to regulate the direction of movement of the coolant (coolant) depending on the degree of its heating.
When starting a cold engine, a working thermostat is closed, which forces the coolant to move in a small circle without passing through the cooling radiator. This is necessary so that the engine heats up faster.
When the coolant temperature reaches 85-90 degrees, the thermostat valve will open and antifreeze or antifreeze will flow into the radiator for cooling.
Thermostat malfunctions
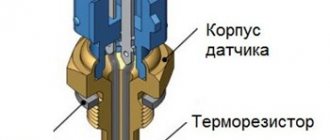
The design of the thermostat consists of a housing with pipes and a sensitive element with a valve, which actually shuts off the pipeline. The housing itself fails extremely rarely, and only due to mechanical damage.
Most often the sensitive element breaks. It is a sealed cylinder filled with a wax-based solid. The cylinder contains a piston with a rod. When heated, the substance melts and expands, pushing the piston. The latter extends and closes the valve.
The most common reasons for thermostat failure are:
- deposits of products of corrosion processes on the moving parts of the sensitive element;
- dirt, scale or foreign objects entering the thermostat housing;
- poor quality coolant;
- malfunction of the water pump (pump).
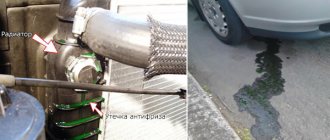
One symptom of a faulty thermostat is an overheating engine. It indicates that the coolant (coolant) moves in a small circle without passing through the radiator. It can also happen the other way around, when the liquid moves constantly in a large circle. In this case, the engine will take a very long time to warm up.
Verification methods
There are two ways to determine the functionality of the thermostat. The first method involves checking without dismantling. To do this, you need to start a cold engine, warm it up to operating temperature (about 90 degrees), and touch the lower radiator hose.
A cold lower pipe at this temperature indicates that for some reason the thermostat did not open. If it is hot, the thermostat operates normally.
Replacement process
The replacement process itself on the Kalina 8 cl unit is simple and can be carried out under normal conditions, in the most ordinary garage with good lighting. When dismantling, place all removed parts in some previously prepared container so as not to lose anything. If the car has high mileage, you may need to purchase new bolts for tightening. But it will be possible to say more definitely after dismantling the head.
Required Tools
- torque wrench;
One type of torque wrench
- a set of keys;
- set of heads;
- hexagon;
- durable screwdriver.
Stages
Place the vehicle on a level surface.
Allow the engine to cool.
Power plant The first step is to remove the casing of the 8 cl power unit.
The number one cylinder piston should be set to the top dead center position.
De-energize the system by disconnecting the negative battery cable.
Drain the coolant.
Disconnect and set aside the air filter element.
Disconnect the heating hoses, other pipes and connectors.
Don't forget to disconnect all the wires from the spark plugs.
Next, remove the cylinder head cover.
Remove the camshaft drive cover located in front.
Insert a screwdriver into the hole in the pulley hub to prevent the camshaft from turning, and loosen the bolt securing the timing pulley.
Next you need to remove the timing belt.
Completely unscrew the bolt that secures the camshaft pulley.
Remove the pulley.
Next, you need to remove the camshaft drive cover, which is located at the rear.
Remove the remaining pipes and wires.
After disconnecting all the wires and pipes, you need to loosen the bolts that secure the cylinder head of the viburnum 8 class. This is done strictly according to the scheme.
Be sure to strictly adhere to this diagram when loosening the bolts. Next, you need to completely unscrew the cylinder head mounting bolts.
They are removed along with the washers.
We remove the cylinder head.
It is worth knowing that during long-term operation, the bolts with which the cylinder head is secured increase in length. Therefore, it is better not to save money, but to install new ones.
Before installing new bolts, they must be lubricated with oil.
We remove the Kalina cylinder head gasket.
The place where it was installed must be cleaned. This is done not mechanically, but using a special liquid. If you use a file or a wire brush, there is a high risk of scratching the surfaces. As a consequence, loss of tightness with all the ensuing consequences.
The surface was polished with an abrasive tool. Scratches are noticeable. Install a new gasket.
Installed new part We install the cylinder head. Make sure the crankshaft and camshaft are at top dead center.
This is a very important condition. We insert bolts into all holes and tighten them in a certain sequence:
We insert bolts into all holes and tighten them in a certain sequence:
The diagram for tightening the bolts. First, we walk around the first circle and pull, applying a force of 20 N•m (2 kgf•m);
Then we go around the second circle and pull, applying a force of 69.4-85.7 N•m (7.1-8.7 kgf•m);
Next, use a wrench to turn the bolts 90 degrees;
We go through it again and turn it 90 degrees again.
Next, you need to connect all the removed wires and pipes. Many car enthusiasts, performing this work for the first time, mark the parts or take photos.
At this point, the replacement of the cylinder head gasket on Kalina with an 8-cl unit is completed. The process cannot be called simple, but requires special care and accuracy. If, after reading the material and viewing the photo gallery, you still have questions, watch the video material.