Rice. 4a: Injector rail SECGAS BASIC (Type 30) 4-cyl.
Injectors are electromechanical devices that precisely control the supply of gas to the engine. The injectors are controlled by an Electronic Control Unit (ECU SECGAS), which uses signals from various vehicle sensors. ECU SECGAS works with several types of gas injectors (different brands, resistances). It is important to select in the software the type of gas injectors that we have installed. Each injector is designed for one cylinder.
4.1. Installing the intake manifold nozzles
Rice. 4b: Intake manifold nozzles
The inside diameter of the intake manifold nozzle hole should be 4.8mm (for a typical M6 thread). We always recommend removing the engine intake manifold when installing the intake manifold jets (sawdust produced during drilling and tapping can cause problems in the engine).
Before removing the manifold, it is recommended to mark the locations for the holes. After cutting, before installing the intake manifold nozzles, apply glue, which will protect the nozzles from loosening and ensure a tight fit. After cleaning the sawdust collector, you can install it again. Drilling random holes in the intake manifold is also prohibited.
Rice. 4c: Installing the intake manifold nozzles
When installing the intake manifold nozzles, simple rules must be followed:
- Mount as close to the petrol injectors as possible.
- The ideal place to install the intake manifold nozzles is 2-3 cm from the gasoline injectors - red field.
- Incorrect location of installed intake manifold nozzles - more than 10 cm from gasoline injectors - blue field.
Rice. 4d: Correct and incorrect installation location for fittings.
The intake manifold nozzles must be installed in close proximity to the petrol injectors so that the supplied gas is directed towards the intake valves.
Rice. 4e: Intake manifold nozzles installed in the same order
The gas injector holes should be close to the head of the manifold. It is important to keep the same distance and angle for each nozzle. Each individual nozzle must be installed identically.
The nozzles should be directed towards the center point of the intake manifold duct.
Rice. 4f: Example of a typical error (cylinder 2):
1. The intake manifold nozzle is not directed towards the center point of the duct.
2. The second nozzle is installed differently than the others (different angle).
1. Manifold valves (marked in red)
2. Correct installation of the nozzle
3. Incorrect installation of the nozzle (Air flow is limited by the valve).
When installing intake manifold nozzles for engines equipped with a variable geometry manifold (SWIRL, TSCV), care must be taken to install the nozzles so that gas can be delivered directly to the engine in any mode. The presence of a variable geometry manifold can be easily determined by the presence of caps at the end of the intake manifold (next to the cylinder head), which by turning or moving cause a change in the cross-section of the manifold channel. In this case, we recommend installing the nozzles in such a way that gas can always flow into the engine. Incorrect installation can result in engine vibrations during high variable loads that cannot be corrected by adjusting the controller's mixture ratio.
Practical information:
To avoid drilling holes in the intake manifold, injector adapters can be installed. For more information, please look at the "Accessories" catalogue.
4.2. Selecting the size of gas injector nozzles.
The diameter of the nozzles is selected depending on the engine power and the number of cylinders in accordance with the formula:
Nozzle size (mm) = engine power (hp) / (number of cylinders*25) + 1
Explanations for the formula
The result must be rounded to one decimal place. The nozzle size is correct for sequential fuel injection type and gas pressure (LPG = 100 kPa CNG = 160 kPa). For engines with semi-sequential or parallel type of fuel injection, the nozzle size should be smaller than the value calculated according to the formula - by approximately 15%.
The nozzle size calculated by the formula should be considered as the overall size. The optimal size may vary within +/-15% of the obtained value.
Self-installation of HBO 2
It is not difficult to install gas equipment on a car yourself if you follow safety precautions and have knowledge of installing such devices.
Stages of installation of gas equipment for 2nd generation gas:
- installation of a cylinder;
- gas main wiring;
- installation of a mixer and dispenser and control unit for gas equipment;
- testing work on the tightness and performance of gas equipment.
Before starting installation, check that all gas equipment is available:
- gas cylinder (cylindrical or toroidal);
- multivalve;
- gasoline and gas electric valves;
- filling valve;
- mixer;
- control panel and wires;
- gas hoses and tubes;
- tees;
- clamps.
Description of step-by-step instructions for installing gas equipment:
- Cylindrical cylinders are mounted in trunks. In hatchbacks, a good option for installing a toroidal cylinder is in the spare tire niche. It is better to install methane on large cars, for example, Gazelle, where there is room for a bulky container.
- Fix the filling valve on a bracket under the rear bumper, on one of the rear fenders or in the trunk of the car.
- Lay the gas line from the cylinder to the engine compartment along the bottom of the body. The fuel line must not pass through the passenger compartment. The hole for the gas line outlet is made with a larger diameter than the pipeline in order to insert a protective rubber or plastic seal into it. The edges are treated with anticorrosive.
- A gas line is fixed along the bottom. You can place the gas pipeline next to the gasoline pipeline in the niche provided for this.
- The next step is to install a mixer between the carburetor and the intake manifold of the car. Tightness is achieved using O-rings and sealant to prevent air leaks. If this is not done, traction will be lost and jerks and dips will occur when the engine is loaded. Typical for the Solex carburetor, its modification DaAZ 21073–1107010 is installed on the Niva.
- The next operation is to install a gasoline electric valve in the fuel pipeline between the gasoline pump and the carburetor.
- Install the gas valve.
- The gas line is connected to the valve.
- A gas reducer is mounted next to the carburetor.
- Connect the gearbox to the pipes that lead to the car's heater. The 2nd generation Lovato gearbox performed well in Russian winter conditions.
- The line from the shut-off valve is connected to the installed gearbox.
- A gas dispenser is installed between the reducer and the mixer.
- The LPG control panel is installed in the cabin and connected.
To perform a test run of HBO, the cylinder needs to be filled with approximately 10 liters. The pipeline is blocked. A soap solution is applied to the line connections. Perform gas inlet and inspect the joints. Bubbles will appear in areas of leakage. If it is not possible to immediately eliminate the causes by tightening the clamps, the gas pipeline is shut off and the connections are redone.
Before operating the LPG, it is necessary to check the effect of the anti-pops on the injector. If the gas pressure exceeds, the firecracker will prevent the gas mixture from exploding.
If the leaks are not eliminated, the consequences of such operation of the car are increased fuel consumption, engine shutdown, gas poisoning, and even an explosion. If in doubt, it is better to set up and service the gas equipment in a specialized service center. The address of the station where gas cylinder installations are serviced can be found on the Internet.
Installation process
For car enthusiasts who have ever carried out repairs and maintenance of VAZ-made cars with their own hands, the installation of equipment will not cause great demands.
There is no specific algorithm for installing a gas system on a car; you can start either by inserting the injectors or by securing the cylinder in the passenger compartment or trunk.
The stages of work can be divided into:
- design (fitting connections, planning the placement of parts);
- rough installation (drilling holes, laying lines);
- gearbox installation;
- injector insertion;
- securing the cylinder;
- final installation (connecting all elements together, securely tightening nuts and bolts, checking for leaks);
- electronic pairing and setup
Injection insertion and ramp installation
Let's start with the most difficult part, with inserting the injectors into the intake manifold. To do this, you will need to disconnect the air filter, electronic chips from the throttle and other elements attached to the intake tract. To remove the collector itself, you need to unscrew the fixing studs (less commonly, bolts) and carefully pull the collector off the studs.
Once the manifold is removed, it is necessary to mark the holes for inserting the gas injectors. The distance from the adjacent plane of the cylinder head manifold to the insertion point can vary in the range from 1 to 7 cm. We select the insertion location with the largest diameter so as not to interfere with the normal air flow. Once the location for the injectors has been selected, the areas on the manifold that will need to be drilled should be marked.
After drilling the holes for the gas injectors, take a tap and cut the thread. Now we thoroughly clean the intake manifold and install the injectors. Before inserting, it is advisable to use a thread locker and secure the nozzles to a locklight or clamp.
Now, depending on the fasteners, you should install the ramp. The mounting location can be on the intake manifold (most often) or on the valve cover (if convenient). To install, we repeat the operation of marking the marks, then simply drill out the landing grooves (it is IMPOSSIBLE to drill through the collector, as this will lead to its failure).
Gearbox installation
The gearbox can be placed almost anywhere. It should be placed strictly parallel to the movement of the vehicle, and the height of the location should not be very low or high. The optimal placement is just below the cylinder head valve cover.
It is advisable to treat the holes made with solid oil or pushsal, this is necessary to prevent the appearance of pockets of corrosion. During installation, it is imperative to use bushing washers in order to eliminate parasitic vibration and premature failure of the gearbox.
Installing the cylinder and pulling lines
The location of the cylinder depends on its type; toroidal ones are great for placing in the spare tire niche, and cylindrical ones are right behind the backs of the rear seats. There is nothing complicated in installing the cylinder - we select the optimal location and install the holding fasteners (in accordance with the instructions). If there is a valve on the cylinder, its outlet channel should be reliably isolated from the external environment with a sealant and led out into its nozzle.
To draw the lines, you will need to drill several holes in the trunk floor and run the tubes from the cylinder into them.
Highways will rarely come into contact with the road surface. In the front part, “on the apron,” we also make mounting holes through which we “run” the line. As soon as the line is “stretched”, we fix its ends in the cylinder and reducer.
Electronics Testing and Calibration
But checking connections for leaks is done by soaping all connections and visually checking for gas leaks; this can be done quite quickly and easily in a garage.
Features of the operation of 4th generation gas equipment
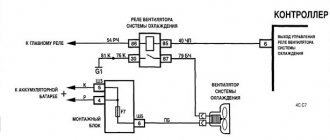
The equipment allows for combined power supply of the engine with gasoline and gas. Switching from one power mode to another can be done from the cabin manually, as well as automatically. The small control panel contains an LED gas level indicator and a fuel switch. The usual location of the control panel is under the steering column on the left near the headlight adjustment control.
The gas indicator contains four green LEDs and one red, located in one row. When one green LED lights up, it indicates the presence of 10 liters of gas. Usually this reserve is enough for 100-120 km. The red LED lights up to indicate the presence of emergency fuel remaining, which may be enough for 50-80 km. It warns you about the need to refill gas at a gas filling station.
A separate red LED, located in the upper corner of the remote control and operating in a flashing mode, signals that the engine is currently running on gasoline, but the system is preparing to switch to gas fuel. This happens every time the engine is started until it reaches normal temperature and warms up well.
Button for switching engine power mode and gas quantity indicators
Since the engine has both a gasoline and gas power supply system, such duplication doubles the reliability of its operation. In addition, the mileage on one refueling with gasoline and gas fuel increases significantly. This is beneficial on long trips through sparsely populated areas, where the network of gas stations is sparse and of poor quality. Also adding the ability to increase protection against car theft is an easily removed and installed switch, the removal of which blocks the supply of gasoline and gas to the injectors.
The 4th generation LPG is especially beneficial for car owners whose engines are equipped with an expensive fuel injection system with a catalyst for purifying exhaust gases. It not only provides significant savings on expensive high-octane AI-98 fuel, but also saves the life of the catalytic converter. This equipment is intended for vehicles that meet environmental requirements Euro-3 and higher. It has a pulsed gas-air mixture injection system, which operates under the control of a separate control unit interfaced with a microprocessor. The control unit processes microprocessor commands and generates control signals that open the electromagnetic gas injection injectors and block the gasoline mixture supply injectors.
The concentration of the supplied fuel mixture is controlled by a system of sensors that determine:
- gas pressure;
- reducer temperature;
- gas temperature.
If the supply gas pressure drops below a threshold value, the electronic unit automatically turns off the gas injectors and opens the gasoline injectors, switching the engine to gasoline power.
Pros and cons of HBO OMVL
Among the arguments in favor of OMVL gas equipment for 4th generation cars are reviews from motorists who have encountered its operation in Russian conditions, where the nearest service center may be several dozen kilometers away.
And also simple facts. Firstly, according to statistics, such units are chosen in more than 40 countries. In Russia alone this is about 20 thousand assembled kits. Secondly, more than 50% of the total supply volume goes to factories, for the installation of turnkey gas equipment, for new cars under the brands: Toyota, Hynday, FAW, Volkswagen, BYD, Suzuki, Tata, Ford, GAZ, and this list is constantly expanding. Thirdly, on the 4th generation OMVL HBO, the connection diagram is one of the most thoughtful: there is not a single extra detail or random element in it.
Finally, the Gorky Automobile Plant has been using equipment of this brand for more than 5 years to re-equip its products. And this is a solid recommendation. The disadvantages include pickiness in the degree of fuel purification (an eternal disease of all systems), an abundance of electronics, expensive maintenance (and only in authorized workshops), as well as the tendency of the distribution unit to fail.
And then a problem arises called: “OMVL gas reducer 4th generation, repair”, and its cost is a round sum
There is only one way out: do not delay maintenance, change small failed components in a timely manner and pay attention to any malfunctions in the engine. If these conditions are met, the installation will last a long time and be virtually trouble-free.
Installing a gas-cylinder unit in a car in the current economic conditions is completely justified: propane is several times cheaper than gasoline, and this fuel is more environmentally friendly. The steadily growing reliability of the alternative fuel supply system is also an argument in favor of switching to liquefied gas.
You might be interested >> Gas equipment Lovato malfunctions and solutions
Electronic injection and mixture supply, the ability to fine-tune engine operating modes open up new prospects for the owner: not only to reduce refueling costs, but also to maintain the vehicle’s speed characteristics unchanged.
A remarkable solution from all points of view would be the choice of 4th generation HBO, OMVL, a brand that has proven itself in the best possible way. The company, with more than 30 years of experience in designing gas installations for transport, is among the leading manufacturers, and the quality of Italian factories has always been rated as high, especially when it comes to automotive equipment.
Converting kilowatts to horsepower
Follow us on social networks
Please note that this website is for informational purposes only and under no circumstances constitutes a public offer as defined by the provisions of Article 437 of the Civil Code of the Russian Federation. Prices on the website are provided as a guide only and are subject to change at any time without notice. The manufacturer may change the configuration, characteristics and appearance of the product without prior notice. Images may differ from actual product. For detailed information about the cost, configuration, terms and conditions of equipment delivery, please contact the company's managers.
Source
Mass air flow sensor device
The internal structure of the sensor is a fine mesh, in the middle of which a platinum thread is stretched. The latter warms up to a temperature of about 700 degrees in a short time. When air passes through it, the thread cools slightly. By how many degrees the filament temperature has dropped in comparison with the reference value, the amount of air passing near it is measured. The output value varies in the range from 0 to 5 Volts. If there is no air flow and the engine is turned off, then the output of the mass flow sensor will be exactly 1 Volt. If you start the engine, air will begin to flow through the mass air flow sensor. The higher its consumption, the greater the voltage will be at the output of the sensor.
Setting up HBO yourself
Let us immediately note that if installing an LPG taking into account the instructions is a complex but feasible task, setting up an LPG assumes that there is a clear understanding of why this or that action is being performed. In other words, for example, setting up a 4th generation Digitronic HBO with your own hands or setting up any other system can rightfully be considered a complex and responsible task.
It is important to understand that errors in settings can lead to unstable operation of the internal combustion engine, various malfunctions and even failure of the power plant and individual vehicle systems
Please note that if you are not confident in your abilities, it is better to immediately entrust this procedure to an experienced master. If you want to configure the HBO yourself, you will need to buy a special wire (cable) and also install the appropriate software on your laptop
By the way, all systems are similar to each other, that is, for example, setting up a 4th generation Lovato LPG with your own hands will not differ much from similar settings in other systems. The only difference is in the graphical interface of the programs themselves and some options that are needed for advanced configuration.
So, before starting the setup, you need to warm up the car until the engine reaches operating temperatures. Next, you need to remove all load from the internal combustion engine, except for idling (turn off the heater, headlights, dimensions, additional equipment, etc.). Now you can connect with a cable and run the unit setup program. Let's look at the HBO tincture, using the STAG4 program as an example.
First, in the program window, you need to set the number of engine cylinders per coil; the RPM speed must also match the engine speed (550-940). All data must exactly match the vehicle.
After this, you need to go to the tab where the switch-on temperature is set. For summer not lower than +35, and for winter not less than +40. Cylinder shutdown is set to 250. This will allow for a smooth transition from gasoline to gas and back, without engine vibration.
As for pressure error time, this parameter is set at 300 to 420. When choosing the type of gas injectors, it is important that the selected type is exactly the same as those on the machine. If the owner does not know which injectors are installed, the injectors need to be inspected
Manufacturers usually mark them so that the program can then determine which injectors are installed.
The operating pressure of the gearbox should be from 1.0 to 1.3 bar, the minimum is not less than 0.50. Fuel type LPG for propane or CNG for methane (marked). Now you can go to the automatic configuration tab and click start (start). All you have to do is wait from 1 minute to 5 minutes. The setup time depends on how well the car runs on gasoline. If the engine is not running stably, there are problems with the ignition system, etc., then it will take more time for auto-tuning.
Next you need to go to the map tab. There you can see that the orange line has taken a bend
So, it is important to note from which number in the coefficient section the line begins. It is good if the line lies in the range of numbers from 1 to 1.4. The fact is that when installing LPG, a specialist must select the right injectors for performance, taking into account the power of the car’s engine
The fact is that some injectors can be adjusted to the engine, since they have a performance margin, while others are designed for a specific power and the margin is minimal
In any case, the pressure of the reducer is important for all types of injectors. During auto-tuning, the program itself will calibrate the pressure of the reducer, and the line may become higher than a coefficient from 1 to 1.4 or lower than this indicator
In the first case, overestimation indicates that the pressure is from 1 to 1.3 bar, but the injector nozzles are too narrow. This suggests that it is possible to increase the performance of the injectors by drilling out the nozzles and making them wider, which will increase the throughput.
If the line is below the coefficient, this indicates large nozzles. In this case, the throughput of the nozzles is reduced by changing the nozzles to suitable analogues with a smaller diameter. Note that the line at a pressure of 1-1.3 should normally be in the range of the coefficient 1-1.4. With such indicators, throttle response is maintained, gas consumption does not exceed 20% compared to gasoline, and the engine operates under normal conditions, there is no big risk of reducing its service life.
Basic parameters of injectors
The development of gas cylinder equipment has provoked the emergence of a huge number of varieties of nozzles. The parameters for the division of dispensers are not several positions, but about ten of the most important divisions. To be more precise, HBO injectors are classified according to:
- Case material (metal or plastic);
- Type of fuel being dosed (propane-butane or methane);
- Coil operating voltage;
- Working pressure and maximum possible;
- Opening and closing times (that is, they can be instantaneous, delayed or customized);
- Electrical resistance of the coil;
- Operating temperature range;
- The outer diameter of the outlet fitting;
- Valve seat diameter;
- Jets available for calibration.
In fact, most of the characteristics of LPG injectors are not required by the average car enthusiast when selecting them. However, for experienced motorists or mechanical aces, each parameter can be extremely important, because the totality of them largely determines the nature of the functioning of a gas engine.
HBO button connection diagram
Let's look at the connection diagram for the 2nd generation HBO button for an injection-driven internal combustion engine using the example of a product from the manufacturer stag2 and Digitronic.
It should be noted right away that the basic functionality and connection method itself are the same for almost all manufacturers. The recommended connection diagram must necessarily be included with the HBO switch. The connection diagram for the 2nd generation HBO button to the carburetor will have a similar appearance.
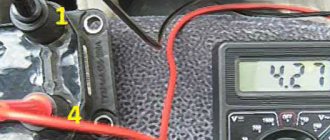
The wire set for stag2 and Digitronic products has the following colors:
- White. It is connected to the gas level sensor in the cylinder and is responsible for the correct indication on the fuel level button in the cylinder.
- Cyan (blue). It is connected to the electromagnetic gas valve, which is located on the reducer. When the device is switched to the “Gas” operating mode, the gas valve opens and gas is supplied to the reducer. An additional gas valve with a filter and an injector emulator can be connected in parallel to the same wire.
- Yellow. Connects to the solenoid valve in front of the gasoline pump. When the button is in the “gasoline” position, power is supplied to the gasoline solenoid valve and the car runs on its native fuel. When the car switches to the “gas” operating mode, no power is supplied and the fuel pump does not work. Many installers of gas equipment do not recommend turning off the gas pump, but insist that it works even when the vehicle is running on gas.
- Red . Power supply for the HBO button. You can connect directly to the positive terminal of the battery through the fuse and boot for it included in the kit. In this case, the HBO switch will be under constant voltage. If you want to power the gas-gasoline switch only when the ignition is turned on, you should take 12 volts from another place (for example, power supply to gasoline injectors).
- Black. Ground, needs to be connected to the car body.
- Brown . Connects to the control contact on the ignition coil. From here, information about the number of engine revolutions is taken and, accordingly, gas-gasoline operation is automatically switched. In the case of a carburetor engine, a signal is taken from here whether the engine is running or not; if the engine is turned off, no fuel is supplied.
Today we will talk about 4th generation LPG, design features, principle of operation, advantages over earlier generations of LPG, installation procedure on carburetor and injection cars, whether it is better to use propane or butane. So, let's go.
Converting a car to use gas as the main fuel is becoming increasingly important in the context of ever-increasing gasoline prices.
This equipment allows you to operate on cheaper fuel, without much intervention in the design of the car.
With the improvement of the car design, as well as with the tightening of toxicity standards introduced in Europe, which are designated as Euro, gas equipment was also modernized.
If the 1st generation gas equipment was very simple in design, without the use of electronics, then the 4th generation gas equipment is already a complex electronic-mechanical device, although the essence of their work is the same - supplying gas to the engine cylinders under certain conditions.
But in the first generation, gas was supplied due to the vacuum created in the engine cylinders, and there was no talk of precise dosage of fuel under different operating modes of the power plant.
Installation of equipment on injection cars
Most of the 3rd generation HBO elements are installed on injection cars in the same way as earlier generation equipment.
The cylinder, depending on the characteristics of the car, is installed either in the trunk or in place of the spare wheel and secured.
A filling device is installed under the bumper or on the rear fender.
Fuel lines are laid at the location where the gas pipeline is installed. Under the hood, usually on the left side near the fender, a gas valve is attached.
The control unit is inserted into the cabin.
A mixer gearbox is installed not far from the engine on the left side. It is installed there to ensure its connection to the cooling system.
A distributor is installed near the intake manifold. To install gas injectors, holes are made in the manifold. An emulator is connected to the injectors of the injection system.
The control unit is connected to the wiring coming from the lambda probe and the throttle position sensor.
Then all connections are checked for the absence of etching of gas and gas equipment.
Multivalves Lovato
Lovato 4th generation for those who value quality and save money
The modern line of multivalves consists of two classes:
- Euro class (type 305);
- Class 00 (type 318).
Euro class (type 305) is the multivalve that should be on the gas cylinder of your car. This class of Lovato multivalves is equipped with all necessary (according to the requirements of the Technical Regulations of the Customs Union) safety elements and service functions:
- Technology of filling no more than 80% of the cylinder volume (reserve for thermal expansion of propane);
- An electromagnetic valve that blocks the flow of gas when driving on gasoline, while stopping the engine, or turning off the car's power;
- Fire damper;
- Overpressure relief valve;
- Gas level sensor in the cylinder;
- Manual valve for shutting off the gas flow;
- Emergency valve for gas line break.
In the line of Euro-class Lovato multivalves, you can easily find a device specifically for your gas cylinder, and it does not matter whether it is cylindrical or toroidal, whether it has an external or internal neck (what types of gas cylinders there are are described here). Class 00 (type 318) is a simplified version that lacks some devices: solenoid valve, fire damper. Class 00 (type 318) is a simplified version that lacks some devices: solenoid valve, fire damper
Class 00 (type 318) is a simplified version that lacks some devices: solenoid valve, fire damper.
What can a cable do?
With this adapter you can:
- Read error codes for HBO faults (erase them).
- Adjust (program) ECU parameters.
- Gas level sensor calibration.
- Setting the parameters of the ignition timing variator (IAC) and much more, it all depends on the controller model.
A homemade cable for diagnostics is universal; for many units you will only have to change the location of the terminals in the cord block.
Diagnostic cable pinout and compatibility table:
| Manufacturer | Controller model |
| AG CENTRUM | JZ-2005 ZENIT |
| ZENIT PRO | |
| JZ-2009 ZENIT | |
| COMPACT | |
| SIROCCO | |
| AUTOGAS ITALIA | EASY JET |
| DREAM JET | |
| POWER JET | |
| AUTRONIC | MISTRAL I |
| MISTRAL II | |
| CARGAS | BARDOLINI |
| ECU-07 ICS-03 | |
| ECU-07 | |
| MIMGAS | S2000U |
| MIMGAS_V1.20 |
| Manufacturer | Controller model |
| AGIS | AGISM 210 |
| AGISM P13 | |
| AS | STAG 200 |
| STAG 300 | |
| STAG 400 | |
| STAG PLUS | |
| STAG PREMIUM | |
| STAG 4 | |
| STAG ISA 2 | |
| STAG 400 DPI | |
| STAG Q-BOX | |
| DIGITRONIC | DIGITRONIC 3D POWER |
| DIGITRONIC (ALL) | |
| KME | AKME |
| BINGO | |
| BINGO M | |
| BINGO S | |
| DIEGO | |
| DIEGO G3 | |
| NEVO | |
| LOVATO | FAST |
| SMART | |
| EASY LPGTECH | |
| EASY TECH 100 | |
| EASY TECH 200 | |
| EASY TECH 300 | |
| ATIKER | FAST |
| MULTIFAST | |
| SAFEFAST | |
| ESGI | ESGI |
| MILANO | MILANO |
| TAMONA | TGSTREAM NEW |
| Manufacturer | Controller model |
| A-MAX | KING |
| AEB | KING |
| BIGAS | SGISN |
| SGISN OBD | |
| AEB GREEN | |
| ELPIGAZ | LEONARDO |
| MILENIUM | |
| NICOLAUS | |
| STELLA/ELIZA | |
| VIOLA PLUS | |
| LANDI-RENZO | IGS |
| LES PLUS | |
| LSI NSI | |
| LSI | |
| IGSYSTEM | |
| LCS/2 | |
| LCSA1/05 | |
| LCSE | |
| LCS04 | |
| OMEGAS | |
| OMEGAS PLUS | |
| OMEGAS PLUS MAX | |
| MINT-XI ULTRAGAS | |
| NMINT-XI-N P EOBD | |
| OMVL | DREAM XXI-N P |
| DREAM XXI-N P EOBD | |
| ROMANO | RISN |
| RISN EOBD | |
| ENERGY REFORM | ENERGY REFORM |
| TARTARINI | TEC 99 EVO |
| ULTRA-GAS | ULTRA-GAS |
| RSI+ | |
| VOGEL | VGI |
| Manufacturer | Controller model |
| EUROPEGAS | OSCAR-N |
Some tips for installing HBO
Firstly, you should only be interested in installing 4th generation HBO. Currently, some services already offer fifth-generation equipment, but we do not recommend buying it. The fact is that it already implements a method of supplying liquefied gas directly into the combustion chamber. Considering the average purity characteristics of our fuel (yes, everything is not so good here), you will spend a lot of money on maintenance.
Secondly, it is better to run plastic rather than copper gas lines from the cylinder to the engine. The point, again, is the low purity of domestic fuel. Copper begins to quickly oxidize and become unusable, while plastic can withstand the presence of almost any impurities without any problems.
Be sure to supervise the work of the installers: gas pipes are intended only (!) for gas, and for the cooling system - only for antifreeze. Under no circumstances should they be swapped!
The fittings should be cut into the manifold only after removing it. Unless you completely control the process, it is virtually impossible to prevent metal shavings and other debris from entering the engine, which can cause a lot of trouble in the future.
Reducing the life of internal combustion engines and other units
The tuner’s task is to achieve correct combustion of the fuel portion, which is checked during diagnostics. In machines without feedback, a gas analyzer comes to the rescue. If afterburning occurs at the exhaust, then the valves are the first to suffer - from overheating. Moreover, the temperature in the combustion chamber remains within normal limits; it’s just that the valve, having come off the seat, can no longer “give” excess heat to the block. In addition, the flame at the outlet “ignites” the thin edge of the valve plate, which is why this phenomenon is called “valve burnout”.
However, in addition to the valves themselves, other components also suffer - the turbine, for example, also does not like the flame at the outlet. It is difficult to predict how long it will last in this mode. Catalysts also suffer from burnout at the outlet - their honeycombs melt, which can cause the ceramic plates to shed, small particles of which fall into the cylinders and damage the cylinder-piston group (CPG). It is clear that savings on additional settings and timely service are tens of times less than the cost of repairing an internal combustion engine or the already mentioned units.
Rough adjustment for load. Peculiarities
When this option is selected, it is customary to change the cells; this is done not by revolutions, but solely by injection time. All that is required is to remember the fuel injection time, this is done at certain points in the movement, after which you need to switch to gas. This is how the 4th generation gas equipment is configured, the nozzles are adjusted and the work in general occurs. In addition, the 4th generation HBO, namely the pressure adjustment of the reducer, plays an equally important role.
Attention: Every driver must understand that adjustment of the LPG gearbox, as a rule, is required only at the time of installation of the unit. But after one hundred thousand kilometers, it is necessary to perform diagnostics
It is also possible to service 4th generation gas equipment with your own hands, but only if you have the appropriate experience, knowledge, and equipment that allows you to do this.
If you consult with specialists, you can find out how to remove 4th generation HBO with your own hands, doing it at home. You always need to know that the proper operation of the unit does not depend on the quality of the electronic settings, as for some reason most car owners believe. Indeed, after a certain period of operation, valves and membranes begin to wear out, resulting in excessive gas consumption.
But this unpleasant moment can be delayed if you learn about the intricacies of proper operation of the equipment. For example, as for starting the engine, this should always happen exclusively on the car’s native fuel, which is often forgotten. Only at the moment when the engine temperature reaches thirty degrees can you switch to gas.
This is explained by the fact that the gearbox membrane freezes in practice at low temperatures. Therefore, the gearbox must be connected to the antifreeze lines, and only this way. If you want to configure the 4th generation LPG gearbox yourself, you need to realize in advance that this is not as easy to do as it seems.
Before doing such work, do not forget to warm up the engine, after which you can turn off the gasoline supply. If there is a need to adjust the sensitivity of the gearbox, then you need to unscrew the sensitivity regulator, and the procedure is performed at the moment until the idle speed values change.
Next you need to tighten the regulator and check the setting. All you need to do is press the accelerator pedal - the engine should not react to such an action, and accordingly, you should notice the absence of delays and jerks. Of course, if you managed to configure the 4th generation LPG yourself, and you did everything correctly, then the internal combustion engine will work stably and accurately.
Cable assembly
Let's look at making a DIY HBO diagnostic cable to connect a laptop to gas “brains” using the example of an HBO cord for one of the popular models of brains from the Polish company Stag.
Components
Actually, the diagnostic cable for HBO itself consists of:
The connector for connecting to the gas brain block (in our case it is a standard one) is a 4-pin waterproof automotive connector that can be bought in a car/radio store or ordered from Aliexpress, as we did. The price of one connector was about 60 cents.
Next, we will need another USB type A connector for subsequent connection of the finished cable for HBO to the laptop. This connector can also be bought at a radio store or ordered from Aliexpress. This connector cost us $1.10.
You will also need a 3- or 4-core copper cable 3-3.5 meters long. It is advisable to use multi-core wire (so that each cable core is wound from several) - this will greatly extend the service life of the finished cable in the future, due to the fact that the cores will break much less.
It is also better to buy heat shrink (for cable insulation) at a radio store.
The “heart” of our cable for matching the laptop and “brains” signals will be the PL2303 chip. It is best to buy not a “bare” microcircuit, but a ready-made USB to TTL module (it will contain the necessary microcircuit with the necessary additional elements sealed) in the same radio store or order from Aliexpress. Our module came with a USB connector, it is best to choose this option, it is easier to assemble, and in the future such a cable for HBO will look much more aesthetically pleasing.
Assembling the cable
Having prepared all the components, it remains to assemble them into a single whole. This should be done according to the diagram given below.
In our case, everything turns out much simpler. The Chinese manufacturer indicated in the documentation for the module a description of the connector and the corresponding wire color:
- black cable - GND;
- green - TXD;
- white - RXD;
- red - VCC.
Therefore, we all came down to crimping and soldering the wires to the 4-pin connector. We used 3 wires:
- black cable - GND
- green - TXD
- white – RXD
We crimped and soldered them in accordance with the connector diagram for our “brains”. We did not use the red wire.
If you plan to make a cord for setting up gas equipment for several types of gas “brains,” then it is advisable to make several adapters that can be inserted into a 4-pin connector.
Next, we connect the appropriate connectors to the “brains” and the laptop, launch the program and turn on the ignition. We will tell you how to work with the program and which one is best to use in the following articles.
Last updated April 2, 2022 at 12:33 pm
After installing gas equipment on a car, you will need a special cord to configure its controller. In addition, in the further operation of the machine, adjustment of the fuel system will definitely be necessary.
Therefore, for those who like to independently diagnose their car, in this article we will tell you how to make a universal cable for 4th generation LPG with your own hands.
Controller Features and Functionality
The production of an electronic control unit for gas systems is established in Polsky, whose products have long proven themselves in the gas equipment market.
The device was developed on a 32-bit high-performance processor, has a compact design, assembled in a sealed plastic case, convenient for installation.
Main features of Digitronic Maxi 2/Titan:
- compatible with methane/propane gas equipment
- designed for engines up to 4 cylinders, with distributed fuel supply (paired, phased, asynchronous)
- building a 2D map based on injection time
- work in conjunction with a parameter recorder and an oscilloscope
- Suitable for turbocharged internal combustion engines, also with Valvatronic system
- there is an adjustment for t° and gas pressure
- work with heating of gas injectors
- adjusting the number of emergency starts with sound alarm
- a start-stop system is available (compatible with hybrid power plants, a warmed-up engine starts immediately on gas)
- automatic adjustment of fuel level sensor
- tests components (gas valve, buzzer, injectors, LED alarm), reads and records system errors
- automatic calibration
- reading engine speed from gasoline injector signals
- setup via bluetooth connection
- adaptation to work with the main types of gas injectors
- possibility of setting a lock with a PIN code (after the programmed time has elapsed, the machine will stop switching to gas)
- records the parameters of the machine and gas equipment with subsequent information about the maintenance of gas equipment
According to the manufacturer's plant, the electronic control unit for gas equipment of the 4th generation digitronic maxi two, compared to its predecessor (maxi-1 (also discontinued digitronic four maxi)), has increased quality and reliability, proven by numerous tests. In addition, for a moderate cost, the average price for the original Maxi-2 electronics kit, which includes a map sensor, a gas/gasoline button, and a wiring harness, is 7,150 rubles.
Also, based on reviews from car owners, we can conclude that no global problems arise during the operation of a gas system with a maxi-2 controller.
The causes of malfunctions are usually:
- poor installation
- non-compliance with the service interval (TO)
- The supplied controller is not the original one.
HBO payback calculator
For correct calculation, you must provide all the data.
Your car consumes 10l/100km
The average price for 1 liter of AI-95 gasoline is 34 rubles.
The average monthly mileage of an ordinary motorist is 7000 km/month.
A total of 840 hundred kilometers per year with an average consumption of 10 l/100 km yields 8400 l of gasoline per year.
It turns out that 285,600 rubles will be spent on gasoline per year.
On gas, fuel consumption is 1 liter more than on gasoline, 11 l/100 km - 9240 l/year.
With an average price of 15 rubles per liter of gas, it comes out to 138,600 rubles/year.
You save 147,000 rubles in 1 year and 441,000 rubles in 3 years!
About the Digitronic brand
In 2004, the engineering and management staff of GAZPART 95 began developing the foundation for a new brand. The idea was to use a wide range of high-quality components from various manufacturers. According to the technical specifications of Digitronic specialists, work is being carried out to manufacture equipment at the Italian plant AEB (Alternative Fuel Electronics). However, there are components from other countries. For example, from the Polish company STAG. And this is one of the Digitronic policy lines, in which there are no restrictions in the selection of a high-quality assortment.
In many respects, gas cylinder equipment of this brand can be considered universal, because it can be installed on different car models
It is important that these products are applicable for trucks and passenger vehicles
Self-tuning
Before tuning, it is recommended to drive a little on gasoline, this is necessary so that the gasoline brains “feel” the normal mode and correct the correction factors.
All self-tuning can do is accurately determine the timing of gas injection at idle. All other engine modes require manual adjustment. It’s a pity, most often gas workers limit themselves to only this mode.
We connect the cable to the car, turn on the Lovato Easy Fast program, initialization occurs, which takes some time. In the lower right corner the cable icon is displayed with a green check mark. From this moment you can start setting up.