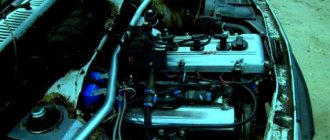
At different times, different engines were installed on the VAZ-2110 car, both carburetor and injection. However, regardless of the type of power system and the number of valves (8 or 16), all engines are assembled on the unit base of the old engine 21083 and 21093. The most progressive of these engines is the 16-valve 1.6-liter VAZ 21124 engine with a power of 89 horsepower. Today we will touch on the ignition module for 8-valve engines 2111 and 21114 (1.6 l), check its performance and find a suitable replacement for the failed module.
We check the ignition module on the injection VAZ-2110 8 valves with our own hands
At different times, different engines were installed on the VAZ-2110 car, both carburetor and injection. However, regardless of the type of power system and the number of valves (8 or 16), all engines are assembled on the unit base of the old engine 21083 and 21093. The most progressive of these engines is the 16-valve 1.6-liter VAZ 21124 engine with a power of 89 horsepower. Today we will touch on the ignition module for 8-valve engines 2111 and 21114 (1.6 l), check its performance and find a suitable replacement for the failed module.
General diagram of the injector operation
So:
- there is a so-called group of information sensors, which is carried out exclusively by data collection;
- all information goes to the controller, which is the analytical center of the injection system;
- depending on a number of factors, the controller sends an electrical pulse of a certain length directly to the nozzles themselves, which open for a strictly specified time period;
- The efficiency of the cylinders and, consequently, the engine itself depends on how much fuel and air are supplied from the injectors.
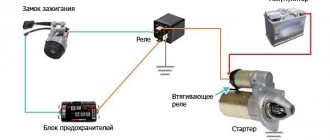
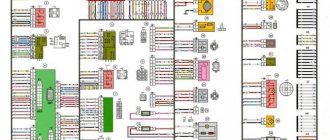
VAZ 2110 injector relay diagram
The price of the injector (see VAZ 2110: flushing the injector on your own) is a flexible concept and depends on a number of components. However, the cost of fixing an injector problem at a car service center is very significant. The DIY repair instructions allow you to fix the problem, but you must have a good understanding of the injector circuit. Photos and videos - materials in this matter will become the most valuable practical assistant.
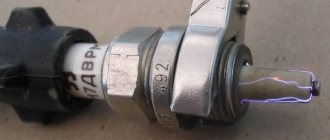
Version of the module on the 8-valve VAZ-2110
Ignition module 2111-3705010 (Stary Oskol).
Ignition module 2112-3705010 for a one and a half liter engine.
The top ten was equipped with two 8-valve engines of different sizes - 1.5 (2111) and 1.6 liters (21114). The ignition modules for these engines are different.
- The one and a half liter engine has a module with article number 2112-3705010,
- and the 1600 cc engine is equipped with module 2111-3705010.
A module for a 1.5 liter engine costs about 1500-2100, and the second one is 500 rubles cheaper.
Common breakdowns
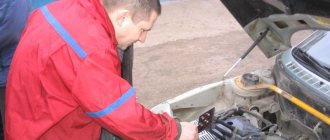
The process of diagnosing the occurrence of problems is not any serious problem. Of course, this applies to those car owners who understand at least a little about electrical engineering and know how to use a multimeter. In the same case, if the necessary knowledge is not available, it is recommended to contact qualified specialists with experience. It is worth saying that checking the VAZ-2110 ignition coil (8 valves) using a device such as a multimeter allows you to provide the desired test result.
There is no need to rush to carry out repair work. The fact is that the problem may not lie in this element at all. Before checking the ignition module, you must consult a qualified specialist and, as a result, check the vehicle. At the same time, you will most likely spend money and your time on performing this procedure. Before checking the ignition unit, you should make sure that all other engine systems are functioning as they should.
Often, breakdowns appear in a vehicle, which subsequently disappear on their own. The indicator does not record such failures. In turn, if we talk about the controller, then they remain in it. If you try to read the errors that occur using the tester, it will not be able to detect them.
What signs of failure exist are more or less clear. Speaking about the causes of problems, first of all, they include:
- Contacts that have been contaminated.
- Quite poor mass attachment.
- The appearance of interference of an electronic nature.
Which is better?
SOATE devices manufactured in Stary Oskol have proven themselves to be the most reliable ignition modules.
Module structure
The module consists of two ignition coils and two high-voltage switch switches.
Inside the module there is a board with radio components and ignition coils filled with compound.
The coil generates a high voltage pulse, and it is a simple transformer with two windings, primary (induction voltage about 500 V) and secondary (induction voltage at least 20 kV). All this is assembled in a single housing, on which there is a connector for signal wires (from the engine control unit) and four terminals for high-voltage wires.
Schematic diagram of the module.
The module operates on the principle of an idle spark - it distributes sparks in pairs to cylinders 1-4 and 2-3 according to impulses transmitted from the ECU.
Connecting and replacing VAZ short circuit
The procedure for removing and installing the ignition coil on old VAZ models:
- First, disconnect the central high-voltage wire leading to the distributor (ignition distributor).
- Disconnect all power wires from the coil contacts. Since they are fastened with nuts, you will need an 8 wrench for this.
- If you don’t know which wires to connect to which connector later, it’s better to immediately remember or mark them somehow, so that later during installation you can connect them correctly.
- Unscrew the coil housing. It is attached to a clamp (clamp), which is pressed to the car body with two nuts.
- After the work has been done, you can remove the ignition coil and replace it if necessary.
For new type VAZ cars:
- We remove the “minus terminal” from the battery.
- Remove the top protective cover of the engine. If the engine volume is 1.5 liters, then this part is missing and this step is skipped.
- We remove the high-voltage wires from the coil.
- Now, using a 13mm wrench, unscrew the two fasteners.
- Using a 17mm wrench, loosen one bolt securing the coil.
- We take out the module.
- Use a hexagon to unscrew the coil from the holder.
- Assembly is carried out in reverse order.
Particular attention should be paid to the connection, since high-voltage wires must be located in the strict order provided for by the design. If this is not done, the car will stall or the engine may not start at all.
Replacing the ignition coil on a VAZ is quite simple. Even a novice motorist can do this in his garage, and if everything seems too complicated, contact a car service. Particular attention should be paid to the choice of product, since this will determine how well the engine and ignition system will work.
Signs
- If one of the module coils completely fails, then two cylinders do not work. This is clearly visible even to the naked eye - the engine is feverish at idle, starting is difficult, fuel consumption is sky-high, loss of dynamics.
- To eliminate all other components of the ignition system, make sure that the spark plugs are in working order. To do this, unscrew them and check the spark on each of the spark plugs by cranking the engine with the starter and placing the spark plug with the high-voltage wire on the head so that the body (threaded part) of the spark plug touches the engine mass. If there is no spark or it is weak, replace the spark plug with one that is known to work.
- If this does not lead to anything, check the high-voltage wires. Thus, we will exclude spark plugs, caps and high-voltage wires from the list of non-working elements. Next we will check the ignition module.
Breakdown of the spark plug insulator.
Dirty spark plug electrodes.
Filled candles.
Finding the origin of the problem
First you need to check the performance of the spark plugs, and this check may indirectly indicate a coil malfunction.
To check, you just need to unscrew the spark plugs, insert them into the tips of the high voltage wires, massage them and turn the crankshaft several times with the starter. In this case, you should look at the spark that forms between the electrodes.
If it is discovered that a spark plug is not working correctly and the spark in it is formed intermittently, it should be replaced and a known good one installed in its place.
If a working spark plug works intermittently, check the high voltage wire.
If the interruptions persist even when the wire is replaced, then in carburetor cars the distributor is inspected next, and only then the coil.
In injection cars equipped with a module, there is no such distributor, so you can immediately start checking the module.
Checking these elements will not be particularly difficult, and the only equipment you will need is a multimeter with the ability to operate in ohmmeter mode, with a measurement range of up to 200 MOhm
.
How to check the ignition module?
- First of all, we carefully inspect the module body. There should be no chips, burns or cracks on its surface. A module with a damaged casing is replaced without any hassle.
- If the spark is unstable only on cylinders 1-4 or 2-3, one of the module coils is probably damaged. In any case, we will conduct a comprehensive check of the device. For this we will need a regular multimeter.
Multimeter for checking the ignition module.
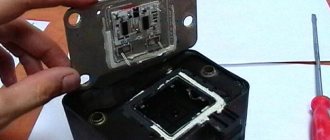
Visual inspection of the IKZ
Remove the ignition coils from the engine using a 10mm or Torx E8 socket wrench (depending on the powertrain model). Carefully inspect the removed coils. There should be no cracks, damage to the rubber cap, melting or leakage of plastic. The spring located inside the coil must be in the correct position.
Diagnostic procedure
The diagnostic procedure can be as follows:
- Disconnect the connector with signal wires from the module.
Remove the connector from the module by moving the lock slightly and pulling the wire.
- Turn on the ignition and check the voltage at terminal 15 (central) of the control wire block. The rated voltage is 12 V. A drop or absence of voltage when the battery is charged indicates that the engine control unit does not supply power to the module. This means the reason lies in the ECU.
We check the voltage between pin 15 and the block ground.
- We remove the high-voltage wires, unscrew the module mounting bots and remove it.
Using a 13mm wrench, unscrew the bolts attaching to the cylinder block.
Unscrew the bolts securing the clutch housing.
Remove the module along with the bracket.
- We check the resistance of the primary windings of the coils - put the multimeter in resistance measurement mode and take readings from the rightmost and central terminals, then from the leftmost and central terminals. The nominal resistance of the primary windings is approximately 0.5 Ohm.
Scheme for checking the primary windings.
We measure the resistance of the secondary windings between terminals 1-4 and 2-3 high-voltage wires. Nominal value: 5.4 kOhm. If the readings do not correspond to the nominal value, the coil is not working correctly.
Scheme for checking secondary windings.
Check the module for a short circuit. To do this, install one tester probe on the central pin 15, the second on the metal body. The device should show the absence of a short circuit (one or infinity). Otherwise, one of the coils has shorted to the housing.
Scheme for checking the module for short circuit.
Classic, family 2101-2107
Domestic VAZ cars of the “classic family” (models 2101-2107) are equipped with carburetor and injection engines. Cars with carburetors have an ignition coil (or "bobbin") installed. The arrangement of the element is as follows: the part is mounted on the left mudguard in the engine compartment of the car, and is attached to the body using two nuts.
Cars with installed injectors (VAZ 2107) have an ignition module. It is mounted on the cylinder block of the car's power unit. The part functions together with the engine's electronic control unit, and the ignition coils are included in the design of the entire module.
The ignition module used is a universal model (installed on other domestic cars)
For the injector and as part of the BSZ, a coil 027.3705 is used, analogous to 27.3705 (ATE-2).
The characteristics of the “injection version” of the VAZ ignition coil are as follows:
Operating temperature from -40° C to +85° C Resistance value: primary winding (0.45+0.05) Ohm secondary winding (5+0.5) kOhm Supply voltage 12 V Overall dimensions 72x156 mm, oil-filled design
Errors
A module malfunction can also be determined using an error scanner. Error codes associated with the module are:
- R-3000, R-3001, R-3002, R-3003 and R-3004 - gaps in sparking, the module itself, spark plugs, high-voltage wires or the ECU may be to blame;
- R-0351 - the coil of cylinders 1-4 does not work;
- R-0352 - the coil of 2-3 cylinders does not work.
The scanner readings do not yet indicate problems with the module itself.
It is possible that the spark plugs are not working or the high-voltage wires are broken, but if we initially diagnosed them, then the fault lies entirely with the ignition module. In this case, we can repair it ourselves, or buy a new one, which is faster, easier and guarantees uninterrupted operation of the ignition system. Good luck to everyone, strong spark and good roads!
The main reasons for the lack of spark
Not all motorists know the reasons for the loss of spark, much less methods for diagnosing and troubleshooting problems. So, it is worth identifying the main reasons, and then deciphering why exactly they become the cause. Finally, you need to consider ways to eliminate the defect. So, what reasons could cause the spark to disappear:
- Failure of the fuel pump.
- Spark plug.
- Ignition coil.
- High-voltage wires and their location.
- Gas distribution mechanism.
All the reasons have been found and it is worth moving on to the process of eliminating this malfunction.
Are you giving me a spark? Troubleshooting!
First of all, it’s worth noting that you don’t need to rush to check right away. As practice shows, there is a certain sequence of actions and malfunctions that could lead to loss of spark on a 16-valve engine.
Fuel pump
Ignition is not the first reason for the ignition failure on a car. Before getting into the electrical part of the car, it’s worth delving into the mechanics, so to speak. Turn on the ignition and listen to see if the gasoline pump is working. If it is silent, then you need to check whether gasoline is entering the cylinders.
It is worth starting the diagnostic procedure by checking the fuses for serviceability. Of course, you can only view the one that is responsible for the fuel pump (in this case, when you turn on the ignition, the pump will not pump), but it is recommended to diagnose everything for integrity. If at least one fails, it must be replaced.
If the previous procedure did not help, then we turn directly to the pump itself. For diagnostics, you will have to remove the entire module, which is located under the rear sofa, and disassemble it.
The pump itself is easy to check - the contacts are closed through the tester. If there are no readings, then the part has “died” and requires replacement. If the pump is “live”, then it is necessary to clean the contact group and check the wiring for breaks.
Spark plug
The candle becomes the second boundary, which may cause the spark to disappear. We unscrew the elements and carry out visual diagnostics. If everything is clean and beautiful outside, then you need to measure the resistance and check the gap. Of course, you can check the performance of a spark plug on a special spark plug stand, but not everyone has one in their garage. Therefore, we do everything the old fashioned way.
We connect the spark plug to a high-voltage wire, which is connected to 1 cylinder, and with the outer side to the body to obtain ground, and provide an ignition contact.
When performing this operation, you should be extremely careful, since the voltage that enters the spark can be fatal. Thus, we check all the spark plugs for the presence of a spark.
An alternative way to check spark plugs
Ignition coil
The ignition coil can be checked using a multimeter. If it is faulty, it is recommended to replace it, but there are brave souls who repair this unit. Of course, not everything always goes smoothly and often everything ends with one thing - the installation of a new one.
High voltage wires
A breakdown or failure of the wire will immediately become known as the car will start to shake. But, if the explosive wires are located incorrectly in the cylinders, then you will have to place them according to the connection diagram. The missing spark problem should go away.
The last place to look for a missing spark is the timing belt. Misaligned valve timing can be a problem. This could happen due to incorrect installation of the deposit disk. It is located on the crankshaft pulley and serves as a reference synchronizer for the sensor. If it is positioned correctly, when 1 cylinder is in the TTM, the sensor is placed between the 19th and 20th teeth. You can eliminate the cause by setting the disk correctly to the marks.
What determines the performance of the coil?
The classic ignition coil or “bobbin”, as it is also popularly called, is essentially a low-voltage voltage converter from the battery and generator to high-voltage, which is then supplied to the spark plugs. That is, this is a miniature electrical transformer.
The ignition coil is a kind of mini electric transformer
The traditional coil, used on carburetor models of vehicles, consists of two windings. The primary winding receives low voltage pulses, for example 12 Volts. As a rule, this is a small number of turns (up to 150) of thick insulated copper wire. The “primary” has 2 terminals on the coil cover. There are much more turns in the secondary winding - up to 30 thousand, but the wire used is much thinner. One end of the “secondary” goes to the “minus” of the primary winding, the other to the central terminal of the coil. In the center of the windings there is a core that enhances the magnetic field. The coil body is insulated, and its cavities are filled with special oil for transformers.
The fundamental characteristic that indicates the serviceability of almost any coil is the resistance of the windings.
Let's sum it up
As you can see, the VAZ 2110 ignition module is a fairly simple device consisting of contacts, coils, boards and wires. However, only contact connections can be repaired. Other elements are beyond repair and need to be replaced.
At the same time, before starting repair work, it is necessary to properly test the module. To do this, you should adhere to the general rules, and also take into account the subtleties and nuances discussed above. As a result, diagnostics of the VAZ 2110 ignition module allows you to quickly identify certain problems and eliminate problems.
Symptoms of a problem
It is extremely rare for two built-in coils to fail at once, so it is more likely to be possible to start the engine with a faulty unit. However, even an inexperienced driver will immediately suspect something is wrong. The malfunction will appear as follows:
- unstable (floating) idle speed;
- the engine has difficulty picking up speed;
- characteristic sound of the engine (triple);
- jerking when accelerating (while moving).
Operating a car with such a breakdown is possible (you can drive to a garage or car service station), but it is not advisable unless absolutely necessary.
Similar signs of unstable engine operation are possible with a number of other ignition or fuel supply faults. To differentiate possible breakdowns, the performance of the ignition unit should be determined. It would be useful to check the contacts of the wires coming to the device, as well as their integrity.
Methods for diagnosing device performance
The simplest method that will help determine the performance of the coil is to replace it with a similar working device. This is possible if there is somewhere to get it. Please note that the module must match the parameters of the device under test. If the engine with a working coil works as before the breakdown, the ignition module is definitely faulty.
The main testing method involves using a multimeter. It consists in determining the resistance of the secondary windings of the coils built into the ignition module. The method is simple and does not require additional skills. The device does not need to be removed for testing. The check is done with the engine turned off.
This is how you check the resistance of the secondary winding with a multimeter
- High-voltage wires are removed from the module sockets.
- The tester switch is set to the 20 kOhm position.
- The multimeter rods are placed in turn in the recesses of the corresponding contact pairs (1 and 4, 2 and 3).
- With an intact secondary winding, the performance in both cases is the same. Normally, the resistance should be about 5.4 kOhm (in some models the indicators differ, which needs to be clarified). If the resistance is much greater, then there is a winding break. The resistance is much lower - a breakdown. The coil is faulty and cannot be repaired.
Video: How to check the secondary winding with a multimeter
When is there an option to repair?
If during testing both secondary windings show integrity and serviceability, the reason for the inoperability of the coils may be a break in the soldering of the switch wires. Such damage is detected when the rear cover of the module is removed. If you have a soldering iron and know how to use it, you can restore the integrity of damaged contacts, while at the same time strengthening the rest. This, unfortunately, is the only failure of the ignition module that can be repaired.
Testing the ignition module can be done using simple do-it-yourself instruments. Based on our advice, you will be able to fully check both the module itself and other elements of the mechanism that may be the cause of the breakdown. We wish you success in this matter!
Read with this
- Ways to independently check the ignition module
- How to remove and replace the ignition coil on a VAZ-2114 with your own hands
- Purpose of a spark on a VAZ 2106, reasons for its absence and troubleshooting
- Contactless ignition VAZ 2106: device, operation diagram, installation and configuration instructions
- VAZ ignition coil connection diagram
- Reactive and active resistance
- Malfunctions of the contactless ignition system of VAZ 2108, 2109, 21099 cars
- Hall sensor VAZ 2108 and 2107: how to check, replacing the regulator and video
- Correct ignition adjustment on a VAZ 2107 carburetor
- Window regulators VAZ-2114: connection diagram. Power window button pinout