Over time, the valve stem seals of the VAZ 2107 lose their elasticity and wear out, and oil gets into the valve guides and cylinders. Signs of such a malfunction are dirty spark plugs, increased oil consumption and smoke from the exhaust pipe. In this case, the oil seals (valve seals) need to be replaced.
Causes and signs of wear on valve stem seals
The caps are continuously exposed to engine oil and exhaust gases while the engine is running. Over time, the inside of the cap becomes dull and abrasion occurs. Oil seals (valve seals) last approximately 50-100 thousand km. mileage The life of the caps is influenced by the quality of the engine oil used, as well as the frequency of replacement.
There are several main signs of cap wear:
- High consumption of engine oil (more than 1 liter per 1000 km).
- Deposits on spark plugs (simply black plugs).
- Blue smoke from the exhaust pipe (especially noticeable at high speeds).
Also, these symptoms may indicate other problems, for example, wear of the CPG in general.
Symptoms of oil seal failure
Signs that the valve stem seals need to be replaced are:
- increased oil consumption;
- smoke and soot from the exhaust pipe;
- soot on candles.
Of course, such symptoms may also indicate other malfunctions, for example, severe piston wear or stuck rings, as well as incorrectly set ignition (for carburetor models). But all this is determined experimentally. For example, measuring compression in the cylinders can help assess piston wear.
In the book on car repair and operation, it is recommended to change the valve stem seals after 30,000 km.
Replacement process
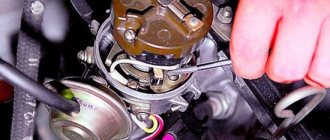
- Completely dismantle the air filter housing. Immediately remove the cover and pull out the filter, then unscrew the fastening nuts from the carburetor and remove the entire housing.
- We remove the gas pedal linkage, as well as the choke cable on the carburetor.
- We unscrew all the valve cover fastening nuts around the perimeter and remove all the spark plug wires for convenience. You can also remove the distributor cover.
To see the process of replacing valve stem seals on a VAZ 2107, see this video:
Source
Preparatory work
- slotted screwdriver;
- ratchet crank;
- set of heads;
- set of open-end wrenches;
- valve desiccant;
- tweezers;
- cap puller;
- rags;
- device for installing caps;
- hammer;
- torque wrench.
- slotted screwdriver;
- ratchet crank;
- set of heads;
- set of open-end wrenches;
- valve desiccant;
- tweezers;
- cap puller;
- rags;
- device for installing caps;
- hammer;
- torque wrench.
To replace the valve stem seals of a VAZ 2107 you will need:
- standard set of keys;
- torque wrench;
- device for removing valves (depressurizer).
Before starting work, it is necessary to wash the engine compartment of the machine. This must be done carefully so as not to wet the sensors, pads, and elements of the ignition system. Before washing the engine compartment, you must disconnect the ground wire from the battery.
It is advisable to carry out the work in a garage - this will help to avoid dust getting on the timing parts during assembly. It is also necessary to secure the machine with the handbrake and turn on neutral speed so that you can turn the crankshaft during operation.
To carry out the repair you will need the following tools:
- a set of keys;
- valve puller;
- tweezers (to pull out crackers);
- oil seal remover;
- a mandrel (or something similar for pressing, for example a piece of tube slightly smaller than the diameter of the oil seal);
- hammer;
- tin solder rod 8 mm.
How to change valve stem seals on a VAZ 2107
Replacing valve stem seals on a VAZ 2107 without removing the head is quite easy. The only condition is accuracy. The article provides complete instructions with nuances. Replacing valve stem seals on a VAZ 2107 without removing the head is quite easy. The only condition is accuracy. The article provides complete instructions with nuances.
In one of the articles we already wrote about what the color of the exhaust or the color of soot on the candles can tell. In short, both must be black.
Signs for repairing valve stem seals
However, this is not a panacea; there are several signs that it is time to change the valve stem seals:
- Increased oil consumption. Of course, you shouldn’t bring the engine to this state, but this situation can still arise. So, with severe wear, the oil seal becomes a filler neck, which only leads to even greater consumption. If this situation occurs, then goodbye oil after a couple of hundred kilometers. It's hard to believe, but it comes straight out of the exhaust pipe;
Blue smoke from the exhaust pipe. It is accompanied by an oil deposit at the end of the pipe;
- Black carbon deposits on spark plugs. Moreover, it should be carbon deposits, not soot.
When is it time to change caps?
Experienced car drivers can easily understand when a replacement is necessary. Moreover, this is easy to do with your own hands, without resorting to the help of specialists from the workshop. If you see the following signs, it means it's time to change the caps.
- Black carbon deposits appeared on the spark plugs. It is important to understand that we are not talking about soot, but about soot. Soot may indicate other problems.
- Presence of blue smoke. The reason for this is a strong oil coating.
- Very high oil consumption. It is difficult to bring an engine to this state and is considered a serious problem. When the oil seal in the engine is too worn out, it will “drink” oil with such thirst that it will simply fly out through the exhaust. Therefore, you should not be surprised when, after driving just a couple of hundred kilometers, you find that you have no oil left at all, even though it was recently filled in.
Tools for replacing VAZ valve stem seals
In order to replace valve stem seals on a VAZ 2107, you need several special things that are on this list:
Heads or socket wrenches for 10, 13 and 17. May be needed for 14. Depends on the year of manufacture. Open-end wrench 13 for carburetor cars;
A special key for the crankshaft, because there is no ratchet on injection cars;
Depressurizer - this is the popular name for a device for desiccation of valves;
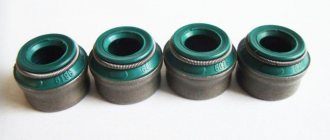
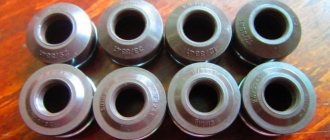
The caps themselves are sold as a set, but can also be found in bulk, you need 8 pieces;
Valve cover gasket;
Lead rod with a diameter of 8-10 mm;
Installing new caps
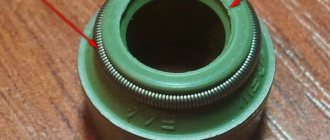
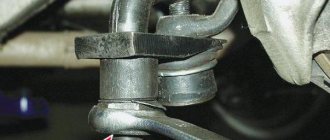
To prevent damage to the edge of the valve stem seal of the VAZ-2107 (the photo shows the installation of the element), it is necessary to put a soft bushing on the valve stem. It is advisable to lubricate the inside of the cap with engine oil. Heat-shrinkable insulation can be used as a sleeve, which must be lightly burned on one side. The main thing is that its diameter is the same as that of the valve stem. It is advisable to install the new element on the guide after the old one has been completely removed. After this, a spring and a plate are put on, and the mechanism is compressed with a desiccant. The crackers are installed in the groove. The procedure for installing the caps on the guide is as follows:
- An auxiliary bushing is located on the valve stem.
- The oil seal is put on and installed until it stops.
- The auxiliary bushing is removed.
- Using a special mandrel or a “10” tubular wrench, you need to hammer the cap into place.
- Install the support washer, plate and spring.
- Fix the desiccant and squeeze it.
- Carefully install the crackers and release the puller.
Replacing valve stem seals on a VAZ 2107
It's time to proceed directly with the replacement. First of all, as before starting any other work, you need to disconnect the negative terminal of the battery. On carburetor cars, you also need to remove the air filter and carburetor. Then the actions are no different from each other.
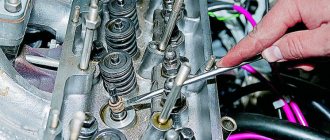
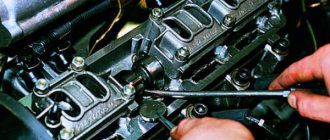
- Remove the valve cover. You should stock up on containers for washers and nuts in advance, because the washers here are specific. Of course, you can easily find them in any auto store, but you don’t want to put off assembly for this;
After this, we rotate the crankshaft so as to obtain a position in which the pistons of the first and fourth cylinders are at top dead center. This can be checked using a mark on the pulley or a feeler gauge: in this position, both valves of the above cylinders will be free;
- After removing the tensioner, bend the pinion bolt lock. In theory, the mark on the gear should coincide with the cast on the body, but it happens differently. If this is not the case, we make marks to establish how it was. There is another option. We simply unscrew the gear, after which, without removing the chain, we wrap some kind of cord around it so as to tighten the gear in the chain and prevent it from slipping out. Then, after completing the procedure, it will be enough to simply adjust the position of the camshaft.
- Next, unscrew the nuts securing the housing and remove it together with the camshaft;
Now we insert a tin rod into the spark plug hole and support the bottom of the valve with it. Thus, it will not fall into the combustion chamber, and when desiccated, it will not pierce the piston bottom;
- Now we take out the crackers, plates and springs with tweezers. At this point it is advisable to be careful;
Next, put on the puller and remove the caps. Then we insert the new cap into the mandrel and carefully press it onto the guide sleeve;
We put the plates and springs in place, squeeze them and insert the crackers. It is important that they fall into the groove. To do this, you need to lightly hit it a couple of times with a hammer, but not hard, otherwise there is a risk of damaging the piston;
- We assemble everything in the reverse order, install the housing with the camshaft, tighten it in the order shown in the picture;
Well, that’s all, replacing the valve stem seals without removing the cylinder head is complete.
Video: replacing valve stem seals on a classic VAZ engine:
Source
Replacing caps
Before you start working on the carburetor, it must be removed. Before that, you need to disconnect the negative terminal of the battery.
Don't forget to also remove the air filter, then follow the following diagram:
- Remove the valve covers and carefully place all the nuts and washers in a separate container.
- Then you need to start cranking the crankshaft. It is very important to obtain a position where the pistons of the fourth and first cylinders are both at top dead center. Only in this case are both valves completely free.
- Then remove the chain tensioner by unscrewing the nuts that secure it.
- Now you can begin to unscrew the housing mounting nuts. After the nuts have been unscrewed, it must be removed directly from the camshaft.
- It is important to insert a tin rod into the spark plug hole, and then use it to support the bottom of the valve.
- Then you need to take the desiccation tool and secure it to a pin. We will dry out the first and fourth valves, and the main thing is to do it sharply.
- At the next stage you should be extremely careful, because it’s time to get out the plates, crackers and springs.
- Once we got all this out, it is important to put on the puller and remove the caps. Then insert a new cap.
- Then we return the plates, crackers and springs.
- After the operation with the first and fourth cylinders is completed, rotate the crankshaft 180 degrees and do the same with the remaining cylinders.
- Then we put everything back together in reverse order.
At this stage, we have successfully replaced the valve stem seals. Now you don't have to worry about your car losing oil faster than it gets it. Always monitor the condition of your engine and oil level, because this will have a positive effect on the life of the car.
How to independently replace oil seals (valve seals) on a VAZ 2107
Many engine and fuel system problems are accompanied by a sharp increase in gasoline consumption. If at the same time there is also intense smoke emission from the pipe, this may indicate wear on the valve stem seals.
In order not to completely ruin the VAZ 2107 engine, it is better not to operate the car in this condition. Moreover, even a beginner can carry out the replacement in his garage with the help of our step-by-step instructions.
Why are oil seals needed and how are they designed?
Engine cylinders need protection from foreign substances entering the combustion chamber. It is the oil seals (or valve stem seals) that play the role of a kind of protector. Their task is to prevent oil from penetrating while the valve stems are operating. If the caps have lost their function, they must be replaced. Otherwise, carbon deposits will begin to appear on the walls of the engine, which will lead to increased oil consumption.
A running engine causes all elements of the gas distribution mechanism to constantly move. They rub against each other, which inevitably leads to wear. To reduce the wear rate, oil gets onto the surface of each element. In this case, you need to ensure that the oil does not end up in the working area of the valves. Otherwise, the motor will begin to malfunction. To ensure that not a drop of oil penetrates into the combustion chamber, oil seals are installed.
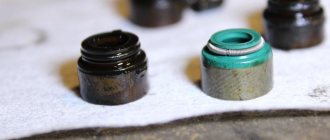
Valve seals have a very simple structure. They consist of only three elements:
- Base. This is the oil seal frame, which is made in the form of a steel bushing. This element ensures the strength of the spare part.
- Spring. It ensures the tightness of the mechanism by pressing the rubber tightly against the valve stem.
- Cap. This is the main element of the device, made of rubber. With its help, excess oil on the rod is eliminated.
Signs of breakdown
To prevent serious problems in engine operation, it is necessary to promptly diagnose and correct oil seal failure.
You can judge the wear of valve stem seals on a VAZ 2107 by the following signs:
- There is an increased release of white or blue exhaust gases.
- Engine oil consumption increases significantly.
- The candles become covered with black soot.
If you find these signs of failure, you need to make sure that the entire gas distribution mechanism is working properly, and not just the caps. Pay special attention to valve diagnostics. If necessary, replace the valve stem seals on the VAZ.
If the problem is not diagnosed and corrected in time, the following consequences may occur:
- the motor will lose dynamics;
- it will begin to work unstably and will often stall at idle;
- the pressure in the cylinders will decrease;
- carbon deposits form not only on the valves, but also on the walls of the cylinders and pistons;
- the tightness of the system will be compromised.
When carbon deposits appear on the engine walls, its service life decreases sharply. If the problem is not corrected in time, the situation will lead to an expensive overhaul of the engine. But these difficulties can be avoided by simply replacing the oil seals on the VAZ 2107.
When is it time to replace
Over time, the sealing material of the valve stem seals becomes hard. As a result, it loses its elasticity, which leads to oil leakage into the cylinder. The same problem occurs when the piston rings are faulty.
The caps are changed in cases where oil leaks occur without visible places. Watch how the exhaust behaves while driving. Brake the car sharply with the engine, and then also sharply press the gas pedal. If this leads to the appearance of thick smoke from the muffler, then it is time to replace the seals.
Thick, bluish-colored smoke may appear on the car even after a long period of parking.
It's easy to explain. If the caps are worn out, this leads to oil entering the engine cylinder. If the piston rings are worn out or coked, the engine behaves a little differently. Smoke will remain behind the car only when driving uphill or during rapid acceleration.
If, in addition to smoke, you observe an increase in fuel consumption, a decrease in engine dynamics and problems during startup, this may all be evidence of wear and tear on the mechanisms.
How to replace caps on a VAZ 2107
- Drain approximately two liters of coolant.
- Remove the air filter housing and throttle linkage if you have a carburetor.
- Remove the valve cover.
- Place the first cylinder in top dead center mode.
- Loosen the chain tension nut.
- Remove the camshaft gear mounting bolt.
- Remove the sprocket and chain and secure them with wire to prevent a possible fall.
- Remove the bearing housing and rockers.
- Remove the candles. To prevent the valve from falling into the cylinder, be sure to plug the spark plug hole with a tin rod.
- Using a valve remover, remove the "crackers".
- Using a screwdriver, carefully pry and remove the oil seal.
- Before installing the new one, do not forget to lubricate the surface of the rod with oil.
- Replace the springs and other parts.
- Repeat all the described operations with each cylinder, installing them at TDC.
After completing all the work, return the crankshaft to its original state, install the bearing housing, camshaft gear and chain. The remaining elements are installed in reverse order.
Source
Stories from our readers
“Fucking basin. "
Hi all! My name is Mikhail, now I’ll tell you a story about how I managed to exchange my two-wheeler for a 2010 Camry. It all started with the fact that I began to be wildly irritated by the breakdowns of the two-wheeler, it seemed like nothing serious was broken, but damn it, there were so many little things that really started to irritate me. This is where the idea arose that it was time to change the car to a foreign car. The choice fell on the melting Camry of the tenth years.
Yes, I had matured morally, but financially I just couldn’t handle it. I’ll say right away that I am against loans and taking a car, especially not a new one, on credit is unreasonable. My salary is 24k a month, so collecting 600-700 thousand is almost impossible for me. I started looking for different ways to make money on the Internet. You can’t imagine how many scams there are, what I haven’t tried: sports betting, network marketing, and even the volcano casino, where I successfully lost about 10 thousand ((The only direction in which it seemed to me that I could make money was currency trading on the stock exchange, they call it Forex. But when I started delving into it, I realized that it was very difficult for me. I continued to dig further and came across binary options. The essence is the same as in Forex, but it’s much easier to understand. I started reading forums, studying trading strategies. I tried it on a demo account, then opened a real account. To be honest, I didn’t manage to start earning money right away, until I understood all the mechanics of options, I lost about 3,000 rubles, but as it turned out, it was a precious experience. Now I earn 5-7 thousand rubles a day. I managed to get the car buy after half a year, but in my opinion this is a good result, and it’s not about the car, my life has changed, I naturally quit my job, I have more free time for myself and my family. You’ll laugh, but I work directly on the phone)) If If you want to change your life like me, then here’s what I advise you to do right now: 1. Register on the site 2. Practice on a Demo account (it’s free). 3. As soon as you get something on the Demo account, top up your REAL ACCOUNT and go to REAL MONEY! I also advise you to download the application to your phone, it’s much more convenient to work from your phone. Download here.
- desiccant;
- tweezers;
- oil seal remover;
- mandrel for pressing caps.
Replacing valve seals VAZ 2110 8V
Replacing the MSK is shown using the example of engine 2111 (8kl). To do this, you do not need to remove the heads from the cylinder block, but you will need a tin rod with a diameter of about 8mm (for example, solder).
We begin the procedure by removing the air filter, fuel pump, ignition distributor and auxiliary drive housing, unscrewing the bolt securing it with a 5-point hexagon. Disconnect the negative terminal from the battery. Remove the timing pulley from the camshaft, and then the cylinder head cover.
| Remove the ground wires by unscrewing the two nuts “1”. Then unscrew two nuts 2 and bolt 3 securing the rear cover of the cylinder head. Please note that there is an O-ring under the bolt head. Remove the back cover from the block head. | |
| Unscrew evenly the four nuts securing the front 1 and six nuts securing the rear 2 camshaft bearing housings and remove the washers. Then remove both housings. | |
| If the key in the camshaft groove does not fit tightly, remove it so as not to lose it. | |
| Remove the camshaft from the cylinder head. | |
| Remove the oil seal from the camshaft. | |
| Rotate the crankshaft so that the piston corresponding to the caps being replaced is at top dead center. After unscrewing the spark plug, insert a tin rod through the spark plug hole between the piston and the valve (to prevent the valve from falling down). | |
| Install the valve spring compressor as shown in the photo. In this case, use a nut without a serrated shoulder. Compress the valve spring with the tool. | |
| Use tweezers to remove two crackers. Then remove the fixture. | |
| Remove the upper spring retainer and the inner and outer valve springs. | |
| Press the oil seal onto the valve guide. | |
| To do this, install the collet of the tool for removing oil seals onto the cap. | |
| Strike the tool bushing sharply with the striker. Then just as sharply hit the striker of the handle of the device, thereby pressing the cap off the sleeve. | |
| Remove the cap from the fixture collet. If you do not have a tool for removing caps, use pliers. In this case, the force must be applied strictly upward and not rotate the caps, so as not to damage the valve guides. | |
| Before installing new valve stem seals, it is recommended to remove the springs from them, otherwise the caps can be damaged when they pass through the grooves under the cracks on the valves. | |
| Dip the valve stem seal in engine oil and insert it into the mandrel. | |
| Carefully press the cap all the way into the bottom plate. | |
| Install the spring on the cap if it was removed. Replace the remaining oil seals in the same way. | |
| Install the springs and valve plate in the reverse order of removal. Install the cotters using the tool so that they fit into the grooves of the valve stem. Remove the tin rod from the candle hole. | |
| After installing the crackers, hit the ends of the valves with a hammer through a metal rod so that the crackers sit in place. Lubricate the camshaft journals and cams, as well as the bearing surfaces under the camshaft journals in the cylinder head and bearing housings with engine oil. | |
| Install the camshaft into the cylinder head supports so that the cams of the 1st cylinder are directed away from the valve tappets. | |
| Apply sealant to the cylinder head in the area of the outer camshaft supports. | |
| Install the camshaft bearing housings, place the washers on the studs and tighten the nuts securing them in two stages in the order shown: – tighten the nuts until the bearing housings touch the surface of the cylinder head. | |
| Make sure that the guide bushings fit into the holes in the bearing housings. Finally tighten the nuts in the specified sequence. | |