- Consumables
- Preparation for work
- Is it necessary to remove the wheel and fender liner?
- Engine protection removed
- Selecting the right crankcase and disassembling it
- Replacing or washing the filter
- Assembly Features
- How to start a car after changing the oil?
Experts recommend changing the oil in the Nissan X-Trail T31 and T32 variator every 50-60 thousand km. However, many motorists make replacements even more often: after 40 thousand kilometers traveled.
Consumables
During the repair process we will need materials and tools such as:
- original NISSAN CVT NS-2 lubricant specifically for Nissan X-Trail T31. In the catalog its number is KLE5200004EU. For the later model X-Trail T32, NS-3 grease must be used;
- two filters: one coarse filter (32101EE), the second fine filter (2824A006);
- gaskets that are necessary for the variator pan (313971XF0C), as well as for the oil cooler (number 2920A096);
- a lot of rags and a container where the used lubricant will be drained (the container must have a volume of at least 8 liters).
Japanese "all-terrain vehicle"
The Nissan X-Trail appeared on the Japanese automobile market in 2000. Since 2001, the Japanese began to export it to other countries. The Nissan X-Trail T30 was the first generation car, produced until 2009. Options for gasoline and diesel engines with manual and automatic transmissions were offered. In all countries except Taiwan, its production and sales ceased in 2007.
Since 2007, production of the 2nd generation crossover, the Nissan X-Trail T31, began. This was a higher level model compared to its predecessor. The body dimensions have increased, the car was assembled on the new Nissan S platform. The interior has also undergone significant changes. Since 2009, Nissan X-Trail T31 began to be produced in St. Petersburg.
The Nissan X-Trail T31 was produced at a Russian plant until 2014. Consumers were offered cars with 2.0 and 2.5 liter petrol engines, as well as 1.5 and 2.0 liter diesel engines. Transmissions – manual transmission, automatic transmission and variator (CVT).
Starting at the end of 2014, production of the third generation Nissan X-Trail – T32 – started in Russia. The design of the body and interior has completely changed. Overall, the car has reached a higher level of comfort. Today, options are offered with 2.0 liter and 2.5 liter engines. Both run on gasoline. There are also models with a 1.6-liter turbocharged diesel engine. All modifications are with all-wheel drive. Gasoline engines have two types of transmissions - a CVT and a manual transmission. Only mechanics are intended for diesel engines.
Preparation for work
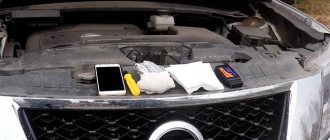
Before you start changing the oil, professionals recommend warming up the car's gearbox. For this purpose, you need to drive 1 - 2 kilometers, then you can start working.
Photo source: www.drive2.ru/r/nissan/160170/
- You need to start by jacking up the front of the car and removing the driver's side wheel.
- The fender liner is being dismantled. It is important to note here that the fender liner is not removed completely, but only to the middle in the direction from the front bumper. Dismantling is carried out according to a simple scheme, since the fender liner is held in place by pistons and a hex bolt (1 piece). To operate, you will need a T20 star key. By removing the fasteners, the fender liner can be moved to the side.
Useful information
When working, you need to remember the following:
- The average volume of oil to be replaced is 7 liters, so you need to buy the appropriate amount in advance based on this value.
- When tightening bolts, you should follow the “crosswise” pattern and accurately control the force to avoid mechanical deformation.
- If there is no funnel, you can carefully fill in new oil by feeding it along the dipstick.
The first few kilometers after changing the oil, you should not subject the transmission to heavy loads. Driving at an easy pace will allow the oil to fill the entire space of the variator and be distributed over all parts that are in mechanical contact.
Engine protection removed
Once access to the Nissan X-Trail pan is open, you can begin to remove it. The engine protection consists of two parts: plastic and metal.
First, the plastic protection is removed. This action is carried out quickly, since the fastening is carried out on 4 snap-on pistons. Removing metal protection will take more time and physical effort. The fastening here is made with metal bolts (4 in total), which are advisable to unscrew in a certain order:
- First, the bolts located next to the front bumper are completely unscrewed;
- the two rear bolts are unscrewed by half (simply loosened);
- the mortgages are removed very carefully;
- the rear bolts are completely unscrewed.
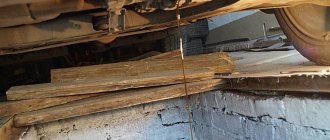
Attention! If the rear bolts are removed first or second, bypassing the “loosening” stage, then the embedded parts will definitely move along the beam. This will create unpleasant circumstances: you will have to jack up the rear of the car, which will slow you down in time.
content
Advantages and disadvantages
The above-mentioned models of continuously variable automatic transmissions are installed in their cars by such manufacturers as Citroen, Peugeot, Renault, and Mitsubishi. Nissan, in addition to the X-Trail model, uses these CVTs for models such as Tiida and Teana.
Until recently, CVT transmissions could not be repaired. Today the situation has changed. There are repair kits available for sale for these units, so they can be restored. The bad thing is that so far few specialists working at service stations have an insufficient level of training to repair CVT gearboxes.
Such transmissions have a number of advantages:
- The variator has good reliability. With proper operation and timely oil changes, it can travel from 150 to 200 thousand km before the first repair.
- A smooth change in the gear ratio creates comfortable conditions for both passengers and the engine, increasing its service life.
- Fuel consumption, unlike classic automatic transmissions and manual transmissions, is most optimal.
- If the car is driving on a slippery surface or on wet asphalt, there is no slipping.
- CVTs provide the best acceleration dynamics, since in this case they maintain engine speed at the highest possible level.
In addition to the advantages, CVTs have a number of significant disadvantages:
- The level of transmission oil for a CVT automatic transmission is less critical than the level of its contamination. Therefore, you have to change the transmission oil quite often. Nissan X-Trail requires replacement more often than manual transmissions and classic automatic transmissions.
- The variator is sensitive to loads. It is used only with engines of a certain power (maximum up to 220 hp). Therefore, it is not recommended to tow other vehicles and trailers with any transmission.
- Although the CVT device is simpler than that of a classic automatic, its repair will cost more. The manufacturer does not provide for servicing of CVTs at all - only replacement.
- CVTs do not tolerate traffic jams and sporty driving style.
Selecting the right crankcase and disassembling it
Photo source: www.drive2.ru/r/nissan/160170/
After removing the car pan, the CVT housing and the engine crankcase come into view. How to understand which of the two crankcases belongs to the variator? The one we need is installed to the left of the muffler along the path of the car. The engine crankcase is installed in front of the variator and will not be used during operation.
For ease of operation, the variator must be cleaned of dirt. This is where WD-40 comes to the rescue. After treatment with the product, wipe the body dry with a dry cloth. After which it becomes perfectly clean, and therefore suitable for further work.
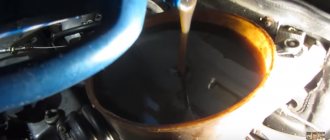
On a clean variator housing you can easily find a plug for draining the lubricant. It is difficult not to notice, as it is the largest in size. Prepare some container in advance where the old used lubricant will be drained. The drain plug has a tight grip on the threads, so reinstalling it will be difficult. She will need some physical effort.
As soon as the waste has drained, the plug is put in place and the removal of the crankcase protection begins. A #10 socket wrench will be used in this procedure. You need to be extremely careful when removing the housing. It is important to hold it with your hand to prevent it from falling. After draining, about 150 ml of old oil will still remain in the system, which also needs to be drained into a container prepared in advance for this purpose.
Whenever changing the lubricant in the gearbox, it is always necessary to simultaneously replace the filter.
ContentsCalculate the average market cost of repairs
First stage
We remove the battery. We remove the air duct. We disconnect the connectors from the engine and gearbox control units. On 2.0 engines, in front of the battery there are first the brains of the TCM box with one connector, behind the battery there are the brains of the ECM engine with 3 connectors.
Disconnects easily and intuitively. Using a 13mm head, unscrew the two bolts securing the brains of the box and move it to the side, there is no need to remove it, it won’t hurt
First of all, the vehicle is placed on a jack, inspection pit or overpass. The left front wheel is removed. The lining that protects the engine from shock loads is dismantled. Using a wrench and a 19mm socket, the plug is removed.
Beforehand, you need to place a container under the hole into which the waste technical fluid will drain.
After this, it is necessary to change the filter element installed in the variator cooling module. The algorithm of actions is as follows:
- The cover of the splash guard element is removed. Under the trim there is a pair of fixing bolts.
- While the technical fluid is drained, the battery and air duct are dismantled, and the connectors of the power unit and variator control unit are removed. All manipulations are carried out with a wrench with heads 10 and 13.
- The tubes through which antifreeze circulates are removed. This is done in order to thoroughly clean them of traces of old oil.
- The bolts securing the cooling module are unscrewed. To remove the filter, just move the cooler a little. The filter is changed along with the gasket; it is also subject to contamination and mechanical wear.
Replacing or washing the filter
Three bolts that secure the filter are removed from the variator housing with magnets. Then the latter is slowly pulled down so that the rubber rings are not damaged. The remaining oil will leak out of the filter.
Photo source: www.drive2.ru/r/nissan/160170/
The filter and magnets can be washed with WD-40, then blown out. After cleaning, the magnets and filter are installed in their original place. The crankcase is tightened with bolts.
It will take no more than one hour to change the oil in the Nissan X-Trail gearbox.
Photo source: www.drive2.ru/r/nissan/160170/contents
Features of CVT gearboxes
We can say that in the domestic automobile market, cars with transmissions such as CVT are not common. So this is something of an innovation for Russian drivers. Therefore, let’s look at the design and operating features of this transmission.
The CVT does not have specific gear levels, like an automatic transmission or manual transmission. In a variator, the transmission coefficient, unlike all other types of gearboxes, changes smoothly. This is its main advantage.
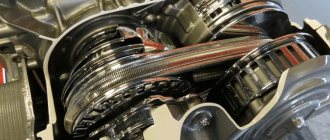
The operating principle of a car variator is quite simple. There are two pulleys whose diameters can be adjusted. This is done by bringing together or removing their component parts. The force is transmitted from the drive pulley to the driven pulley using a V-belt. In cars, this belt is made of metal; another belt simply could not withstand such loads. It is often made from several cables so that it can take on a trapezoidal, or wedge-shaped, shape during operation.
As soon as the conical surfaces of the side blocks of the drive pulley come closer together, its diameter increases. He pushes the belt closer to the edge, which takes on a wedge-shaped shape. The gear ratio increases. At this time, the driven pulley reduces its diameter. The side blocks move apart, the belt drops to a lower level, closer to the center of the pulley. On the driven pulley side, the gear ratio decreases. The slave sets the wheels of the car in motion. This is how the car accelerates – smoothly and gradually. This process is shown more clearly in the figure.
At the minimum gear ratio, the side surfaces of the pulleys move away from each other so much that the belt takes on a rectangular shape. Their approach or removal is controlled by an electronic system driving a hydraulic oil drive specially designed for this purpose.
The Nissan X-Trail design uses two types of continuously variable automatic transmission, or CVT, from the Japanese company Jatco. Two modifications are installed on crossovers: RE0F06A, which began production in 1999, and JF011E (RE0F10A) produced in 2005. The latter is the undisputed world leader among continuously variable automatic transmissions.
Assembly Features
The assembly process is simple, but has some features:
- The bolts should be tightened “crosswise”, as is done when installing the cylinder head. At the same time, you should not overdo it with the tightening force.
- When installing the variator protective pan, it is better to replace the old gasket with a new one.
- Sometimes technicians forget to replace the drain plug and tighten the oil cooler bolts. This nuance should always be remembered.
- To install a new filter, you will need to tilt the oil cooler housing to the side. But you can remove it and rinse it well with diesel fuel.
- You should calculate how much lubricant is poured into the container during disassembly (usually about 7 liters). This volume needs to be known exactly in order to pour the same amount back. The amount of infused oil should not exceed the permissible limit. Excess may push the seal out.
- Fresh lubricant flows into the gearbox through the dipstick.
content
Selection and replacement of engine oil
Engine oil must be completely replaced every 15,000 km. mileage Is it possible to do everything yourself? Let's talk about this.
Removing the pan, installing a new filter element (cleaning)
After draining the technical fluid, the oil pan is removed. It is secured with many bolts. When dismantling, you need to be careful and careful; traces of old oil may remain in the pan.
Carefully inspect for the presence of chips
The part holding the filter is removed with a socket head. The sealing element is dismantled. When cleaning, you can use a special carburetor cleaner or WD-40.
How to start a car after changing the oil?
You can start the car only after placing it in a horizontal position according to the following scheme:
- The car idles for 5 minutes;
- then, with an interval of 20 seconds, the gears are switched to each gear in order, then the actions are repeated, but in the opposite direction;
- you need to drive smoothly along the road without jerking or slipping;
- return to the garage site and repeat on the spot changing gears in all modes in one direction, then in the opposite direction (from D to P);
- then you need to check the oil level in the gearbox with a dipstick while the engine is running;
- If the oil level is exceeded, it can be topped up.
In practice, it has been established that the Nissan X-Trail filter must be changed after a maximum mileage of 15,000 km. Although some official service stations install a new filter after 30,000 miles.
Description of the variator
The second generation of the X-Trail crossover was equipped with Jatco RE0F06 CVTs, as well as modified RE0F10A (JF011E) gearboxes. CVT transmissions used in designs have the following advantages:
- the simple design of the box allows the motorist to independently diagnose and maintain the system without the need to involve specialists.;
- the ability to remove filters and clean them of dirt;
- magnets installed in the tray attract wear products (metal shavings);
- When starting the engine, there is no need to warm up the liquid. The system will automatically bring the oil to operating temperature;
- low gearbox wear;
- a radiator built into the system allows you to maintain the temperature of the variator within normal limits and protect against overheating;
- the absence of steps in CVTs ensures lower consumption than on a standard automatic;
- smooth acceleration of the car;
- simple controls;
- CVTs are relatively safe for the environment.
There are some drawbacks, among which it is customary to highlight:
- improper operation very soon leads to serious disruptions in the operation of the CVT variator;
- expensive maintenance and repairs;
- The failure of one sensor leads to the inoperability of the entire system.
How to partially replace CVT fluid
Raise the car, unscrew the plug, drain the oil. The plug is 19, the oil is dark, but not dead, it has not been changed. The car has been standing for about twenty minutes, and the thin stream continues to run. In order not to waste time, let's remove the fender liner on the left side - TORKS-T20, and also the clip.
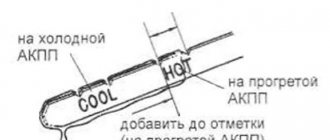
There is a heat exchanger under the fender liner; under it, the gasket and oil filter need to be replaced. The oil drains, screw the plug into place, lower the car and fill in the oil. We take out the dipstick, which is here with a lock: press a little on the side and lift it up. There should be a marking on the dipstick, but there isn't one here. The oil used here is NS-2. We insert the funnel, we will use the original NS-2 CVT Fluid oil, order number KE909-99945, this is a five-liter package. We pour in the entire canister, because 5 liters of oil have drained. We take out the funnel, insert the dipstick, and to prevent it from snapping into place, turn it in the opposite direction and start the car.
We run the gearbox in all modes, lift it, drain the oil, twist the pan and change the heat exchanger filter.
We drain the oil, the machine ran for 12 minutes, the oil is noticeably cleaner. While the oil is draining, unscrew and replace the filter in the heat exchanger.
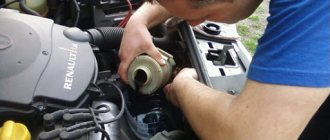
Take the 10mm head and unscrew the 4 bolts. The bolts are not tight enough. Unscrew the top ones first. Oil started leaking from under the heat exchanger. So, the heat exchanger is unscrewed, we take it to the side, and we see that the filter is dirty. We pull out the filter, the rubber band remains in place - it must be removed.
We take a new filter 31726-1XF00 and install it in place. Now the filter is in place, and there is a rubber sealing ring on the heat exchanger, we will also replace it: we will remove it and put a new one in the groove. This will have to be done by touch. The new O-ring will have the original Mitsubishi number 2920A096. We install the ring with guides, 4 ebbs, and check that it is level and press it, without moving it left or right.
The sealing ring is installed, after which we move the heat exchanger back and, without clinging to the edges, set it straight. Tighten the nuts. At this point, the heat exchanger filter and gasket have been replaced, now you can wash it with carburetor cleaner, and when it dries, there will be no more oil stains.
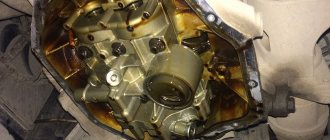
Now we remove the pan: the oil is slowly oozing out, so for now you can put the fender liners in place. The magnets are quite clean, the box was not burned, so there is no dirt especially for 80000, and the magnets are not dirty. We wash the pan, unscrew the filter (three bolts) and remove it. Oil will run out from under it.
We take a new filter, original, Nissan 31728-1xz0d. The filter is mesh, transparent through, in principle, it can be washed and reinstalled. We take a new gasket, original, number 31397-1XF0C, metal gasket, profiled, coated. Therefore, there is no need to coat the new one with sealant. We washed the tray and magnets. We wipe the area where the gasket will be located in a circle and degrease it with a regular degreaser. We also wipe the tray. We put on two bolts, and put a tray on the guides. We tighten all the bolts, and only then we will tighten them, little by little, in a circle. We check the plug - the plug is tight. Lower the car and fill with oil.
We put a funnel - open another five-liter jar of oil, and pour it all out in the same way. Let's start the engine. We check that everything is dry underneath and that nothing is leaking. Let's first see what the oil level is, and if it's not on the dipstick, you need to top it up. The box has warmed up, 47.6 degrees, we measure the oil level, it is at the maximum. The condition of the oil is clean.
To warm up or not to warm up the variator?
In order to understand the issue of warming up the Nissan CVT, you need to understand what happens to the unit at subzero temperatures. This assembly consists of a set of metal parts, rubber, plastic seals and gaskets, as well as lubricant.
If the temperature drops below 0, the variator must be heated
When the temperature drops significantly, the lubricant will become thicker. As a result, there will be a decrease in lubrication efficiency when starting the variator, which will be accompanied by an increase in the load on all the mechanisms of the device. There is also compression of metal, plastic and rubber throughout the entire unit. At temperatures less than fifteen degrees below zero, the Nissan CVT is noted to operate with jerks until it warms up completely.
We can conclude that problems with a Nissan CVT without preheating in winter are inevitable. Proper operation of the CVT means prohibiting the operation of the CVT without the use of a pre-heater at temperatures below minus thirty-five degrees.
Proper warming up of the Nissan variator
In the previous paragraph, it became clear that it is necessary to warm up the CVT. Now let’s figure out how to warm up a Nissan CVT in winter correctly. Under no circumstances should you use methods similar to an automatic transmission; this will be accompanied by the appearance of new problems. There are several correct options available for warming up the Nissan CVT. Next, we will consider each separately.
CVT design
The first option is warming up while moving. It involves starting the car immediately after starting. In this case, it is necessary to limit engine speed, and also avoid sudden acceleration and braking. After warming up, you can operate the Nissan variator in standard mode.
The second option involves warming up the CVT while parked. In this case, you will need to start the power unit and wait from five to twenty minutes, depending on the ambient temperature. You should wait until the engine reaches operating temperature. The fact is that the Nissan variator is heated directly from the running engine until the car starts moving. This method will be convenient for owners of cars with automatic start installed, since there are no problems with spending additional time.
If the temperature regularly drops below -10, it is better to install a pre-heater
The third method is considered the most rational and correct among experts. The correct approach is to comprehensively warm up the car, which involves using the parking temperature while driving.
CVT warm-up data depending on temperature
- 0 and above – no warming up required;
- 0 – 5 – for 3-4 minutes in a moving vehicle;
- 5 – 10 – about five minutes both when parked and in motion;
- 10 – 15 – within 5 to 10 minutes without moving and from 10 to 15 minutes after starting the car;
- 15 – 23 – warming up the engine in the parking lot for 10-15 minutes, followed by a temperature increase while driving for 15-20 minutes;
- 23 – 30 – from 15 to 20 and from 20 to 30 minutes, respectively, when parked and in motion;
- 30 – 35 – CVT operation is carried out only when necessary, with pre-warming in the parking lot for half an hour and a further increase in temperature after starting from a standstill for forty minutes;
- less than 35 – operation is not recommended.
Disassembled variator
In Finland, an alternative method of warming up the Nissan variator is used. For this purpose, the unit is equipped with electric heating, which is connected directly from the mains through a standard plug. The temperature is set automatically, while maintaining operating parameters. These Nissan car models are distinguished by characteristic slots on the bumper.
Required parameters for oil in the Nissan X-Trail variator
The main task that owners of cars with a CVT transmission face is the timely replacement of lubricating fluids. By the way, delaying the necessary procedure can negatively affect the operation of the checkpoint. An increase in temperature on the surface of the working cones promotes the formation of a film that prevents the belt from slipping.
Some manufacturers do not recommend changing the oil in the variator, since officially the oil lubricant from the manufacturer is filled in for the entire operational life of the vehicle, however, this option is not always the best, especially if the car is operated in difficult conditions.
In addition, manufacturers still advise checking the quality characteristics of the poured oil, and if they do not meet the standards for color, transparency or odor, it is recommended to change the fluid to a new one.
The most acceptable option for the X-Trail T31 is to change the oil every 20-30 thousand kilometers. After some simple calculations, you can find out that the oil fluid should be replaced on average once every 3 years.
An independent oil change must be carried out on a heated CVT gearbox, since an increase in temperature helps to reduce the viscosity of the composition - due to this, it drains faster. In order to warm up the gearbox, it will be enough to make a short trip, after which you can proceed directly to changing the oil lubricant.
What kind of oil is in the Nissan X-Trail variator?
In addition to regulating the period for changing the substance, the operating book also contains information about the substances themselves, which the manufacturer recommends for changing the oil in the Nissan X Trail t31 variator. These oils have passed certification and production tests for compatibility with this unit. However, the owner can independently select the appropriate liquid in accordance with his preferences. In this case, it is necessary to focus on the modern ATF-IV standard; only substances in this segment will allow long-term and reliable protection of the unit from the harmful effects of loads during long runs. In addition, there are 3 main types of transmissions on the market that are used when changing the substance in the variator housing:
- Mineral substances, due to their archaic design, are the least popular among car owners. Due to their composition and manufacturing method, they do not contain modern additives that would help maintain the unit in its original condition. The only significant advantage, in addition to the low cost of these materials, is their low fluidity and, accordingly, the low probability of oil squeezing out through the seals at low temperatures. Sometimes such a substance is poured in conditions of constant low temperatures, but this is categorically not recommended by the manufacturer.
- Semi-synthetics - such a product is already the result of adding a certain amount of modern chemical additives to the composition of mineral substances. Such products are more popular among owners due to their relatively good washing properties. Semi-synthetics are most often used when filling boxes with high mileage, as they also have low fluidity, which consequently reduces the likelihood of substance loss through microcracks and wear of box gaskets. In addition, in comparison with the most modern competitors, the cost of such a substance is low.
- Synthetics are the most modern material, which is made almost exclusively from additives. According to its characteristics, it is most suitable for use as the main replacement fluid. It significantly surpasses its competitors in its cooling, washing and protective properties. However, it is also the most expensive product in terms of its cost. In addition, it is synthetic oil that is most often counterfeited by unscrupulous manufacturers.
Step-by-step instruction
- We drive the Nissan X Trail T31, turn it off and take all the necessary precautions: activate the handbrake, install wheel chocks under the rear wheels.
- Use a wheel wrench to remove the wheel nuts of the front left wheel and jack up the car until there is a gap between the wheel and the ground. We remove the wheel. We put it under the left threshold as insurance in case of absence of racks.
- We dismantle the fender liner, which is held on by several plastic pistons and one bolt. The caps are reusable, remove them carefully. You can do without completely removing the fender liner. It is enough to bend the part from the bumper to the middle of the wing. This will be enough for unhindered access to the oil separator. All this is necessary when replacing the fine filter.
- Changing the oil in the variator is not possible without removing the engine protection. We go down into the pit and dismantle the engine protection, of which there may be two. First of all, remove the plastic one. It is held on by several plastic clips. Next, remove the metal protection, paying attention to the following recommendation.
The total oil volume in the Nissan X Trail T31 box is 7.5 liters. The volume of the canister with the original oil is 4 liters (Nissan¬ Kle5200004 EU).
Good analogues include Ravenol oil (4014835719392). Fill about 6 liters of fresh lubricant through the dipstick hole. Then we bring it to normal in small portions, monitoring the level with a dipstick.
Once the required amount of lubricant has been achieved, start the car and switch the gearbox selector alternately to all positions. We turn off the car and check the level. If necessary, add or pump out oil using a technical syringe.
How to spot a fake
Often the buyer is offered counterfeit products. Using a counterfeit can be costly for the owner, since the counterfeit does not contain the necessary components and does not meet the specifications established for the transmission fluid.
A counterfeit can be identified by the following differences from the original product:
the shape and quality of the canister;
production of the main label - in the original it is fused into the outer wall of the container, but in the counterfeit it is simply pasted on;
the peculiarities of the information sticker on the back of the canister - it is made with a spine for reversal, freely unfolding and smoothed back (not sticking, but as if magnetized). The background for the font should not be gray, but white;
the execution of the lid - check for the presence of small breakdowns (traces from twisting on the conveyor);
the presence of an erasable code on the back of the canister, with the ability to check on the manufacturer’s official website.
Also, the buyer should be wary of the low price, which is 20 percent or more lower than the market average. To avoid counterfeiting, you need to buy oil from trusted suppliers.
We invite you to watch a video review of the differences between counterfeit and original Nissan oils.