January 23, 2019 Lada.Online 36,961 1
Lada Granta, Lada Kalina and Lada Priora are budget cars, so they do not have all the comfort options. For example, in the interior of these models there is no second lamp for rear passengers. However, you can install the ceiling lamp for the rear row with your own hands. Let's talk about all the features of this modification.
Replacing the grant interior lamp
As all owners of the Lada Granta in the “Standard” and “Norma” trim levels know, standard interior lighting is extremely scarce. There is only one courtesy lamp, it is located in the driver and front passenger area, and in addition, it has one very dim lamp, which is barely enough for the front passengers, and is completely lacking for the rear passengers. This situation did not suit me, as a result of which I decided to replace the standard lampshade with a more advanced one. The Lada Kalina “Lux” lamp was chosen as an alternative. This lampshade is similar in size and seating to the standard Granta lampshade, but has additional lighting sections. However, in its electrical part the lampshade is only partially compatible with Granta. The main contact lines are the same, but the shape of the connector and its pinout are different. Another problem is the low brightness of the standard lamp lighting technology. These shortcomings prompted me to lightly upgrade the lampshade before installing it.
Article on the topic: Air got into the Kalina cooling system
At the preparatory stage, incandescent lamps were replaced with bright diodes, as well as the connector was modernized for compatibility with the standard Granta wiring. Factory diodes were used, on plates, already with soldered resistances, designed for 12V power supply. Connection to standard locations was made using the included adapters for various sockets. After replacing the diodes, we begin to work with the connector.
First, we determine which wire is responsible for what. If your connector looks the same, there is a 95% chance that the red wire will be a common plus, the black wire will be a minus of the satellite lamps, as well as a minus of the central section when the mode selector is switched to constant light mode. The green wire will be the minus of the central section when the mode selector is switched to glow mode when the doors are opened. Next, we completely disassemble the connector. To do this, take a long time and carefully break the plastic part so as not to touch the tongues of the contact plates. These plates are wider than Grant's sockets and will not fit into them. To solve this problem, I took contact plates from old radio equipment, of a suitable size, and soldered them to the plates of the Kalinovsky lampshade.
How to make interior light with your own hands, detailed instructions.
Many owners of a modern Lada are not satisfied with the lighting in the car's interior. In this regard, there is a need to modernize the lighting yourself. We'll tell you how to independently improve visibility in the vehicle interior.
Independent tuning of the Lada interior is quite common. Most vehicle owners strive to increase interior comfort and improve the appearance of the interior with their own hands. First of all, most car enthusiasts improve interior lighting. The desired result can be achieved by installing LED lighting for the Lada Granta interior. LED tuning is quite easy to do with your own hands, while significantly increasing the visibility of the interior and making the Granta’s interior more attractive.
Installation of LED strip
Before installing footwell lights in a car with your own hands, you should decide where you will attach the tape itself.
To illuminate the footwell area, it can be installed below the seats, along the perimeter of the lower part of the front seats, under the instrument panel and under the glove compartment. It all depends on your imagination. Remember, when choosing a place for installation, you should take into account that the installed lighting should be directed towards the floor.
After choosing a location, measure and cut a piece of tape of the required size. Do not forget that it may not be cut in all places. Cut only in areas where solder contacts are located. Therefore, having measured what length you need, it is better to take a little less than vice versa, so that later there is no sagging during fastening.
After cutting, solder a wire to the edges of the tape and try to connect it to a power source. If it works, isolate the solder joints. To do this, put a heat-shrinkable tube over the joint, heat it with a soldering iron or even with a lighter. After insulation, attach the tape to the selected location using an adhesive layer, glue, or even regular silicone ties.
How to make interior light with your own hands, detailed instructions.
Many owners of a modern Lada are not satisfied with the lighting in the car's interior. In this regard, there is a need to modernize the lighting yourself. We'll tell you how to independently improve visibility in the vehicle interior.
Independent tuning of the Lada interior is quite common. Most vehicle owners strive to increase interior comfort and improve the appearance of the interior with their own hands. First of all, most car enthusiasts improve interior lighting. The desired result can be achieved by installing LED lighting for the Lada Granta interior. LED tuning is quite easy to do with your own hands, while significantly increasing the visibility of the interior and making the Granta’s interior more attractive.
Connection
All the necessary contacts for connecting an additional lamp are in the front lamp. To install the wires, it is not at all necessary to remove the roof trim; just bend it slightly from the edge or move it slightly out of the door seal.
Article on the topic: What happens if you fill with 92 instead of 95
Lada Priora front lamp diagram:
- far left (red) – “mass”
- central (white) – +12V
- far right (black) – ground (door switches)
Diagram of the front lamp of Lada Granta (pre-style) and Lada Kalina:
- far left (black) – “mass”
- central (green) – “ground” (door switches)
- far right (red) – +12V
Diagram of the front lamp with ERA-GLONASS for Lada Granta FL:
- 11 and 14 – +12V appears after turning on the main relay (turning on the ignition, opening the doors). The power goes out 2-5 minutes after removing the ignition key.
- 15 – “mass”.
- 17 – “ground” (door limit switches), which appears for a while when the doors are opened.
The result of such a connection in the video:
Attention!
Wire colors may vary depending on vehicle equipment. Focus on the contact numbers and check the wiring with a multimeter.
Causes of breakdowns and methods for eliminating them
Despite the simplicity of the interior lighting circuit, sometimes malfunctions occur, leading to malfunctions or complete failure of the lighting devices. The most common problem is that the light in the Kalina’s cabin does not turn on. The reason may be burnt out light bulbs and fuses, replacing which is not difficult.
The lights do not light up when the doors are opened due to wear on the cam washers. Some car enthusiasts try to reduce the stroke of the locking mechanism by moving the pusher mounted on the car body in the door opening. Sometimes this helps eliminate the problem, but when the pusher moves, the tightness of the door to the seal worsens. This breaks the seal and allows dirt and water to get into the seal.
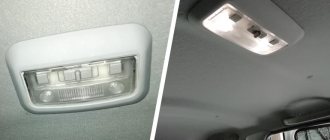
Interior lighting Lada Granta
The interior lighting of the Lada Granta may not suit the car owner for a number of reasons, for example, dim light or the design is not to one’s taste. In this case, you can do something drastic and replace the Granta interior lamp with a Kalinovsky one .
The Kalinovsky interior lighting lamp has catalog number 1118-3714010. To complete the work you will need: female terminals (3 pcs), pliers, heat shrink tubing and a Phillips screwdriver.
Depending on the configuration of the Lada Granta, different types of lighting lamps are installed in the car interior. Read the instructions in case you need to modify or replace the Granta's interior lighting .
Article on the topic: Lada Vesta station wagon release date and price
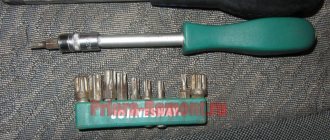
Tools required: flathead and Phillips screwdrivers. Before starting work, disconnect the negative cable from the battery.
Replacing a single interior lamp
1. Pry off the lampshade with a flat screwdriver.
2. Remove the interior lamp from the housing.
3. Disconnect the wires by squeezing the block.
1. Remove the two screws securing the interior lamp housing.
3. Installation of the Granta interior light is carried out in the reverse order.
Replacing the interior lamp with separate lighting
1. Press the plastic lock on the interior lighting unit cover.
2. Remove the lamp cover.
3. Remove two fastening screws.
4. Disconnect the connectors from the wires and remove the lamp housing.
To disassemble the lampshade, you should:
1. Disconnect the terminals with wires from the terminals of the faulty switch.
2. Press the plastic latches of the switch.
3. Remove the fasteners from the housing.
Assembling the interior lighting lamp is carried out in the reverse order.
Connection and installation of the Kalina interior lamp in Grantu
We remove the Grant interior lamp and cut off the connector. The pinout of the wires is as follows:
· White with red is a common plus.
· Black—constant mass.
· Brown and green - mass from limit switches.
Pinout of wires from the Kalina interior lamp:
· Black is a permanent minus.
· Green - mass from limit switches.
We crimp the terminals and put on the heat shrink tube. We connect according to the following diagram:
· We connect white and red to red from the lampshade.
· Brown with green to green.
· Black with black.
Article on the topic: LED running lights in dimensions
We install the Kalina interior lighting lamp in place and check its operation.
Installation of LEDs in the interior lamp of Kalina
You can’t just replace lamps with LEDs, because the polarity is wrong. In order for everything to work out, you only need a relay for closing and a block for it. We connect two more to the white-red wire (we connect one to the relay winding, the other to one of the terminals). Take a brown and green wire and cut off a piece of wire with a terminal. We connect this piece to the second contact of the relay, and the wire itself to the free contact of the winding. The relay can be placed between the roof and the interior trim. We connect it all to the lampshade like this:
· White with red - to black in the lampshade.
· Brown with green - to green.
· Black to red.
If you do, try to do it in the lampshade so as not to cut the wires to the block.
Refinement of the interior lighting lamp Grants
Front interior lamp in Lada Granta
The lighting is not bright enough; reading in such lighting is not comfortable. Let's look at how easy it is to make a small tuning of the interior lamp, the lighting of which will be several times brighter.
The easiest way to modify the interior light in Grant is to replace the lamp with an LED one. However, this will not make the lampshade shine any brighter, if only by a little bit. In order not to resort to alterations and increase the brightness of the flashlight many times over, it is enough to find LED modules (ELF 5SMD, 12V, IP67). They are an assembly of several super-bright diodes, and are used to illuminate advertising boxes and three-dimensional letters (91r/piece).
Installing LED modules in the Granta interior lamp does not cause any problems. We remove the lampshade, then insert the modules into its side sections, sliding them under the legs of the standard light bulb. In the middle section you will have to trim the plastic ear clips a little. There is no need to glue, solder or drill anything.
Connecting LED modules is also simple. We wind the power wire around the contacts of the light bulb. As a result, the consumption of each module of four diodes is about 0.5 watts. The light output from the entire lampshade is like that of a powerful energy-saving light bulb. Everything is simple, effective and inexpensive.
Article on the topic: Priora fuel pump relay does not work
Installation of an additional lampshade from Priora in the interior of the Lada Granta
I've been wanting to do this for a long time... I couldn't find the frame for the Priora lamp. I wanted to order it on the Internet for 900 rubles, but decided that it was expensive. And recently I went to the store, asked for this frame, and they gave it to me for only 180 rubles. I used the standard lamp, I already had it, because... I put a viburnum in front. I set the lamp to 10 watts - it shines normally, just what I need. I advise everyone to install it. I took the power from the main lampshade. I cut the ceiling with a utility knife.
cut a hole in the ceiling, right under the stiffener, stretch a three-core wire from the central lamp
screw the frame from the Priora... using self-tapping screws to the roof reinforcement, carefully so as not to pierce the roof right through
connect the wires to the lampshade and insert it into the frame
https://club-lada.rf/tuning-granta/tuning-granta-interier/291-ustanovka-plafona-salona-kalina-granta.html, https://club-lada.rf/granta-remont/308- snyatie-plafona-salona-granta.html, https://club-lada.rf/tuning-granta/tuning-granta-interier/285-dorabotka-plafona-salona-granta.html, https://www.drive2. ru/l/8166007/
How to make interior light with your own hands, detailed instructions.
Many owners of a modern Lada are not satisfied with the lighting in the car's interior. In this regard, there is a need to modernize the lighting yourself. We'll tell you how to independently improve visibility in the vehicle interior.
Independent tuning of the Lada interior is quite common. Most vehicle owners strive to increase interior comfort and improve the appearance of the interior with their own hands. First of all, most car enthusiasts improve interior lighting. The desired result can be achieved by installing LED lighting for the Lada Granta interior. LED tuning is quite easy to do with your own hands, while significantly increasing the visibility of the interior and making the Granta’s interior more attractive.
Features of interior lighting fixtures
In the minimum configuration, Kalina's interior lighting is represented by one lamp located on the ceiling in the front of the car. It gives a soft yellow light, but according to car enthusiasts, it is not enough.
More equipped versions have two built-in lamps: one in front, the second above the rear seat. Lighting in luxury versions has been improved: some halogen lamps have been replaced with LED lamps.
The front courtesy light in the Kalina's cabin, located above the rearview mirror, has a control unit. It consists of a right lamp for individual lighting, activated by a key, a left lamp, activated by a key, a lamp and a three-position switch that determines the interior lighting mode. When the switch is set to the far left position, the lamp lights up continuously until it is turned off. In the middle position of the three-way switch, the lamp is de-energized, and when switched to the extreme right position, the light automatically turns on when any of the car doors is opened and turns off when all doors are closed with the ignition on.
Installation
- We choose a place to mount the lampshade in the rear of the car. We find the stiffener by pressing on the ceiling trim. For convenience, you can make a fastening template from masking tape, which we paste onto the ceiling trim in the place where the lampshade will be placed.
- We make a hole in the ceiling trim according to the template using a utility knife.
- We make holes in the stiffener with a drill and secure the lamp frame with screws.
- Snap the lampshade into the frame.