Lada Granta, Lada Kalina and Lada Priora are budget cars, so they do not have all the comfort options. For example, in the interior of these models there is no second lamp for rear passengers. However, you can install the ceiling lamp for the rear row with your own hands. Let's talk about all the features of this modification.
Features of interior lighting fixtures
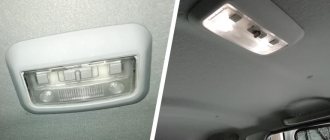
In the minimum configuration, Kalina's interior lighting is represented by one lamp located on the ceiling in the front of the car. It gives a soft yellow light, but according to car enthusiasts, it is not enough.
More equipped versions have two built-in lamps: one in front, the second above the rear seat. Lighting in luxury versions has been improved: some halogen lamps have been replaced with LED lamps.
The front courtesy light in the Kalina's cabin, located above the rearview mirror, has a control unit. It consists of a right lamp for individual lighting, activated by a key, a left lamp, activated by a key, a lamp and a three-position switch that determines the interior lighting mode. When the switch is set to the far left position, the lamp lights up continuously until it is turned off. In the middle position of the three-way switch, the lamp is de-energized, and when switched to the extreme right position, the light automatically turns on when any of the car doors is opened and turns off when all doors are closed with the ignition on.
Required
Lamp lighting, for example:
- from Lada Priora Luxe (catalog number: 21700-3714010-01) together with mounting frame (21700-3714014-01);
- from Sable or GAZelle (CA 453.0031);
- lamp from a foreign car (for example, with this number: 3b0947291);
- any other of your choice.
You will also need several meters of wires.
Where can I buy
: in our online store (category Interior lighting).
Causes of breakdowns and methods for eliminating them
Despite the simplicity of the interior lighting circuit, sometimes malfunctions occur, leading to malfunctions or complete failure of the lighting devices. The most common problem is that the light in the Kalina’s cabin does not turn on. The reason may be burnt out light bulbs and fuses, replacing which is not difficult.
The lights do not light up when the doors are opened due to wear on the cam washers. Some car enthusiasts try to reduce the stroke of the locking mechanism by moving the pusher mounted on the car body in the door opening. Sometimes this helps eliminate the problem, but when the pusher moves, the tightness of the door to the seal worsens. This breaks the seal and allows dirt and water to get into the seal.
Other section materials
| Lada Kalina with 1.4 engines |
| Description of design |
| VEHICLE SPECIFICATIONS |
| CAR DETAILS |
| SAFETY DURING MAINTENANCE AND REPAIR |
| KEYS TO THE CAR |
| FRONT AND REAR DOORS |
| HOOD |
| TRUNK LID |
| FUEL FILLER PLUG |
| SEATS |
| SEAT BELTS |
| REAR VIEW MIRRORS |
| INTERIOR LIGHTING LIGHT |
| LOCATION OF CONTROLS AND INSTRUMENTS |
| IGNITION SWITCH (LOCK) |
| INSTRUMENT CLUSTER |
| STEERING WHEEL ADJUSTMENT KNOB |
| STEERING SWITCHES |
| HEADLAMP CONTROL UNIT |
| VENTILATION AND HEATING SYSTEM CONTROL UNIT |
| LOCATION OF THE MAIN VEHICLE UNITS |
| CHECKING THE CAR BEFORE DEPARTURE |
| MAINTENANCE REGULATIONS |
| CHECKING THE CONDITION OF WHEELS AND TIRES, REPLACING THE WHEEL |
| ADDING FLUID INTO THE WINDSCREEN WASHER RESERVOIR |
| REPLACING THE WINDSCREEN WIPER BLADES |
| CHECKING THE OIL LEVEL IN THE ENGINE PAN |
| CHANGING ENGINE OIL AND OIL FILTER |
| CHECKING COOLANT LEVEL AND REPLACING COOLANT |
| CHECKING THE LEVEL AND CHANGING THE OIL IN THE TRANSMISSION |
| CHECKING THE BRAKE HYDRAULIC FLUID LEVEL |
| BLEEDING THE HYDRAULIC BRAKE DRIVE |
| ADJUSTING THERMAL CLEARANCES IN THE ENGINE VALVE MECHANISM |
| CHECKING THE CONDITION AND REPLACING THE GENERATOR DRIVE BELT |
| CHECKING THE CONDITION AND REPLACING THE TIMING BELT |
| CHECKING THE CONDITION AND REPLACING SPARK PLUGS |
| REPLACING THE FUEL FILTER |
| REPLACING THE AIR FILTER ELEMENT |
| REPLACING THE FILTER ELEMENT OF THE VENTILATION AND HEATING SYSTEM |
| Kalina. Increased oil consumption (more than 500 g per 1000 km) |
| Checking the condition of the brake system |
| Battery faults |
| The low battery indicator light is on |
| The vehicle's on-board voltage is higher than 15.1 V |
| The low battery indicator does not light up |
| Headlights and headlights do not light up |
| The wiper motor does not work |
| The wiper motor does not operate intermittently |
| The brushes stop in any position |
Instructions for replacing lamps
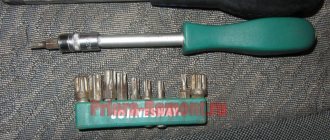
Replacing the light bulbs in Kalina's lampshade is easy. To do this, you will need two screwdrivers: one – flat, the second – Phillips. The procedure looks like this:
- Remove the lampshade glass. To do this, you need to insert a flat-head screwdriver into the grooves on the glass of the lampshade and carefully open the glass, which opens access to the interior lighting lamps.
- Replace light bulbs.
- If you need to remove the lighting unit with control buttons, insert a flat-head screwdriver into the groove of the unit on the driver's side and press the tool. The plastic cover will come off easily, so it is better to hold it with your free hand. This will give you access to the screws securing the unit to the roof sheathing.
- By unscrewing the two screws with a Phillips screwdriver, you can remove the lighting unit by pulling it towards you with a little force.
- To completely dismantle the device, you must disconnect the electrical connector.
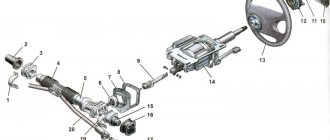
Removing the car dashboard
To dismantle the torpedo you will need the following tools:
In addition, you will need a bit of patience and accuracy when performing the work.
- First you need to bend the rubber seals of the front doors from the A-pillars.
- After this, you need to remove the plastic covers of the front pillars. Each of them is held on by 3 clips. Use a slotted screwdriver as leverage.
- Next, you need to unscrew the screws securing the upper front (in the direction of travel) panel trim. There are 2 of them: one on the right, the other on the left, both are located near the racks.
- After this, you need to remove the upper front trim by carefully pulling it towards you. It is secured not only with self-tapping screws, but also with clips at the front. When removing the panel, try not to lose them.
- Then you need to unscrew all the screws and remove the trim on the side air ducts.
- First you need to remove the ashtray. To do this, just pull it all the way back (in the direction of travel of the car) and unscrew the 4 screws that secure it to the console.
- Then you need to pry with a screwdriver and pull out the plugs located to the right and left of the alarm button.
- After this, you need to unscrew the 2 screws located under the plugs and securing the center console from below.
- Now you should carefully pull the console towards you and disconnect all the wiring from it, having previously marked with a marker what is attached where. If you don't have a marker, you can take a picture with your phone of which wires go where.
- After dismantling the center console, you need to unscrew 2 bolts and 5 screws and remove the steering column cover.
- Then you need to unscrew 2 screws and remove the outer trim of the instrument cluster.
- Next, you need to unscrew all the instrument panel mounting nuts from above using a 10 mm wrench.
- After this, you need to tear off the lock washers on which the heater air duct is seated, unscrew the remaining screws securing the dashboard, and remove it by pulling it towards you.
We create interior lighting ourselves
There is not enough light in the interior of the standard Lada Kalina, so most car owners improve their lighting themselves by installing 0.6 W LED lamps instead of 5 W incandescent bulbs.
The most popular LED lamps of the F-3s50f37 brand provide a luminous flux of 80 lumens and have much lower power. A rectifier is built into the lamp design, which protects the product from incorrect polarity connection.
Additional lighting in the Kalina's cabin allows you to create more comfortable conditions, especially at night. It is an LED strip secured with double-sided tape. The device is glued to the bottom of the dashboard and illuminates the floor under the feet of the driver and passenger.
It is more convenient to fix the floor lighting for rear seat passengers on the air ducts. Connecting lighting to the on-board network can be done in several ways. The simplest one is to connect via a toggle switch to the “plus” of the low beam. If it is necessary for the backlight to turn on when the doors are opened, then it should be connected through the door limit switches.
Interior lighting plays an important role. It not only creates a comfortable atmosphere, but also makes driving conditions favorable, reduces driver fatigue and the risk of road accidents. For this reason, additional lighting has become widespread in recent changes to factory models.
The light in the Kalina, to put it mildly, is not very comfortable, rather dim, only one lamp, no lighting under the feet, in the trunk on the left there is one dim lamp. It was decided to fight this.
The following parts were ordered on the Energomash website:
— Board PL 27 lampshade 51.3714
- 1 PC.
— 219.40 rub. — Board PL 57-01 lampshade 51.3714
— 2 pcs.
— 128.40 rub. — LED strip white glow, 20cm, 12 LEDs
— 4 pcs.
— 320.00 rub. — LED strip white glow, 50cm, 30 LEDs
— 1 pc.
— 200.00 rub. — Transportation costs
— 1 pc. — 110.00 rub.
The PL 27 board and 2 57-01 boards are installed in the standard lampshade. Instead of conventional light bulbs, we get LED ones. At the same time, the light becomes much brighter, you can comfortably read something and find a lost item much easier.
How to properly connect an LED strip in a car
You can connect the LEDs in your car to the on-board network or directly to the battery (not advisable, more on that later).
The on-board electrical network of the car does not correspond to the nominal power parameters of the LEDs, since the voltage taken from the battery reaches 14.5 Volts. This is not fatal for LEDs, but it significantly reduces their service life.
The second risk factor for direct connection to the on-board network is significant current drops. Any car has units with significant power draw from the battery - starter, head lighting, air conditioning, electric power steering. They consume hundreds of watts, and currents reach tens of amperes.
You've probably noticed how, when starting the engine, the headlights go out, the radio and on-board computer turn off, and turning on the air conditioner "cuts down" the volume of the music. And this is when the wiring lines are separated through a distribution box and there are current stabilizers in the equipment.
Use stabilizer
Any LED can operate for a long time only in a narrow range of currents and voltages. For example, an SMD 3528 LED element requires 2.8-3.4V and 0.02A for power supply. Thanks to the limiting resistors on the tape itself, they only feel comfortable at a mains voltage of 12V.
To connect the LED strip to the 12V of the car, use a stabilizer; it is connected to the gap in the positive wire from the battery. You can assemble it yourself. Below is a diagram using the example of a voltage stabilizer LM 7812. It has an output voltage of 12V and produces a current of up to 1A. This is an outdated model and requires additional cooling.
More modern switching stabilizers will be a good replacement for outdated analogues. Here are the characteristics of a regular switching stabilizer from Aliexpress:
- Wide range of input voltage (4-36V) and adjustable output (1-36V);
- adjustable output current (0-5A);
- protection against overheating and short circuit;
- a wide range of operating temperatures is declared -40 +80 degrees;
- Conversion efficiency 96%;
- They cost around $3-4 on Ali (220-270 rubles).
Connecting RGB strip
Remember , there is a list of lighting colors that can be used on a car. Violation of the rule entails deprivation of rights, with confiscation of lighting devices. Read below about the legality of installing the backlight.
When connecting an RGB strip, an RGB controller is added to the circuit, which regulates the power of each color LED and allows you to obtain any color. It is connected after the stabilizer, before the RGB strip.
When connecting the diode strip to a car, you should avoid bending it. Any break will lead to a rupture of the conductive coating. If you need a sharp turn, make a break and connect the ends with connectors.
Use connectors
They clamp the contacts tightly and are quite reliable even in conditions of constant vibration. But it is better to fill the places of such connections located outside the car with sealant or hot-melt adhesive. If you had to make additional holes in the machine body to route the LED strip wiring, carefully treat them with an anti-corrosion compound and, if possible, seal them. The connection points of the wires should be covered with heat-shrinkable tubing for reliable insulation.
How to remove the lampshade on Kalina
Removing the lamp cover will not cause you any problems; it can be easily pryed off with a sharp object. To remove the lampshade itself, you will have to unscrew two self-tapping screws.
Carefully pry up the cover of the central lamp and remove it
To remove the ceiling completely, dismantle the ceiling lining
Unscrew the fastening screws and pull out the lampshade
Carry out the collection in reverse order. As a result, after installation we should have a light like this:
How to change the polarity on the interior lamp of a Lada Kalina
You can do this in two ways:
Swapping the + and wires is the easiest way. But the light will not work when the doors are opened.
The second option is more complex and involves replacing everything + that fits the lampshade. We need to replace the + with - on the base lamps, and ! we remake the “-”, which is taken from the body to the central lamp to “+”. Without this manipulation, nothing worked for me personally.
The pinout of the switch remains almost unchanged, with the exception of replacing “-” with “+”
Connection
All the necessary contacts for connecting an additional lamp are in the front lamp. To install the wires, it is not at all necessary to remove the roof trim; just bend it slightly from the edge or move it slightly out of the door seal.
Lada Priora front lamp diagram:
- far left (red) – “mass”
- central (white) – +12V
- far right (black) – ground (door switches)
Diagram of the front lamp of Lada Granta (pre-style) and Lada Kalina:
- far left (black) – “mass”
- central (green) – “ground” (door switches)
- far right (red) – +12V
Diagram of the front lamp with ERA-GLONASS for Lada Granta FL:
- 11 and 14 – +12V appears after turning on the main relay (turning on the ignition, opening the doors). The power goes out 2-5 minutes after removing the ignition key.
- 15 – “mass”.
- 17 – “ground” (door limit switches), which appears for a while when the doors are opened.
The result of such a connection in the video:
Attention!
Wire colors may vary depending on vehicle equipment. Focus on the contact numbers and check the wiring with a multimeter.