The axle shaft seal changes depending on operating conditions, climate, and the quality of the seal itself at different intervals of time and kilometers. You need to monitor the condition of the hubs and rear drums. Even small amounts of oil or oil “fogging” from under the rear-wheel drive oil seal (small droplets) is a symptom of immediate replacement. Replacing an axle seal on rear wheel drive vehicles looks very similar, but not exactly the same. These processes are described below using the example of the right-hand drive oil seal of the VAZ 2101 and VAZ 2123. And then - some information about axle shaft seals, parameters for their replacement, and aspects of choice when purchasing a new oil seal.
Tools and materials
To work you will need:
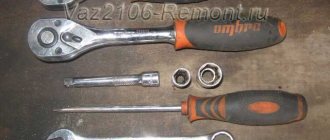
- A set of keys;
- Large flat screwdrivers;
- Massive hammer;
- Jack;
- Wheel locks;
- Mandrel for pressing the drive oil seal.
In addition, of course, you need an axle shaft seal 2101 (or 2123). You may also need an axle bearing. But let’s not rush, if the axle shaft itself has significant runout (more than 0.7 mm) - it also needs to be changed, otherwise it will break both bearings, and the one in the bridge is much more difficult to change. Then it is better to have the axle shaft assembled. Removing the bearing from the axle shaft and then installing a new one is a more complex procedure than replacing the drive seal, but it is better to do the entire described complex once. Defects on the axle shaft can only be done after removal, more on that below.
Signs of a leak through the gearbox seals: what to look for
The main sign that indicates problems is considered to be transmission oil stains after the car has been parked for several hours. At the same time, it is important to make sure that it is the gearbox that is leaking, since there may be engine oil leaks (for example, the oil filter is not secured properly).
Let's move on. If it is definitely established that oil is leaking from the gearbox, you need to stop using the car, start diagnosing and solving the problem in a timely manner. If the malfunction is ignored, the oil level will decrease, which will lead to gearbox wear and transmission breakdowns.
Also, the leak can intensify at any time, as a result of which the box may break unexpectedly. However, in this case, simply replacing the oil seals cannot solve the problem. In other words, the box itself will require removal, troubleshooting and comprehensive repairs. Naturally, the costs of such repairs will be high compared to the costs of replacing only the seals.
Let us also add that in order to avoid such problems, regardless of the condition of the gearbox, you should periodically check the oil level in the gearbox, as well as assess its condition and replace the oil in the gearbox if necessary.
At the same time, you need to pay attention to the appearance of crunching, grinding, and noise when the box is operating. If noises and other signs appear, gears are difficult to engage or do not engage at all, then transmission diagnostics is needed.
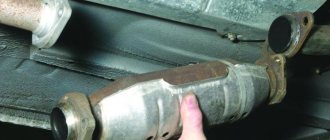
Changing the axle shaft seal 2101
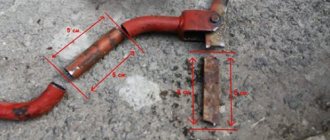
We set the car level. We securely block the wheels. We do not use the handbrake! Otherwise, the brake drum will not be removed. Raise the right wheel and remove it. Next, remove the brake drum; to do this, unscrew its bolts (two), gently tap it on the rim from the inside out through the wooden backing, turning it slightly.
Now you need to jack up the axle shaft from below so that the flange of the right drive is higher - otherwise, when removing the axle shaft, oil will leak out.
When the drum is removed, you can try to remove the drive. There are three ways: a special inertial puller, tapping the flange through a wooden spacer, the “wheel method”. Few people have a puller, and if tapping on the flange fails to dislodge the axle shaft from the support bearing seat, we place the wheel directly on the flange with two bolts on the reverse side. We do not tighten the wheel bolts completely, leaving 2.5-2 cm of thread. Now the wheel needs to be pressed against the flange and pulled strongly towards you, that is, outward relative to the car. Several such impacts from the weight of the wheel will definitely remove the axle shaft.
Having taken out the axle shaft, you need to inspect it for:
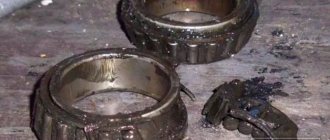
- Is there excess play in the bearing?
- Is there any drive runout?
To determine the runout, you need to put it on a smooth surface and roll it around its axis - the runout will be noticeable. We are solving the issue of replacing the drive assembly with the bearing or just the drive bearing. With some experience, the drive bearing can also be replaced independently, but here you need skill or good mandrels, since both removal and subsequent pressing are complicated by the fact that the ends of the axle shaft are long and it is difficult to position it conveniently for impact.
You can only knock on the inner ring of the bearing. Under no circumstances should you place the drive vertically on the bearing and knock, even through the backing on the tail part of the axle shaft (which goes into the rear axle) - it may move and a runout will appear.
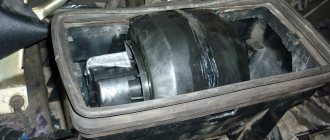
Automatic transmission torque converter design
Hydraulic automatic transmissions and variators are equipped with a torque converter, which acts as a gearbox clutch. People call it a “donut”, and a torque converter is an abbreviation for “hydrodynamic transformer”.
The name of the part speaks for itself about its functions. By pumping oil, it creates torque, which it then transmits to the wheels of the car. To understand how it does this, let's look at its design.
Here's how a torque converter works:
The torque converter oil seal is located on the pump wheel bushing. Thanks to it, the appropriate pressure is maintained inside the gas turbine engine to convert torque.
Attention! As soon as the oil seal dries out, the bushing cannot function normally and breaks. A broken part no longer creates optimal pressure and does not supply oil to the clutches and other rubbing parts.
Write in the comments, did you change the oil seal yourself? Or did you take it to a service center?
Advice
For those who have not removed the bearings from the seat. In general, all bearings are pressed into place at the factory. In garage conditions, there is no press; in addition, equipment (beds, tables with stops, mandrels) is also needed. Therefore, to remove the bearing by blow, you need a very massive hammer. So that the blow is massive at a low speed of movement of the hammer. Even with a strong blow, the bearing cannot be removed with a light hammer - the blow will be elastic.
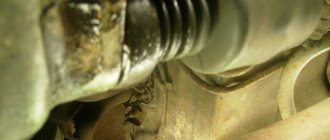
The drive seal is now clearly visible. To remove the oil seal, use a large flat screwdriver point-blank, tapping it diametrically in a circle.
Now be sure to inspect and clean the seat of the right drive oil seal with a rag. If it has holes or corrosion, in addition to cleaning, it is advisable to use a seating lubricant for the new oil seal.
Everything is ready for assembly. We press the axle shaft seal into the seat using a mandrel or head of suitable diameter.
Assembly is carried out in reverse order.
On all “classic” models (VAZ 2101-07), replacing the oil seals of the right and left drives occurs in the same way.
How it works?
The oil seal consists of a rigid (outer) surface that is mounted in a hole. Often the kit includes a metal ring that is hermetically connected to the rubber seal. It fits tightly into the landing niche.
The inner part is softer, it seems to envelop the rotating shaft. The oil seal leaks from the inside of the circle. Manufacturers are constantly looking for compromise:
- hard material is more durable, but does not fit tightly around a rotating object;
- soft, elastic rubber provides excellent sealing, but wears out quickly.
To enhance the girth, a ring spring is often installed on the inner side. If it comes off, the grenade seal will leak.
Changing the axle shaft seal 2123
Replacing the 2123 drive oil seal changes in a similar way, with some differences, since the VAZ 2123 has a slightly different shock absorber mount to the rear axle:
- You will need to unscrew the 4 bolts securing the right rear drive bearing bracket. Then jack up the axle shaft so that its end is slightly higher than the entrance to the rear axle. Then remove the shock absorber mounting bracket from the bearing mounting plate bolts.
- The NIVA has 5 wheel bolts, so to remove the drive using the “wheel method” you will need to screw it onto three bolts, not two.
Otherwise, the procedure for replacing the axle shaft seal 2123 is no different from the process described above for the axle shaft seal 2101, perhaps with the difference that the “NIVA” and “Chevrolet NIVA” are a little higher, which means it will be a little more convenient to work at the bottom.
Article: 21213-2301034, additional articles: 21213-2301034Р
Order code: 003029
- Buy with this product
- show more
- Buy analogues
- Passenger cars / VAZ / VAZ-2120 “Nadezhda”1 drawing
- » href=»/catalog/vaz-3/legkovye_avtomobili-30/vaz_2120__nadejda_-245/reduktor_i_differencial_perednego_mosta-117/#part56643″>Right oil sealFront axle / Front axle gearbox and differential
- Passenger cars / VAZ / VAZ-212131 drawing
Determining a worn oil seal
If the axle shaft was removed for some other purpose, be sure to check the condition of the drive seal. To do this, in addition to the presence of oil leaks, we check:
- The elastic band should be soft and elastic to the touch;
- The cut sliding along the drive has a sharp edge;
- The notches on the rubber part (they will only be visible when the oil seal is removed) are not worn out.
- If the oil seal is “burnt”, that is, it worked with overheating, its sliding edge will be somewhat stiffer than the peripheral part of the rubber. It should only be replaced immediately, even if there is no leak yet.
Consequences of element failure
If the drive seals are not replaced in a timely manner, the following occurs:
- An oil leak occurs.
- Contamination of spare parts located nearby occurs, since the oily coating is a magnet for dust and dirt, which is subsequently difficult to get rid of.
- The oil used in a car is a rather aggressive substance and, when it gets on parts and mechanisms, it significantly reduces their service life.
In other words, timely replacement of the drive oil seal is the price for long-term and high-quality operation of the mechanism.
Selecting a new drive oil seal to replace
Many manufacturers make good, high-quality parts. Three points are important in the oil seal, which can be checked when purchasing:
- Like all oil seals with a metal fit, the metal cage must be made of good material, soft enough, but at the same time, with a high class of processing, otherwise the oil seal will not fit tightly into its seat;
- The quality of the rubber, including the absence of nicks, casting seams, and other visible defects;
- The quality of the articulation of metal and rubber. The thin edge of the transition between the rubber part and the metal part.
All these parameters are very indirect, but still speak about the manufacturing technology of this important part. It is clear that it is difficult to determine the hardness of rubber and its performance properties by eye, but sometimes indirect parameters allow you to compare two parts and choose the best one. Therefore, it is better to look at it carefully before installing it in your car.
| Attention Bearing Buyers Dear customers, send your questions and requests for the purchase of bearings and components by email or call now: Delivery of bearings throughout the Russian Federation and abroad. Bearing catalog on the website |
Attention Bearing Buyers
Dear customers, send your questions and requests for the purchase of bearings and components by email or call now: +7 [email protected] Delivery of bearings in the Russian Federation and abroad. Bearing catalog on the website
themechanic.ru
Design features
Ring elements used to seal rotating mechanisms in various vehicle components are classified depending on the type, design characteristics and scope of application.
View by material
Depending on the material involved in the manufacture, seals (specific buffers) for the drive can be presented:
- butadiene-nitrile cuffs – highly resistant to low temperatures and elastic elements;
- polyacrylic cuffs - heat-resistant elements with increased resistance to petroleum products and ozone;
- silicone cuffs - elements for use in a wide temperature range, but not sufficiently resistant to chemical compounds;
- fluorine-polymer cuffs - elements resistant to chemicals and high temperatures.
The type of oil seal based on the composition of the rubber mixture is selected for specific operating conditions, including aggressive external influences and the temperature range of the working environment.
Presence of edges
The standards provide for the production of different types of sealing cuffs. Today, single-lip oil seals are produced with and without anther. It is the second option with an additional protrusion that prevents dust from entering and liquid leaking out. According to the type of execution, seals can have an edge that is machined and molded.
Item type
Frameless elastic drive seals are represented by a synthetic rubber ring. The inner surface is distinguished by the presence of molded working edges. Single- and double-edge products (front and rear working parts) are considered standard, but some seals are equipped with four edges. Thanks to the coiled and twisted inner spring, a tight connection of the seal with the protected shaft is ensured.
The presence of a special reinforcing belt in the oil seal design gives the sealing collar additional advantages.
Types of reinforced seals:
- closed frame;
- partially exposed frame;
- bare frame.
The frame part can be straight (in the form of a plate rolled into a ring), or have an L-shaped or other complex (in terms of shape) profile.
Shaft rotation
Depending on the type of rotational movements of the shaft, sealing cuffs differ for constant and reverse direction of rotation, which can be determined by the type of notch or knurling applied to the working surface. The oil seals of the first type have shading, which is directed to the right or left side. Reversible cuffs are distinguished by a zigzag or other complex shaped notch.
Protection level
In addition to standard designs, cassette-type cuffs are used as seals. Such buffers are represented by a pair of rings inserted into each other. High resistance to severe mechanical loads and full protection are ensured by reliable support of the outer ring directly into the shaft. The inner ring element tightly presses the outer one and is also partially fixed on the shaft.
Additional items
Drive oil seals of the same size differ significantly not only in properties, but also in the presence of additional elements in the design:
- anther;
- corrugation;
- knurling and notches.
The anthers on the front of the ring are small protrusions responsible for protecting the oil seal from the penetration of large contaminants. The boot is connected to the shaft using a spring method or through the natural elasticity of the element.
Complex and simple corrugation of the outer part makes it easier to fit the seal and makes it more dense, which has a positive effect on protection against fluid leakage at high speeds and operation at high temperatures. The presence of hydrodynamic knurls and notches on the working part of the oil seal has similar properties.
Why does it fail
Consumables don't last forever. The gearbox drive seals work under difficult conditions, being between the external environment, where the contamination comes from, and the box, where the hot liquid moves.
The elements experience heavy loads, suffer from overheating, temperature changes, and dirty transmission fluid. Wear products from automatic transmission clutches move in the ATP flow: the abrasive eats away all elements of the unit, including seals.
The cuffs age at the end of the service life of the spare parts precisely calculated by the manufacturer. The process is accelerated by worn shafts. The sealing layer may lose functionality: then the gearbox seal of the Volkswagen Polo sedan must be replaced.
Wear of the sealing elements progresses as the fastenings of the connecting and protective parts of the gearbox are loosened. The exact cause of early wear of the cuffs is difficult to determine due to limited access to the part.