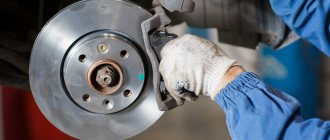
The brake system of the VAZ 2114 car contains a master brake cylinder (GTC). The main task of this unit is to convert force when the driver presses the brake pedal. The brake cylinder is located on the cover of the vacuum booster, and above it is the brake fluid reservoir. Like any other part, the GTZ can be damaged and fail. To replace it, you don’t have to go to a car service; you can do this work yourself.
Symptoms of a faulty master cylinder
Problems that arise with the brakes while traveling are considered critical and must be corrected immediately. The culprit of the malfunction is often the main cylinder, installed in the engine compartment and rigidly connected to the pedal. To find out the cause of the breakdown and repair the unit yourself, you need to know the structure of the brake master cylinder (MBC) and its principle of operation. During the diagnostic process, it is necessary to distinguish and filter out problems with other elements of the system.
Examination
You should make sure that the master cylinder is the culprit for the malfunction of the brake system. This is easy to do; you don’t even have to go to a service center and spend money on it.
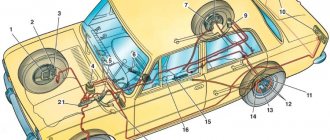
Unit location
- Press the brake pedal with the power unit off.
- Start the engine without taking your foot off the gas pedal.
- During normal operation, the gas turbine engine fails under the influence of vacuum.
- If the pedal does not fail, you will need to conduct more thorough diagnostics and restore the device to functionality.
How does the GTZ function?
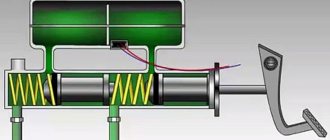
The unit consists of the following parts:
- metal housing with holes for supplying brake fluid, pedal rod and connecting the expansion tank;
- 2 pistons with rubber seals;
- 2 return springs;
- guide bushings;
- end plug with gasket.
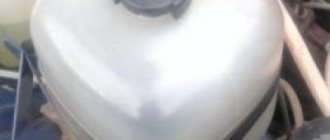
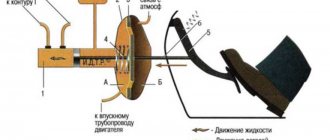
An expansion tank is attached to the top of the main distributor body, where excess fluid goes through compensation holes. Inside, the element is divided into 2 cylinders with separate pistons standing on the same axis.
The blind end of the housing is closed with a threaded plug; on the other side there is a flange for attaching to the vacuum booster. The brake pedal rod is attached to the first piston. The brake circuit pipes are connected to the lower holes - separately for the front and rear wheels.
The operating principle of the master brake cylinder looks like this:
- When you press the pedal, both pistons simultaneously move forward and push fluid into the circuit tubes. Under its pressure, the wheel cylinders are activated, compressing the pads on the discs.
- Part of the liquid that does not have time to pass into the tubes flows into the expansion tank through special bypass holes.
- When the driver releases the pedal, the springs push the pistons back, returning them to their original position. Liquid from the tubes and reservoir refills the cylinders.
- To compensate for the expansion of the liquid (for example, from heating), another pair of holes is provided leading to the expansion tank.
Note. The GTZ acts in conjunction with a vacuum booster (not shown in the diagram), which helps put pressure on the pistons. This allows the system to respond faster and make the driver's actions easier.
Symptoms of problems
The general technical condition of the car (including the brake system) can be checked using a personal diagnostic adapter - a car scanner. These types of devices are widespread and have a wide price range. We would like to draw your attention to the budget model of Korean production Scan Tool Pro Black Edition.
At a cost of about 2 thousand rubles. This scanner is capable of fully diagnosing your car (engine, gearbox, transmission, abs, srs and much more), which will pay for itself in 1-2 trips to the service station. The adapter is quite easy to use, has Russian-language software and is compatible with most cars produced in 1993. The device will also be useful when buying a used car, as it can show its real mileage and VIN.
The fluid brake system consists of many parts that can become unusable: pipes, wheel cylinders, calipers, drums and pads. Typical signs of a faulty master cylinder:
- After pressing the pedal, the car stops slowly. The reason is that the cuffs of one or two pistons have lost their tightness - they have cracked or “floated”.
- To slow down, you need to press the brake pedal hard. The phenomenon occurs due to swelling of the rubber of the piston seals.
- The brake pedal travel is too short. The fluid inside the cylinder has nowhere to go because the compensation hole is clogged. Another option is that the passage is blocked by a swollen rubber seal.
- A common symptom is pedal failure, the brakes coming on at the end of the stroke. This indicates complete wear of the cuffs; as a result, liquid penetrates behind the piston and rushes into the expansion tank - the cylinder “bypasses.”
- The pads do not release the brake discs and drums and get very hot when driving. Options: one of the pistons is jammed or the bypass hole is clogged.
The listed symptoms of a GTZ malfunction are similar to malfunctions of other elements. Pedal failure also occurs when a large amount of air enters the tubes or loss of fluid in one of the working cylinders. Sluggish deceleration and increased force on the pedal are often caused by a breakdown of the vacuum booster - a cracked membrane or a lack of tightness at the joints of the hose that takes off engine vacuum.
There are signs that clearly indicate the performance of the main hydraulic cylinder and the malfunction of other elements:
- during braking, the car pulls to the side - the problem lies in a certain circuit or wheel;
- jamming of the brake mechanisms of one wheel;
- creaking and squeaking when braking;
- heating the discs and pads on one wheel.
If you eliminate these symptoms, it will become easier to check the brake master cylinder in a garage. This also includes obvious brake fluid leaks and the knocking sound of worn calipers.
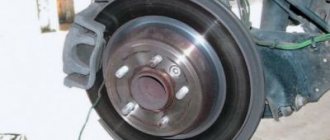
Vulnerable spots of the car
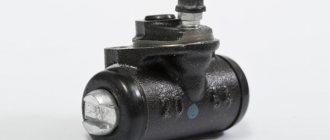
The brake cylinder (TC) is leaking. To find it, you need to remove the wheels and inspect the front discs for leaks from the caliper; on the rear wheels you also need to remove the drum. Most often, the rear TC fails due to poor-quality rubber seals. And such problems, as a rule, begin in cold weather (How to replace the rear brake cylinder?).
The main cylinder of the brake unit (GTC) has leaked. It is necessary to conduct an external inspection to look for smudges. Most often, the GTZ leaks precisely because of the rubber seal closest to the vacuum booster. The fuel fluid from the GTZ flows onto the gearbox, then flows onto the left CV joint. But it may also be that the GTZ flows into the vacuum chamber without external leaks. This can only be discovered by removing the GTZ.
The brake hose is leaking/falling off. Again, the malfunction is determined by visual inspection for the presence of smudges. The hose could fly off the caliper itself, leak at the joints, or burst.
Therefore, first, evaluate the condition of the pipes and cylinders on the calipers, and then proceed to the main one.
If you find a malfunction, carry out repair work and replace parts if necessary. Then be sure to bleed the brakes, as there will be air in the system. Also, do not forget that brake fluid is hygroscopic and requires regular replacement (How often do you change brake fluid?).
Source
Diagnostics and repair
From the signs listed above, it is easy to understand that in most cases there is only one source of problems - rubber products that have become unusable. The cuffs crack and swell, as a result they leak liquid and close the discharge holes. Hence the recommendation: all “rubber bands” of the brake system should be changed at intervals of approximately 100 thousand km, without waiting for critical wear.
Reference. Many auto mechanics express the opinion that after replacing the cuffs, the main hydraulic cylinder will not last long. The statement is true if the car owner purchased cheap, low-quality spare parts or installed new o-rings in the cylinder, where internal wear has formed in the walls.
Before checking the GTZ for operability, make sure there are no other faults:
- Inspect the wheel assemblies from the inside for leakage of brake fluid from the working cylinders.
- Check the integrity of the expansion tank and the fluid level in it.
- Start the engine and at idle speed, press the vacuum take-off pipe to the amplifier. If the engine speed has increased noticeably, there is an air leak and the master cylinder is most likely working.
A clear symptom indicating a breakdown of the main hydraulic cylinder is drops of brake fluid on the body . If you discover a leak, feel free to dismantle the unit and disassemble it to look for the cause. Another common problem - fluid flowing through the seals - is diagnosed as follows:
- Open the cover of the expansion tank and place an assistant in the driver's seat.
- Listening to sounds in the tank, give the command to an assistant to press the pedal.
- If the pedal moves easily and gurgling is heard in the reservoir, liquid is entering there. The reason is that worn cuffs are unable to create pressure in the circuits; liquid seeps through the leaks and enters the container.
Also, problems with the GTZ are indicated by jamming or too little pedal travel.
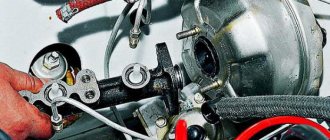
Sit behind the wheel, press it several times, and start the engine while holding the pedal with your foot. If it sinks to the floor or does not budge, disassemble the hydraulic cylinder. To replace or repair the master brake cylinder, you need to remove the unit from the vehicle. Work is carried out in the following order:
- Suck out the liquid from the tank with a syringe. If the cuffs are leaking, press the pedal several times and suck out the excess fluid.
- Remove the expansion tank.
- It is not necessary to drain all brake circuits. Substituting a small container, unscrew the nut of the first tube and carefully move it to the side, plugging it with a wooden stick.
- Repeat the operation with the second tube, unscrew the fastening of the GTZ flange and remove the unit.
Further actions depend on the design of the master cylinder. If the element is completely disassembled, change the rubber seals. Otherwise, you will have to replace the pistons assemblies. Pre-wash the body and all openings with alcohol; do not use gasoline. After assembly, add fluid and bleed the brake system to remove air.
Source
Installing new pads
In order to install the stops, it is necessary to place the piston in the area of the brake cylinder.
Here it is important to balance your strength and not overdo it, because this work is hard, requiring not only effort, but also caution, since the part is made of aluminum, which, as is known, is not very strong
The second step is to install the pads in the caliper. The caliper itself is installed in its place and secured with a bolt. Installation of parts is carried out in the reverse order of dismantling.
The job is done, all that remains is to put on the wheel.
For an experienced motorist, replacing pads is not a complicated procedure that takes a little more than fifteen minutes. It is necessary because the pads primarily affect the safety of the car, because they are directly connected to the braking system.
Therefore, you should not neglect this type of repair work; it is better to spend some time in the garage and a certain amount of money on buying new parts than to suffer more serious losses in an accident, which is what worn pads lead to.
We wish you good luck and a bon voyage!
The brake system worked well, but still not perfect. I was especially infuriated by the beating of the pedal when I pressed the brake in the middle, and I wanted to carry out preventative measures: replace the fluid, replace the vacuum seal, bleed it.
I didn’t choose wheels for a long time, I couldn’t financially cope with the transition to R14, so the stock is from Autoreal (cost: 1200 rubles per pair)
The process of replacing discs is generally simple; all difficulties arise from stuck bolts and the discs themselves to the hub. You can change in one helmet, no assistants are required, if only to save you from boredom.
As usual, we place the wheelbarrow on the platform, do not forget to provide a reliable support for the car, so that during the work it does not fall on our heads! We remove the wheel, for easy access to the bolts we turn the caliper towards ourselves. We unscrew the two bolts securing the caliper, move it to the side, securing it or placing it on some kind of support so that it does not hang on the hose.
Then unscrew the caliper bracket from the steering knuckle and remove it, thereby freeing the brake disc.
All that remains is to unscrew the last two studs, and you can begin to knock down the brake disc. This activity is very interesting. Here, depending on your luck, it happens that the discs come off after just a couple of hits, and sometimes you have to suffer because the discs are no longer needed. I hit the work surface, naturally it was all chipped. If the disc is needed, we hit it on the inside of it, using the pointed bit. It is more convenient to perform this procedure from the pit. I cleaned the disk landing area with a metal brush. As you can see in the photo, there is paint and dirt, and WD40 was poured in generously.
Before assembly, I started painting work, I didn’t bother too much, I sanded the discs lightly, but I had to tinker with the calipers and brackets a little longer, I didn’t sand them to perfection. I didn’t want the usual color, I was already pretty tired of red and silver, and since there isn’t much choice in the village, I took the paint: Auto enamel 1K repair, alkyd, Adriatic color 425, I’ve already driven more than 5 thousand km, the paint is spot on))
In order to seat the new disk evenly, I tightened all the wheel mounting bolts and began to gradually tighten it with a cross, the disk sat smoothly, without distortions...
Everything else is in reverse order. And don’t forget to bleed the brakes, this is where you will need an assistant. There are plenty of pumping methods on the Internet and I don’t see the point in describing my own.
The color turned out to be very unusual, some people like it, while others are drawn to red.
And now, after several days of repairs, happy as an elephant, I jump behind the wheel and go to check the brakes, and at the first braking I fell into a stupor! NO BRAKES! (I didn’t brake all the way, but in a smooth, gentle mode, so as not to ruin the disks). At first it seemed to grapple, and then it swam. In shock, I check all connections for leaks - everything is normal. I touched the discs, and they were boiling water, and it was just a couple of smooth stops! I didn't expect this. Go home straight away and let the discs cool. After some time, leaving again - the same thing, but a little better. At this rate I drove 80 kilometers, and each time the brakes grabbed better and got less hot.
https://www.drive2.ru/l/7951803/
https://youtube.com/watch?v=1M8iKMFVM0k
Sources
- https://vaz-russia.ru/remont-vaz-2113/zamena-perednih-tormoznyih-kolodok-na-vaz-2113-vaz-2114-vaz-2115.html
- https://mylada.net/remont/zamena-perednix-tormoznyx-kolodok-na-vaz-2110.html
- https://spike.su/index.php/Replacing-brake-discs-VAZ-2113-2114-2115.html
How to check the brake master cylinder
A smooth or sharp dip in the brake pedal, or its floating and vibration during braking, usually indicates a malfunction of the brake master cylinder . Most often, the reason for its malfunction is the loss of tightness of the rubber sealing cuffs or improper operation of the bypass valves.
To distinguish its malfunctions from other malfunctions of the brake system and find out how to check whether the master cylinder is working, read the article.
How to understand that the GTZ is bypassing brake fluid?
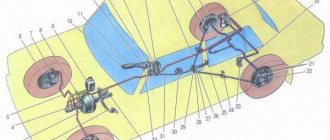
Vehicles use a system with two separate hydraulic circuits. You can read in detail about its task and work separately. The general principle is that when the brake pedal is pressed, the vacuum booster rod acts on the first piston of the GTZ, which, by compressing the brake fluid supplied from the reservoir, creates excess pressure in circuit 1 directly, and in circuit 2 indirectly by moving the second piston.
GTZ device diagram, click to enlarge
If the piston seals are severely worn, the GTZ bypasses: the liquid passes between the walls of the housing of the first, second or both pistons in the opposite direction and returns to the expansion tank. As a result, necessary to act on the brake cylinders is not created
There are two simple ways to check the operation of the brake master cylinder for bypass of brake fluid:
Method number 1 (performed with an assistant)
- Unscrew the cap of the expansion tank in the engine compartment.
- Have an assistant press the brake pedal while observing the condition of the fluid.
- If, when pressed, the level decreases and remains until the pedal is released, the cylinder is in good condition.
- If the fluid level begins to increase when the pedal is pressed or bubbles appear and gurgling is heard, the GTZ is bypassing.
Installation process
If any difficulties arise during dismantling, then it is worth looking into the VAZ 2114 service manual, there is a detailed description of the removal and installation of all mechanisms. And now to work:
- The cable tension must be loosened and the rear pads must be brought together. After this, you can use the 12th key to remove the guide pins. The seat must be thoroughly cleaned with a metal brush, and then the drum must be knocked down. It is not recommended to use a metal tool for these purposes, as it can damage the seat. The best solution would be a rubber hammer;
- The caliper can be located in front or behind the wheel axle. This should not affect the operation of the mechanism in any way, but usually owners of the VAZ 2114 prefer to install it on the rear axles, since symmetry will have a positive effect on braking. The next step is to join the faceplate and hub. You should check that the centering has been carried out thoroughly. If there are defects, the docking must be repeated;
Signs of a faulty master cylinder
Among the symptoms indicating a malfunction of the master brake cylinder, the main signs can be identified:
Checking the GTZ in 5 minutes without removing it from the car: video
- pulling the car to the side when braking;
- overheating of the pads on one wheel;
- squeaks when pressing the brake pedal;
- pedal travel is too soft or hard;
- shortened pedal travel;
- brake pedal failures;
- holding the wheels with blocks after releasing the pedal;
- fluid leaks on the GTZ housing.
Most signs of a brake system malfunction appear when the brake pedal is pressed and are similar to other problems with the brake system. In particular, the failure of the pedal may indicate congestion or depressurization of the lines. Therefore, before checking the serviceability of the master brake cylinder, it is necessary to at least check the level of brake fluid in the reservoir, as well as the condition of the pads, discs and hoses .
How to Diagnose a Malfunctioning Master Cylinder
| Symptom of malfunction | Why is this happening? | Alternative reasons |
| Slow braking |
|
|
| Great force when pressing the pedal |
|
|
| Short brake pedal travel | ||
| The pedal gets stuck while driving |
| |
| Pedal failure near the end of the stroke |
|
|
| The pads continue to hold the discs |
|
|
| The pads and disc/drum on one wheel get hot |
| |
| The car pulls to the side when braking | ||
| Squeaking/creaking noise when braking |
|
|
| Slow return or stuck pedal when released |
|
|
Installing rear disc brakes, adjusting braking forces on the rear axle
- First, the drum brake system is unscrewed and removed.
- Next, the four bolts are unscrewed and the hub is removed.
- After this, the brake pipe is unscrewed from the cylinder.
- Next, the hub is installed using the appropriate faceplates (left and right). The tabs on the adapter must be on the outside.
- There is no need to place a grommet under the bolt indicated by the arrow, as it will make it difficult to install the caliper.
- The hub bolts must be replaced with new ones, 5 mm longer than the old ones.
- Six bolts are needed on each side: four to secure the hub and two to install the calipers. A total of 12 new bolts will be needed. If it was not possible to find bolts of the required length, then you can take longer ones and cut them to the required length: the thread to the head should not exceed 13 mm.
- The corner of the beam will have to be crushed with a hammer, and, if necessary, the surface will have to be refined with a grinder. The metal here is soft enough, so there will be no difficulties. This is done in order to prevent the caliper from touching the beam. If rear 14-inch wheels and calipers are installed, then this operation is not necessary.
- There is a protrusion around the circumference of the hub that prevents the VAZ disk from seating. The internal diameter of the disc, like the hub, is 58 mm, but where there is a protrusion, the diameter is 60 mm.
FAQ
When the engine is running, the pedal slowly sinks to the floor with constant force, is it necessary to change the turbocharger?
Smooth subsidence of the pedal is a frequent sign of leaking GTZ seals. In this case, it is possible to repair the part by installing new cuffs from the repair kit.
Brake fluid leaves the reservoir, but then appears, is it the GTZ?
Changes in the level of brake fluid in the reservoir are not necessarily a sign of a breakdown of the turbocharger. The fuel fluid can also either go down or rise due to airing, boiling due to overheating of the pads, or jamming of the actuator cylinders.
Does it make sense to install a repair kit or is it better to replace the GTZ?
It makes sense to install a repair kit when only the rubber parts are worn out. If the piston is severely worn or the housing is damaged, it is better to replace the entire turbocharger.
Vulnerabilities of the VAZ 2114
The most vulnerable points in the VAZ 2114 brake system include:
- Master brake cylinder - most often, leakage occurs due to wear of the sealing collar, which is subjected to stress during operation. There are also cases of installation of initially poor-quality seals. Detecting this leak is the most problematic, since liquid can go into the vacuum booster. In this case, no leaks are formed. If there are leaks on the left CV joint and gearbox, the GTZ is leaking.
- Brake cylinders of the rear wheels - in the VAZ 2114 their cuffs are susceptible to destruction, especially in frosty weather. A leak is determined by the presence of traces of leaking brake fluid on the calipers. If there is a strong leak, there may be marks under the wheels and on the road surface.
- Brake hoses - they are also subject to mechanical damage. If the rubber is dry, cracks will form on it. You should also inspect for leaks.