If the brake cylinders fail, depending on the type of defect, the rear wheels may lock when released or, conversely, continue to rotate freely when the brake pedal is pressed. In any case, you shouldn’t wait for this moment, especially since replacing the rear brake cylinders can easily be done with your own hands.
Features of replacing the rear brake cylinder 2114
It is well known that the serviceability of the brake system in a car is of great importance, since it is directly related to road safety. Therefore, if any problems occur in this system, it is necessary to urgently repair and replace parts that are problematic.
Rear brake cylinder
Consequences of brake fluid leakage from the GTZ
When brake fluid leaks from the master cylinder, brake fluid can get onto various parts of the car. As you know, TZ is quite chemically active and often damages other parts of the car.
For example, when liquid leaks, it can fall on the vacuum booster membrane, which will soon lead to its rupture and, as a result, air leakage from the receiver, and of course, replacement of the vacuum booster itself.
VUT membrane rupture
Also, when brake fluid leaks, it gets into part of the engine compartment, behind the steering rack, and causes great damage to the paintwork.
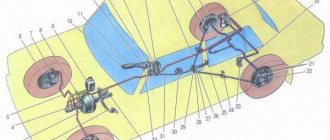
Brake system
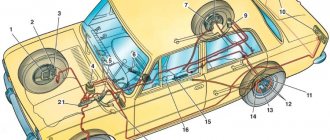
All modern cars have a hydraulic brake system, and discs or drums are used as braking elements. Discs are considered more efficient in their action, but drums do not wear out longer. The brake system of the VAZ 2114 contains the following parts:
- Brake master cylinder;
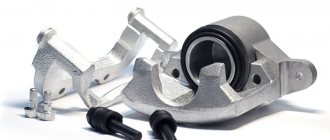
- Front caliper (right and left, they are not interchangeable with each other);
- Rear brake service cylinder (one for each rear wheel);
- Vacuum booster;
- Tubes;
- Hoses;
- Disks (on the front wheels, identical to each other);
- Drums (on the rear wheels, interchangeable with each other).
From the cabin, the system is controlled using a pedal, the free play is regulated by a rod.
Removing air by pumping
If during the repair process a lot of fluid leaks from the circuit and air bubbles form in the system, the repaired hydraulic cylinders will not be able to function normally. The circuit must be pumped using the instructions:
- Place a spanner and a transparent tube directed into the bottle onto the discharge fitting.
Before removing air and during the bleeding process, the tank is replenished with new fluid. A working substance filled with bubbles and poured into a bottle cannot be reused. Upon completion of the repair, check the operation of the brakes while driving.
Video: how to pump the brakes of a VAZ 2107
The design of the VAZ 2107 brake system is quite simple - there are no electronic ABS sensors and automatic valves installed on modern cars. This allows the owner of the “seven” to save money on visits to a service station. To repair the GTZ and working cylinders, no special devices are needed, and spare parts are quite affordable.
We're sorry, but the requests coming from your IP address appear to be automated. For this reason, we are forced to temporarily block access to the site.
To continue, please enter the characters from the image in the input field and click "Submit".
Cookies are disabled in your browser
. We will not be able to remember you and correctly identify you in the future. To enable cookies, follow the tips on this page.
Rear brake cylinder
The working rear brake cylinder on a VAZ is a device in which two pistons, under pressure created by the liquid, push the rear pads apart. The pads are pressed against the drums and braking occurs.
The rear brake cylinder for 2114 (ZTC) can be of different manufactures. In Russia there are quite a lot of enterprises specializing in the production of spare parts for cars. The original parts are produced by AvtoVAZ; many spare parts for VAZ cars are produced in Samara.
But there are also products from other companies (including foreign ones):
- Ate, Germany;
- Samco, Italy;
- Lucas;
- Fenox;
- AP Lockheed;
- "Basalt";
- "Craft".
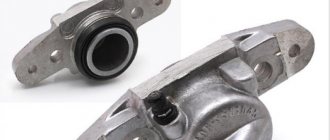
ZTC Kraft
Among all the listed companies, according to customer reviews, the products of ATE have proven themselves the best. Among Russian brands you can about
Depending on the manufacturer and region of sale, the price of a cylinder on average ranges from 250 to 700 rubles (as of 2105). There is no difference between the VAZ 2114 and VAZ 2115 models; the parts are completely interchangeable with each other.
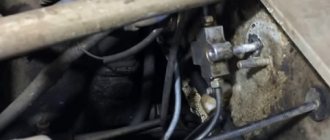
On a fully assembled car, it is not visible where the rear brake cylinder is located; it is located inside the rear drum. But you can understand where it is by looking at the brake pipe that goes to the cylinder.
Which cylinder to install if replacing?
To avoid problems during operation, it is better to find the original Togliatti-made GTZ, catalog number 21013505008. But since the VAZ 2107 family of cars has not been produced for a long time, finding this spare part becomes difficult, especially in remote regions. An alternative is products from other manufacturers that have proven themselves well on the Russian market:
Judging by the reviews of the owners of the “Seven” on thematic forums, defects most often come across among the products of the Phenox brand. Advice regarding the purchase of original spare parts: do not purchase them in markets and unverified stores; many counterfeits are sold at such points.
Defective spare parts were also found during the Soviet era. I remember an incident from childhood when my father took me to drive his first Zhiguli from a car dealership. We covered the 200 km journey all night, because the pads on the rear and front wheels spontaneously compressed and the rims became very hot. The reason was found out later - a defect in the factory master cylinder, which was replaced free of charge at the service station under warranty.
Malfunctions
Symptoms of a malfunctioning TTS:
- The brake fluid leaves the reservoir;
- The rear drum is wet, fluid leakage is noticeable;
- The braking efficiency has disappeared, the pedal “takes” at the very end of the stroke, sometimes not from the first stroke.
Reasons for inoperability:
- Natural wear and tear;
- The cuffs are corroded due to mixing different types of brake fluid;
- Poor quality of the part;
- The pistons were squeezed out due to severe wear on the pads.
It happens that the pistons inside the housing become jammed. If this happens with the pistons spread apart, the car begins to constantly slow down and the drum overheats. You cannot drive with such a defect; the car must be urgently repaired.
There is one nuance that is worth focusing on. Often, when bleeding the brakes, technicians try to unscrew the bleeder fitting on the cylinder and break off. Even WD-40 doesn't help. This happens due to the fact that over time, the “pumping” begins to boil in the ZTC body. Therefore, before bleeding the brakes, you should have a supply of new replacement parts.
There is also a tricky way that will help you avoid breaking off the fitting. Before unscrewing, you must carefully (do not break the fitting with a hammer!), but thoroughly tap the housing around the bleeder fitting and try to move it out of place.
After this, without using much effort, we try to weaken the “pumping”. Doesn't work? Then tap again. Most likely, patience will be rewarded, and problems associated with unscheduled cylinder replacement will not arise.
Replacement
It is recommended to replace the rear brake cylinders in pairs at once, even if only one of them is leaking.
To replace, you will need the following tools:
- Car jack;
- Wheel key;
- Wheel stops;
- Keys for 10 and 12;
- Hammer;
- A wooden block (or better yet, a brass or bronze drift);
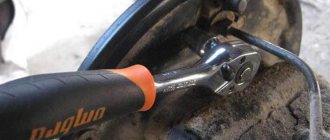
- Brake bleeding wrench.
Replacing the rear brake cylinder on a VAZ 2114 occurs as follows (if there is no car lift):
- We loosen the bolts on the rear wheel, lift the car with a jack, and remove the wheel;
- We unscrew the two bolts on the drum (they also serve as guides for the wheel) with a 12mm wrench;
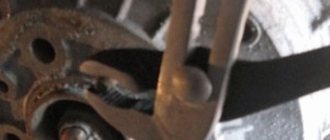
- We remove the drum. If it does not come off, tap it with a hammer through a drift or wooden block. Important! You cannot put the car on the handbrake; the handbrake lever must be fully released;
- Removes the pads;
- Unscrew the brake pipe with a 10mm wrench;
- Unscrew the two cylinder mounting bolts (also a 10mm wrench).
That's it, rear brake cylinder 2114 has been removed. One more small nuance. When we disconnected the tube from it, liquid began to flow.
It’s better to plug the pipe with a wooden tip - less fluid will have to be filled, and it will be easier to bleed the brakes.
Installing the rear brake cylinder is done in the reverse order.
That's all, we've figured out how to replace the rear brake cylinder. You should also remove air from the system by bleeding the brakes. After all work has been completed, the functionality of the new part should be checked.
Check:
- Is there any fluid leakage after the replacement?
- Are the brake pads spread on the wheel where the brake caliper was changed?
The functionality of the new part can be checked before installing the wheel in place, but this check must be done by two people. However, you won’t be able to pump the brakes alone.
We do the check as follows:
- One of the participants gets behind the wheel, presses the brake pedal and holds it down;
- The second participant tries to spin the drum and looks for any liquid leaks.
If everything is in order, install the wheel in place. If the drum spins or fluid leaks, the cylinder will have to be replaced.
There is one more point here that masters do not always take into account. After bleeding, we start the engine, press the brake pedal several times, and only after that we check the effectiveness of the brakes while driving (making sure that the system is in full working order). There have been many cases when the brakes were checked while accelerating in front of an obstacle. The result was a wrecked car. Replacing a rear brake cylinder is not a difficult task, but it is very important and requires care and attention.
Robot principle
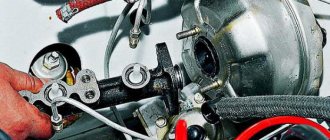
The operating principle of this part is very simple. When you press the brake pedal, you push a rod, which in turn moves a piston inside the turbocharger. The piston forces brake fluid from the cylinder into tubes that lead to the wheels. There, the fluid presses on the pads through the brake piston and, due to friction, the car stops. In this simple scheme, a lot depends on the GTZ; it must be completely sealed, the brake fluid must not leak anywhere. The piston should not jam. All this must be carefully monitored so that at the most inopportune moment at high speed you are not left without brakes.
Basically, most cars have two-circuit main brakes. The first circuit goes to one pair of wheels, and the second to the second pair. If the car is rear-wheel drive, then the first circuit is responsible for the front wheels, and the second for the rear wheels. On front-wheel drive cars, everything works differently. The first circuit includes the right rear and left front, and the second circuit contains the left rear and right front. When one of the circuits fails, the second remains in working condition. If the tube of one of the circuits breaks, you need to rivet it so that all the liquid does not leak out of the tank.
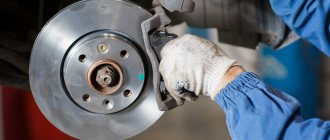
How to remove and install the rear brake cylinder on a VAZ 2114
The rear brake cylinder is responsible for effectively braking your car. Therefore, you need to check its operation from time to time. After all, your safety on the road depends on it. It is located under the rear wheel drum. To gain access to it, you need to remove the wheel and pull out the drum.
Selecting a brake cylinder
Today there are a huge number of manufacturers of spare parts for cars. And it’s easy to get confused when choosing quality spare parts. In order to make a choice, you can read reviews on the Internet. We also read and came to certain conclusions. The most reliable brake cylinder is considered to be the ATE cylinder. The cylinder is also not inferior to it. You can also look at Kraft products.
How to determine whether a brake cylinder is faulty
The first sign of a problem in the brake system will be a brake fluid leak. You can also evaluate the condition of the cylinders when replacing the rear pads. Usually the rubber bands in the brake cylinders break and the pistons become sour. Of course, they can be repaired, but it is much easier to replace them with new ones, since they are not expensive. In stores you can find cylinders for around 400 rubles.
Replacing the rear brake cylinder
The first step is to remove the brake drum.
Raise the handbrake all the way.
Remove the cap from the bleeder fitting and use a size 8 wrench to completely unscrew it.
Lubricate the fitting with grease.
Loosen the brake pipe fitting.
We finally unscrew the fitting.
Unscrew the 2 bolts securing the working cylinder.
Place the fitting cap on the tube to prevent brake fluid from leaking out.
Remove the brake cylinder from the shield.
Before installation, we clean everything from rust and dirt and degrease the working surfaces.
Reinstall the brake cylinder in reverse order.
Reinstall the brake drum.
We bleed the brake system and check everything for leaks.
Video on replacing the brake cylinder:
Repair and replacement instructions
Problems with the main hydraulic cylinder can be resolved in two ways:
- Disassembling, cleaning the unit and installing new seals from the repair kit.
- Replacement of the GTZ.
As a rule, Zhiguli owners choose the second path. The reasons are the poor quality of the new cuffs and the deterioration of the inner walls of the cylinder, which is why the malfunction recurs 2-3 weeks after replacing the rings. The probability of failure of the GTZ with parts from the repair kit is approximately 50%; in other cases, the repair ends successfully.
On my VAZ 2106, which has an identical hydraulic cylinder, I have repeatedly tried to change the cuffs in order to save money. The result is disappointing - the first time the pedal failed after 3 weeks, the second time - after 4 months. If you add up the fluid losses and the time spent, you will get a full replacement of the gas turbine engine.
Tools and accessories
To remove the main hydraulic cylinder in your own garage, you will need the usual set of tools:
- open-end and ring wrenches measuring 10-13 and 22 mm;
- small flat-tip screwdriver;
- pliers for retaining rings;
- syringe or medical bulb;
- a lot of rags.
It is recommended to prepare plugs for the brake system pipes in advance - after disconnecting, fluid will inevitably flow out of them. It is worth placing a rag on the bottom of the GTZ, since a small part of the contents will still spill.
For a simple plug, use a neat wooden wedge with a diameter of 6 mm with a pointed end.
Repairing the brake system is always followed by bleeding, for which you need to prepare the appropriate devices:
- a spanner suitable for the fittings of the working cylinders (7 or 8 mm);
- a supply of liquid of a suitable brand;
- tools for removing wheels - jack, wheel wrench;
- a bottle and a transparent plastic tube that fits onto the RC fittings.
If you plan to replace seals, the repair kit should be selected according to the brand of the GTZ itself. For example, Fenox cuffs will not fit the ATE master cylinder because they are different in shape. To avoid mistakes, take parts from the same manufacturer. To repair the original unit, purchase a set of rubber products from the Balakovo plant.
Dismantling and installation of GTZ
The hydraulic cylinder is removed in the following sequence:
- Using a syringe or bulb, empty the expansion tank as much as possible. Having loosened the clamps, disconnect the pipes from the GTZ fittings and direct them into a cut-off plastic bottle.
Don’t be afraid to mix up the metal tubes; the rear circuit line is noticeably distant from the two front ones.
If the hydraulic cylinder is being replaced, set the old part aside and install the new one on the studs. Reassemble in reverse order, tighten the tube couplings carefully so as not to strip the threads. Having reached the filling of the GTZ, proceed in this order:
- Fill the reservoir with fresh fluid to the maximum level, do not put on the cap.
- Loosen the line couplings one by one, allowing the fluid to displace the air. Monitor the level in the container.
If air did not previously enter the system, and the plugs prevented fluid from leaking out of the pipes, bleeding the master cylinder is quite sufficient. Otherwise, expel air bubbles from each circuit as described below.
While helping a friend bleed a new hydraulic cylinder on a 7, I managed to tighten the rear brake clutch. I had to buy a new tube, install it on the car and remove air from the entire system.
Replacing the rear brake cylinder on a VAZ 2114
Rear brake cylinder VAZ 2114
It’s not uncommon for many car enthusiasts, including the domestic auto industry, to have a problem with their brakes. This type of car malfunction is the most dangerous and there are many reasons for this.
According to their principle of operation, brakes can be:
- foot hydraulic;
- manual, mechanical locking.
VAZ 2114 cars are equipped with drum brakes in the wheels in which the rear brake cylinders are installed. But, in other respects, as on all manufactured cars. The only differences can be in the type of blocking element: disk and drum. But also according to the manufacturing technology of the brake cylinders themselves.
Where is the brake cylinder located? The rear cylinder is located at the rear on the inside of the metal casing. In order to find it, just look under the car and above the bridge you will immediately see tubes through which it is simply difficult not to find it.
Location of the rear brake cylinder on a VAZ 2114
Which is the best master brake cylinder for VAZ 2107?
To slow down and completely stop the VAZ 2107, traditional liquid brakes are used: disc brakes at the front and drum brakes at the rear wheels. The main element responsible for the reliable operation of the system and timely response to pedal pressure is the master brake cylinder (abbreviated as GTZ). The total resource of the unit is 100–150 thousand km, but individual parts wear out after 20–50 thousand km. The owner of the “Seven” can diagnose the malfunction and make repairs independently.
Car brake system repair
When repairing the brake system, replacing the rear or front brake cylinder, connecting pipes, front cylinder or hoses. Everything requires subsequent pumping of the entire system. Therefore, it is necessary to provide access to all wheels at the same time. To do this, lift the car evenly and place it on supports; for greater convenience, you can remove all the wheels, and not just the one on which you need to directly replace the cylinder. When carrying out such actions, always remember the precautions that you need to take for your own safety.
Replacing the brake cylinder itself does not seem difficult, but there are quite a lot of additional manipulations that must be performed. In order to do this, you can refer to the technical instructions for the car for maintenance and repair, or you can do without it, because there is nothing supernatural in this.
Brake system components for VAZ - sharing experience
We share our experience on choosing brake system components for front-wheel drive VAZs.
In the same way as with the topic of choosing a suspension, I want to create a universal entry on choosing brakes, which will make it easier for readers to search and choose. I’ll start with myself, or rather with what I’ve ever had.
Pads It would seem the simplest and most banal, but not an unimportant detail. I have experienced the following:
Factory TIIR (I don’t know how it is now, but 5 years ago it was exactly like this)
General impressions: The brakes are normal for the first couple of thousand kilometers, then everything goes poorly - a terrible squeak/creak, the disk quickly heats up, and begins to “beat”
Service life I drove 2 thousand km, after which they began to squeak terribly and did not slow down
Price quality? The price is free with the car, the quality is enough to break in the car and then immediately change them.
My advice: It’s better to change it immediately to normal ones