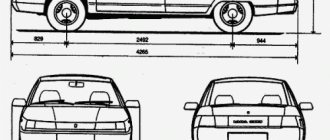
Many people simply don’t like the old instrument panel, while others want a Europanel on a VAZ 2110 because the old one has already lost its appearance, so to speak, it’s worn out. In any case, having decided on a replacement, you need to solve a couple more questions: where to get a suitable panel and how will the installation take place: on your own, or will this task be entrusted to specialists?
Panel trim for old VAZ 2110
Let’s be clear right away: there is nothing complicated about installing a Europanel yourself, so it’s quite possible to decide to do it. In addition, you yourself will control all the stages; you may want to carry out others at the same time as this work - to eliminate noise and squeaks while driving, windproofing, etc.
What should be considered when replacing a torpedo on a VAZ 2110
Replacing the torpedo on a VAZ 2110 will not only add some charm to the car, but can greatly improve the ride comfort not only for the passenger, but also for the driver. After all, you can replace the dashboard with a torpedo. When replacing it, the following points should be taken into account:
- What exactly does the car owner want to achieve with a replacement? This could be an increase in space in the cabin in front of the front seat.
- Just to give, so to speak, an expensive look to the car.
- Organize a place to install additional devices - radios, screens, and so on.
In any case, you can get the most beneficial effect from such an undertaking.
It is also worth considering the category of people, passengers, who will be in the car. This will sometimes improve the safety of the vehicle.
Once the type of torpedo is determined, it is worth thinking about what additional functions it should perform. This could be the installation of additional equipment, space for mobile phones, space for a car audio system - speakers, or a radio.
The next stage is choosing a coating. It is best to get it as universal as possible and try to install torpedoes with the following coatings:
- Plastic. The torpedo is made entirely of plastic without unnecessary inserts.
- Plastic with wooden or leather inserts.
These are the two most popular types of torpedoes for the VAZ 2110, which are the most practical to use and will best suit almost any type of interior.
Indicator lamps located on the additional panel of the VAZ-2112
An additional panel is installed in the VAZ-2112 dashboard, on which the designers also placed several indicators. In particular, in the middle there is a silhouette of a car with its doors open. If one of the doors is illuminated, it means that it is not closed tightly enough.
On the left side of the vehicle indicator (one above the other) there are three indicators:
- low engine oil warning (optional);
- warning about low fluid level in the windshield washer reservoir;
- additional warning about high coolant temperature.
To the right of the car silhouette, again one above the other, there are three more indicators:
- indicator of malfunction of brake lights or side lights;
- warning of high brake pad wear;
- seat belt warning.
We install Europanel and make sound insulation on VAZ 2112, VAZ 2111, VAZ 2110
Installing PTF on a VAZ 2110 with your own hands
Now we will try to figure out how to install the European version of the panel on a domestic VAZ-2110 car. Before starting the installation process, you need to decide for yourself the need for noise insulation of the body of a domestic car. The thing is that these procedures are better and easier to perform simultaneously. We take the European panel and carefully examine it. What the overlay itself looks like and what the inserts for a variety of buttons and air passages look like. In addition, consider what the panel plugs, bracket, and also the button for heating the glass of the rear of the car look like.
We have at our disposal only the factory version of the domestic VAZ-2110 car, which is equipped with the same factory panel. First of all, do not forget about caring for your car. Before we begin the process of replacing the panel, we begin work related to noise insulation of your vehicle.
To do this, we will need about six sheets of BIMAST-DOMS, as well as about three to four sheets of splen. Of course, we are talking about material that is designed with a margin for malfunctions. In addition, it is worth purchasing thin foam rubber that can self-adhesive; five sheets in size will be quite enough. First, you need to remove the front seats of your car. As for the upper part of the genital tunnel, it must be removed using a screwdriver. After this, we remove the lower part of the tunnel.
After this, we begin to remove the steering casing and steering wheel, and to do this you need to unscrew three self-tapping screws and only four screws. After this, it is necessary to remove the switches under the steering system. Having completed all of the above, we carry out work that involves dismantling the unit, relay and glove compartment, after which we remove the headlight control and the instrument panel. And finally, having reached the fasteners of the factory panel, we unscrew them too. Now all that remains is to remove it from the car body, and in the process of disconnecting it is necessary to unscrew everything that connects the panel and the car’s instruments. Remember that the factory noise insulation system must also be removed, because now you will have a new one. The standard domestic panel trim must be removed and a universal instrument panel must be installed. Now you need to secure the instrument harnesses and seal the joints of the air holes. It is also worth remembering that additional functions will require additional buttons, which will find their application in the European version of the car panel, and of course, additional wires that need to be connected right now, since this will not be possible later.
After all of the above has been done, you can start wrapping in bitoplast and all its connectors, which are available on the euro panel. We also screw the Euro linings using self-tapping screws. After this, it is worth noting that the work associated with installing the new panel is completely completed. Now you can apply materials that will ensure complete noise insulation of your vehicle. After the special material has been applied to all the necessary places, work related to gluing SPLEN must be carried out. Remember that experts note the fact that SPLEN is a fairly convenient material, and the process of working with it will not take a lot of time and will not require much of your effort.
And so, having done the difficult work, the final part of our process has arrived. We install the panel in its place in your car. Remember that you will not need more than two days to complete the entire work, but of the entire period, the largest working part must be spent on making a new connection to the alarm system.
Description and location of indicators on the panel
After 2006, a new dashboard was installed on VAZ 2112 cars. For reasons that are not entirely clear, any description of it includes the prefix "euro", perhaps due to its modernity and quality.
But to use it, you need to know the symbols, which are not always easy to understand even from the instructions. You can often only guess what a particular indicator or light indicates. To make this task easier, take a look at the instrument below and its explanation.
Description of the panel
See:
- Pointer arrow. Designed to indicate the approximate coolant temperature. The data is obtained from a sensor that is installed in the gap between the cylinder head and the thermostat. This allows you to obtain accurate data. Sections have a range of 20 degrees, the lower level is 50, and the upper level. 130.
- Tachometer. Its purpose is known to any driver. show engine speed. Sections of 5 units are digitized every 10 units. To get the real value, add a couple of numbers to the figure. Starting from 55, the engine enters the red zone in revolutions.
- Left turn signal indicator.
- A similar indicator for the right turn signal.
- Speedometer. It is an induction type and receives speed data from a sensor on the gearbox. Unfortunately, it’s definitely not very high; the error can reach 5 km/h or even more.
- Fuel level sensor. The sensor is located directly in the tank.
- The warning light indicates a dangerously low fuel level.
- Low beam indicator.
- Lamp for monitoring the amount of brake fluid.
- High beam indicator.
- Lever for adjusting the clock.
- Total (odometer) and daily mileage.
- Alarm.
- Failure of electronic systems, resulting in critical engine failure.
- Clock and thermometer.
- Low battery charging voltage.
- Lamp for signaling the activation of the hand brake.
- Critical oil pressure level.
- Fuel mixture enrichment indicator.
What types of overlays are there?
Installation of the VAZ 2110 dashboard on Lada 4×4 (VAZ 2121, 2131)
If you just need a Euro pad, then there are two options:
- Euro-1 rubber, another name for which is Caprice. It has the same instrument cluster as the VAZ 2110, the only thing is that there is no shelf on the passenger side;
Panel trim VAZ 2110 Euro-1
Panel trim VAZ 2110 Euro-2
There is also a Euro-3 overlay on sale. But it is for later and more advanced VAZ cars - Priora, Kalina. The fact is that this version provides more devices, for example, there is a unit for climate control, which is not observed in the top ten. Although, in principle, if desired, installing this option is also possible.
Panel trim VAZ 2110 Euro-3
Any Euro pad mentioned above is a quality product, unless, of course, it is a cheap fake. It is softer and even, according to manufacturers, less traumatic, like the old one. In addition, after its installation, the supply of warm air to the side windows should improve.
Algorithm of actions
First you need to remove the old panel. This is done as on other car models produced by VAZ.
See:
During installation, it is necessary to replace the ignition switch with a decimal or Kalinovsky one, depending on how many terminals on the pad are blocked. You can keep the old one and rearrange the wires, but the new one will work and look better.
The dashboard wiring needs to be replaced. Also, connect the additional two wire sizes at w4/13 and w3/13 on the mounting block. This applies to older units with 11 relay spaces.
Depending on whether it is an injector or a carburetor, the connection has its own nuances. If you bought a whole factory panel, it should be accompanied by instructions. Briefly, you can notice that the speed sensor is not installed on the injector, take this into account when installing.
A car wiring diagram can be of great help. If it doesn't exist, you can find it on the Internet. There is a certain difference between VAZ 21124, 2111 and other car options, so find your own.
If the instrument panel does not work after turning it on, check whether the wiring is correct. this is usually an error.
Components
When purchasing, you will receive what is included in the kit, namely:
- Europlate;
- Inserts for switches (buttons) of devices;
- Trim on the instrument panel;
- Since your instrument combination may differ from those whose installation is structurally provided, there should also be six plugs; they can be inserted instead of buttons;
- The buttons themselves and two pads for them: • Double – for low beam and dimensions; • To turn on the fog lights; • Heated rear window.
- Air ducts;
- Block and wiring harness designed to connect a double button for side lights and low beam;
- Brackets securing the instrument panel.
In addition, if you are not entirely satisfied with this combination, and you need more buttons for other devices, then they, as well as the pads for them, can be purchased separately.
Alternative torpedo
The alternative dashboard is softer than the standard “tens” dashboard, but the main advantage is the absence of unpleasant grinding and squeaking. Motorists decide to get rid of the standard one precisely because of the squeaking. For the VAZ 2110 car there are several types of panels that differ in design.
The panel is sold as a set:
- The panel itself, which is an alternative to standard plastic.
- Buttons, brackets and inserts for blowers and instrument panels.
- A set of wires and a block for a double switch.
- Buttons for low beam, heating, dimensions and fog lights.
- Plugs for buttons are installed in places where keys are not needed.
Installation of Europanel on VAZ 2110, 2111, 2112
On the Internet, many are tormented by the question of where to buy and how to install a Euro panel on a VAZ 2110. This is not surprising, the old panel is already tired and I want to somehow update the interior. In this article I will show you what is needed in order to replace the old VAZ 2110 panel with the euro and an equally important question - where to find it:
installation of europanel on vaz 2110
For those who don't understand:
- Removing the europanel of a VAZ 2110 is the same as dismantling the old panel, there is no difference (see instructions below).
- To replace only the panel trim, it is no longer necessary to remove the panel!
So, let’s look at the panel overlays, which differ in:
- Euro-1, another name is “Caprice” and has an index of 21104. The distinctive features of this lining are that it has no shelf.
- Euro-2, index 2110L, the cover already has a shelf.
- Euro-3, an overlay without a shelf, but under the instrument panel of a new type (Kalina, Priora), has a climate control unit with 3 knobs and a large emergency stop button.
The euro overlay for the panel consists of:
- The pad itself
- Inserts for buttons (small button insert 2110L-2120031, large 2110L-2120032)
- Air ducts (2114-81080623)
- Instrument panel trim (2110L-5325124)
- Double button for turning on the headlights and low beam
- Button for turning on the rear fog lights (with locking)
- Button for turning on the heated rear window (with locking)
- Pads for buttons - 2 pcs.
- Plugs instead of buttons - 6 pcs.
- Wiring harness for connecting the dual headlight and low beam switches
- Block
- Instrument panel brackets
- You may need to purchase separately various buttons for the VAZ-2114 and pads for them.
Now we move on to installation, and here we can distinguish two methods, each of which has its own advantages and disadvantages:
Installing the Euro trim without removing the panel
We try on the panel overlay and adjust it if necessary. At this stage, it is recommended to use anti-creak (panel soundproofing). This way, you will insure yourself against squeaks in the future.
To install the dashboard in the Euro trim, you can follow one of the following methods:
- Use the brackets from the Euro trim kit.
- Use brackets from the old trim (drill).
We connect the Europanel buttons according to the instructions:
The advantage of this method is time. If you have already resorted to dismantling the panel, then you will spend about 3 hours replacing the lining. If this is your first time encountering this type of work, then about 6 hours.
Installing Euro trim with panel removal
If you decide to completely remove the dashboard, then follow these instructions.
Similarly, we cut the euro-overlay around the perimeter, according to the instructions attached to it. We assemble the cover: install the air duct panels and accessories that came with it.
We fix the Euro-overlay to the panel with dozens of self-tapping screws.
Replace the old panel with Euro-3
- Buy a Euro-3 torpedo assembled with under-torpedo wiring, find wiring diagrams for the old-style and new-style panels and do the docking yourself. Forum thread.
- Buy Euro-3 overlay.
Then you should replace the old-style automatic control system (2 knobs) with a new one (3 knobs) according to this instruction, or this one. Leave the old device, or replace the old-style dashboard with a new one (Kalina/Priora, 1118-3801010-12), again manually connect connectors (they are different) according to pinout diagrams.
Conclusion
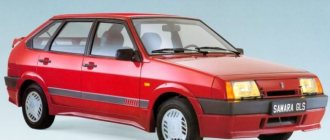
VAZ 2110 with Europanel
By the way, if you still want to change the panel completely, then try installing a panel from the Priora in the top ten.
If I decided to replace the VAZ 2110 dashboard, then..
Let's prepare a new dashboard trim for installation
To do this, we cut off the remaining material of the Euro lining. There is no need to cut out any space under the dashboard, otherwise there will be a gap between the control column and the trim. In this place you simply need to make 2 cuts on the sides so that this part of the lining can be slightly bent as needed. Also, there is no need to cut off 10 mm from the sides of the lining in the area of the side air ducts; these places must be adjusted to the location.
We measure the panel overlay and adjust it as necessary. At this step, it is recommended to use anti-creak (soundproofing the panel). This way, you will insure yourself against squeaks in the future.
To install the dashboard in the Euro trim, you can use one of the methods:
- Use fasteners from the Euro lining kit.
- Use fasteners from an old lining (from drilling).
- We connect connectors and Europanel keys according to the instructions:
How to remove the dashboard on a VAZ 2110 with your own hands - step-by-step instructions + photo report
In order to remove a torpedo on a VAZ 2110, you must perform the following procedure:
- Unscrew 2 screws on the right and 2 on the left on the central tunnel.
- Next, remove the covers on both sides.
- Remove the plug near the handbrake.
- Unscrew the screws on the left and right of the central tunnel.
- Unscrew the screws at the back of the central tunnel.
- Removing the plastic of the central tunnel.
- Disconnecting the cigarette lighter wires. Mark so as not to get confused when connecting to the assembly.
- Remove the gearshift knob cover.
- Using a wrench, unscrew the interior heating air duct.
- Removing the air duct.
- Unscrew the fastenings of the central panel from the front.
- Unscrew the fastenings of the central panel at the back.
- We finally remove the panel.
- We unscrew the screws of the glove compartment.
- We remove the glove compartment.
- Disconnect the glove box light wires.
- We unscrew the screws inside the space in place of the glove compartment.
- Unscrew the remaining screws on the sides of the torpedo.
- Unscrew the torpedo bolts as follows as in the photo.
- Removing the air duct.
- Unscrew the nut on the dashboard under the air duct.
- We lower the torpedo from the pins.
- We disconnect the wires from the front panel and mark them so as not to get confused during assembly.
Instructions for installing the Europanel on a VAZ 2110
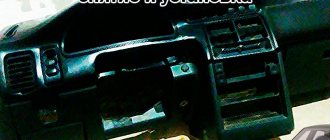
Many people simply don’t like the old instrument panel, while others want a Europanel on a VAZ 2110 because the old one has already lost its appearance, so to speak, it’s worn out. In any case, having decided on a replacement, you need to solve a couple more questions: where to get a suitable panel and how will the installation take place: on your own, or will this task be entrusted to specialists?
Panel trim for old VAZ 2110
Let’s be clear right away: there is nothing complicated about installing a Europanel yourself, so it’s quite possible to decide to do it. In addition, you yourself will control all the stages; you may want to carry out others at the same time as this work - to eliminate noise and squeaks while driving, windproofing, etc.
Where can I get Europanel?
The fact is that europlates, as well as assembled europanels, have become in short supply, since their production was discontinued more than five years ago. Therefore, they mostly sell used ones in good condition; it is quite difficult to find a new one. If suddenly the offered product does not suit you, you can install the Priorovskaya by completely disassembling the old one.
Didn't find the information you are looking for? on our forum.
We recommend reading:
VAZ 2110, when you press the gas, the car choke on the injector
The stove does not heat up at idle speed of the VAZ 2110
What is the best gear oil for vases
Gasoline consumption of Lada Vesta, what the manufacturer promises
VAZ 2110 gear shifts poorly: causes, troubleshooting, gearbox diseases
How to change the generator on a VAZ 2107
Gasoline consumption of Lada Largus per 100 km, city, highway, combined cycle
Low beam on VAZ 2114 went out
Installing a new cover
Installation of a new lining occurs after preliminary preparation:
- It is necessary to measure and trim off excess material;
- But it’s better not to cut off what seemed to be superfluous under the instrument panel, otherwise there will be a gap near the steering column, and you can make cuts to bend it a little if necessary;
- Near the side air ducts, trimming is also done during installation, measuring on site;
- We carry out fitting and adjust trimming;
- We apply anti-creak to avoid squeaking in future operation;
- We choose the method of installing the dashboard with a Euro trim: use new brackets included in the kit or drill them out from the old trim;
- All that remains is to install the instrument cluster you need and secure the Euro trim with self-tapping screws, which are then hidden under the plastic trim.
With panel disassembly
The first stage is carried out according to the plan already described. Next, we proceed like this:
- We assemble the trim, installing our instrument cluster, air duct panels and those accessories included in the kit;
- At the base of the panel we carefully attach the wiring harness;
- We connect the wires from the Euro pad to this harness, tightening everything with mounting ties;
- We connect devices to the required buttons using connectors;
- We secure the cover with self-tapping screws.
This method, although it takes more time, provides high-quality sound insulation to eliminate all annoying squeaks.
This material will help you quickly and accurately disassemble the dashboard:
We also recommend replacing light bulbs with high-quality analogues or LEDs. So, the updated panel will look even more solid.
Removal and installation of VAZ 2110 panel
Below are step-by-step instructions for removing the “tens” dashboard.
- Disconnecting the battery
- Remove the steering wheel and steering column switches
- Be sure to remove the top lining of the floor tunnel
- Remove the glove compartment and unscrew the mounting screws
- Remove the headlight hydraulic adjustment handle by pulling it towards you
- Unscrew the hydraulic corrector nut and remove it
- Remove the upper side air duct deflectors by prying them up with a screwdriver
- Under the deflectors we find the panel fastening nuts, unscrew them
- We unscrew the screws from the bottom of the dashboard, next to the hood release lever, at the mounting block, in the niche of the glove box, etc.
- Now you can remove the door seals, remove the lining covering the front pillars
- Disconnect the electrical wiring terminals
- You can remove the panel by holding the steering column adjustment lever in the desired position
The fully unscrewed VAZ 2110 panel is supported by two guide pins (see photo above) with white arrows pointing to them. We assemble the panel in the reverse order.
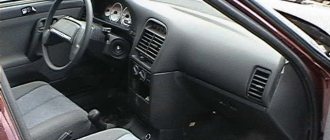
Europanel
Note Some versions of cars of later releases (in particular, models produced) are equipped with a modified instrument panel - the so-called “European panel”.
- Left side deflector.
- Outdoor lighting buttons.
- Instrument cluster.
- Egnition lock.
- Right steering column switch (windshield wipers and washers).
- Hazard warning light button.
- Instrument lighting control knob.
- Immobilizer sensor with indicator.
- Rear window heating switch.
- Plugs (reserve places for installing switches for additional equipment).
- Central deflectors.
- Heater control panel.
- Covers for niches for installing car radios.
- Right side deflector.
- Left steering column switch (direction indicators and headlights).
- Hood release lever.
- Steering wheel.
- Clutch pedal.
- Brake pedal.
- Accelerator pedal.
- Socket for connecting a portable lamp.
- Gear shift lever.
- Ashtray cover.
- Cigarette lighter.
- Glove box.
- Parking brake lever.
- Side light switch.
- Indicator for turning on side lights.
- Indicator for turning on headlights.
- Headlight switch.
- Indicator for turning on the rear fog lights.
- Rear fog lamp switch.
- Plugs (reserve places for installing switches for additional equipment).
- Headlight level control.
- Tachometer.
- Left turn signal indicator.
- Speedometer.
- Right turn signal indicator.
- Coolant temperature gauge.
- Fuel level indicator.
- Left indicator panel.
- Information display.
- Right indicator panel.
- Button for resetting the daily mileage counter and setting the clock.
Tuning the instrument panel of VAZ 2110
How to do tuning of the VAZ instrument panel yourself and replace the light of the lamps with a more pleasant one.
While in a car, the driver most often looks at the instrument panel to look at the indicators of the sensors that are responsible for its operation. This is why instrument lighting should not affect the eyes. However, on many VAZ models, the manufacturer installs yellow or pale green backlighting, which can lead to severe eye fatigue during long trips. Therefore, it is better to tune the instrument panel and replace its light with a more comfortable one.
First you need to select a new color for the dashboard. This is determined only by your imagination. Today on sale you can see light elements of any color, when choosing which you need to take into account several important points. When using the car every day or making long trips, it is better to use a white soft backlight that does not strain the eyes. If the car is rarely used, you can use light green bulbs or another color that is not too straining on the eyes.
Disassemble the dashboard and dismantle the instrument panel. Unscrew the screws securing the dashboard to the car body. Their location and quantity can be found in the manual for your car. On some models, in order to remove the dashboard, you need to disconnect the trim, then lower the steering column all the way down.
Next, to tune the instrument panel, unscrew the bolts located under the trim. Using the blade of a flat-head screwdriver, you need to pry up the instrument cluster to pull it out. Be careful not to leave any chips on the surface of the glass.
Disconnect all connectors from the wires connected to the connectors located at the rear of the dashboard. Pre-mark the pads so that they do not get mixed up during reassembly.
On the back side, unscrew all the bolts. Then you need to carefully disconnect the plastic gasket and glass. You don’t have to dismantle the instrument needles, but all work must be done carefully, without touching or knocking them down, otherwise you will need to align and adjust the sensors.
On the back of the microcircuit you need to find where all the light bulbs or LEDs are located. To ensure accuracy, they must be outlined with a black marker or felt-tip pen, just not thick. Then you need to carefully unsolder them from the microcircuit.
Take new light elements. They need to be checked using an adapter or battery. It is better to use LEDs, they consume much less energy and have a much longer service life. It is also necessary to carefully inspect the metal antennae on each diode, which must be intact.
Install 2 diode antennae in the chip hole left over from the previous LED or lamp socket. Carefully seal the antennae from the back of the chip. Using this diagram, install all the diodes.
Reassemble the microcircuit board in reverse order. You need to start the car and turn on the headlights or low beams to check the functionality of the new LEDs.
How do you like this option?
There are also ready-made tuning panels for VAZ of all models. But they are significantly more expensive than the DIY option, although the build quality will be much higher. After all, not all of us are born with a soldering iron in our hands)))
The cost of finished panels starts somewhere around 7,000 and above.
But naturally, no one will stop at just tuning the panel. Therefore, personally, the next step would be to replace the seats or at least the covers on them. Now there are a lot of different options for good covers, you can even buy car covers wholesale and then sell them in your city. I know that it’s hard to find travel cases in the regions, only Chinese consumer goods, so there will be demand.
Good luck!
LADATUNING.NET
Europanel for VAZ 2110-12: what you need to know before buying
Hot summer heat! The temperature outside the VAZ 2110 on the surface of the body reaches 80 ° C, burning off the paint and drying out rubber products by the falling rays of the sun. Direct incinerating effects of rays cause cracks in plastic and rubber parts. The heat reverses the process carried out when molding plastic parts, disrupting the chemical composition of the substance during the constant heating process, creating a haze on the windshield that reduces visibility.
Increased heating has a particularly negative effect on the dashboard, the main part of the vehicle's interior. Car enthusiasts pay attention to the condition of the panel every day. The budget car class is equipped with panels made of polyvinyl chloride - a thermoplastic plastic. The stylish interior design of models of this type will not let car lovers get bored because the decor is swollen from heating by the sun. Although the soft polyurethane dashboard of the VAZ 2111 is also worthy of careful treatment in regions with maximum solstice. You can avoid the appearance of cracks and fading of the material by constantly covering the panel with any object, which will protect the panel from direct rays, but not from heating in a closed cabin.
An economically viable way out of the situation with an unsightly dashboard is only to replace the product with a luxury version for the VAZ 2112. The idea of changing an element is to recreate the original features of the vehicle’s interior in an updated European class design, where each panel element has a functionally justified location. The configuration of the instrument panel with cutouts for ventilation holes, placement of buttons and warning sensors meets the wishes of most car enthusiasts.
Tuning a VAZ 2112 should end with updating the appearance of the interior, highlighting and personalizing the car, raising it to a European class, replacing the old instrument panel with unsightly cracks and a faded surface with a part made of modern composite materials. Attracting the glances of amazed passers-by to the car, after a luxury Europanel is installed for the interior of the VAZ 2110 and the VAZ 2112 model, the car enthusiast is able to fall in love with his vehicle again and is ready to spend hours in the cabin, feeling the aroma of novelty and the look of European style with maximum and ergonomic functionality of the arrangement of elements on the instrument panel.
We cooperate with:
PEC
You can find the nearest representative office, track the cargo and calculate the cost of delivery on the website: pecom.ru
Business Line
You can find the nearest representative office, track the cargo and calculate the cost of delivery on the website: dellin.ru
Baikal Service
You can find the nearest representative office, track the cargo and calculate the cost of delivery on the website: baikalsr.ru
Energy
You can find the nearest representative office, track the cargo and calculate the cost of delivery on the website: nrg-tk.ru
WHALE
You can find the nearest representative office, track the cargo and calculate the cost of delivery on the website: tk-kit.ru
Zheldor expedition
You can find the nearest representative office, track the cargo and calculate the cost of delivery on the website: jde.ru
Vozovoz
You can find the nearest representative office, track the cargo and calculate the cost of delivery on the website: vozovoz.ru
SDEK
You can find the nearest representative office, track the cargo and calculate the cost of delivery on the website: cdek.ru
Delivery is carried out throughout Russia and the CIS.
Deadline for order delivery to T.K. from 1 to 4 business days from the date of receipt of funds. (orders are not processed on Saturday and Sunday).
Lead time for orders that include painting services: 5-10 business days.
The lead time for placing orders and “made to order” items is from 14 days; you can check with the manager for more detailed information.
ATTENTION! All fragile goods (headlights, plastic products, glass, etc.), by default, are sent in additional paid packaging from TK. If you take responsibility for the integrity, we can ship without it. To do this, you need to make a note in the comments when placing your order.
For additional information, please contact the managers.
Installing the Euro trim without removing the dashboard
In this option, you need to have a drill and screws on hand.
Rely on the lining mounting diagram and start in order:
- Remove the dashboard.
- Open the glove compartment and unscrew the three screws from the inside (positions 1,2,3 in the diagram). Trying to unscrew the screw (pos. 9) from the inside near the windshield is difficult, but doable.
- Remove the 4 keys (next to the control module) and unscrew the screws from the inside (pos. 4.5)
- Unscrew or loosen the fastening by adjusting the backlight (pos.

- Open the fuse module and unscrew 2 screws from the inside (pos. 6 and 7)
- Now the panel overlay is held in place only by screws, positions 10 and 11. They cannot be unscrewed, so we break them out or lift the overlay by the right edge and cut them off with a file. (Note: the Euro trim will cover the entire top of the panel up to the windshield, so you don’t have to worry about the appearance when you cut or break the screws)
- Remove the old dashboard trim.
Installation without completely disassembling the panel
The panel, as many people know, consists of three parts, but the Europanel of the VAZ 2110 is, in fact, only the upper part of the dashboard. And if the goal is only to replace it, without any modifications or other tuning, then you can safely do a partial disassembly without removing all the equipment.
You will need:
- Drill;
- Screwdriver;
- Self-tapping screws.
The dismantling process goes like this:
- Remove the dashboard;
- Open the glove compartment and unscrew the three screws from the inside. It is quite difficult to unscrew the screw near the windshield, but still doable;
- Next to the ECU, pull out 4 buttons and unscrew the screws from the inside;
- We loosen the fastening of the backlight adjustment. You can unscrew it completely, as is more convenient;
- Having opened the instrument fuse box, we also unscrew 2 screws from the inside;
- There are still two self-tapping screws that hold the panel trim, but they cannot be unscrewed without complete disassembly. Therefore, either these screws are carefully broken out, or even cut out by lifting the overlay on the right, using a metal file. At the same time, the appearance of the future updated “face” of the interior will not be affected, since the Euro trim will cover these places;
- Now you can safely remove the cover.
We carry out actions with the overlay according to the instructions
We lay the harness at the base of the panel
We stretch and bundle additional wires
The connectors under the cover are wrapped in bitoplast
Installing the Euro pad and tightening it with self-tapping screws
Installing the Euro pad and tightening it with self-tapping screws
View of the assembled panel from the inside
How to remove the Europanel on a VAZ 2112 + video
The average owner of a VAZ 2112 rarely faces the need to remove the instrument panel of his car. The main reason why you have to dismantle the Europanel is body repair, electrical repair or repair of devices installed directly behind the instrument panel. Since it can be very difficult or even impossible to get to such devices without removing the instrument panel, in such cases you have to remove the entire europanel. Removing the instrument panel is also required when eliminating squeaks and other noises that occur while driving a car, or when installing additional sound insulation for the interior. In addition, even with careful handling of the car, over time the instrument panel may lose its appearance and require replacement with a new one.
In this article we will try to cover the main stages of removing the europanel from a VAZ 2112 car. The “Euro” instrument panel can be found on cars of the VAZ 2110, VAZ 2111 and VAZ 2112 line. Therefore, everything that will be said below about dismantling the VAZ 2112 europanel is also true for the rest models. In addition, it should be noted that the fastenings of the Europanel are identical to the fastenings of a conventional instrument panel, so this step-by-step instructions can also be used when dismantling a conventional panel.
So, when removing the Europanel from a VAZ 2112 car, the sequence of actions should be as follows:
For safety reasons, it is necessary to turn off the power to the vehicle's on-board network. To do this, you need to disconnect the negative terminal from the battery.
The steering wheel needs to be removed. To do this, use a flat screwdriver to pry up and remove the decorative trim with the inscription “LADA” from the steering wheel. Next, using a Phillips screwdriver (PH2), unscrew the two screws that are located in the recesses under the removed cover. After this, remove the horn switch cover.
Now you need to fix the steering wheel. This can be done in two ways: turn the steering wheel all the way to the left or remove the key from the ignition switch and turn the steering wheel in any direction until it clicks when it locks. After this, you should unscrew the central nut holding the steering wheel. To do this, you will need a socket wrench with a 24mm head (for convenience, it is advisable to use a socket wrench with a ratchet).
For safety reasons, there is no need to immediately remove the central nut - it should be left on the last 3-4 turns of the thread. After this, set the steering wheel to the middle position (the front wheels should be parallel to the longitudinal axis of the car). In order not to waste time finding the correct position of the steering wheel when installing it, before removing the steering wheel, you can apply coaxial marks on the steering wheel itself and the upper plastic cover of the steering column.
Next, you need to use medium-force blows on the rear of the steering wheel from the left - right and from above - from below to knock it off the splines of the steering shaft. After this, you can completely unscrew the central nut and remove the steering wheel.
The process of removing the steering wheel from VAZ 2110-2112 cars is shown in detail in the following video:
Now you need to remove the side panels on the left and right sides of the center console. Each shield is secured at the rear with two screws, which must be removed using a Phillips screwdriver (PH2).
Next, use a Phillips screwdriver (PH2) to unscrew the screws securing the glove compartment, located underneath the glove compartment at the front wall of the car interior. Having removed the glove compartment from its place, it is necessary to disconnect the wires going to the glove compartment illumination lamp. After this, the glove compartment can be completely removed.
The next step is to use a Phillips screwdriver to unscrew the screws securing the instrument panel. One of the screws is located in the glove compartment niche, the rest are along the edges at the bottom of the instrument panel.
Now you need to use an 8-mm open-end wrench and a Phillips screwdriver to unscrew the screws securing the instrument panel in the area of the center console.
After this, remove the protective grilles of the air ducts located along the edges of the instrument panel. To do this, just pry them off with a flat-head screwdriver.
Next, use a socket wrench to unscrew the nuts located under the removed air duct grilles.
Remove the instrument panel from the studs by lifting it up and pulling it towards you. After this, you need to disconnect all the connectors on the wiring harnesses going to the instrument panel, having previously marked them for subsequent assembly. Now the instrument panel can be completely removed.
The process of removing the instrument panel from a VAZ 2112 is shown in the following video:
We hope our instructions will be useful for you!
We remove the torpedo
Removing and installing a new torpedo on a VAZ 2110 takes a lot of time, we also advise you to be patient, since there are dozens of connections and wires in this part of the interior. Each action must be careful, since the VAZ 2110 mounts are very fragile and can be easily broken. After this, the panel will no longer fit properly, and the car will noticeably increase in squeaking while driving.
In some cases, it is not necessary to completely dismantle the standard panel. Our article provides a description of a complete analysis.
Necessary tool
To remove the case, you should have in your arsenal:
- Labels with adhesive backing.
- Marker or pencil.
- Set of screwdrivers and keys.
The main assistants in this work will be a 10 mm wrench and a Phillips screwdriver. We need a pencil or a washable marker in order to mark the removed elements. This also applies to self-adhesive labels. There are too many wires and parts, after disassembling you will already forget where each component is located. Markings and stickers will remind you of the location of wires and parts.
Preparatory work
Some people prefer to disassemble without dismantling other components of the interior, but this significantly complicates and prolongs the work. We recommend preparing the interior as you will need room to maneuver. Remove the seats and steering wheel - follow this sequence. It is also worth dismantling the floor tunnel.
To do this, you need to unscrew the screws and move the VAZ 2110 part back. We perform the same operation with the lower part. The next step is to dismantle the glove compartment, now you can remove the mounting block and relay. During the process, each wire must be labeled. You need to be especially careful when handling speedometers.
Removal - step by step instructions
- We find the central panel, on the right side of it there are two self-tapping screws - unscrew them. We do the same with the opposite side. Now we dismantle the shield on both sides, as shown in the photo.
- Next, use a flat screwdriver to pry off the plug installed on the central tunnel. Now you can unscrew the tunnel fastenings; they are located on the back and sides.
- Now this part can be completely dismantled. We now have access to the cigarette lighter - we disconnect all the wiring from it, and then remove the cover from the gearbox knob.
- We move on to the air duct - using the “tenth” key we remove it. Now we have access to the central panel, it is held in place by fastenings at the rear and front. After removing the screws, we dismantle the panel.
- We removed the glove compartment in advance, so all we have to do is disconnect the backlight and unscrew the fasteners behind it. You need to unscrew the screws on each side of the panel, after which the panel can be unscrewed using a wrench and a Phillips screwdriver - we clamp the nut with the wrench and twist the screwdriver.
- Using a flat screwdriver, pry up the air duct and remove it. There is a nut left on the dashboard that needs to be removed. Now the panel can be completely removed, lift it up and pull it towards you, the panel will then come off the pins. We mark the wiring and take out all the plugs. There are quite a lot of wires, don’t get tangled up in them - a marker will help you make this
That's it, the torpedo is dismantled, you can replace its individual components, install another panel from a VAZ 2110, or carry out tuning using a Europanel. Assembly proceeds in reverse order. Will there be an overlay installed instead of the standard panel? Then move on to the next section.
Installation and repair instructions
View after dismantling the panel
Replacing the panel, especially if you are installing it on an old VAZ 2112, is a certain difficulty. Older machines do not have some of the functions for which the panel has buttons. The wiring may need to be worked on.
Tools and materials
Standard tools will be required.
But a certain amount of additional materials is needed:
- you will need plugs for extra buttons that are not needed on an old car;
- air duct;
- various inserts, buttons (5 pieces) and pads;
- a new wiring harness suitable for the wiring diagram;
- brackets for mounting the instrument panel;