Author: Sochi Auto Repair
The procedure for disassembling a car engine - instructions and a step-by-step plan on how to properly disassemble the engine, a step-by-step list of actions when disassembling the engine. We disassemble the engine as follows:
Procedure for disassembling a car engine - instructions:
1. Remove it from the car.
2. Disconnect the clutch.
3. Remove the camshaft drive belt, tension roller and spacer washer located under the tension roller.
4. Disconnect and remove the pulley from the camshaft.
5. Remove the cover. To do this, unscrew the three fastening bolts of the water pump and one bolt with a nut attaching the rear cover of the camshaft drive belt.
6. Disconnect the water pump. We first pry it off with a screwdriver, which we insert between the cylinder block and the pump housing flange, and move it a little.
7. The procedure for disassembling a car engine - now remove the head, oil sump, gasket, oil receiver from the cylinder block and unscrew their corresponding mounting bolts. When loosening the bolts securing the oil receiver and the oil level sensor in the oil sump, pay attention to the spring washers installed under them. To remove the sensor from the cylinder block, set the crankshaft in a counterbalanced position that does not interfere with its removal.
8. Remove the connecting rod cover by turning the crankshaft, while the piston being removed must be at B.M.T. (bottom dead center). Then unscrew and remove the fastening nuts of the part cover. Sometimes the lid does not lift, in this case we hit it with a hammer two or three times. The erased number of the cylinder on the cover is copied from the cylinder itself and attached to the cover.
9. Having opened the cover, push the connecting rod inside the cylinder and remove it along with the piston. We take out the part extremely carefully, without touching the mirror inside the cylinder, avoiding damage to it. We inspect the removed parts from the cylinder, checking that the number on the connecting rod is intact; if necessary, we apply the number again. When disconnecting the piston from the connecting rod, we also put a number on the piston, so the parts will not get mixed up when assembling the cylinders. We remove other engine cylinders in the same way.
10. Disconnect the flywheel. The procedure for disassembling a car engine is to first disconnect the wire on the battery (from the negative terminal), remove the clutch and gearbox, unscrew all 6 fastening bolts of the flywheel, which we secure from turning with a screwdriver, then remove the locking plate from the bolts. To check, remove the flywheel from the crankshaft flange and inspect the teeth of the flywheel rim. If they are heavily worn or damaged, replace the flywheel with a new one. After checking the teeth, we inspect the surfaces where the flywheel contacts the clutch driven discs and the crankshaft flange. If there is damage or scuffing on the surfaces, we replace the flywheel with a new one or send it to a workshop for sharpening.
11. Disconnect the crankshaft rear oil seal holder with the gasket.
12. Remove the pulley from the crankshaft. We carefully monitor the key that is not seated very tightly in the crankshaft groove, which should not get lost; we take it out and put it aside.
13. Unfasten the oil pump with the gasket, remove the caps from the main bearings, unscrewing the corresponding bolts, and the crankshaft.
14. To inspect the cap shells of the main bearings on the middle support, remove the crankshaft thrust half-rings. We inspect the inserts. If damage or signs of wear are found, replace the parts with new ones. If there are no signs of damage or wear, then we apply markings in accordance with their installation relative to the beds and covers during assembly.
15. In order to remove the generator brackets and engine support, disconnect the water pump supply pipe and unscrew the corresponding fasteners.
16. We remove the piston rings with a special puller; if it is missing, we remove the rings by hand, spreading the locks of the rings. To avoid damage to the part, we perform this operation very carefully. Then remove the retaining rings securing the piston pins and the oil scraper ring release spring from the piston. The piston bosses have special recesses, thanks to which the rings can be easily pulled out. The procedure for disassembling a car engine is now, having removed the rings, remove the piston from the connecting rod, to do this, first push the pin out of the piston, remove the liners from the cover and from the connecting rod itself, and carefully inspect them. We replace damaged or worn liners with new ones. If they are not damaged or worn, then we mark them relative to the covers and connecting rods. We make all markings only on the part of the inserts that does not work.
When is a car engine overhaul necessary?
All internal combustion engine systems wear out over time. Depending on the model, brand and operating conditions of the car, this can happen either after a year or after 5 years, or even more.
But in any case, by the behavior of the vehicle, you can determine in time that the deadlines are already approaching. The main signs that something is wrong with the engine:
- The consumption of gasoline (diesel fuel, gas) and motor oil has increased.
- The exhaust becomes the “wrong” gray color.
- Compression decreases.
- The engine begins to knock and overheat for no reason.
- Power decreases.
- The pressure sensor is constantly on or flashing.
Any of these signs indicates a problem with the internal combustion engine system and the need to repair the engine yourself or at a service station.
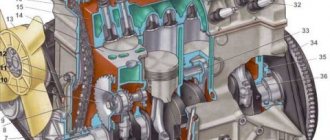
Cylinder block
To disassemble a cylinder block with inserted cylinder liners, you need to turn the engine mounted on the stand with the crankcase down, install a puller on the cylinder liners one by one and remove them. Then you should remove the sealing rings from the sleeves and send the unit for washing. To clean the oil channels of the block, it is necessary to unscrew the end plugs of the longitudinal oil line of the block and the lubrication channels of the pushers.
Rice. Removing the piston ring from the piston using a tool
Rice. Removing the piston pin retaining ring
Rice. Device for pressing the liner into the cylinder block and pressing the liner out of the block: 1 - handle; 2 - nut; 3 - pressure plate; 4 — guide pin; 5 — cylinder block; 6 - sleeve; 7 — rod; 8 - glass; 9 — washer
If necessary, checking the tightness of the cylinder block cooling system is carried out with water under a pressure of 0.3 MPa. When testing, special attention should be paid to the absence of leakage through the seals in the gap between the bottom of the liner and the cylinder block.
All parts with friction surfaces in the holes of the block, except for the guide pushrod bushings, can be replaced (cylinder liners, crankshaft main bearing shells, camshaft support bushings). Cleaning the outer surface of the sleeve ensures the safety of the sleeve seating belts without disturbing their dimensions.
How to remove the engine
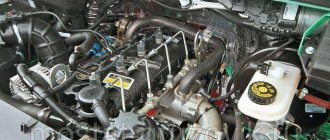
To remove the engine from the engine compartment, you will need the following:
- Disconnect all plugs from the sensor connectors installed on the vehicle. You don't have to label them, since each connector has its own shape.
- Remove the radiator pipes, unscrew the fuel hose, and then loosen the engine mounts.
- Loosen the bolts securing the gearbox to the engine. If the engine is installed longitudinally, then it is advisable to loosen the gearbox mount in order to move the unit back.
- Unscrew the bolts securing the exhaust manifold to the exhaust pipe.
- When nothing is blocking the engine, use a chain with a tap or other device to remove it from the engine compartment.
Taking this opportunity, you need to wash everything under the hood, as well as process the connectors and wires.
Removing engine housing parts
After removing the external units, you can begin disassembling the engine. First of all, to protect the gasoline engine from damage, you need to remove the spark plugs by unscrewing them from the holes in the cylinder heads, and close the holes with special plugs. On an injection engine, it is necessary to remove the fuel accumulator and injectors; on a diesel engine, remove the injectors using an inertial universal puller.
Rice. Removing the nozzle using an inertial universal puller: 1 - handle; 2 - rod; 3 - load; 4 - adapter; 5 - nozzle
When removing the exhaust gas pipeline, it is necessary to unscrew the fastening nuts and remove it with gaskets. If the gaskets are burnt to the head plane, they should be carefully separated using a screwdriver. Repeat this operation with the second gas pipeline (if installed). If there is no need to disconnect it, the exhaust gas pipeline can be dismantled together with the cylinder head.
To remove the intake gas pipeline, you need to unscrew the nuts securing it to the cylinder heads with a socket wrench and, lightly tapping with a wooden hammer, disconnect the gas pipeline manually.
To remove the cylinder head cover, you need to unscrew the nuts securing the cover and remove it along with the gasket.
When removing the rocker arm axle, rods and pushrods (on V-shaped engines), you should unscrew the four bolts securing the rocker arm axles at each cylinder head with a socket wrench, remove the axle assembly with rocker arms and struts, remove the pusher rods and valve lifters from the cylinder block socket with using a metal rod, the end of which is bent at a right angle.
To remove the rocker arms and struts, you need to unsplit one end of the axle and remove the first flat washer, spring spacer, second flat washer, first rocker, rocker strut, second rocker, spacer spring, then remove all other rocker arms, struts and spacer springs.
Some engines use hydraulic valve lifters. The hydraulic compensators are installed in the head with a slight interference fit, but can be easily removed without the use of special tools.
When removing the crankshaft pulley, you need to bend the lock washer from the edge of the ratchet and unscrew the ratchet with a socket wrench, locking the crankshaft using a wooden mandrel placed under the crankshaft. To remove the crankshaft pulley, use a three-jaw universal puller. After removing the pulley, remove the key from the crankshaft groove.
Rice. Removing the crankshaft pulley using a three-jaw puller
To remove the timing gear cover, you need to unscrew the cover mounting bolts with a socket wrench and remove it. Then, lightly tapping with a wooden hammer, it is necessary to remove the cover gasket, carefully separating it from the plane of the cylinder block.
On engines with an overhead camshaft (or camshafts), before removing the shaft from the engine, you must remove the timing cover, loosen the tensioner roller (tensioner) and remove the camshaft drive chain or timing belt. You can remove the cylinder head from the engine without removing the camshaft.
When removing the cylinder head, you need to unscrew the mounting bolts with an angled socket wrench and remove the cylinder head, and then the gasket. If the gasket is burnt, you need to carefully remove it with a screwdriver. At the rear end of the head, lugs are attached to lift the engine. When repairing the head, the ears do not need to be removed.
Guide bushings and insert valve seats are pressed into the cylinder head. Each cylinder head houses the intake and exhaust valves for each cylinder bank. When removing the head from the engine, use a scraper to clean the combustion chambers from carbon deposits without removing the valves. When repairing cylinder heads, it is necessary to remove the valves. To remove the valves, place head 3 on a workbench and, compressing springs 4 using puller 1, remove the valves from the guide bushings.
Rice. Removing valves: 1 - puller; 2 - valve; 3 — cylinder head; 4 - valve spring; 5 - cracker
When removing the oil sump and oil pump receiver, the following work must be done:
- turn the engine on the stand and install it with the clutch housing down;
- Unscrew the fastening bolts and remove the shield and clutch housing cover;
- Unscrew the oil sump mounting bolts with a socket wrench and remove it from the engine manually;
- remove the crankcase gasket, carefully separating it with a screwdriver from the plane of the cylinder block;
- unscrew the bolts securing the crankcase partition and remove it;
- Unscrew the bolts securing the oil pump receiver and remove it with the gasket.
When removing pistons with connecting rods, it is necessary to unscrew the nuts of the bolts, having first unscrewed them (if cotter pins are installed). The covers and connecting rods should be checked for marks. If there is no stamp, it is necessary to brand the connecting rods and caps in accordance with the cylinder numbers.
Then you need to remove the caps from the connecting rods, lightly tapping the caps with a wooden hammer, turn the engine 90″ on the stand and remove the pistons and connecting rod assembly from the cylinders one by one. Place the connecting rod caps in place and secure with nuts, tightening them by hand.
When removing the pistons and connecting rods assemblies, remove the connecting rod caps in pairs (1st and 5th, 2nd and 6th, 3rd and 7th and 4th and 8th cylinders), while turning crankshaft using a wrench on the flywheel ring gear.
When removing the crankshaft, do the following:
- Unscrew the bolts securing the main bearing caps with a socket wrench and remove them;
- check for stamps on the lids. If it is absent, perform branding with a core;
- remove the covers together with the liners, and the back cover along with the rubber and wooden seals;
- remove the oil deflector from the crankshaft;
- Remove the crankshaft with camshaft, flywheel and clutch assembly from the engine;
- remove the main bearing shells and place them in numerical order;
- remove the rear main bearing cuff;
- Reinstall the main bearing caps.
Rice. Removing the crankshaft
Rice. Removing the timing gear from the crankshaft using a puller
When removing the clutch from the flywheel, it is necessary to unscrew the bolts securing the clutch pressure plate housing with a socket wrench, remove the pressure plate assembly, and then the driven disk assembly. When unscrewing the bolts, you need to turn the crankshaft sequentially.
Removing the timing gear from the crankshaft is carried out manually or using a puller.
To remove the flywheel, you need to unscrew the flywheel mounting nuts, unscrew them with an angled socket wrench and remove the bolts from the hole in the crankshaft flange. The flywheel is attached to the crankshaft flange with asymmetrically spaced bolts (usually one bolt is offset).
Rice. Pressing out the front bearing of the gearbox input shaft using a puller: a - screw; b - shock: 1 - grips; 2 — grip holder; 3 - emphasis; 4 — cargo; 5 - guide shaft; 6 — handle; 7 — bearing; 8 - crankshaft
Rice. Removing the camshaft gear using a press
If it is necessary to replace the front bearing of the transmission input shaft, it should be pressed out before removing the flywheel from the shaft using a screw puller or, after removing the flywheel, pressed out using an impact puller. The grips 1, installed on the ends of the bearing rings, are moved apart by a threaded stop 3. At the moment the load 4 hits the stop 3 of the shaft 5, the bearing 7 is pressed out of the flywheel.
To remove the camshaft (on V-shaped engines), it is necessary to remove the cylinder head cover and the rocker arm axis with the rocker arms assemblies, remove the rods and pushers, remove the camshaft cover and unscrew the two bolts securing the camshaft flange through the holes in the gear.
When dismantling the camshaft, special care should be taken to ensure that the tops of the cams do not touch the bearings or damage their surfaces. The shaft is removed assembled with the timing gear and flange.
To remove the gear from the shaft, bend the lock washer, unscrew the gear fastening nut, remove it and remove the roller with the spring, remove the lock washer. Next, the camshaft must be installed on the press and by pressing its handle, disconnect the gear, and then remove the thrust flange and spacer ring from the shaft.
Removing the gear from the camshaft, as well as pressing the gear onto the camshaft, can be done using a special tool.
Rice. Removing the gear from the camshaft (a) and pressing the gear onto the camshaft (b) using a tool
Engine assembly steps
To assemble the motor, the following new parts are needed:
- a complete set of engine gaskets and seals;
- new cylinder head bolts;
- a new set of chains or timing belt;
- new oil and filter, spark plugs, service belts;
- new pump, thermostat.
To assemble the engine, you need to assemble the bottom of the cylinder block, and then proceed to the following:
- install the cylinder head, tighten the cylinder head bolts without tightening them;
- armed with a torque wrench, as well as the correct data on the tightening torque of the cylinder head bolts, we tighten the bolts in the correct order and with the required torque;
- now the sprockets and timing chain, or the timing belt with rollers are installed, and we set everything according to the marks on the first cylinder; you can check the marks by the mark on the flywheel;
- rotate the crankshaft by the pulley to identify possible snagging;
- Reassemble all attachments in reverse order.
Now we proceed to install the engine in the engine compartment, everything in the reverse order.
Most likely, the engine will not start the first time until the fuel system builds up pressure and all sensors are not synchronized. Then we check the pressure in the cylinders with a compression meter, where the compression should be at least 13 kPa.
Connecting rod and piston group
When disassembling the connecting rod-piston group, it is recommended to secure the connecting rod assembly with the piston in a vice, remove the piston rings using the device, and remove the piston pin retaining rings with pliers. When removing the oil scraper ring, you must use a tool to remove the ring disks, then manually remove the expanders. To press out the piston pin, heat the piston in oil or in an electric heater to a temperature of 55 ° C, press out the piston pin using a mandrel and disconnect the piston from the connecting rod. Then you need to check the condition of the piston pin, piston and bushings of the upper end of the connecting rod.
Run-in and testing
The final stage of engine overhaul is its running-in and testing. The best way to break in an engine is a combined one, which we wrote about in one of the articles. For the most efficient operation of the power unit, it is necessary to run it in, both hot and cold.
In many foreign countries, in addition to the running-in stand, there is a test stand, which, using a large number of sensors and indicators, tests the engine and determines the service life after repair and restoration work. Unfortunately, there are no such stands in the CIS, since it is believed that their use is not economically feasible.
In what cases is the power unit repaired?
Let's consider in what cases it will be necessary to repair the engine:
- Wear and wear of parts exceeds 80% of the resource.
- The appearance of mechanical damage to the main components of the power unit.
- Failure due to improper setup or maintenance.
- Other reasons that could cause malfunctions.
How to classify the repair of gasoline engines:
- On-line repair. This is the repair of worn parts, which during operation have a service life lower than the main power unit.
- Technical repair of engines. It is carried out during routine maintenance for the planned replacement of worn out elements.
- Unscheduled repairs of car engines. This is an unexpected breakdown of the power unit, which is caused by poor-quality maintenance, spare parts or other reasons that led to restoration operations on the motor.
- Planned repairs. It is also called a major overhaul. It is usually carried out according to the mileage of the car, when the resource of the power unit is exhausted.
Is it possible to fix a vacuum cleaner yourself?
Most of the models of household cleaning appliances from the Korean company are represented by designs that are relatively simple in technical terms. Accordingly, in most cases, repairing such products is also quite simple.
Obviously, the complexity of repair work is completely related to a specific unit or part. Thus, fixing a small break in a corrugated hose is much easier than replacing a broken electric motor bearing.
Let's look at common malfunctions of Korean-made household vacuum cleaners and possible ways to eliminate such defects at home. It is logical to note: with all due respect to service workshops, the amount of payment for repairs in the service often approaches the cost of a new vacuum cleaner.
If you get defective parts
At any mileage, cylinder scuffing is possible, caused by destruction of the piston, rings, or breakage of the spark plug (an electrode or a piece of insulator has broken off). Scuffing on the cylinder surface causes loss of compression, which reduces power and causes oil burn.
If you come across fake filters or oils, the life of the engine can be very short. At high speed and rpm, the filter can burst along the rolling line, leaving the engine without oil. And simply poor filtration will reduce the life of the bearings of all shafts. Substandard oil can cause scuffing, and it can also burn so intensely that the driver can easily miss the moment when the engine is left without oil.
Unqualified maintenance
Insufficient quality of air purification, or, even worse, a break in the air filter curtain will reduce the service life of the motor significantly. A heavily clogged filter will not let dirt through, but neither will air. The motor will operate in an off-design mode, and this will not extend its life.
It is important to follow the replacement intervals prescribed in the instructions. More frequent replacement is needed only in steppes and semi-deserts with their eternal dust. I advise you not to buy the cheapest filters - they can let large particles through. A good thing cannot be too cheap. It is best to buy filters from online spare parts stores.
Running in the engine, advice from professionals
After repairs, you should not subject the vehicle to high loads. First you need to warm up the engine well. Then start the engine and let it idle for about ten minutes. After this, the engine must be turned off and cooled. These manipulations should be done several times. The engine should now idle for about ten hours. Only after the above operations can you begin operating the vehicle.
For the first fifty kilometers of driving, you should not accelerate the vehicle more than forty kilometers per hour. Then it can be accelerated to 60 km/h. Then, every hundred kilometers of driving, it is necessary to increase the speed of the car by 10 km/hour. Notice the increase in compression level. If it is missing, send the vehicle for re-diagnosis. Try not to accelerate or brake suddenly.
Compression test, troubleshooting
One of the main reasons for engine repair is decompression. Actually, the troubleshooting itself must be done every 30 thousand km, combining it with valve adjustment.
Signs of the need for early technical inspection of the engine are:
- power surges;
- increase in fuel consumption;
- engine tripping.
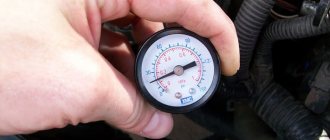
Compression measurement
If you experience similar symptoms, you need to do the following:
- Check the starter and charge the battery.
- Find a compression gauge and warm up the car.
- Remove the spark plugs and fuel supply hose.
- Insert the compression gauge into the spark plug socket of the first cylinder and depress the accelerator.
IMPORTANT! The normal pressure in the VAZ 2114 engine is 1.0 MPa in the standard configuration and 1.4 MPa on an eight-valve engine.
- We turn the key in the ignition and turn the starter for 10 seconds, watching the device, it must be interpreted as follows: a. if the pressure stops at 0.8 mPa and then stops growing or does so slowly, then the cylinder head is broken or there is a leak in the valve; b. if it just grows slowly, it means that the rings have exhausted their service life (by the way, this fact can be checked by adding oil and measuring again, if the pressure returns to normal - the rings are 100% to blame).
After the procedure is repeated for all cylinders, it is necessary to analyze the records. So, in a working engine, compression should not fall below 1 MPa and should not have a spread between the cylinders of more than 0.2 MPa. Otherwise, you will have to repair the engine.
Where to begin
Many motorists wonder where to start repairing gasoline engines? The answer is quite simple - it is necessary to determine the signs: is repair of the unit generally necessary, or is the problem hidden in something else? To do this, you will have to carry out a number of diagnostic procedures. They are divided into 2 types: electronic and mechanical.
Electronic diagnostics can show whether car repairs are necessary in terms of electronics and whether there are any problems at all. To do this, the electronic engine control unit is checked, as well as the condition of all sensors and connections. If no problem has been identified, then there is no point in going any further, as you may create a problem that will have to be solved.
Mechanical diagnostics will require a lot of time, effort and knowledge. To carry out this operation, there are instructions on the Internet, but in this article we will try to explain everything in much more detail and clarity. If problems are discovered during diagnostic operations, gasoline engines will have to be disassembled and repaired.
By the way, there is an engine repair manual for this, which is issued by the manufacturer, both in paper and electronic form. So, let's look at the process of repairing a car, or rather its power unit, in more detail.
Reasons for disassembling the vacuum cleaner motor
The motor is the main unit of the vacuum cleaner. Its failure leads to complete inoperability of the device. Among the malfunctions that require disassembling the electric motor, the most common are:
- Quick erasing of brushes, sparking.
- Excessive noise and vibration.
- Excessive heat.
- Uneven operation, drop in speed.
- Complete stop of the unit.
An engine that shows no signs of life indicates a problem in the power supply circuit. If the entire electrical circuit is in good condition, the brushes correspond to the required sizes and shapes, and the rotor rotates freely by hand, one of the motor windings may have burned out.
Uncharacteristic operation, vibration, and increased noise will indicate faulty bearings holding the motor armature. Sparking is usually caused by damaged current collectors or worn brushes.
Expert commentary
Spare parts for VAZ engines are in good demand. This is why there is such a high proportion of substandard spare parts on sale. Such parts come from three sources. The first is cooperative spare parts: their use is especially dangerous. For example, the service life of timing belts can be only a few tens of engine hours. The second source is still encountered defects from the official supplier. This is a spare part that did not pass VAZ technical control, but went on sale. Such parts and components destroy buyers’ faith in the reliability of VAZ cars. Finally, the third source is remanufactured engine parts. But these are becoming less and less common.
Choosing a new engine
When choosing a new motor, it is important to consider some parameters:
- vacuum cleaner model;
- identical shapes of the old and new motor;
- the presence or absence of a skirt under the impeller;
- engine power indicated on the motor or body of the vacuum cleaner - it ranges from 1600W to 2200 W;
- shape of the holes for the motor holder.
- correspondence of the dimensions of the old and new engines and their impellers.
The vacuum cleaner has become one of the most useful and reliable human assistants. This unit can last a long time with proper care and attention. The user only needs to know and put into practice a few simple rules:
- give the device a chance to rest;
- keep the filters clean;
- change dust collectors on time;
- do not allow impacts on the body and do not use harmful detergents;
- Wipe metal elements dry with a washing vacuum cleaner;
- monitor the rhythm of operation of the unit.
In addition, you should remember that each vacuum cleaner comes with instructions. And before operating any equipment, you must carefully study it in order to learn all the intricacies of use and maintenance inherent in this particular model.
Engine care, driver actions to extend the “life” of the engine
To extend the life of the engine, it is necessary to create the most gentle operating conditions for it, try to maintain optimal engine speeds and use only technical fluids recommended by the manufacturer, in particular, high-quality oil and fuel.
Timely oil change: the most important procedure
In addition, regularly carry out various preventive measures and do not forget to take good care of your car.