Many VAZ-2114 owners try their best to improve the appearance of their car. Moreover, special attention is paid primarily to the exterior. But in no case should we forget about the interior design. After all, this is where the driver mainly spends his time.
In this material we will talk about how door trim is done on a VAZ-2114 on our own. In reality, this is quite easy to do - you just need to be patient and careful. The procedure here is as follows:
- door disassembly;
- removal of old casing;
- installation of a new one.
In some cases, it is also necessary to remove the trim when repairing the door if:
- it rattles when driving;
- her power windows squeak;
- lock is faulty, etc.
Dismantling
So, to change the door trim, the first step is to remove the door components and get rid of the old trim material.
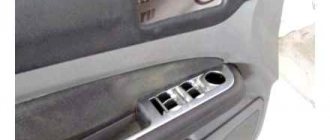
Basically, all you need to get started is a set of screwdrivers and a good mood. Removing the VAZ door trim
- First remove the podium. To do this, there are three mounting bolts under the podium, which can be unscrewed with a simple Phillips screwdriver.
- Remove the podium carefully, take your time. Otherwise, there is a risk of damaging the wiring from the power windows.
- Disconnect the connector with wires from your power windows.
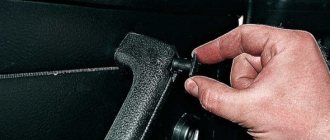
- Now you need to remove the door handles. Pry off the covers with a flat-head screwdriver. Under them you will find mounting bolts. They are unscrewed with the same screwdriver, after which the handles are easily removed.
- The next step is removing the door opening mechanism trim. To do this, you need to carefully pry off the cladding using a flat-head screwdriver and remove the element.
- There are locking mechanisms on top of the doors. Plastic pins. They have a hole where a Phillips screwdriver fits perfectly. The stoppers are removed by simply unscrewing them with a screwdriver.
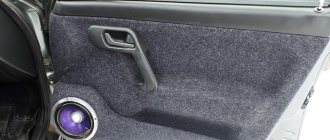
- There are probably speakers on the front doors. To remove them, simply unscrew the mounting bolts. If these are not standard speakers, the dismantling procedure may be slightly different.
- Carefully remove the speakers from the casing and disconnect the wiring. Do not pull anything sharply until you are sure that all wiring is disconnected.
- Remove the plastic lever that adjusts the side mirrors and get rid of the decorative moldings.
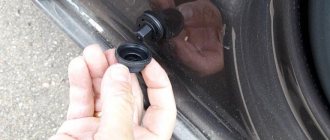
- Now you can remove the casing itself. It is held in place by plastic pistons, which are inserted directly into the metal part of the doors.
- Using a flat-head screwdriver, pry up the trim, smoothly detaching the material from the surface.
- Don't be afraid to break the caps as they are consumables. New ones will cost a small amount of money.
Dismantling is in full swing. Each door will take you about 30 minutes, maybe more. It all depends on the skill and level of preparation.
Sheathing
The doors have been stripped of everything unnecessary, so you can start covering them.
Door trim for VAZ 2114,2115 “Success”.
Clean the surfaces, get rid of traces of rust, debris, and damage. Once you have disassembled the doors, it would be a good idea to check the condition of the metal and carry out a number of preventive maintenance works; If you want to increase the soundproofing properties of the door, you can glue foam rubber under the new cladding material; Cut out the new trim pieces. To do this, you can use a pattern or simply attach the material to the door cards and cut out the necessary elements; Do not forget to provide allowances around the perimeter of the sheathing material so that it can be bent; Cut holes in the material for handles. Leave a little more so that when installing the handles, they will pull the material along with them, and you will not have any traces of cutting on the outside; Apply glue to the base of the sheathing material
The choice of adhesive largely depends on the type of sheathing you are using; In the case of the VAZ 2114, special attention is paid to the armrest, where careful and thorough tension is required; Straighten out any irregularities and make sure there are no wrinkles. To do this, it is better to use glue that does not dry instantly. This will give you the opportunity to correct unevenness; Perform the procedure for reassembling the door elements when the glue is completely dry
This will give you the opportunity to correct unevenness; Perform the procedure for reassembling the door elements when the glue is completely dry.
Replacement example
The work is completed. There is nothing particularly complicated about door trim. The only most problematic parts are the door disassembly stage. But if you have at least a little experience, you can easily cope with the task.
Loading …
How to properly remove the door trim on a Granta fret
Replacement of interior trim
The VAZ 2114 has factory inserts made of fiberboard on the doors, which are covered with a fairly simple fabric. Therefore, it is worth starting with it. To do this, we take measurements and purchase more modern fabric, eco-leather, vinyl leather or genuine leather. This can be a base color that will emphasize the business style of the owner, or a combination of two (the main thing is no more) shades to maintain the sporty style of the car. I think if you are into tuning, then you will definitely have glue and a construction stapler in your garage. After carefully removing the wooden inserts, we use these tools to replace the factory upholstery with our own.
Important: when making a pattern, take into account the presence of parts and holes, with the cut of which many people make mistakes.
Then we create covers for sun visors from the same material: remove the visors, rip apart the polyethylene, take measurements on the new fabric with a margin, cut the pattern and form the cover, and then sew it together with an internal seam. We pull the finished cover onto the visor using a metal ruler, fill the void with foam rubber and sew it tightly.
In order to change the roof sheathing, you need to remove it, tear off the old material, make a pattern for a new one, lay foam rubber between the fiberboard board and the body and secure the upholstery using liquid nails or the same assembly adhesive.
The seat reupholstery is similar. However, it is only necessary if you are keeping the old seats.
Stage 5. Putty, primer and painting
We decorate the interior by tuning or replacing the door trim of the VAZ 2110 with our own hands.
Here we are already approaching the finish line. We take fiberglass putty and a rubber spatula and apply a small layer to the surface of the card. Once dry, I used a screwdriver attachment with sanding discs. I took 3 types of sandpaper, 100,400 and 1000.
After drying, you can prime them.
I took regular primer in cans and a spray gun. The only difference is the painting time.
After the primer came black paint as a base and white splashes from the brush.
And here is the final result. Very satisfied. They turned out quite tough and not too heavy.
Material:
- Glass mat - 2 meters for 275 rubles.
- Lycra-1 linear meter for 500 rubles.
- Resin-3 kg for 310 rub.
- Rings - 4 pairs for 250 and 1 pair for 170 rubles.
- Putty-500 g for 690 rub.
Sources
Other details
Of course, in order for the car to be not only stylish, but also modern, you should think about purchasing additional accessories for tuning. So, you can buy equally sporty floor mats for a sports steering wheel. But replacing electronics is a more complicated matter.
To change the multimedia system and install backlighting, it is better to contact a specialized studio. Although some people do such things on their own - on the Internet you can find videos of do-it-yourself tuning. Additional accessories for the interior can also include monitors - some install them on the backs of the front seats.
To maintain the holistic image of the VAZ 2114 interior, most people tune the dashboard: install new lighting, install lamps, replace indicator arrows, replace light bulbs and protective glass.
The main thing is that tuning the interior of a VAZ 2114 is equally demanding both in terms of details and the overall picture. You shouldn't forget about this. But the tuning studio will definitely provide you with high-quality modernization. And if you don’t trust other people’s hands, watch the video, use all your skills and go ahead!
Stage 2. Covering with Lycra
Tips for proper and high-quality soundproofing of car doors with your own hands
Now we take our door for covering. We need Lycra to give shape to our skins. To do this, you can use any thin and well-stretchable material; tights from your wife, sister, or mother are suitable (underline as appropriate).
Now we take a construction stapler and punch through all the indentations; you can also use Akfix glue for this.
At the back of the card, along the edges, we turn two blocks to give rigidity to the cards, otherwise they will turn out to be “banana-shaped”.
Be sure to pull the lycra very tightly; after pouring the resin, folds may appear that can be removed with putty, but do we need it?
At this stage, we immediately think about the fastenings for the door opening handles if we remove the factory ones.
How to remove
The disassembly process is the same for all doors, including the driver's door. To replace the casing, you will need to remove interfering structural elements and remove old material. You need to prepare a set of screwdrivers.
Initially, the podium is dismantled. There are three screws underneath, which can be easily removed with a standard Phillips screwdriver. You need to remove it carefully and with feeling. Otherwise, you may break the wires supplying the power windows. After dismantling the podium, you will need to disconnect the terminal from them.
Next, remove the inner handles
The pads must be carefully pryed off with a flat screwdriver or knife. The bolts are hidden behind them
After unscrewing them, the handles themselves are removed.
Then it will be necessary to dismantle the lining of the closing mechanism. It is pryed off with a flat screwdriver. Then comes the turn of the stoppers - these are plastic pins located on top. Unscrew with a Phillips screwdriver.
We should not forget about the speakers, usually located in the front doors. They are secured with screws. It is worth noting that if they were not installed at the factory, the latches may be non-standard. Having pulled out the speakers, you need to disconnect the wires leading to them. You shouldn't pull them sharply, as they are quite thin and tear easily.
After this, remove the lever that moves the side mirrors. Then you can remove the decorative moldings as well. Only after this will it be possible to remove the old cladding material. It is held in place by plastic caps. They are attached directly to the metal of the doors. The casing is pryed off with a knife or screwdriver, after which it is detached from the base. There is no need to worry about breaking the caps - they cost mere pennies and are sold everywhere.
There is no point in replacing Euro screws with self-tapping screws in the future if they reliably fix the upholstery. On average, one door takes about half an hour. If you have minimal experience, you will have to spend significantly more.
Stage 2. Covering with Lycra
Now we take our door for covering. We need Lycra to give shape to our skins. To do this, you can use any thin and well-stretchable material; tights from your wife, sister, or mother are suitable (underline as appropriate).
Now we take a construction stapler and punch through all the indentations; you can also use Akfix glue for this.
At the back of the card, along the edges, we turn two blocks to give rigidity to the cards, otherwise they will turn out to be “banana-shaped”.
Be sure to pull the lycra very tightly; after pouring the resin, folds may appear that can be removed with putty, but do we need it?
At this stage, we immediately think about the fastenings for the door opening handles if we remove the factory ones.
Making a door card
To manufacture the part, marks are made: cutting lines, places for standard holes for handles, fasteners, speakers. Manufacturing instructions:
- A perimeter map is cut out of plywood.
- Holes are drilled.
- The foam rubber is glued to the plywood, then to the fabric base. There should be a 1 cm allowance at the edges.
- Holes are cut for self-tapping screws; for this it is better to use an awl.
- The substrate is cut with an allowance of up to 10 mm.
https://youtube.com/watch?v=BfDOt3Gea9Y
The panel is sheathed in one piece
To ensure that the tensioning process goes smoothly, it is important to lay the selected material face down. The covering is fixed with a single injection. Folds are straightened out before finishing fastening
Before finishing fastening, the folds are straightened out.
Dismantling the casing
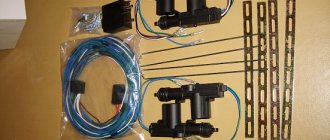
Changing the cladding involves removing and installing a new door card. Required equipment:
- plywood;
- screwdrivers;
- knife;
- fastenings: clips or pistons;
- self-tapping screws;
- glue;
- foam;
- drill.
During dismantling, the pistons break, so to install new ones you will need a soldering iron or hot glue. This fastener is replaced with plastic clips. New plywood will be needed if the old structure is deformed or cracked. Dismantling steps:
- The bracket that secures the window regulator is pulled out.
- The handle is being dismantled. To do this, remove the bolts on the inner and outer parts of the armrest.
- Speakers and other pieces of electronics are removed.
- The panel is removed from which the covering fabric is cut.
The process of dismantling a Eurocard is similar.
Removing the front door trim
Plastic spikes or “herringbones” for fastening may break during the process of removing the skin. We purchase in advance a quantity sufficient for the update. It is better to buy double white-orange or transparent clips.
Do not remove the casing with jerks or sudden movements. The sockets that attach the trim to the door can be damaged.
If you are planning to replace the trim, before purchasing it, compare the dimensions of the trim installed in your car with the new one in the store. The location and diameter of the holes for the handle and for fastening may not be the same.
Installation of the casing occurs in the reverse order.
Materials for upholstery
On a VAZ 2114 euro, the door trim is made from various materials. Choose fabric based on price, quality and ease of use. For example, a knitted piece is easier to secure than a silk piece, but velvet looks more impressive. Eco-leather and Alcantra are durable, while leatherette and carpet provide a combination of price and quality. Velvet flocking is also popular.
Main types of fabric, their advantages and disadvantages:
- Leather – luxury upholstery. It is resistant to moisture and temperature changes. Traces of chemical contaminants are easily removed from leather.
- Eco-leather and leatherette are durable and wear-resistant materials. The technical characteristics of this fabric are similar to natural leather, but the price is lower. There is only one drawback - the fabric requires special care. Microcracks will appear on the canvas if you use abrasives or heat the leatherette during cleaning.
- Alcantra is a modern material that consists of ultra-fine fibers. This coating will not deteriorate from moisture, will not stretch, or shrink even after a long period of use.
- Carpet is made from artificial fibers and is considered a traditional automotive fabric. It repels dust, is resistant to fungal compounds, does not fade, and does not stretch. Convenient for re-tying. Provides heat and sound insulation.
- Velvet - gives the interior a noble look, is wear-resistant and durable. This upholstery will last for many years.
- Vinyl or leatherette is the most durable and durable option; it will make the skin durable. These types of fabrics withstand climatic changes and do not deteriorate due to treatment with detergents. However, when used for covering leatherette, you will need to install an additional layer of insulation.
How to remove the door trim on a VAZ 2114 and 2115
Removing the trim on Lada Samara cars, such as the VAZ 2114 and 2115, is a fairly common task for many car owners, and they have to do this for completely different reasons, the main ones of which are given below:
- When soundproofing doors from the inside
- To repair or replace glass, lifts, or door opening and closing mechanisms
- For installing an acoustic system that does not fit in standard places on the casing
So, to remove the casing yourself, you will need a minimum of tools, namely:
- Flat and Phillips Blade Screwdriver
- Sharp and thin knife
Why do you need interior tuning?
Almost all VAZ cars have interiors that are not distinguished by sophistication. Rather, adjectives such as unremarkable, simple, gray would suit him. Some are not even afraid to call it tasteless. All this emphasizes that the interior of this model lacks modernity: individual style (upholstery, carpets, chrome or wood trim, designer console at the gearbox), electronic elements (dashboard, lighting and backlighting, multimedia equipment) and control features (pedals, steering wheel , gearbox, regulators). As for ergonomics, the seats are hardly characterized by increased comfort. Therefore, many try to at least replace the driver's seat or simply install an adapter.
Of course, in addition to tuning the interior, you need to pay attention to both the internal details and the exterior of the car. We recommend that you read the article about general tuning of the VAZ 2114 in order to make not only the interior, but the entire car cool. This article is devoted to body kits for this model.
Let's look at tuning the VAZ 2114 interior one by one.
Material selection
The first thing you need to start with is the choice of sheathing material. The current range is quite wide, which allows each car owner to choose the ideal option in accordance with their wishes, requirements and financial capabilities.
The most attractive options are:
- Genuine Leather;
- Faux leather;
- Alcantara;
- Velours;
- Flock;
- Carpet.
For more information about the nuances of these materials for creating door trim, see the table.
Material
Peculiarities
Genuine Leather
This is a strong, reliable and durable material, the only significant drawback of which is its high cost. It's not easy to work with, but the end result is a stunning finish. A true classic that will never go out of style
Leatherette
Noticeably cheaper compared to genuine leather, but the service life is not as long. In just a year, leatherette may become covered with miniature cracks in the form of cobwebs.
Door cards for VAZ 2114
Alcantara
Many call this material ideal for the fourteenth model. It has an attractive appearance, similar to suede, but has increased durability and practicality. Easy to care for, easy to install and comes in a wide range of colors. Alcantara has no disadvantages as such
Velours
Well suited for door trim, as opposed to seats. The material is pleasant to the touch and beautiful in appearance, but with constant contact, abrasions form. The peculiarity of the structure will require you to frequently clean the fabric, because velor collects a large amount of dust
Flock
It feels like velor to the touch, but unlike it, it is much easier to clean, does not get wet and is not afraid of even sudden temperature changes.
Carpet
Almost carpet, but softer and more pleasant. The material is easy to work with, costs little, does not wear out in a short period of time and stretches well
For the VAZ 2114 this is especially true, since when replacing the trim it is important to carefully repeat all the bends of the doors
Dismantling and subsequent installation of door trim in Kalina-2
The choice depends on your goals for refining the car interior. Thus, flock is suitable for a sporty style, leather is for class, and velor is for sophisticated ideas.
Re-upholstery of VAZ 2114 door cards
Purpose of the cladding
To understand how to remove the door trim of a VAZ 2114, you need to find out the purpose of this automobile fragment. The fabric insert enhances the appearance of the interior. If stains, mechanical damage or abrasions appear on it, you will need to disassemble the inside of the door, remove the panel, and attach a new lining. Thanks to this element:
- the interior becomes more attractive;
- additional sound insulation is created;
- a speaker is installed in the facing fragment;
- electrical wiring and fasteners are hidden;
- The corners of the closed plastic panel and iron parts are softened.
The canvas is removed for a number of reasons: increasing sound insulation, installing speakers, deformation, replacing material. There are many options for cladding on the market, but drivers prefer to buy special automotive fabric.
When replacement is necessary
The VAZ 2114 door card consists of iron, and the element is covered with fabric on top to give the body part an attractive appearance. Replacement of upholstery is provided if:
- the material has ruptured, it could be a hole from a knife or a burn through a cigarette;
- abrasions were found;
- there was a rupture at the base of the door;
- the inner gasket cracked and the outer casing ruptured;
- There was a deformation of the body part.
When deformed, it becomes difficult to close the door. In this case, you can modernize the interior and install homemade cards, choose fabric, decide on the design and read the instructions for replacing the fabric.
Glass replacement
It is better to buy glass and a glass holder as a set for replacement.
To replace, you need an extension, a wrench, an 8 and 10 mm socket and an assistant.
The side glass is blocked with a screwdriver to prevent it from falling out. The door trim is removed. A felt-tip pen marks the places where the glass frame is attached to the door on the frame and on the door. The bolts securing the glass frame to the window regulator are turned out.
The window regulator bar must be fully raised. The cable on the roller from the bottom of the glass is dismantled. Then the seals (velvet covers) are carefully removed.
Hold the glass during this time so that it does not fall out. After removing the seals, the glass is lowered down about 10 cm, tilted to the side and removed from the groove.
Replacing the door glass of a VAZ 2114
The new glass is installed in the reverse order. Apply WD-40 or a similar lubricant to the glass frame, insert the glass and leave to dry. After the grease has dried, the glass is installed in the door. New glass is installed in the seals.
If the seals have become unusable, new ones are cut out of rubber, while the old ones are used as patterns.
The glass with seals is inserted into the groove, aligned and lowered into the stopper. The window lifter handle is lowered to its lowest position. The glass is fixed with bolts and the cable is installed in its original place.
The operation of the window regulator is checked and, if necessary, the cable tension and the position of the seals are changed.
Replacing the window regulator
To replace the window regulator, you need an extension, a wrench and a 10 mm socket.
Having freed the front door from the trim, remove the 2 bolts securing the glass to the bar. Usually they are tightened tightly, so it is more convenient to use the head as a lever.
Remove three nuts securing the electric motor, one nut under the glass, two in the center and one nut at the bottom of the door.
After removing all the nuts, disconnect the power plug from the electric motor.
After removing the structure, the electric motor is first checked. If it is faulty, it is replaced. If the cause of the breakdown is not obvious, replace the window regulator.
Stage 3. Pouring resin
Now begins the most interesting and tedious task
It is best to use small disposable containers for mixing the resin; I used the proportions for 100g of resin: 1g of hardener
It is best to use plastic cups for beer, they have thick plastic, which is what we need. When the resin reacts with the hardener, it generates heat that can melt our container.
!Attention! Use resin only in well-ventilated areas, wear a respirator and gloves. I usually spray the outside twice with drying intervals of 2-3 hours. I usually shed the outside 2 times with drying intervals of 2-3 hours
I usually spray the outside twice with drying intervals of 2-3 hours.
Now we pick up a grinder or any other tool for cutting our cards.
Here you can clearly see the bars for rigidity
We cut out the entire inside of our cards, leaving space for the clips.
Main stages
Plastic is considered a wear-resistant coating. Rubber is characterized by high noise insulation and rapid wear. The device is adjusted after treating the main elements with silicone grease. Experts recommend using a composition that retains its elasticity and sound insulation characteristics at low ambient temperatures.
In auto stores you can buy a simplified version of a silent lock. To install the mechanism, you will need to open and lock the door. Then unscrew the bolts that secure the lock. The impact driver is applied to the top bolt. They deliver light blows. If necessary, this procedure is repeated.
Auto mechanics prohibit simultaneous unscrewing of 2 mounting bolts. Otherwise, the inner lock will fall. In this situation, you will need to open the door and remove the top and bottom bolts. Then turn the outer lock body. After dismantling the case, a new lock is installed. The fasteners are screwed in one by one. The bare pin of the latch is replaced with a silent analogue. It will take 20 minutes to install 4 door locks. Then the VAZ doors are glued using the method described above. This work is done by two people.
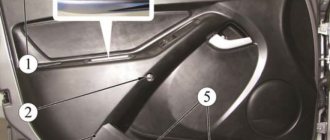
1. Remove the door trim. How to remove the door trim on a VAZ 2114, 2115? 2. Apply the podium to the door trim. (Fig. 1) 3. From the inside, through the door trim, we fasten the podium with two galvanized screws 4.2×16. (Fig. 2) 4. We cut through the door trim for the speaker (for VAZ 2114, 2115 podiums, we cut through the door trim to connect the wires to the power window button). (Fig. 3) 5. Secure the podium around the entire perimeter with 4.2×16 self-tapping screws. (Fig. 4) 6. We check the “hedgehogs” of the fastening of the casing - we replace the bad ones. 7. For VAZ 2114, 2115 podiums, we install and connect power window buttons. We carefully cut through the skin, leaving allowances along the edges! (Fig. 5) 8. Install the trim back on the door. (Fig. 6) 9. Through the petals in the podium (in the hole for the speaker), we screw two 3.5×41 screws through the casing into the iron. This allows the podium and trim to be firmly secured to the door. (Fig. 7) 10. From below, under the podium pocket, trying to ensure that the heads of the screws are not visible and do not touch the podium, we screw the trim to the door - into the iron with two 3.5x25 self-tapping screws. (Fig. 8) 11. Connect the speaker. (Fig. 9) 12. Install the speaker and its grid.
Good day to all! I think I said it, but I’ll repeat it... At the beginning of May, I purchased door trims from 2114. I was tired of the creaks of door trims on 2109, so the first thing after purchasing the trims was to look for the so-called “pistons” from Gazelle. To my surprise, I searched for a long time, and in the end I found it, of course! I took with a reserve: 30 pcs. piston from Gazelle (set: piston, self-tapping screw, plug) - 16 rubles * 30 = 480 rubles 30 pcs. clip shelf s/o 2108 - 5 rubles * 30 = 150 rubles
Everyone knows that Russian cars are a rattle, and a dozen are no exception. Some try to somehow deal with the creaking and rattling in the cabin, and some turn up the music louder and do not pay attention to all this. If you belong to the first category of people, then this article may be useful to you.
Tips for installing Lux-3 door trim on VAZ 2109, 21099, 2114, 2115
These door trims, or “door cards” as they are also called, will help transform and refresh the “Tired” interior of your car. Please note that the abbreviation “Leatherette” does not mean that the usual factory fabric insert will be replaced by a flap of artificial leather substitute. This means that the upholstery coating itself resembles leatherette in its texture, and the fabric insert will remain fabric.
Fans of tuning can easily replace the insert material with any material at their discretion. Despite this, the upholstery fits perfectly into the interior of the car, perfectly matching the texture with other plastic interior parts. Owners of factory upholstery with a pocket separate from the cards will have the opportunity to install speakers with decorative mesh, usually sold as a set, which also gives a more aesthetic, modern, youthful look. Despite all these advantages, those who decide to purchase and install these upholsteries need to be prepared for the fact that the fastening of clips and pistons of “Hedgehogs” remains at the same level as in the first years of production of these cars. The manufacturer continues to attach the brackets for the pistons by soldering. Therefore, it is recommended to further strengthen them, for example:
For greater satisfaction from the purchase, improvement of acoustic comfort and avoidance of unnecessary noise, it is recommended to carry out all associated work in the internal space of the doors, such as eliminating damage, lubricating, carrying out anti-corrosion treatment and soundproofing the doors. Frequent manipulations with removing and installing upholstery do not benefit them; the plastic fastenings break over time.
Pay attention to the location of the pistons; they may not coincide with the fastening of the original upholstery. Some may be missing, while others have been completely replaced by the manufacturer with fastening with self-tapping screws. Anyone who decides to do such work must be prepared to drill through the door partition to attach the trim from below. To do this, you can use, for example: an 8.5 mm drill, a mating part from the mounting pins for the rear acoustic shelf (as a dowel), ordinary wood screws and furniture decorative plugs. Many Samara owners use pistons from the Gazelle air intake to attach their cards, but then they will have to drill the upholstery with a 12-13 mm drill.
To fasten the upholstery itself, it is recommended to purchase, in addition to the standard ones, reinforced “Hedgehog” pistons; despite their fragility, they hold the upholstery more firmly. In addition, they already come with a counter part. In general, a seemingly simple job at first glance requires painstaking work to achieve maximum pleasure and comfort. All these are trifles; someone may not do some operations and leave everything as is, without strengthening the fastenings, or not doing sound insulation. All this is at your discretion, I will only say one thing - IT IS WORTH IT. The appearance of the new salon will not leave anyone indifferent.
Source
Selecting the material
There is now quite a large selection of materials suitable for the purpose in question. Therefore, choosing the one that suits you best will be quite simple.
Most often used:
- leatherette;
- velours;
- alcantara;
- flock;
- carpet;
- skin.
Genuine leather has gained the reputation of a reliable and durable material. Its only drawback is the high price. It is very convenient to use, and the results are always excellent.
Alcantara has a pleasant appearance and high strength. It is not difficult to care for her. Externally it resembles suede. The color palette allows you to satisfy the most whimsical taste.
Velor, as they say, looks rich on car doors, but wears out very quickly on seats. It needs regular cleaning, as due to its structure, literally everything sticks to it.
Flock looks very similar to velor, but is more practical and easy to clean. He is not afraid of water, he is not afraid of the cold.
Carpet, in fact, is a type of carpet. The difference is that it is softer and more pleasant to the touch. Wear-resistant, ideal stretch. Inexpensive.
Changing the steering wheel
Before changing the shape of the steering wheel, make sure that this will not affect ergonomics and safety. In addition, the steering wheel of an exotic shape does not always comply with the rules of the road. Most often, the factory steering wheel is replaced with a sports steering wheel - this is the ideal solution: stylish, comfortable, certified.
Sheathing process
After removing the old material, you can begin to install the new one.
The metal surface must be cleaned of traces of corrosion. Carefully remove any debris that has accumulated inside and repair any damage found. Since the upholstery has been removed, nothing prevents you from carrying out preventive maintenance along the way.
To improve sound insulation, foil foam rubber is installed inside with glue. This, among other things, will ensure better heat retention in winter.
Using a pattern, which is easy to download on the Internet, or, at worst, old cladding, new elements are cut out from previously selected material
In the latter case, it is important not to forget to leave a few centimeters of margin around the perimeter in order to be able to tuck it inside
A hole is cut in the workpiece for the handle. It should be slightly less than necessary. This way, when it's put in place, it will pull some of the material in and the edges will be hidden from view.
Glue is applied to the inside of the cut fabric. Which composition to use depends on the material you choose.
The most difficult thing is with the armrest cover. Here you need to apply the fabric carefully and very carefully. All irregularities must be stretched and folds straightened. It is also unacceptable to leave air bubbles. It is better to choose glue that dries for a long time. This will allow you to correct defects on the new upholstery if necessary.
It will be possible to fix the finished elements only after the fixing composition has completely dried. Assembly is carried out in reverse order.
To better imagine the whole process, you should watch this video:
Removing the rear door trim
The sequence of actions for dismantling, or how to remove the rear door trim on a VAZ 2114 and mount it back.
- Using a flat-head screwdriver, press out the decorative molding of the door handle and remove it.
- Remove the door handle.
- Using a flat-head screwdriver, press and remove the door handle trim.
- After unscrewing the fastening screws, remove the inner part of the handle.
- Using a flat-head screwdriver, remove the door lock handle trim.
- Unscrew the cap of the door locking mechanism (lock) and remove it.
- Use a flat-head screwdriver to disconnect the 10 door trim fastening studs.
- Carefully remove the trim, moving it evenly away from the door.
Installation of the casing occurs in the reverse order.
After removing the trim, it is recommended to carry out anti-corrosion treatment and check the condition of the internal cavities of the door.
Removing the trim
Sometimes you need to remove the trim from a door when it is jammed. In this case, space is made in the cabin for trim parts and work is carried out from the inside.
To improve sound and heat insulation, foil foam rubber is installed inside the casing. The pattern is made according to the pattern of the old casing. The material is cut with a margin of a few centimeters so that it can be folded. A hole is cut out for the handle. It should be slightly smaller in size than the handle itself. Insulation adhesive is selected depending on the type of material.
Sometimes, after removing the trim, decorative inserts are replaced. Typically, leatherette, Alcantara, carlet and tapestry fabrics are used for replacement.
Information on how to remove a VAZ 2114 door or door trim is required not only to change decorative panels or install sound insulation, but also to replace a power window or glass.
Replacing a door on a VAZ 2113-VAZ 2115
Note! The front door on cars of the Samara 2 family is removed in the same way as the rear door. To avoid repetition, in this article we will look at the instructions using the example of a door from the front, and you, if necessary, do a similar procedure from the back.
Since the work of removing the door comes into contact with electronics, we recommend disconnecting the negative terminal from the battery to avoid short circuiting the wiring. Read more here: “Replacing the battery on a VAZ”, point 1.
Removal
1) First you need to remove the door trim. Use a screwdriver to remove the bottom screws that secure the pocket, and then remove it from the car.
Note! After unscrewing the bottom screws, do not rush to completely remove the pocket. There are built-in switches that regulate the glass (raise and lower it). They need to be removed:
- unscrew the screws from the bottom and slightly move the pocket away from the trim;
- use a screwdriver to pry up a switch and pull it up;
- then release the clamps of the wire block and disconnect it together with the switch (shown in the small picture below);
- repeat the procedure with the second switch;
- Remove the bottom pocket completely from the car.
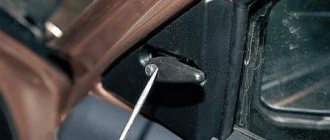
2) Now use a knife or screwdriver to pry up the decorative trim holding the door handle.
Note! After removing the trim, you will see two large screws in front of you that secure the handle to the door. Using a screwdriver, completely remove both screws (only one screw is visible in the photo below) and completely remove the handle from the car.
3) Next, use a screwdriver to pry and remove the plastic lining (indicated by the arrow) located on the door opening handle. This cladding is attached inside with clamps; sometimes it is enough to pry off any corner with a screwdriver and it will begin to come off little by little.
4) Then grab the button that closes the car door with your hand and simply turn it out. In case of difficulties, take a screwdriver in your hands and completely unscrew the button using the upper thread (shown in the small photo below).