AutoNews / Reviews / Tests
How to Remove the Door Trim of a VAZ 2107 Video
Replacing the door trim on a VAZ 2101-VAZ 2107
door trim certainly gives a different look to the car when you sit in it inside the cabin, because if you remove it, you can see the inside of the door, as well as the wires (If the door has electric windows), and this is often not very beautiful, but like there are people who do not pursue beauty and thus make a sports car (In this case, everything is removed from the interior and only the steering wheel and one driver’s seat remain), but still not many people need this and therefore the trim in the car it will take its place in the cabin for a very long time (one could say even a lifetime), while covering all the parts on which it is installed.
In order to change the trim, you need tools, specifically: You will need a screwdriver, in addition to this, we also advise you to immediately purchase holders at the auto store that hold the trim on the car door (There are seven holders in total that secure only one trim on the door, Accordingly, if you decide to change the entire door trim, you will need to stock up on 28 holders, they very often break because they are disposable and the broken ones are replaced with new ones, which cost a penny in the store)
When should you replace your door trim?
Everyone decides for himself when he needs it, someone changes it in this case if the casing is torn, and someone changes it because it is very dirty (In paint, for example), but in this case, if it is very dirty, then don’t rush go to a car store and get a new one, try to wash off traces of dirt with the old one, if necessary, use special plastic cleaners or car interior leather cleaner, they clean well, in addition, they refresh the color of the part and give them a new look, and if you use them often, then they protect parts from early aging and the appearance of small cracks on them.
How to remove the door card on a VAZ classic 2106
After watching my video
, You will see “How
to remove
door
panel (
trimming
) on
a VAZ
classic 2106”, how not to break the clips,...
Soundproofing door cards. Replacement of factory pistons. VAZ 2107
Noise insulation: insulating tape 3008v 1mx1.20m 4 mm -256 rubles Piston for trunk upholstery double 2 rubles Installation…
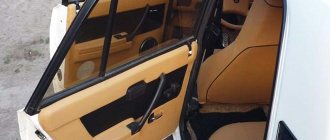
Re-upholstery of door cards for VAZ 2107
Elements of the interior trim wear out over time and lose their attractive appearance. The door trim of the VAZ 2107 especially suffers during operation. Door cards become frayed, deformed and begin to poorly stay in place. You can simply replace them with new “stock” ones, or you can modernize the interior by installing homemade door cards based on thicker plywood. This solution improves the durability of the upholstery and the acoustic characteristics of the interior. The base can be sheathed with leatherette (leatherette).
Step-by-step instruction
So, below is a step-by-step algorithm for performing the operation. It won’t take much time and everything will go well if you follow these instructions clearly, without doing anything on your own.
Removing the upholstery
Removing the upholstery
To easily remove the upholstery from the door of a VAZ 2107 and thereby prepare the surfaces for gluing with soundproofing material, do the following:
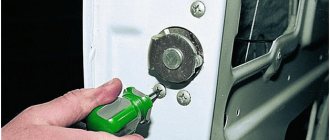
- We take a shaped screwdriver and unscrew the self-tapping screw, which we find in the upper part of the lining;
- Then unscrew the screws at the bottom (there are 3 of them);
- Remove the cover;
- Now you need to use a screwdriver to press the lock of the window lifter handle, pull it out and remove the handle;
- Again, use a screwdriver to remove the plug for the armrest handle, then remove the screws that hold it in place;
Door trim and removal
- The handle is removed with care so as not to damage the door “opener”;
- It's time to unscrew the door lock release button (it lends itself to a curly screwdriver);
- Now you can remove the upholstery, which is secured with 8 pistons, by prying it off with a screwdriver.
Main process
Let's continue:
- We degrease the surfaces, as was said, with a special liquid or ordinary industrial alcohol.
White Spirit
Advice. It is not recommended to degrease the very bottom of the door surface. The fact is that anticorrosive prevents rotting, and it is in this part of the door that moisture collects. If we degrease this part of the surface (remove the anticorrosive), then there will be no protection and the door will soon rot.
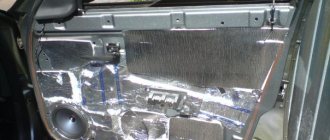
- We place the selected vibrating material (preferably not heavy - this is described in detail above) on a flat surface and cut out rectangular pieces;
- Then, warming them with a hairdryer, we thread them through the door slots and glue them to the inner surface, which is closer to the street;
- If successful, then we insert a roller into the slots, which we use to roll the vibrating material;
Convenient rolling roller
- Now it's time to start laying down the Spleen or acoustic felt;
Splen for doors
- The soundproofing operation can be called complete, but all that remains is to attach the upholstery.
Fastening the upholstery
The upholstery can be mounted on screws rather than on pistons. Here's what to consider when doing this:
- Self-tapping screws should have a small pitch, that is, they should be intended for metal;
Self-tapping screws for metal
- There shouldn’t be a lot of them (it will be enough to fix the upholstery at 4 corners and one screw in the middle);
- Particular attention should be paid to the locations of the screws. They should not be attached in places where the caps stood;
- To prevent everything from looking “collective farm”, the screws are covered with decorative plugs.
Note. By the way, you don’t have to use plugs in the lower part of the upholstery, because they won’t be visible there anyway.
- It is advisable that the screws be of different lengths. At the top of the door, the upholstery should be fixed with long screws, at the bottom with short ones.
Metal screws with decorative plugs
The technology for screwing in self-tapping screws is conventional:
- You don’t have to make holes for self-tapping screws in the metal in advance, but mark the places on top of the upholstery and screw them in;
- The self-tapping screw should be for metal, with a small step, so that it fits into the metal surface like clockwork;
- As for the number of self-tapping screws, it is better to have 2 self-tapping screws in the corners on top, and 3 at the bottom.
Note. The upholstery is attached with self-tapping screws so that squeaks disappear. But to completely eliminate the squeak, this will not be enough. Below are some helpful ways.
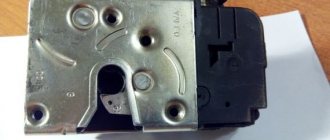
Dismantling the door trim of a VAZ 2107
Old VAZ 2107 door cards are removed as follows:
- remove the window handle by pulling out the fixing bracket;
- Unscrew the bolts under the plugs and remove the door handle (armrest);
- remove the trim from the door opening handle;
- remove the speaker (if installed);
- remove the door card by pulling it towards you.
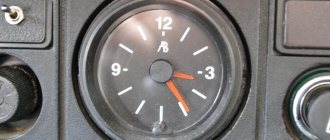
Main characteristics of the VAZ 2107 torpedo
Before you find out which machine you can install the panel from, you should take into account the location and characteristics of the elements that make up the original design. The left part of the VAZ 2107 torpedo consists of the following elements.
- Engine efficiency sensor, where the red sector indicates uneconomical mode, and the green sector indicates optimal engine performance.
- Coolant temperature sensor, where the white sector is associated with a cold engine, and the green sector with the operating mode. If the engine boils, the red sector will light up.
- Tachometer responsible for the crankshaft speed.
On the right side of the native instrument panel there are:
- speedometer - shows the speed of the vehicle, while the counter at the bottom shows the total mileage of the car, and the top one is responsible for the local mileage (if necessary, the data is reset);
- fuel sensor - presented in the form of a warning light that lights up when there is less than 5 liters of gasoline in the tank;
- battery charge sensor, where the red sector indicates that the battery is discharged, green - normal, yellow - the power supply is being recharged.
It is impossible to determine which element of the above is the most important. Each unit plays its role in the safe movement of the vehicle. It should be noted that between the right and left parts of the original VAZ 2107 panel there are a direction indicator and a set of light bulbs.
- Informs about the opening of the air damper.
- Indicating that there is no battery charge.
- Dimensional.
- High beam.
- Informs about lack of oil pressure.
- Notifying when the parking brake is used.
Making a door card for VAZ 2107
The old sheathing should be used as a template for marking out the new one. You just need to attach it to a sheet of plywood and, using a pencil, mark the outline of the door card and the holes for the handle fastenings, the door opening lever and under the window handle axis. The latter need not be done if the car has (or will be installed) electric windows. Particular attention should be paid to the correct marking of the mounting holes. If you make a mistake, the door trim will not hold well and knock when the body vibrates.
After this, you can cut out the plywood base of the sheathing along the marked contour and drill the necessary holes. The edges of the casing and holes must be sanded.
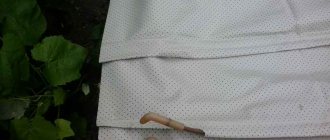
The foam backing is cut along the finished contour of the skin, taking into account an allowance of approximately 10 mm. It is better to use a two-layer backing consisting of foam rubber and a fabric lining. This material is easier to glue to the plywood base of the upholstery. If you glue foam rubber directly, it, due to its porous structure, intensively absorbs the glue. As a result, it is not possible to achieve a uniform layer and high-quality sizing.
You can sheathe the base with a single piece of leatherette or vinyl leather, cutting it according to the size of the door card. The pattern must be made so that there is an allowance of 50 mm. This ensures that “bald” areas around the edges are avoided in case of an error. This is especially true for vinyl leather, which is subject to deformation and heating with a hairdryer during stretching.
To give a more original look to the covering, it can be made from several multi-colored pieces of leatherette, sewing them together. It is best to sew with a “French seam”, which is distinguished by good strength and attractive appearance.
When everything is ready, you can start gluing the foam backing onto the plywood. MAH glue, which is used in professional tuning studios, is well suited for this.
After gluing the backing, you need to cut it to the size of the plywood base and cut holes in it for attaching the door handle, speakers and the axis of the window handle.
Leatherette upholstery is stretched as follows:
- Place the leatherette blank on a flat surface face down;
- cover the upholstery with the door card blank, laying it down with foam rubber;
- Fix the trim with a stapler on one edge of the trim, stretching the leatherette so that folds do not form;
- make sure there are no folds;
- secure the opposite edge of the upholstery, remembering to stretch it well;
- Secure the side edges of the upholstery with a stapler.
Excess material must be trimmed after attaching the upholstery, leaving a few millimeters so that it does not begin to tear near the staples.
Soundproofing of the VAZ 2107 interior
One of the first things that tuning specialists undertake is soundproofing the car. Indeed, the ergonomics and exterior of the seven leaves much to be desired. While driving on our roads, there is noise from the wheels and suspension, as well as noticeable rattling of trim elements and much more. At the moment, there are many approaches to sound insulation, which we will talk about right now.
Materials and procedure
As a rule, the order of work begins with door structures
.
You need to remove their casing using a regular screwdriver and a selection of spanners. By the way, if you seriously decide to do tuning a VAZ 2107 with your own hands
, then we recommend acquiring several sets of tools. This will reduce your time and nerves while performing various tasks. Fortunately, there are many kits on the market now that will be useful in your garage.
When removing old siding, you should be extremely careful. The fact is that the surface of the plastic and some of its elements are very susceptible to fractures and damage.
. When you remove the trim, be sure to insulate the screwdriver or knife with electrical tape. This lifehack will help maintain the integrity of the door's paintwork. When the “door card” is removed, do not rush, because there is wiring inside and it can be damaged. Be careful and remove it carefully.
This is the first step in soundproofing the cabin. When the doors are processed and the special material is installed, you can begin deeper tuning. The dashboard and car seats should be removed. From the factory, the floor of the seven is treated with a special material, which you need to completely remove using a sanding machine or regular sandpaper. After this, the floor is treated with insulating mastic. The first layer of polyethylene foam
– a special material that has a noise-absorbing effect.
Choose the number of layers and thickness of this material yourself. For a seven, experts recommend about ten millimeters. This will be enough for normal sound insulation. The process of attaching polyethylene foam is carried out with a special construction adhesive
, which can be purchased at any automotive store.
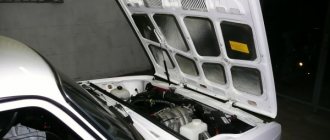
Sound insulation of the hood. Procedure
Let us briefly consider the nuances of soundproofing the engine compartment
.
Any network of automotive stores provides the opportunity to buy ready-made kits. Each element is the correct size and shape for your car's hood. Before gluing, you need to thoroughly degrease the surface using any solvent. The fact is that the engine compartment is a place where a high concentration of oil and dust
, so you need to get rid of it efficiently.
When the inner surface of the VAZ 2107 hood is clean, proceed with the installation of the soundproof film
. This is done with a special hairdryer. There is glue on the Shumka elements, so you can easily install it. All you have to do is smooth it out and that’s it. This will not only keep the heat under the hood, but will also create additional comfort inside the car. After all, sometimes the roar of the engine causes some discomfort to the driver and passengers.
Need to replace door trim
Considering that the latest version of the VAZ 2107 rolled off the production line in 2012, the standard upholstery has long expired. VAZ 2107 door cards dry out and crack. The inner panel breaks through the outer skin; due to deformation, it does not stay in place on the door and not only spoils the appearance of the interior. A deformed panel makes it inconvenient to close the side windows.
When repairing, you can change the entire panel of the skin, replacing the old elements with a new card with stock skin. There is an option to modernize the interior and install homemade cards, choose the material that best matches the overall design of the interior.
Interior tuning, VAZ 2101-07 (door trim) | Topic author: Hana
Door trims for VAZ 2101-2107 (set).
Andrey (Atilano) Not bad, it’s really cheaper here. a little =) Podiums VAZ 2105, 2106, 2107, from 450 rubles to 1150.00 rubles. Delivery throughout Russia. Both by mail and transport companies https://avto-vs.ru/index.php? category > Dmitry (Newell) how to buy
Alexey (Curumo) We spend a significant part of the day behind the wheel of a car, so the comfort and appearance of the car dealership play an important role for the modern driver. Upholstery of the car interior is something you should pay special attention to. Have you bought a new car, but you are not satisfied with the appearance of the interior? Have you purchased a used car and need to fix any defects? Our company has been reupholstering and tuning interiors for over 10 years! Individual approach to each car! You choose the color and quality of the material yourself! Low prices! https://www.arsenal-sof.siteedit.ru Questions in PM!
Materials for upholstery
Drivers have hundreds of options available to them regarding which door trim material to choose for tuning their car. Most often chosen:
- auto fabric;
- thick textiles;
- genuine leather;
- leatherette option, euro leather, Alcantara.
The most affordable artificial materials remain: vinyl and leatherette. The advantage of the set is its durability and the ability to be treated with leather detergents.
Luxury door upholstery involves the use of expensive materials: genuine leather, artificial Alcantara or almara. The material is soft, stretches well, and is highly durable. The price depends on the brand and production features; rough natural leather is cheaper than processed and dyed almara with an additional layer of insulation.
Textile upholstery only has the advantage of a variety of colors. You can choose colored upholstery that will harmoniously fit into the overall style of the interior. The disadvantages of textiles include difficulty in cleaning; not all stains can be removed.
Features of dismantling
Before work on reinstalling the door trim, you need to prepare a tool. You will need:
- Plywood sheet up to 4 mm.
- Door latches and clips are sold as a set, matching the interior color.
- Foam rubber, sheet up to 10-15 mm thick.
- Material.
- Glue.
To cover doors 2107, you can use an old part; if the factory plywood is not deformed, this will make the work easier.
Dismantling the panel proceeds in steps:
- Pull out the bracket securing the window regulator.
- Remove the window lifter handle. If the mechanics were reinstalled on the power window, remove the clamp covering the standard hole.
- Remove the plugs on the door handle, unscrew the armrest bolts, and remove the element.
- Remove the trim panel from the door handle.
- Remove speakers and adjacent electrical appliances, if installed.
- Carefully pull the door card towards you and remove the panel.
Dismantling takes up to 10 minutes, it is important to unscrew the bolts sequentially; if the interior has been modernized, and the door has additional clips along the edge of the card, remove them first.
Acoustic shelves and podiums for cars. (Saratov) | Topic author: Batilde
⚡⚡⚡ARE YOU LOOKING FOR QUALITY AND CHEAP COVERS (DOOR CARDS) FOR VAZ 2101-2107? THIS IS FOR US! 2500 PER SET! Cards with ECONOMY podiums for 16th speakers. ✅With pockets for small items. ✅Easy to install on standard clips. ✅A simple solution to refresh the interior and improve the sound. ✅We ship within Russia by Post and transport companies. Write in a personal message or ☎☎☎ Calls/Viber/Wats App+79271631611 ➡Site: http: www.autoobshivci-shop.com ➡On Odnoklassniki: https://ok.ru/akustiches ➡In Contact: https://vk. com/obshivki_class